Notes, worked examples and practice for this topic are being written by our tutors. The past-paper questions below are ready now: work each one on paper, then open the mark scheme and the examiner's comment.
Tap a question to zoom it. Mark scheme and examiner's comment open under each question.
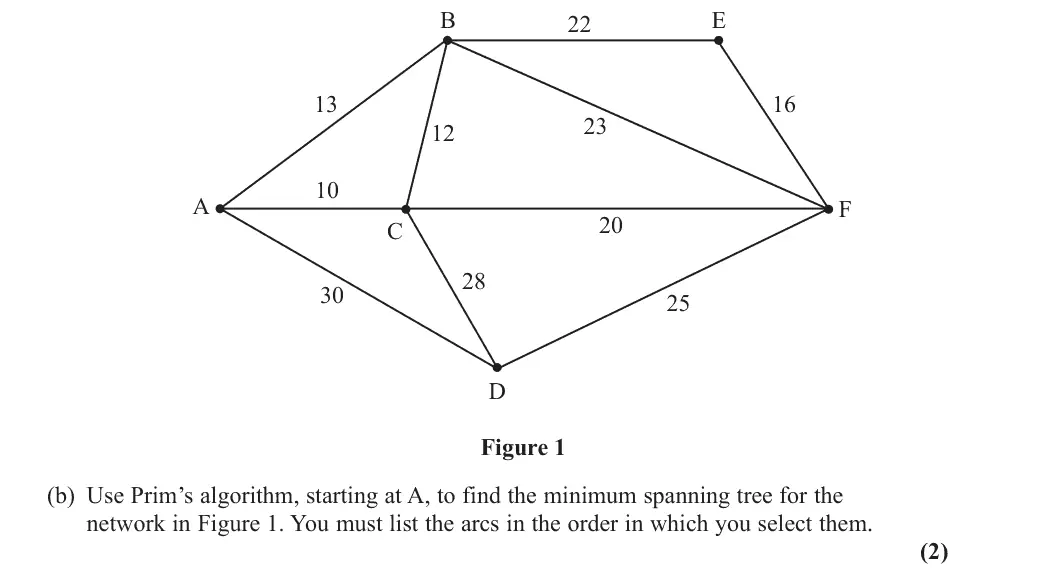
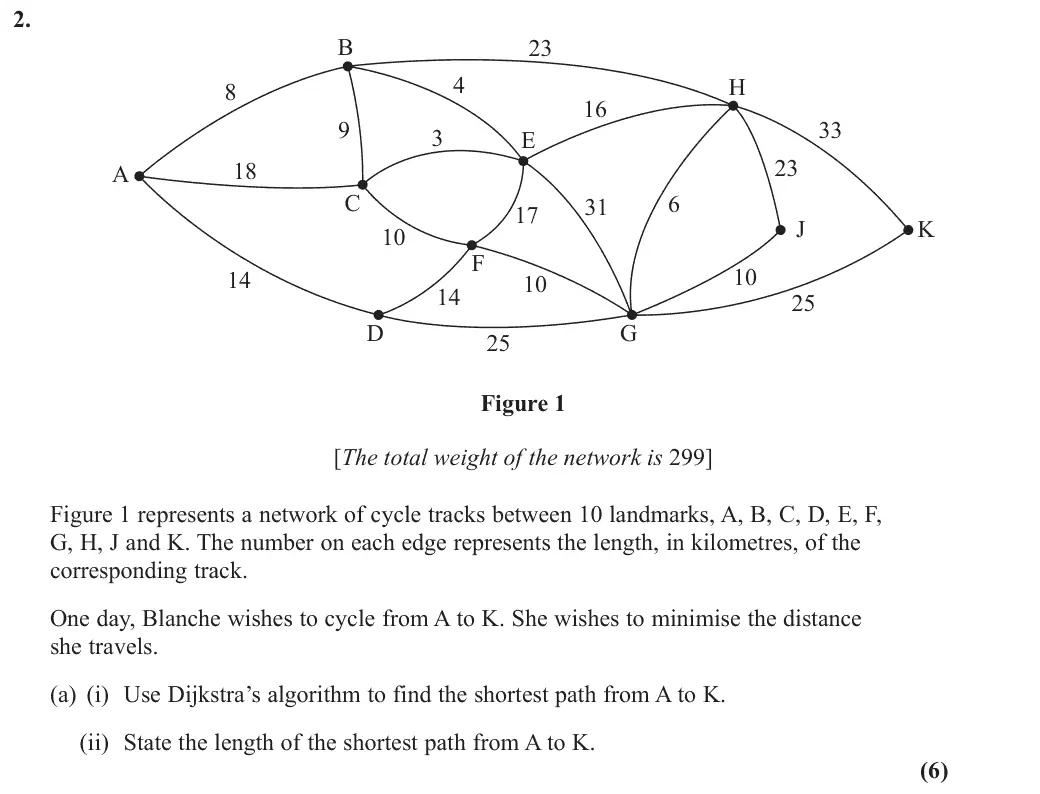
June 2025 · AS Paper 2 (Decision 1) · Q1(b)2 marks
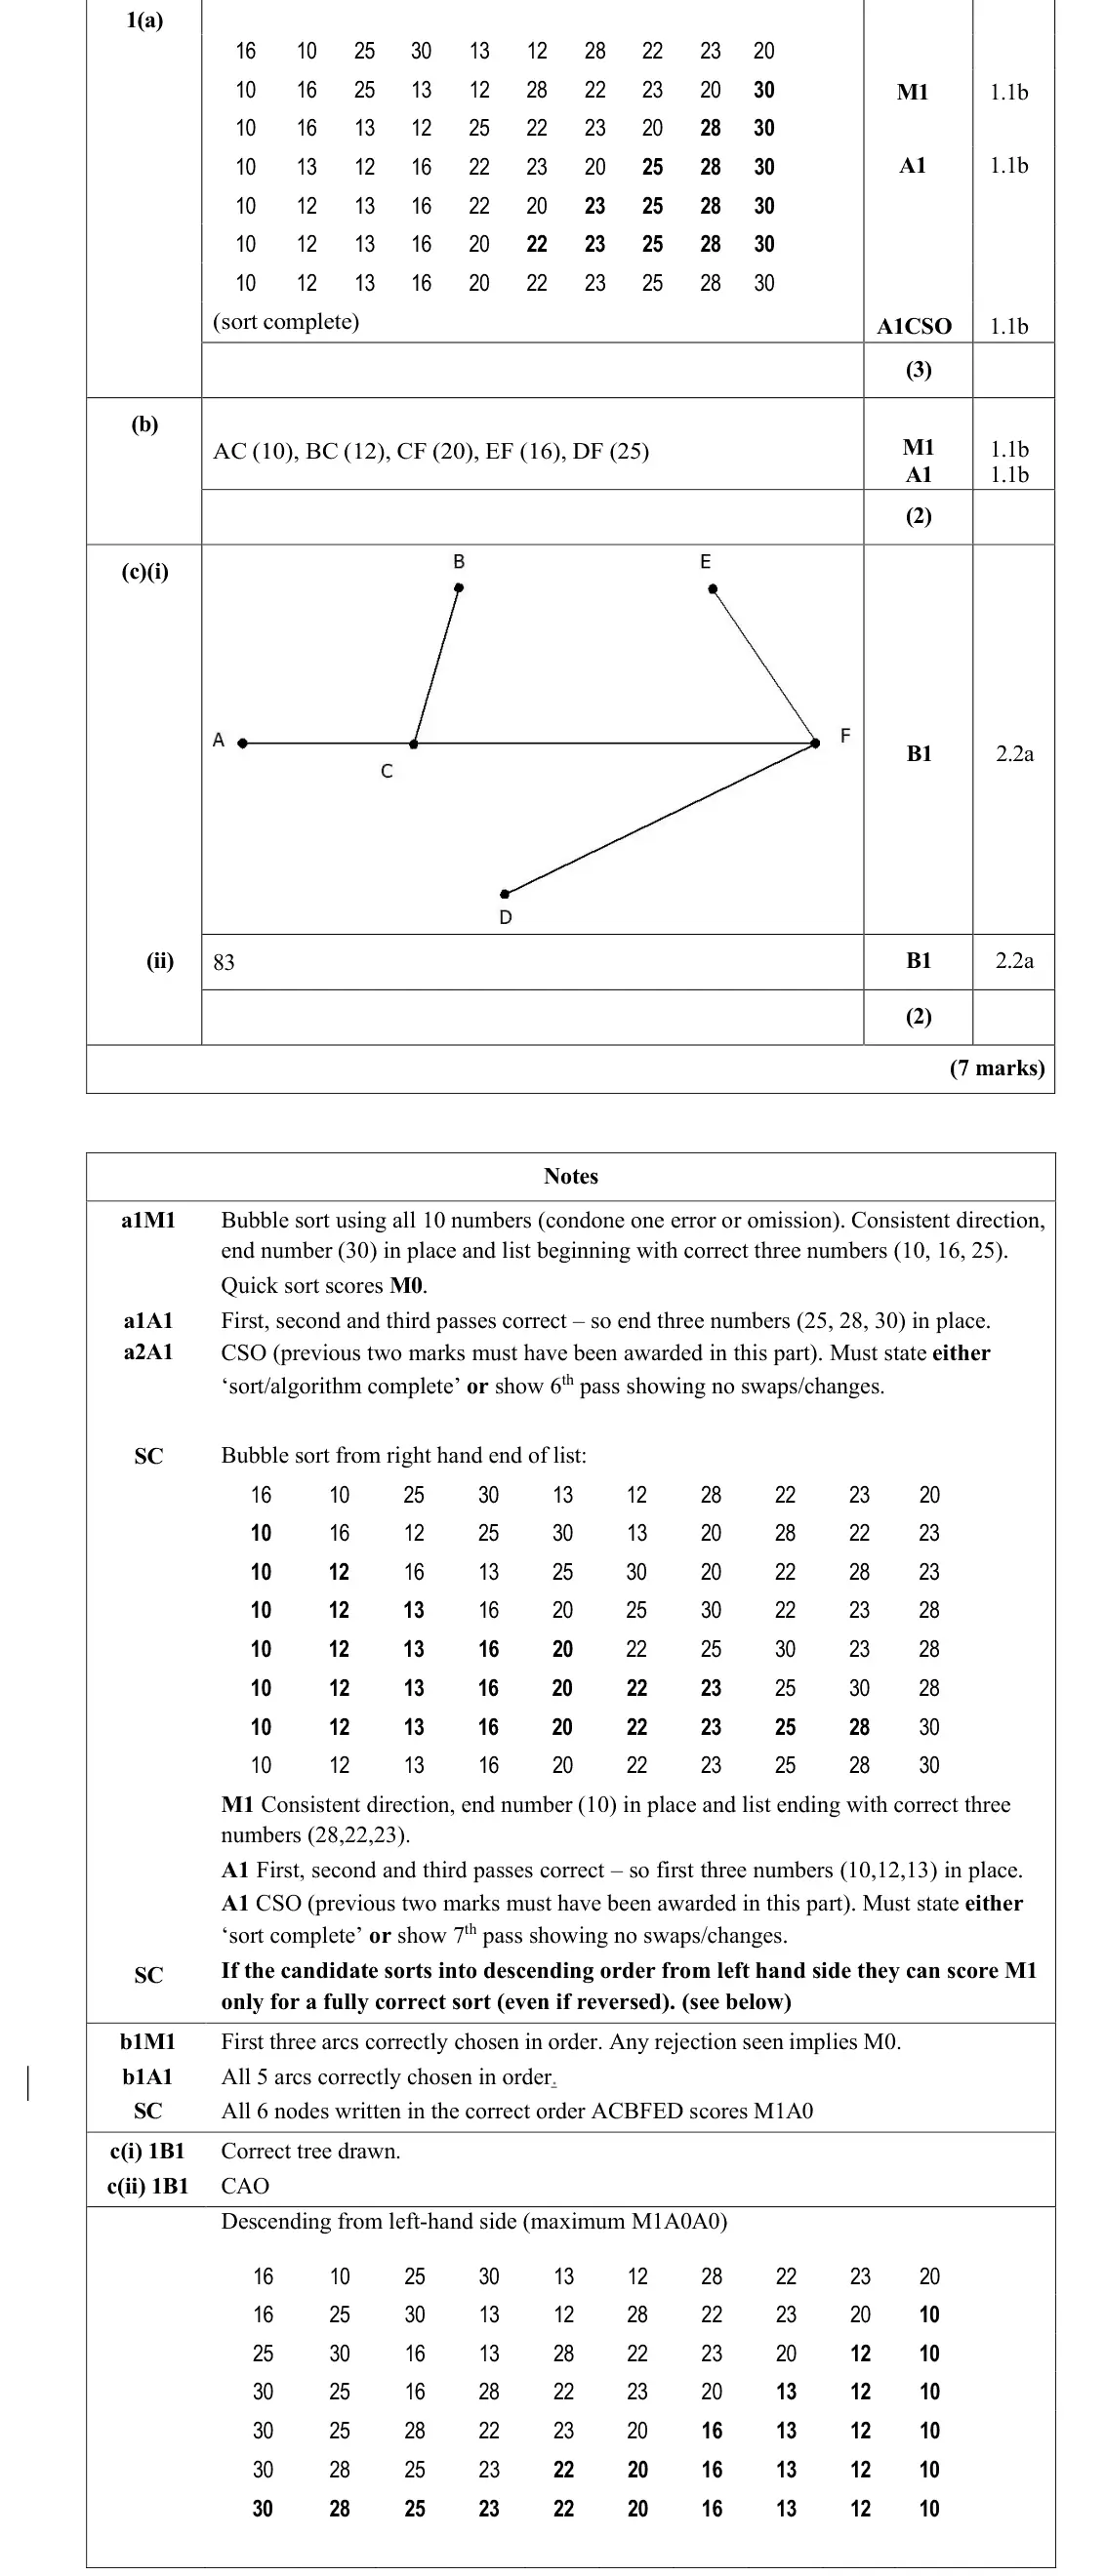
Mark scheme (whole question; this part is marked with the orange bar)
Examiner's comment
This was a very accessible opener, with a significant number of learners scoring full marks, however a surprising number of learners did not score highly being full marks despite it being a very accessible question. Part a) was generally answered very well with a majority of learners scoring at least two out of the three available marks, and most securing full marks. Very few descending sorts or quick sorts were seen, and most were able to show just the final results of each pass rather than every comparison. A small group of learners chose to write out every swap, and not just the result at the end of the pass, which was very time consuming for them on an already tightly timed paper. It was most common to just stop after the 5th pass, with no 6th pass or “sort complete” statement made. Some learners used a more unusual “cross arrow” notation, where learners were trying to show all the swaps that took place in a single line – this was confusing to follow and more often than not led to a mistake in one of the passes. Part b) saw a number of learners use Kruskal’s or a version of the nearest neighbour algorithm, or considering and rejecting arcs in a hybrid version of Prim’s and Kruskal’s. Several learners chose to draw the distance matrix in order to perform Prim’s, which was an unnecessary use of their time. The third arc dictated whether a candidate had correctly used Prim’s, and therefore if the wrong algorithm was used, the candidate lost both the method and the accuracy mark. Nonetheless a majority scored all marks here. Part c) provided easy marks for those who had correctly used Prim’s in part b), but also the opportunity for full marks even if Kruskal’s had been used in part b). There were a few errors in adding up the arc lengths, with a variety of total lengths in the range 85-89. Almost all learners who had a correct MST in b) also scored the two marks in c), and thus a large majority scored both of these marks).
Key points from the mark scheme and examiner's report
Prim from A: AC, BC, CF, EF, DF
the third arc shows whether Prim (not Kruskal) was used
any rejection implies M0
listing nodes ACBFED scores M1 only
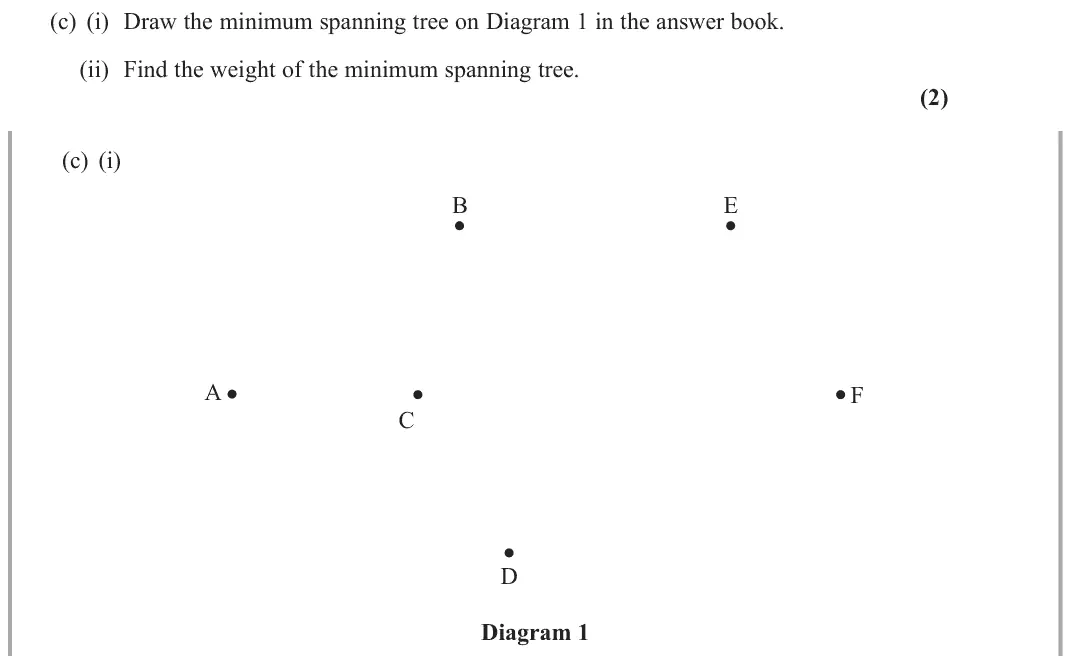
June 2025 · AS Paper 2 (Decision 1) · Q1(c)2 marks
Mark scheme (whole question; this part is marked with the orange bar)
Examiner's comment
This was a very accessible opener, with a significant number of learners scoring full marks, however a surprising number of learners did not score highly being full marks despite it being a very accessible question. Part a) was generally answered very well with a majority of learners scoring at least two out of the three available marks, and most securing full marks. Very few descending sorts or quick sorts were seen, and most were able to show just the final results of each pass rather than every comparison. A small group of learners chose to write out every swap, and not just the result at the end of the pass, which was very time consuming for them on an already tightly timed paper. It was most common to just stop after the 5th pass, with no 6th pass or “sort complete” statement made. Some learners used a more unusual “cross arrow” notation, where learners were trying to show all the swaps that took place in a single line – this was confusing to follow and more often than not led to a mistake in one of the passes. Part b) saw a number of learners use Kruskal’s or a version of the nearest neighbour algorithm, or considering and rejecting arcs in a hybrid version of Prim’s and Kruskal’s. Several learners chose to draw the distance matrix in order to perform Prim’s, which was an unnecessary use of their time. The third arc dictated whether a candidate had correctly used Prim’s, and therefore if the wrong algorithm was used, the candidate lost both the method and the accuracy mark. Nonetheless a majority scored all marks here. Part c) provided easy marks for those who had correctly used Prim’s in part b), but also the opportunity for full marks even if Kruskal’s had been used in part b). There were a few errors in adding up the arc lengths, with a variety of total lengths in the range 85-89. Almost all learners who had a correct MST in b) also scored the two marks in c), and thus a large majority scored both of these marks).
Key points from the mark scheme and examiner's report
draw the tree AC, BC, CF, EF, DF
weight 83
adding slips gave 85 to 89
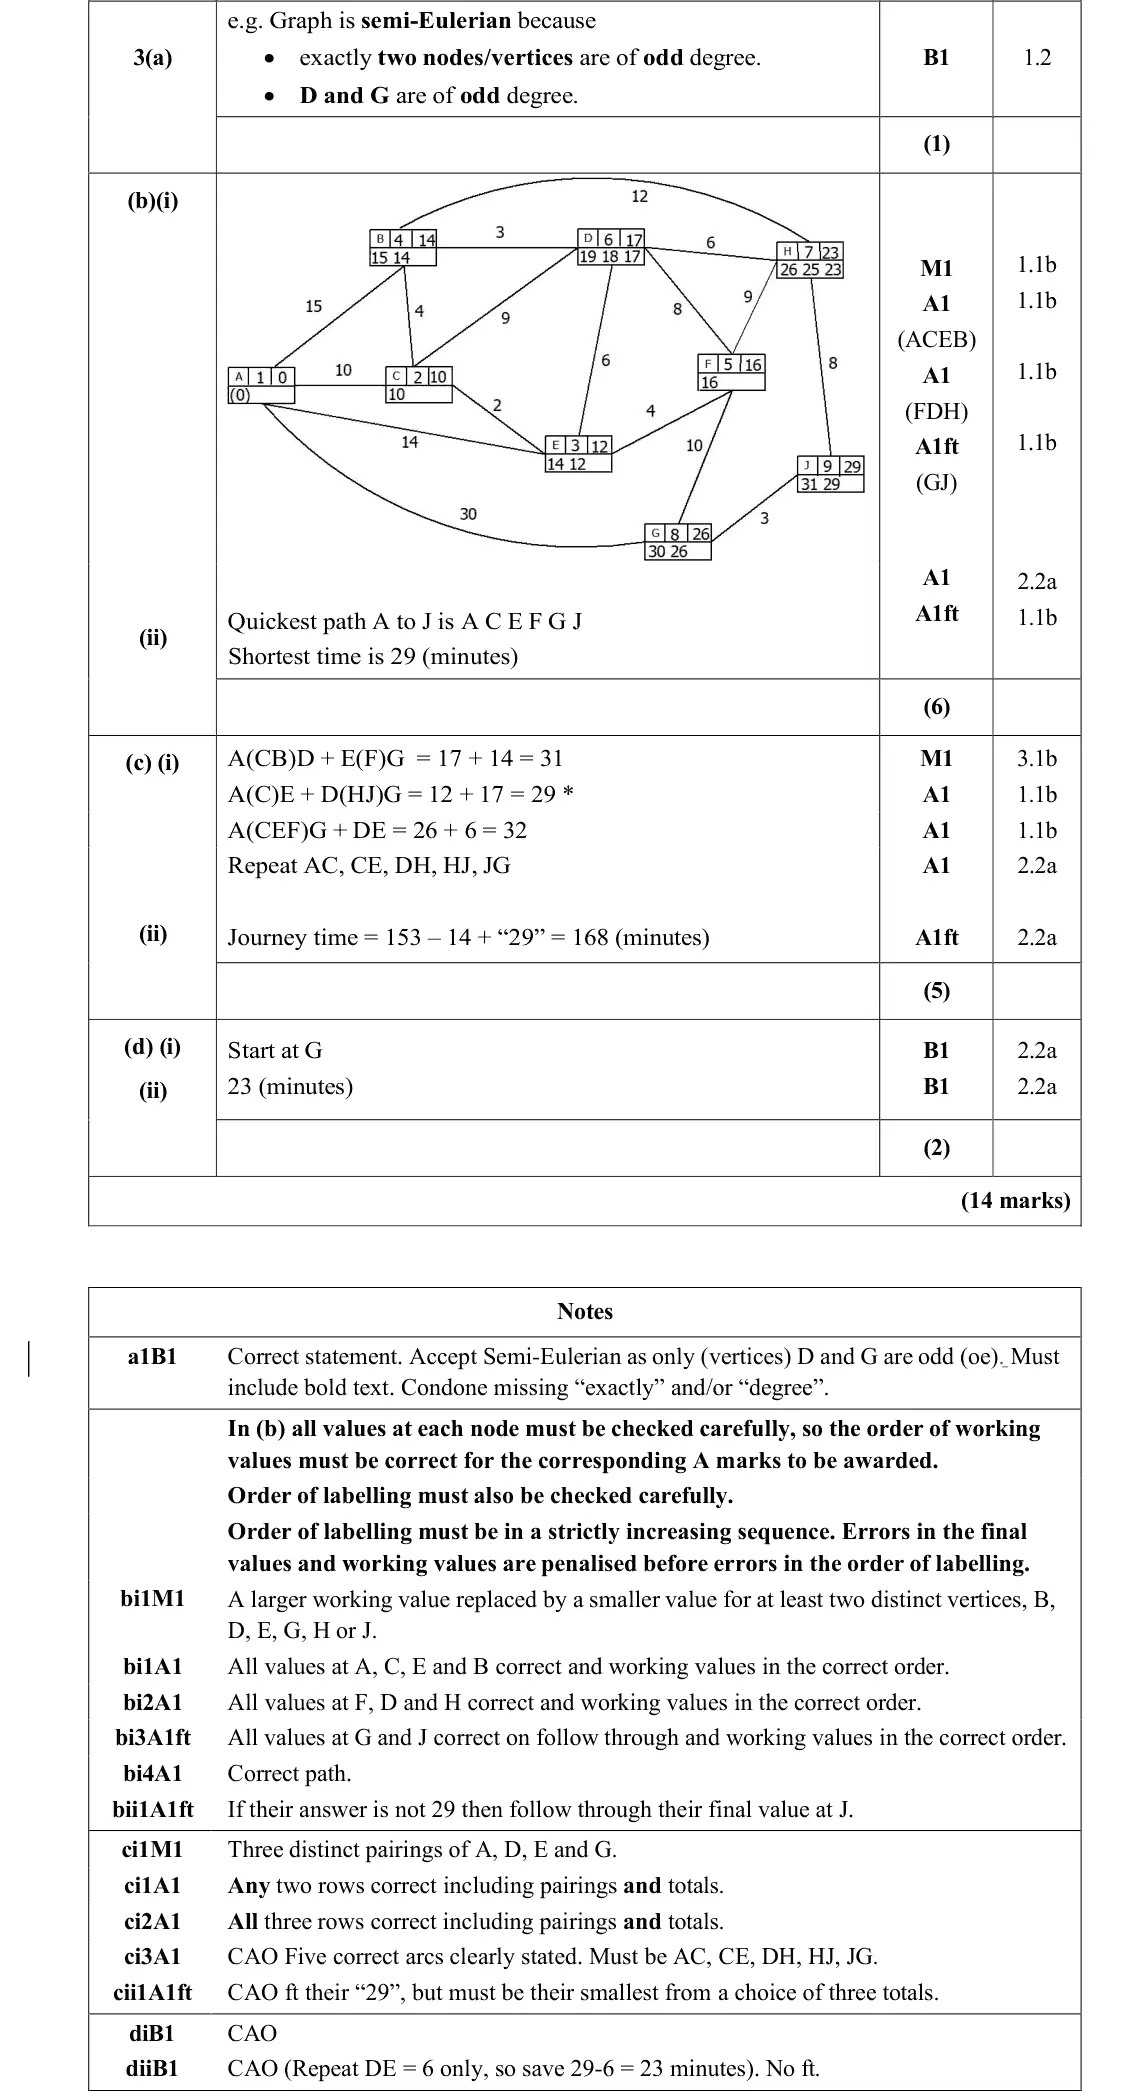
June 2025 · AS Paper 2 (Decision 1) · Q3(b)6 marks
Mark scheme (whole question; this part is marked with the orange bar)
Examiner's comment
This was a standard Dijkstra/Route Inspection question, and the first half of the question was generally very well-answered. Again, the second half created a level of differentiation among the learners.
Key points from the mark scheme and examiner's report
quickest path ACEFGJ, 29 minutes
working values in order
errors at D (missing 18), H (missing 26), F (extra values)
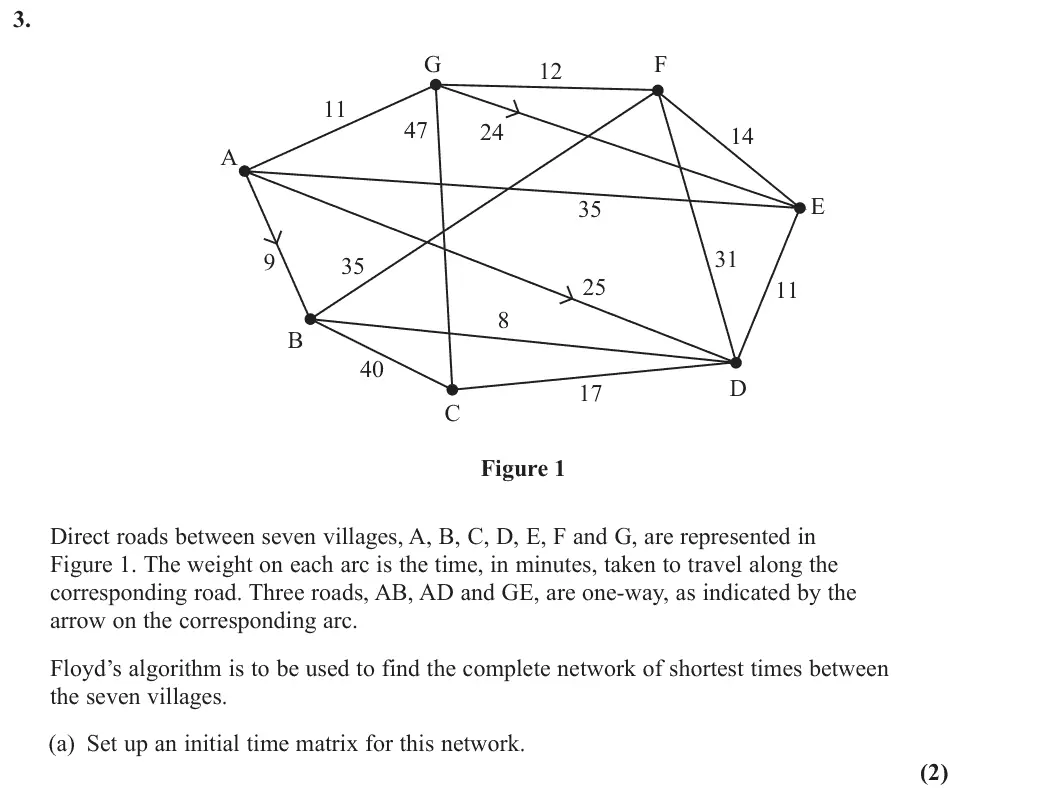
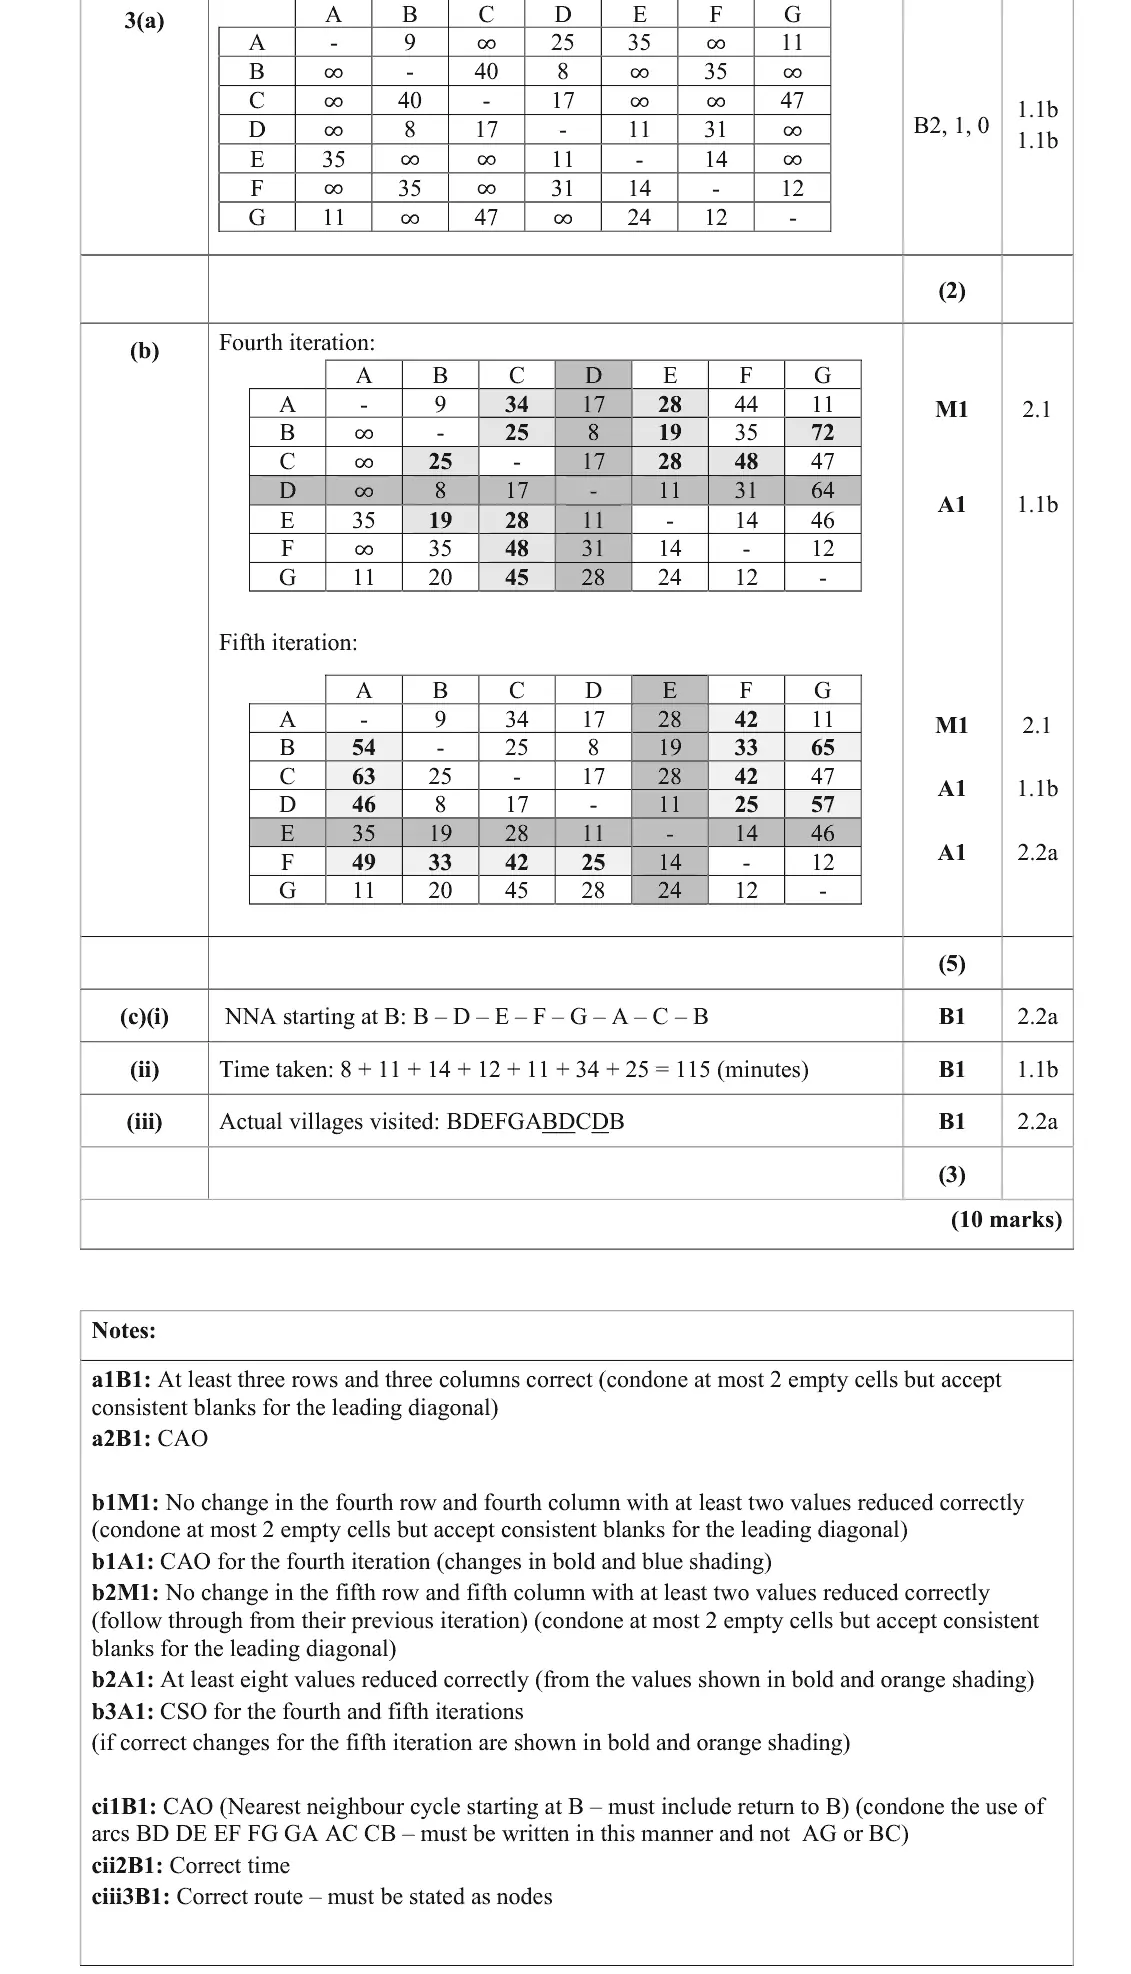
June 2025 · Paper 3D (Decision 1) · Q3(a)2 marks
Mark scheme (whole question; this part is marked with the orange bar)
Examiner's comment
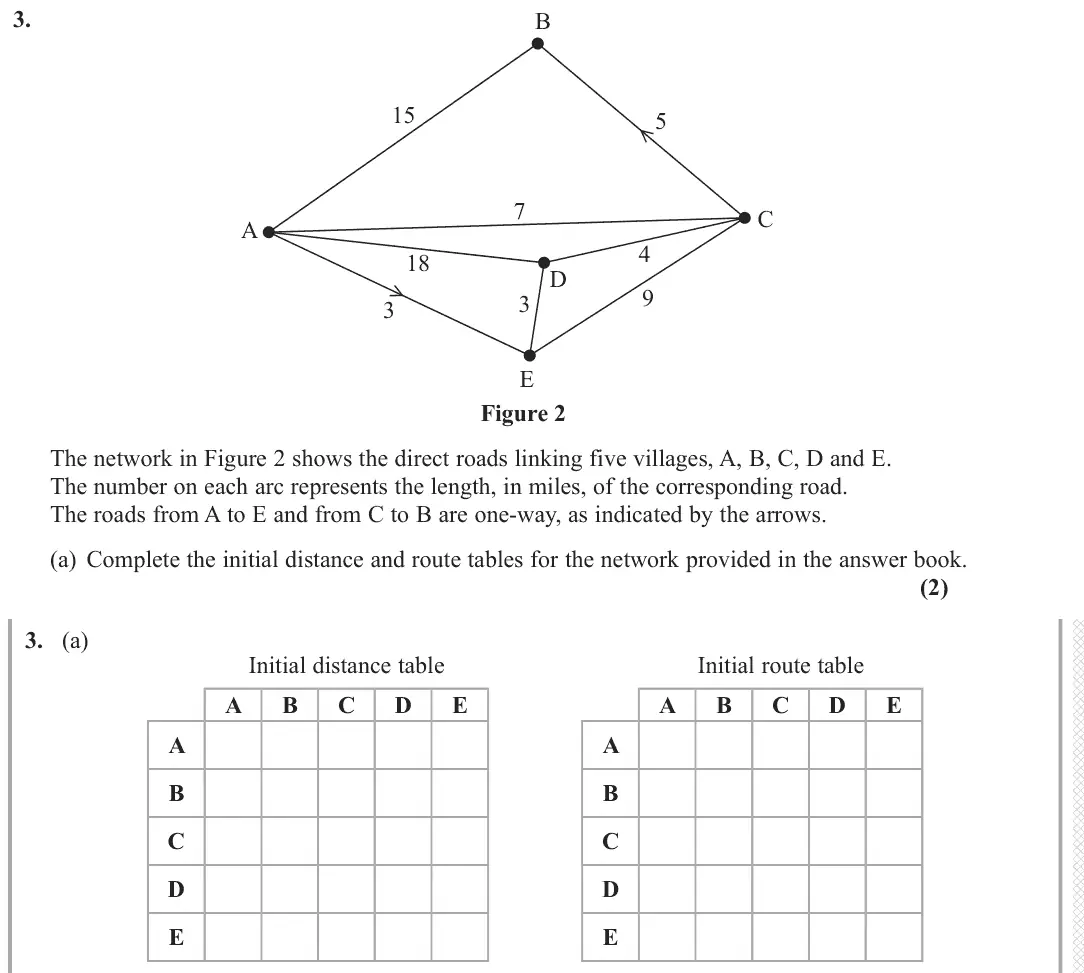
Part (a) was accessible to nearly every candidate with almost all of those who produced a completed table gaining both marks. Those who lost 1 mark often did so due to transcription errors. A small number of candidates transposed the table
Key points from the mark scheme and examiner's report
initial matrix with ∞ for no direct road
AB, AD and GE one-way, so BA, DA and EG are ∞
a few transposed the table
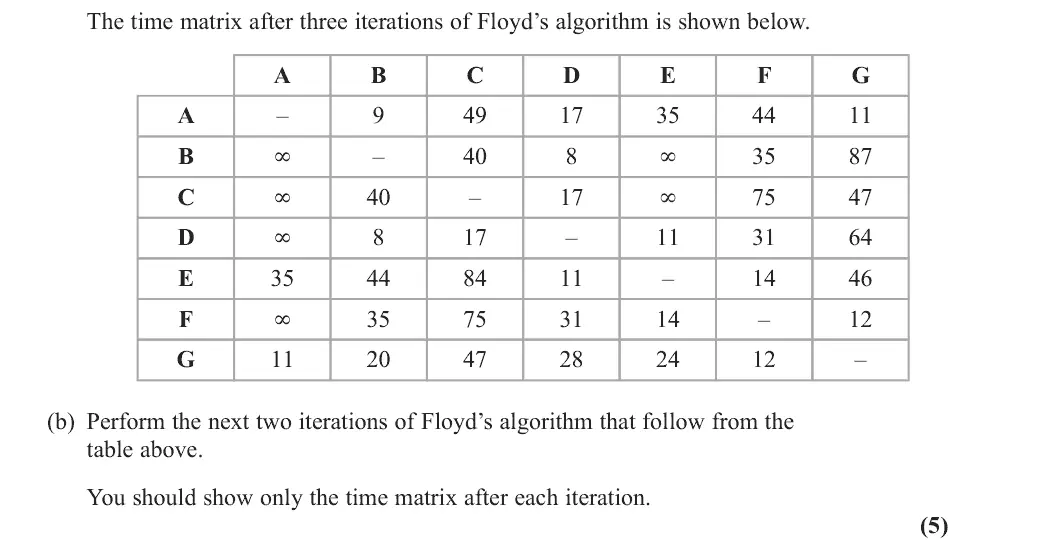
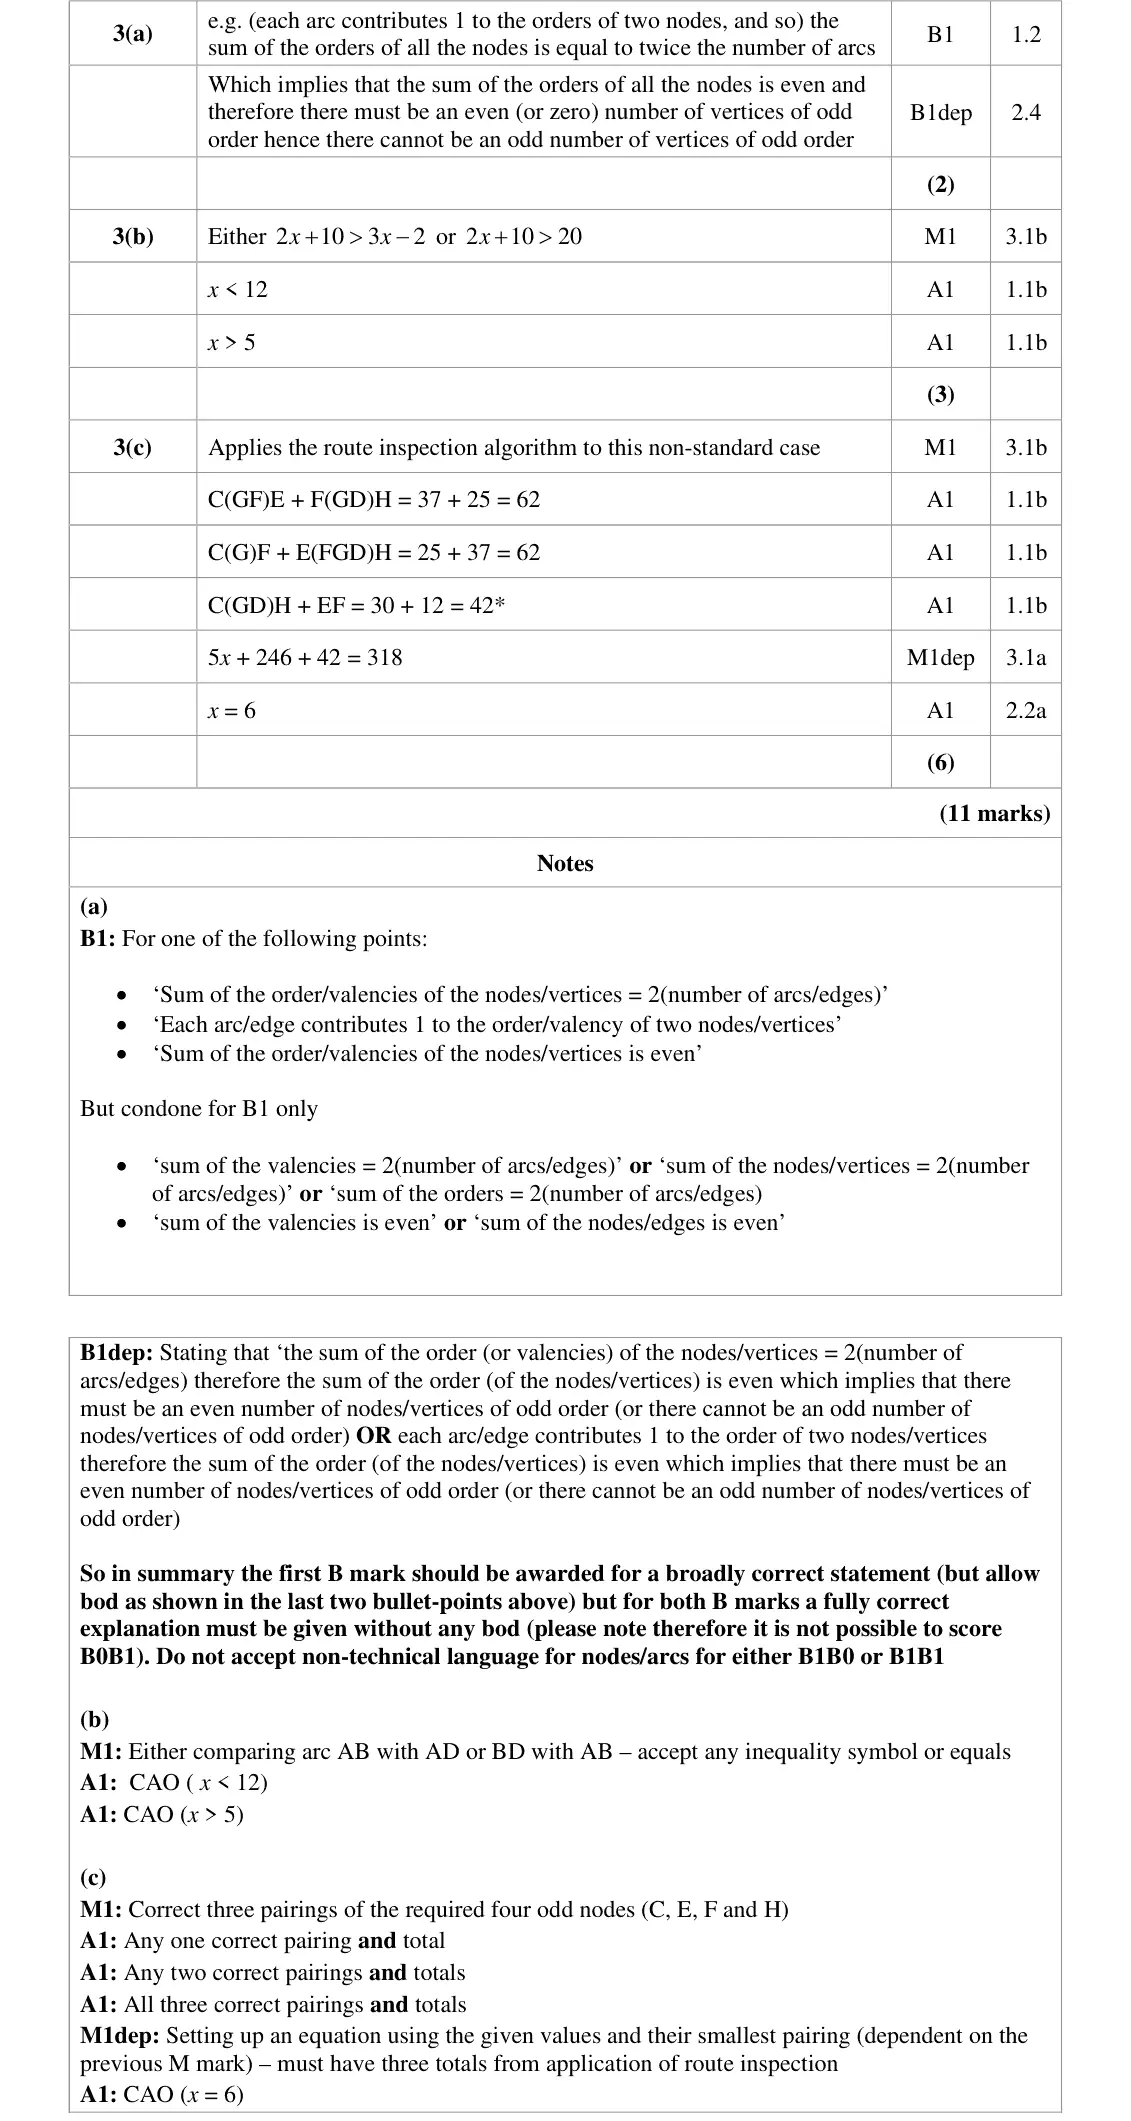
June 2025 · Paper 3D (Decision 1) · Q3(b)5 marks
Mark scheme (whole question; this part is marked with the orange bar)
Examiner's comment
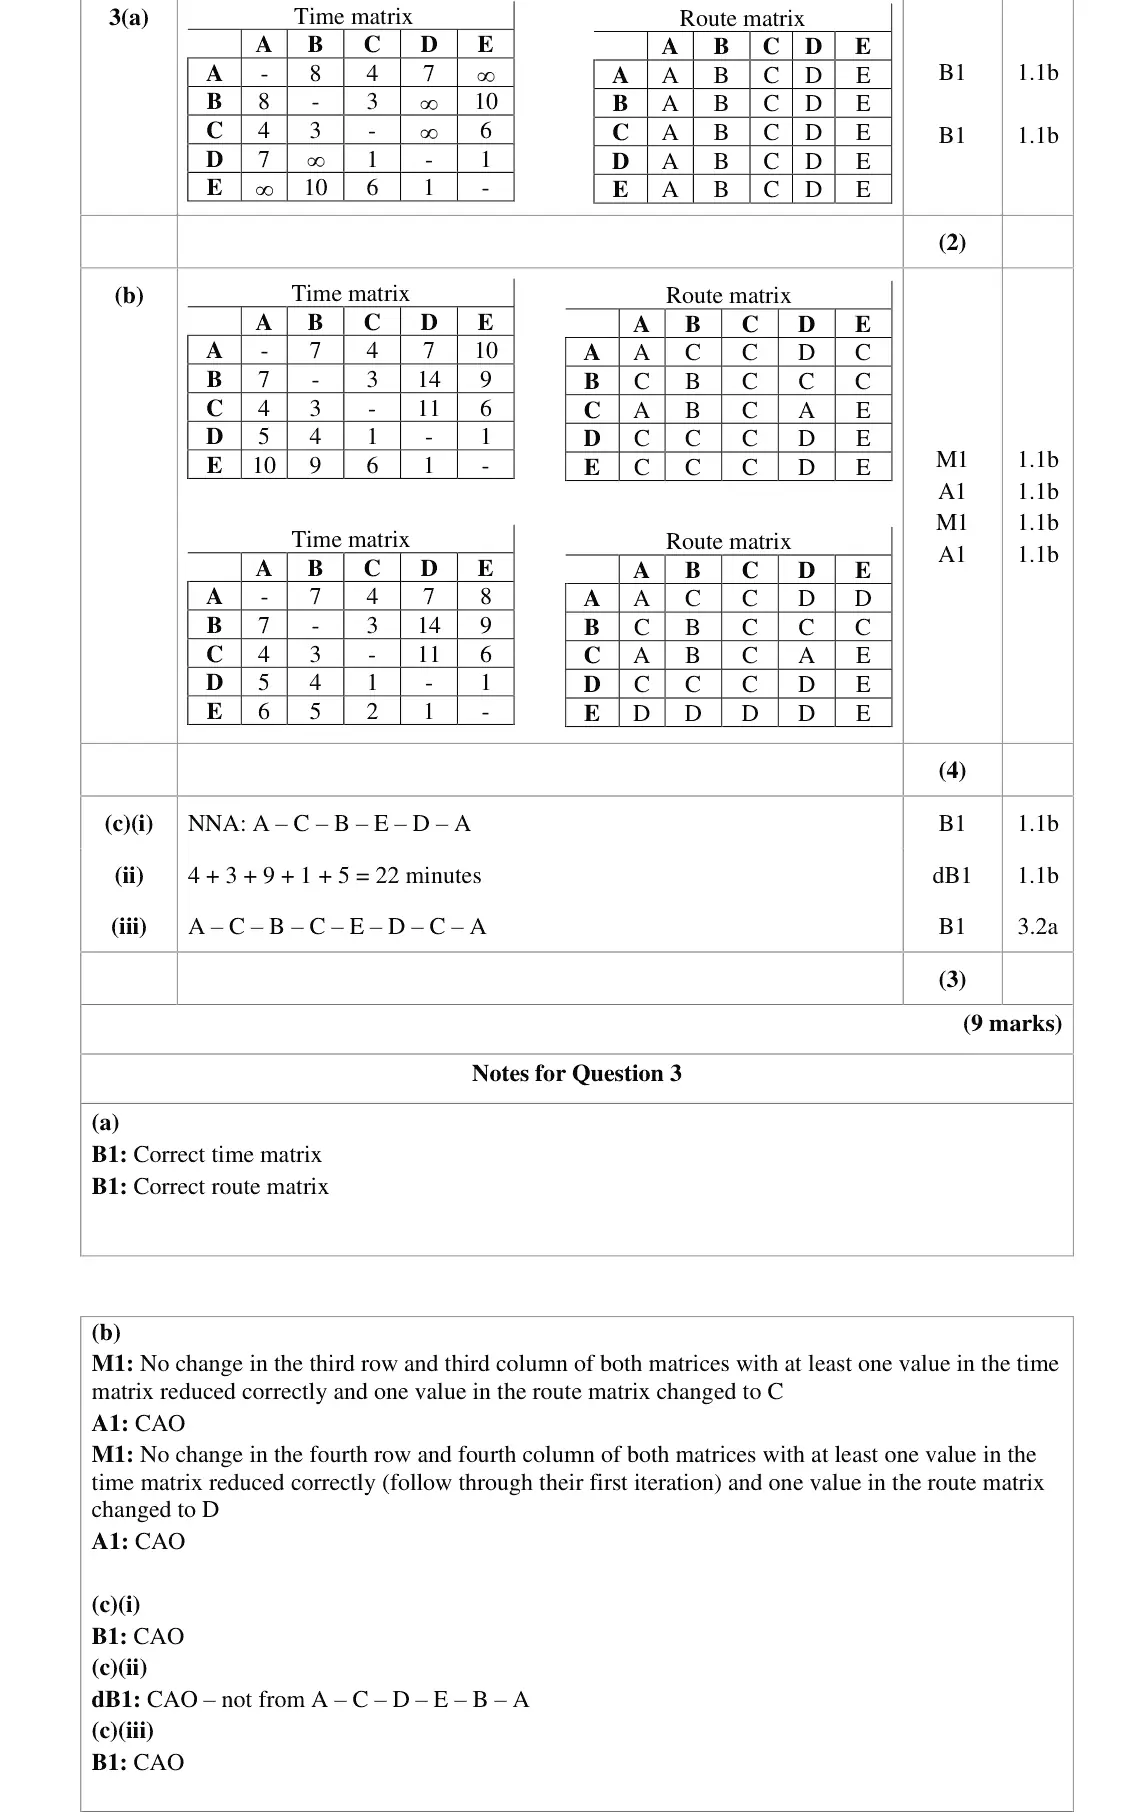
In part (b) most candidates gained at least 3 marks. When errors occurred, it was usually down to arithmetical slips rather than a lack of understanding of the algorithm. Some candidates used shading or, worse, highlighter pen, to mark the row and column that were unchanged. Unfortunately, this made it difficult (or impossible in some cases) to read the candidates work. If a candidate wishes to mark the unchanged row and column in some way, this is better done using a large bracket which does not obscure the numerical values. Part (c) (i) was answered well and did not rely on part (b) being correct. Errors in (ii) were typically in computing a time of 139 and not correctly reading off the distance values from the fifth iteration. However, in the final part a significant number of candidates failed to correctly
Key points from the mark scheme and examiner's report
4th (via D) and 5th (via E) iterations from the given matrix
row and column k unchanged
e.g. AC 34, BE 19, then BA 54, CA 63
do not obscure values with shading
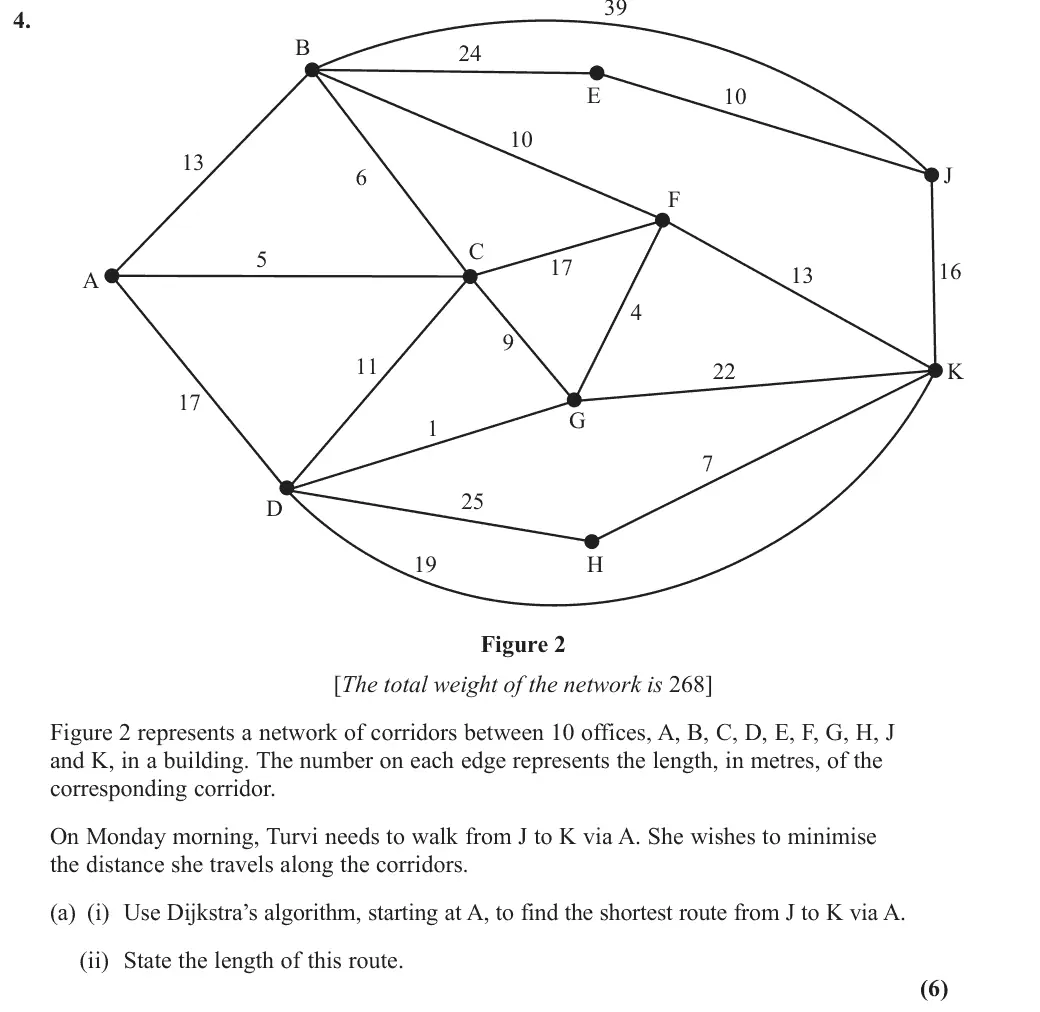
June 2025 · Paper 3D (Decision 1) · Q4(a)6 marks
Mark scheme (whole question; this part is marked with the orange bar)
Examiner's comment
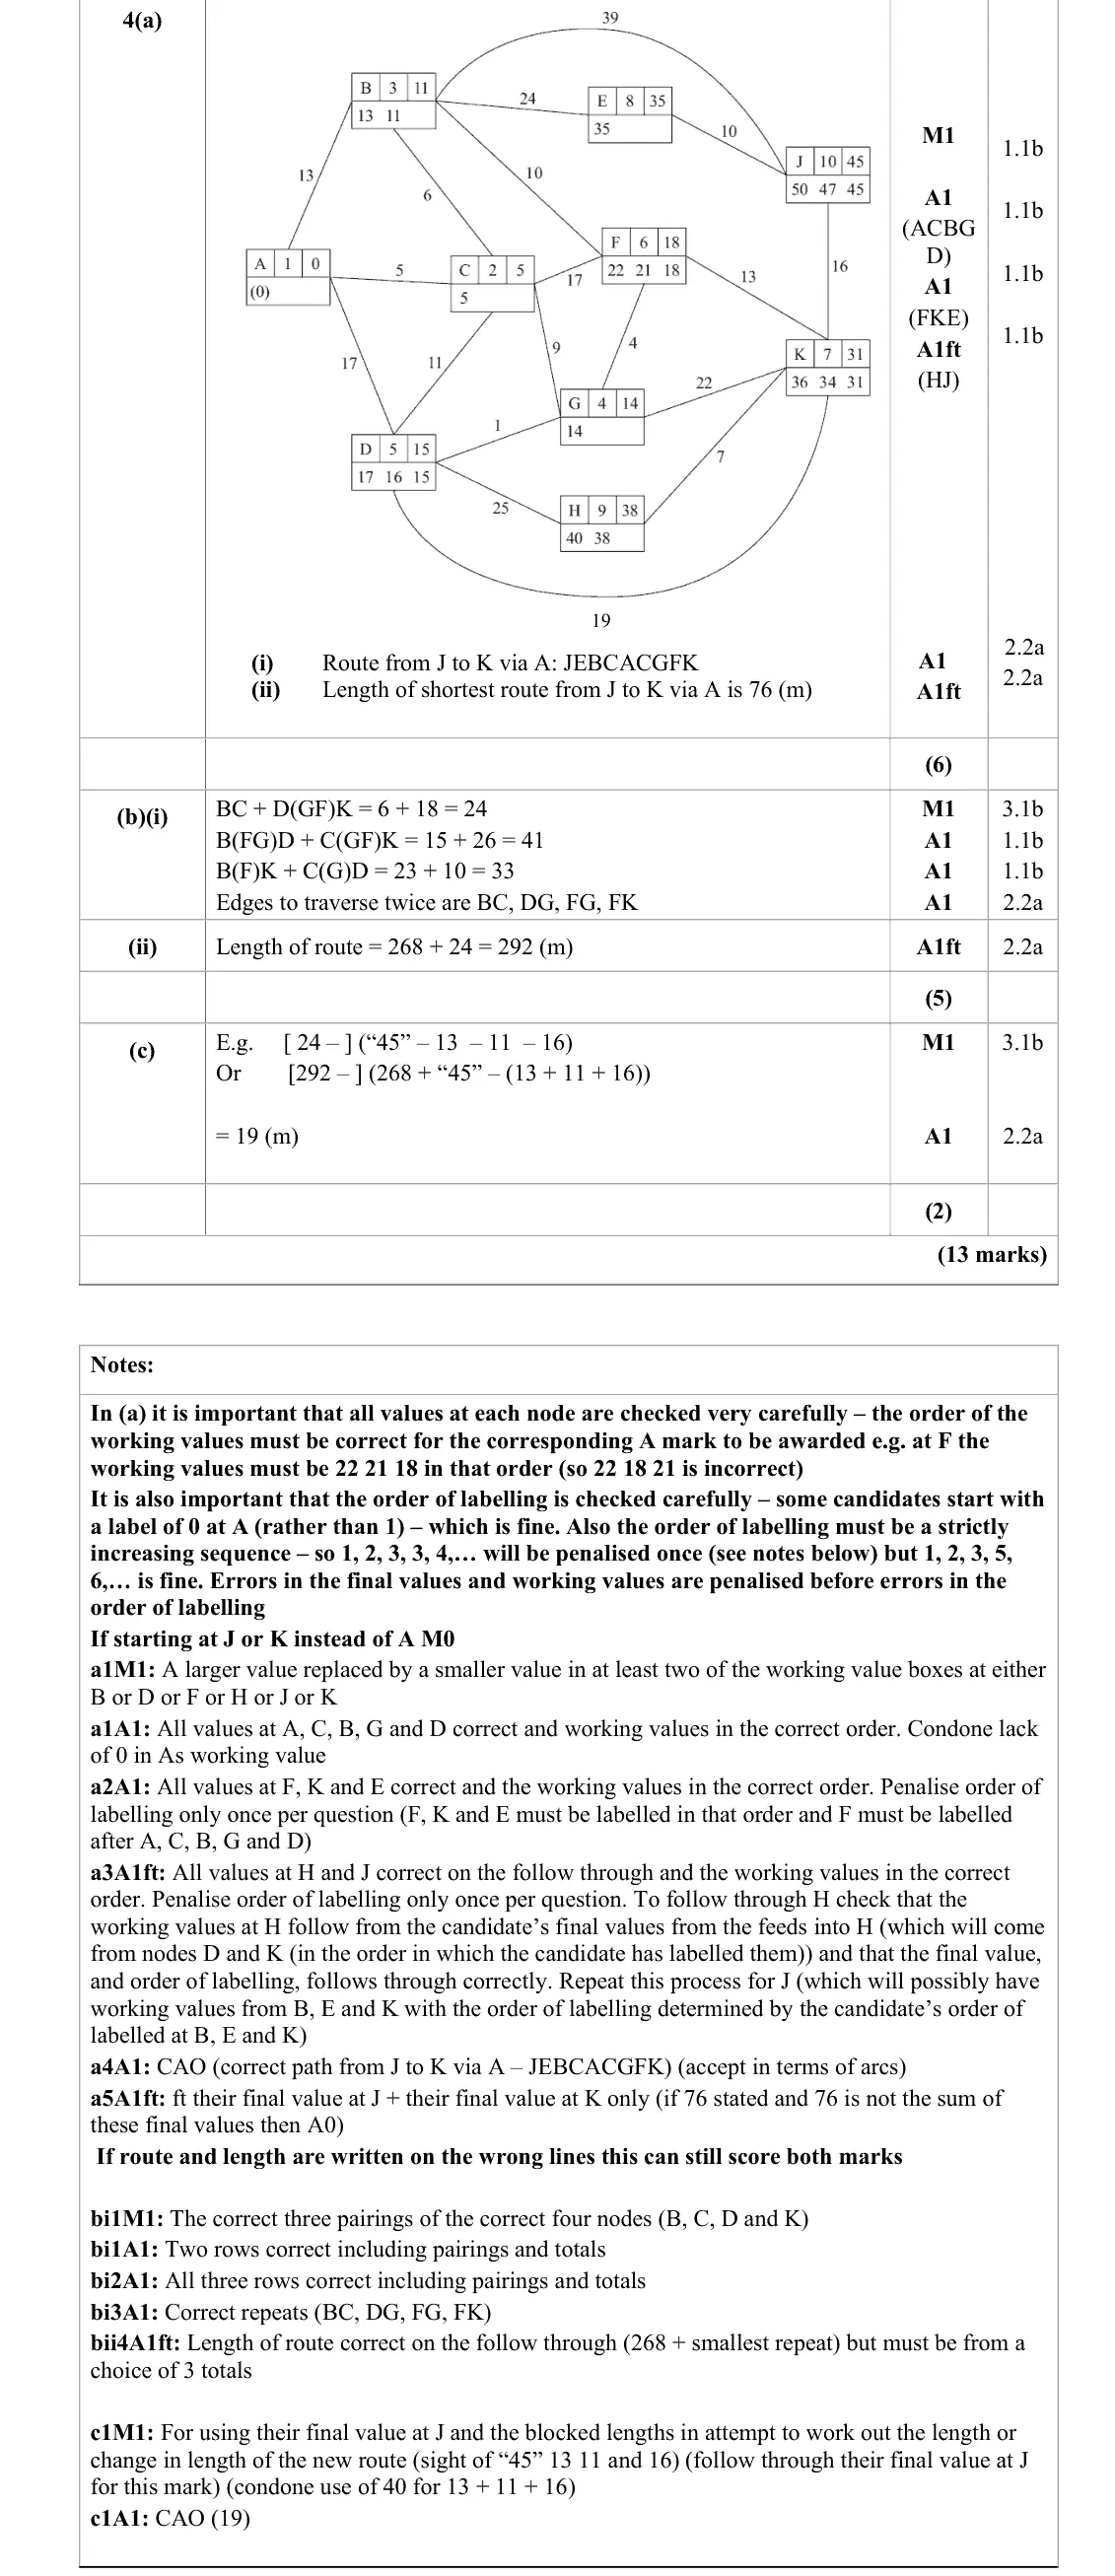
Part (a) was generally well answered. Most candidates approached the algorithm confidently, followed the correct labelling conventions, and showed the necessary working values. A recurring issue was candidates mistakenly starting the algorithm at node J rather than A, which led to no marks. This was likely due to misreading the question and perhaps reflects the lack of similar practice questions in available resources. While nearly all candidates secured the initial method mark, full marks were often not awarded due to errors in updating working values or mislabelling. Nonetheless, most candidates found the correct route or at least its correct length.
Key points from the mark scheme and examiner's report
Dijkstra from A (not J) gives A to J = 45 and A to K = 31
route J E B C A C G F K, length 76 m
working values in order (F: 22 21 18)
June 2024 · AS Paper 2 (Decision 1) · Q3(b)6 marks
Mark scheme (whole question; this part is marked with the orange bar)
Examiner's comment
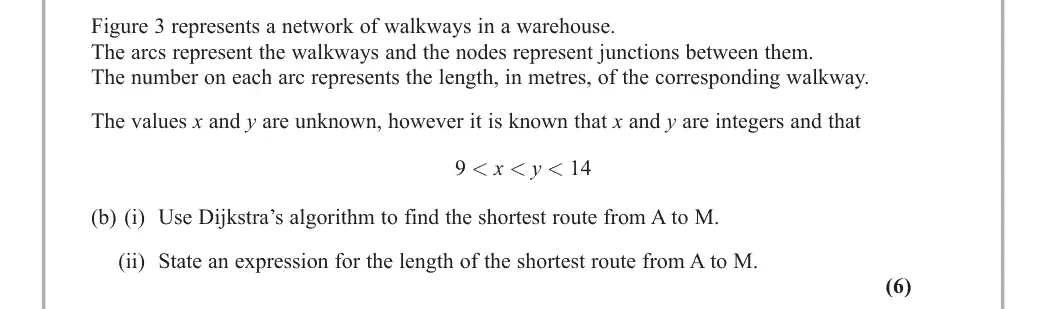
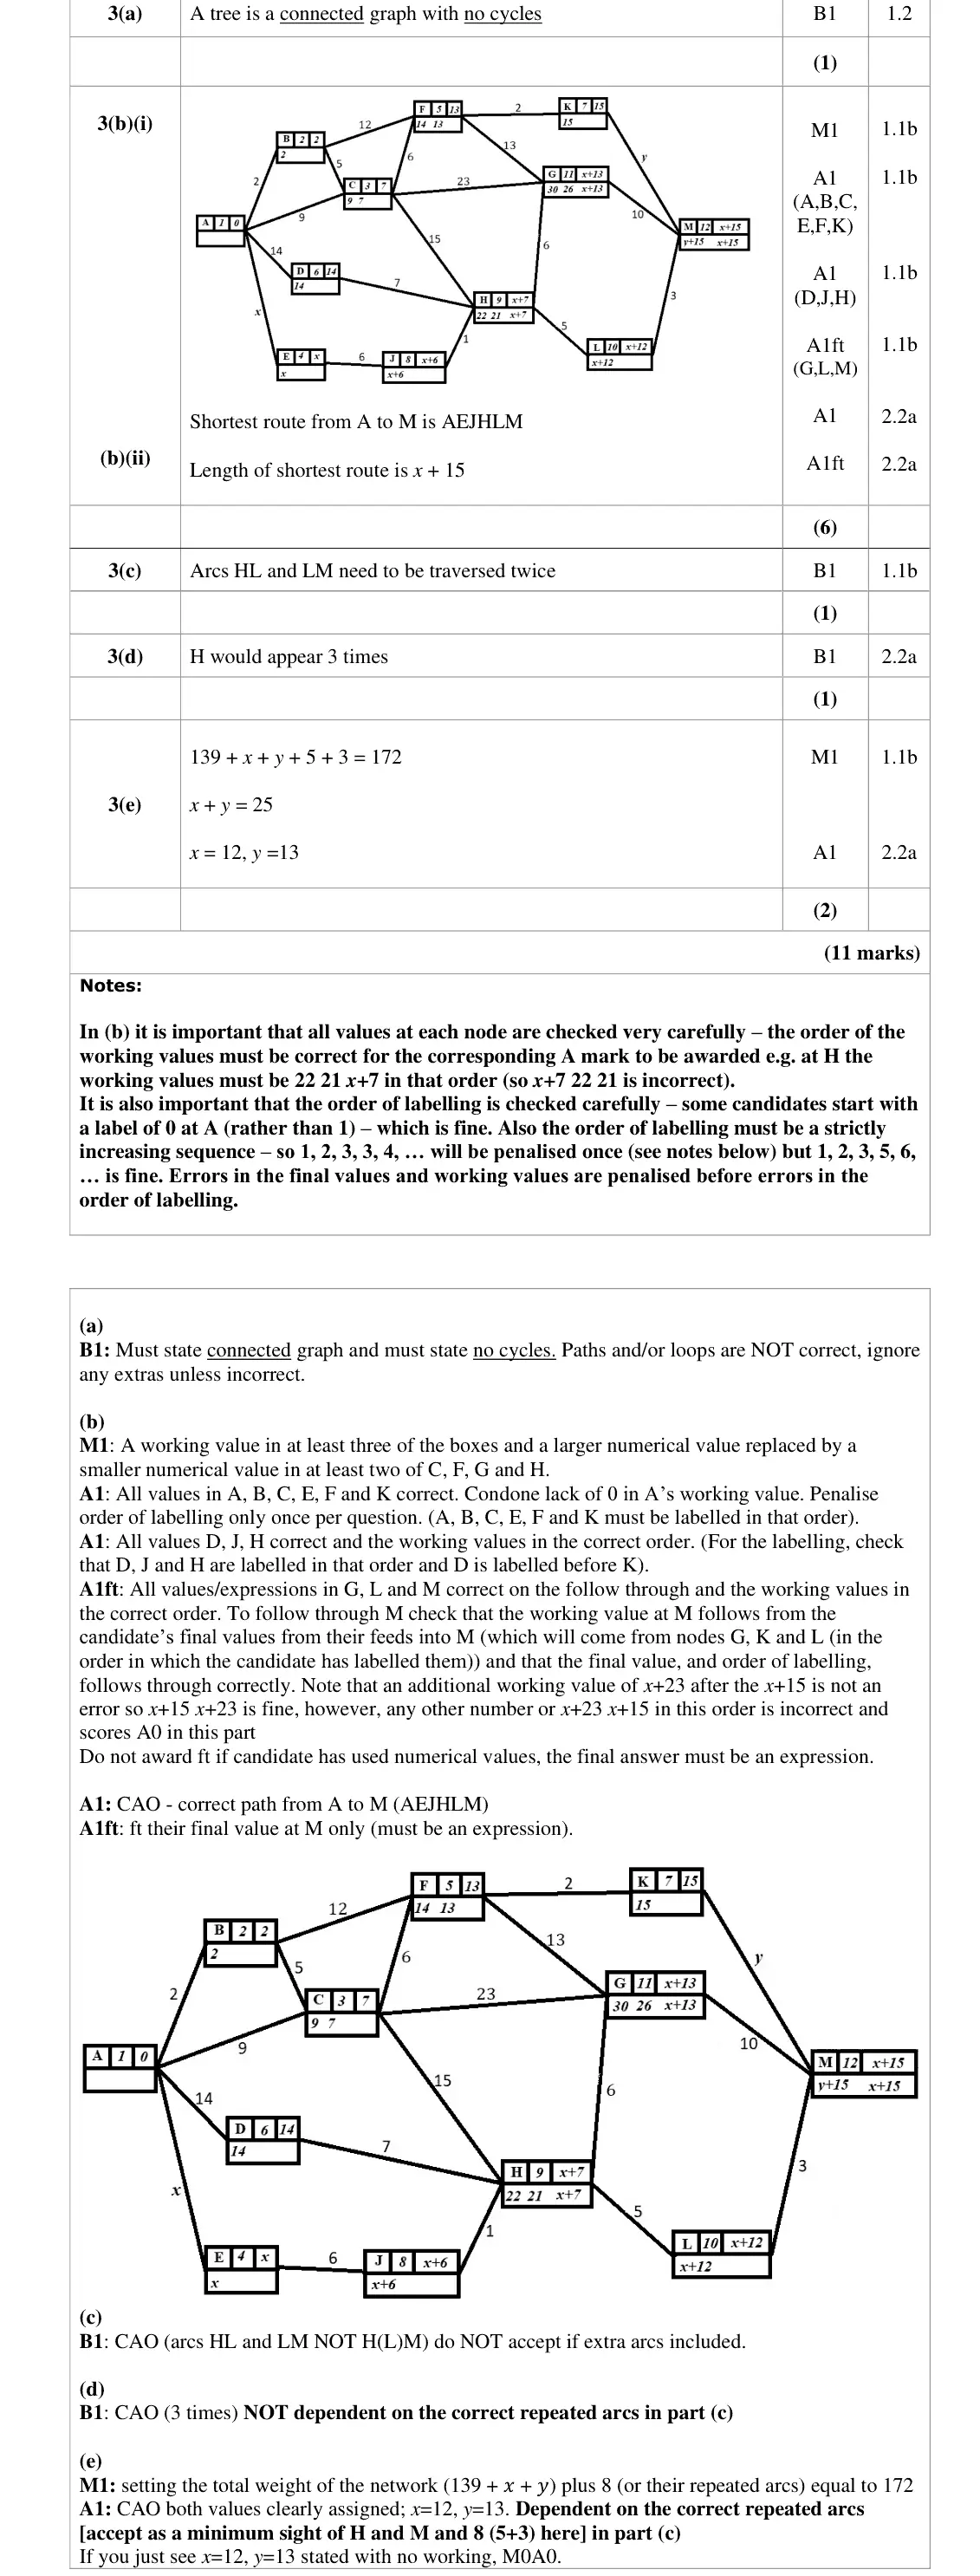
This question saw a much wider range of scores awarded. Part a) required pupils to accurately define a “tree”, however few candidates correctly used the appropriate technical terms; those that did had clearly learnt the definition. Many incorrectly described a spanning tree or used “loops” instead of “cycles” or missed that it needed to be connected. Candidates were clearly unfamiliar with how to accurately convey the definition and often confused it with elements of other definitions that have been previously assessed and hence this part was often omitted. In part b) it was clear that candidates had learned Dijkstra’s algorithm, however the use of unknowns proved too much for some who either tried to deal with purely numerical values, or quickly made significant errors. However, a pleasing number of candidates scored 4, 5 or 6 marks on part i) for generally accurate attempts along with correct routes and lengths in terms of x. Common errors tended to occur at H (either 22 or 21 missing), G (30 or 26 missing), E and F or G and L labelled in the wrong order. Most candidates achieved the shortest route from A to M, but candidates were not necessarily clear that the length of their shortest route could be given as an expression, even though the question asked for the answer in this format. Some candidates are still obliterating their working values or writing them down in the incorrect order, indicating a lack of understanding of the process required. In part c) most candidates recognised the nodes BCHM as odd, however the most common response was to fail to appreciate that B and C were the start and end nodes and were not required as part of the correct calculation. Those that did identify HM as the pair, generally gave the correct arcs, however it was not uncommon to see vertices listed as opposed to arcs. Part d) produced a slender majority of correct answers, however frequently candidates stated 2, 6, or other integers, possibly from listing the nodes as opposed to the arcs. Most understood the need to add in the length of the repeated arcs from c) in part e). Those that had listed BC as one of their arcs ended up with e.g. x + y = 20 and were then able to progress further, often giving a wrong answer such as x = 9, y = 11. Those that correctly identified HL and LM in c) generally achieved both marks in e).
Key points from the mark scheme and examiner's report
keep x and y as unknowns: route AEJHLM, length x + 15
working values in the correct order (22 21 x + 7 at H)
answer must be an expression
June 2024 · Paper 3D (Decision 1) · Q2(a)3 marks
Mark scheme (whole question; this part is marked with the orange bar)
Examiner's comment
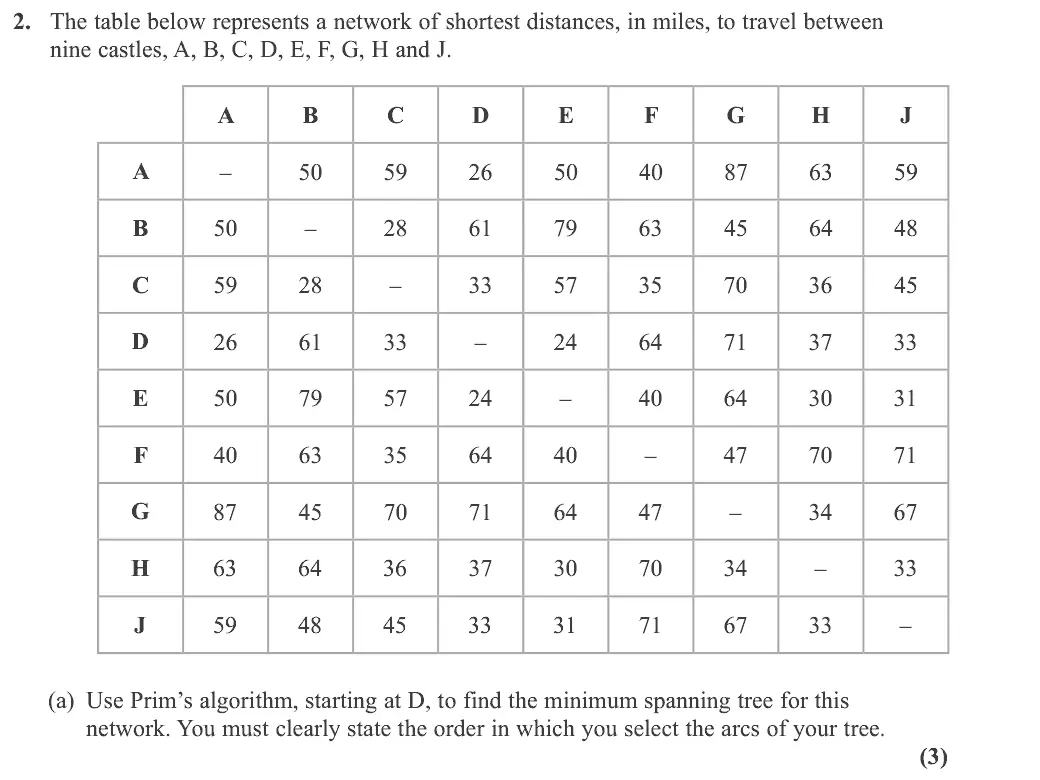
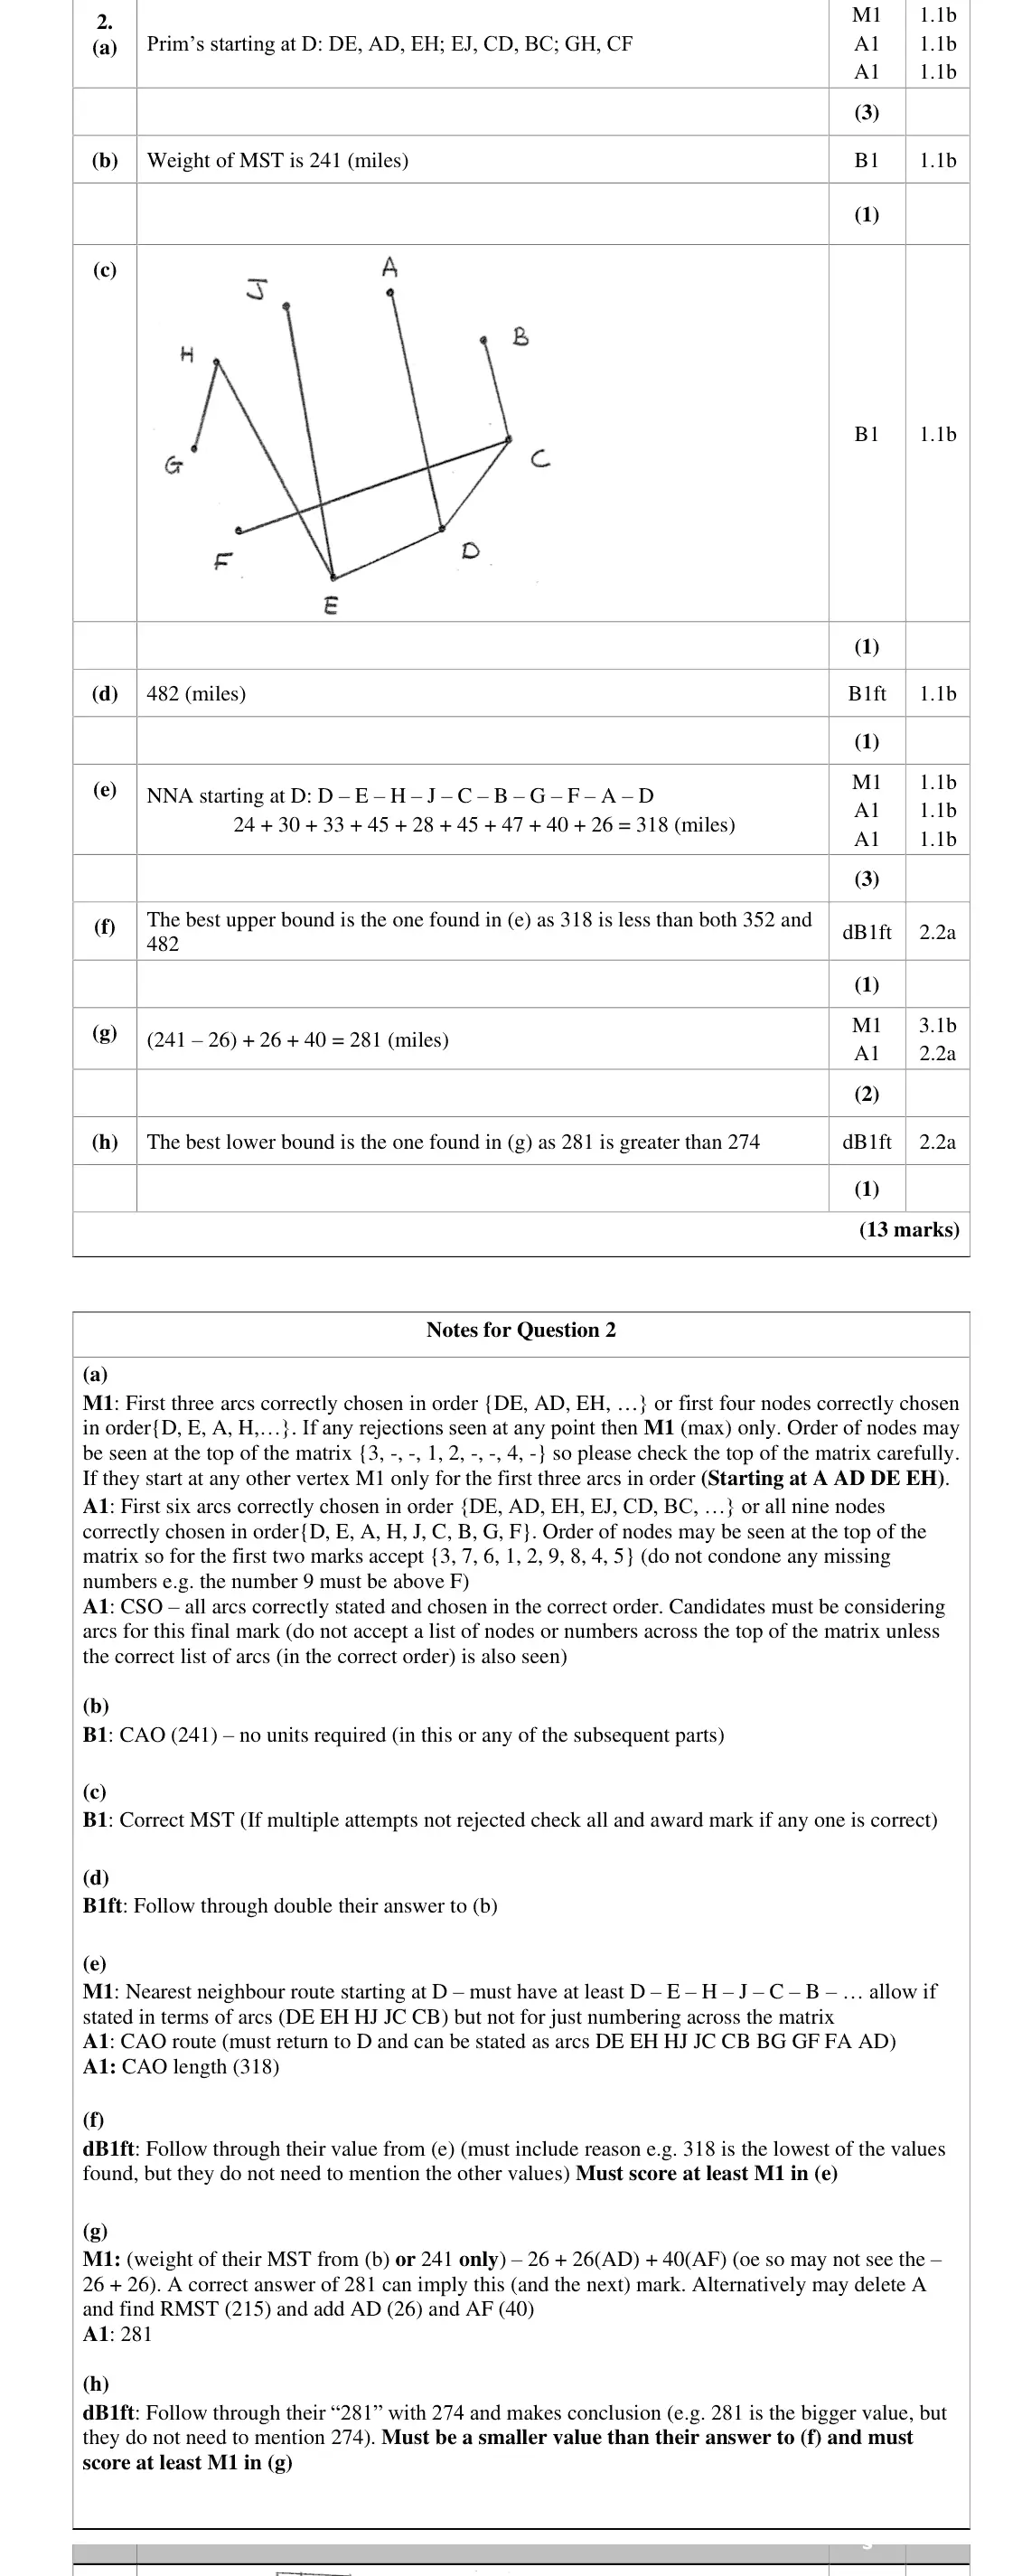
Parts (a), (b) and (c) were generally well approached and it was clear that many candidates understood how to apply Prim’s algorithm. There were a small number of responses which chose to start the Prim's at a node other than D, but they were rare. Some candidates lost marks for not listing the arcs of the tree explicitly, sometimes giving a list of nodes instead, or even simply numbering the top of the matrix with the order of selection followed by giving the weight of the tree only. There were occasional errors in the order of selection, for example sometimes EH and EJ were incorrectly interchanged, and other errors arose from the apparent application of a nearest neighbour approach resulting in a route rather than a tree. In (b), most who used their minimum spanning tree from part (a) generally made fewer errors than those who recreated the work to produce an MST here. Nonetheless, most did arrive at the correct lower bound of 281. In the comparison of upper and lower bounds in parts (f) and (h), it was clear that most
Key points from the mark scheme and examiner's report
Prim from D on the matrix: DE, AD, EH, EJ, CD, BC, GH, CF
list arcs in order, not just nodes or numbers
EH/EJ order swapped by some
June 2024 · Paper 3D (Decision 1) · Q2(b)1 mark
Mark scheme (whole question; this part is marked with the orange bar)
Examiner's comment
Parts (a), (b) and (c) were generally well approached and it was clear that many candidates understood how to apply Prim’s algorithm. There were a small number of responses which chose to start the Prim's at a node other than D, but they were rare. Some candidates lost marks for not listing the arcs of the tree explicitly, sometimes giving a list of nodes instead, or even simply numbering the top of the matrix with the order of selection followed by giving the weight of the tree only. There were occasional errors in the order of selection, for example sometimes EH and EJ were incorrectly interchanged, and other errors arose from the apparent application of a nearest neighbour approach resulting in a route rather than a tree. In (b), most candidates were able to write down the weight of the MST correctly, even some who had made errors in Prims and the vast majority were able to draw the tree correctly in part (c).
Key points from the mark scheme and examiner's report
241 miles
June 2024 · Paper 3D (Decision 1) · Q2(c)1 mark
Mark scheme (whole question; this part is marked with the orange bar)
Examiner's comment
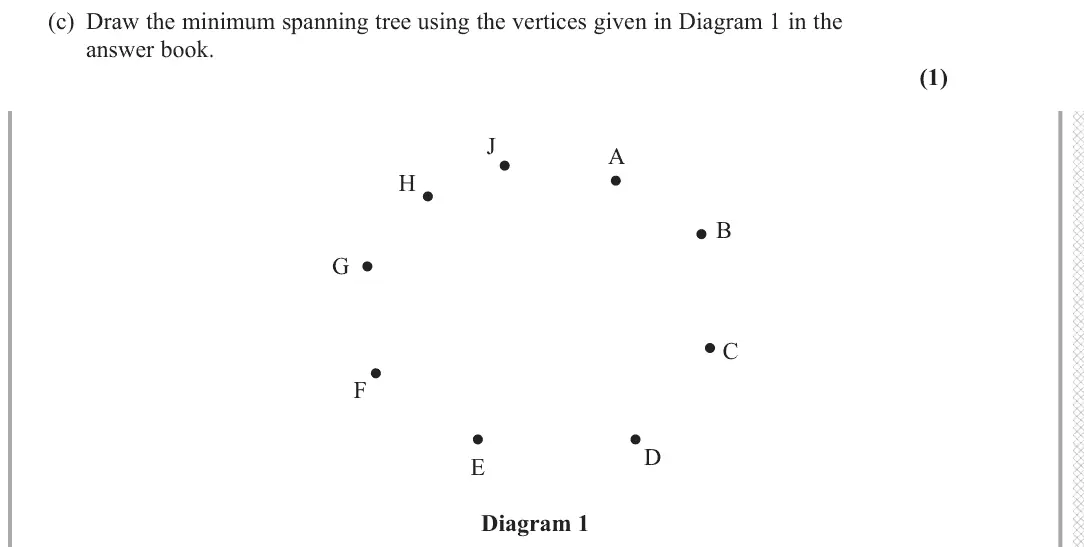
Parts (a), (b) and (c) were generally well approached and it was clear that many candidates understood how to apply Prim’s algorithm. There were a small number of responses which chose to start the Prim's at a node other than D, but they were rare. Some candidates lost marks for not listing the arcs of the tree explicitly, sometimes giving a list of nodes instead, or even simply numbering the top of the matrix with the order of selection followed by giving the weight of the tree only. There were occasional errors in the order of selection, for example sometimes EH and EJ were incorrectly interchanged, and other errors arose from the apparent application of a nearest neighbour approach resulting in a route rather than a tree. In (b), most errors in Prims and the vast majority were able to draw the tree correctly in part (c).
Key points from the mark scheme and examiner's report
draw the tree DE, AD, EH, EJ, CD, BC, GH, CF on Diagram 1
June 2024 · Paper 3D (Decision 1) · Q3(a)5 marks
Mark scheme (whole question; this part is marked with the orange bar)
Examiner's comment
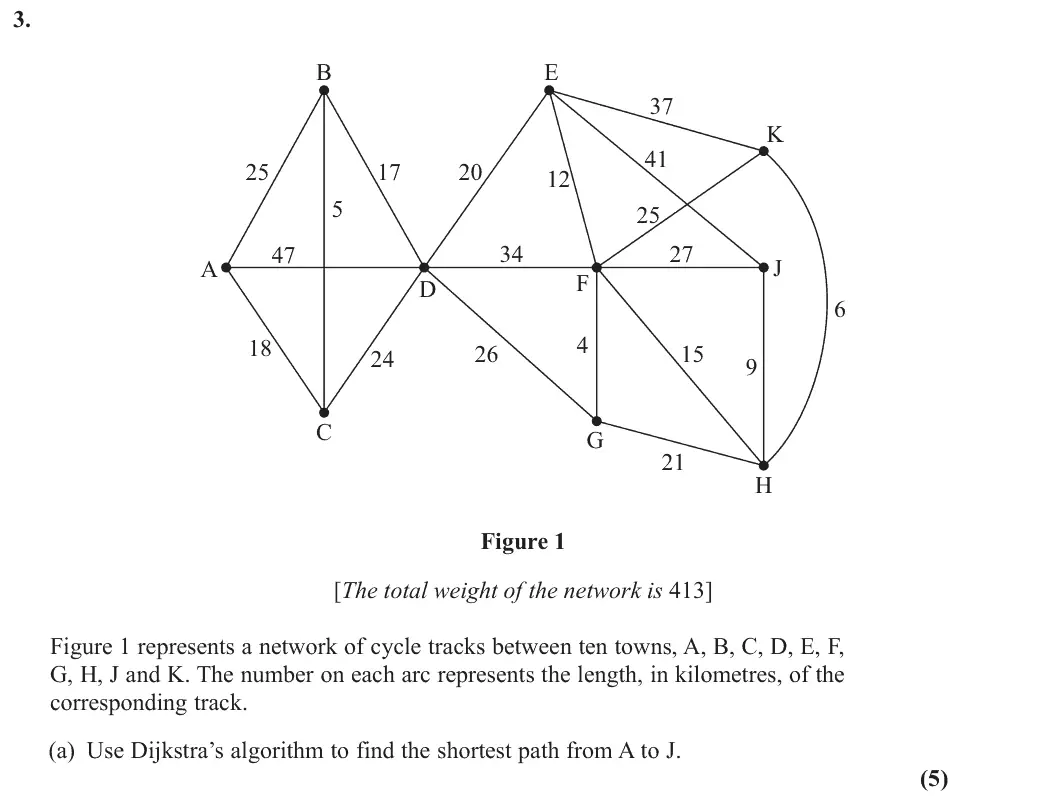
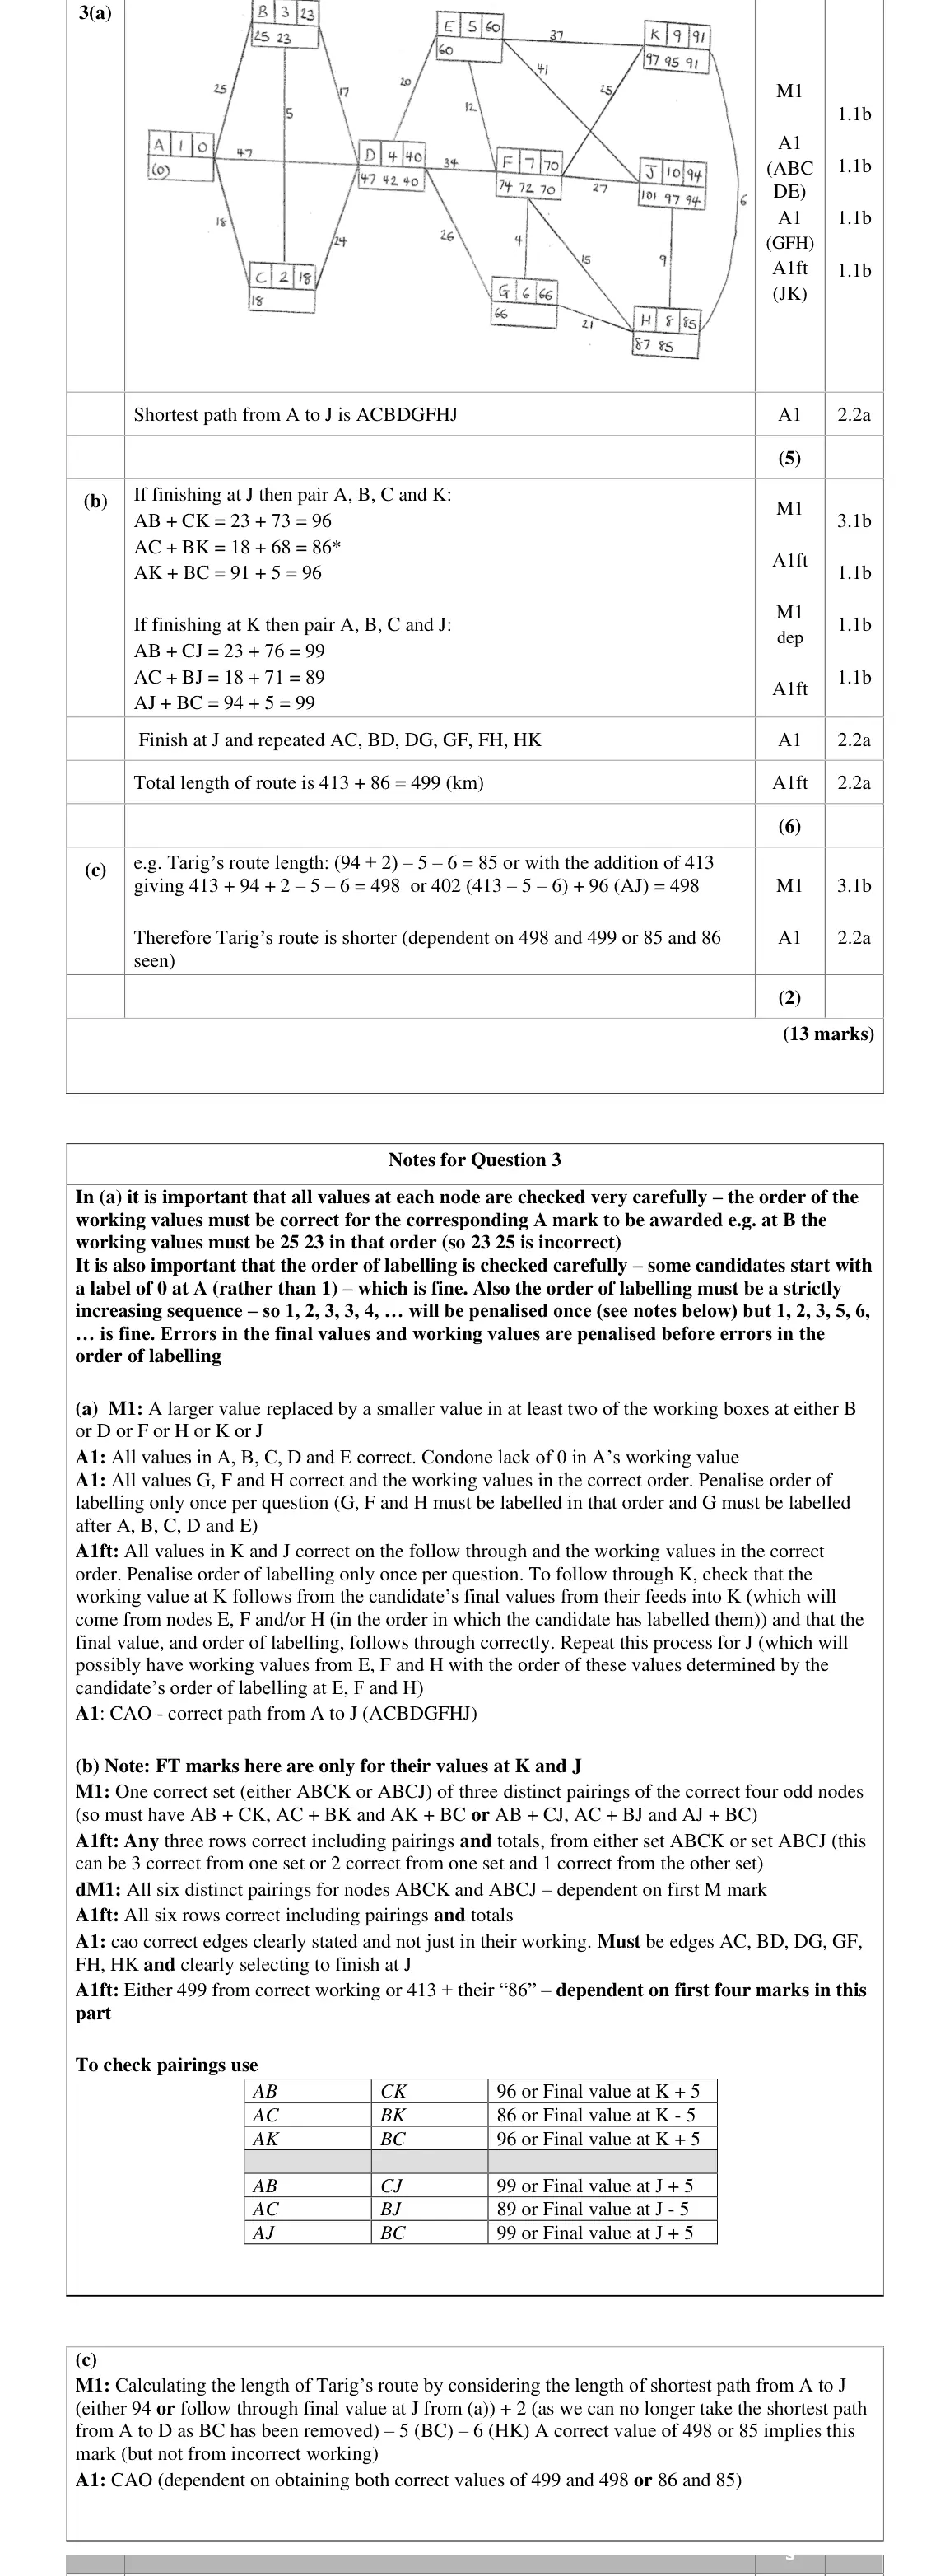
In part (a) Dijsktra’s algorithm was applied successfully by the majority of candidates. The usual errors were seen including missing working values, errors in the order of working values, occasional errors in order of labelling and occasional arithmetical errors. However, errors seemed to be perhaps less common that in recent series. A common error was a final value of 87 at H resulting in 93 at K and 96 at J. A small number of responses labelled their working values with the node from which it had come, which was acceptable. Sometimes candidates misunderstood what was being asked for the final mark in a) and gave the length of the shortest path rather than the shortest path itself. A common error here was the omission of C, resulting in an incorrect shortest path ABDGFHJ.
Key points from the mark scheme and examiner's report
ACBDGFHJ, 94 km
working values in order (B: 25 23)
C often omitted from the path
final value 87 at H was a common error
June 2023 · AS Paper 2 (Decision 1) · Q3(a)1 mark
Mark scheme (whole question; this part is marked with the orange bar)
Examiner's comment
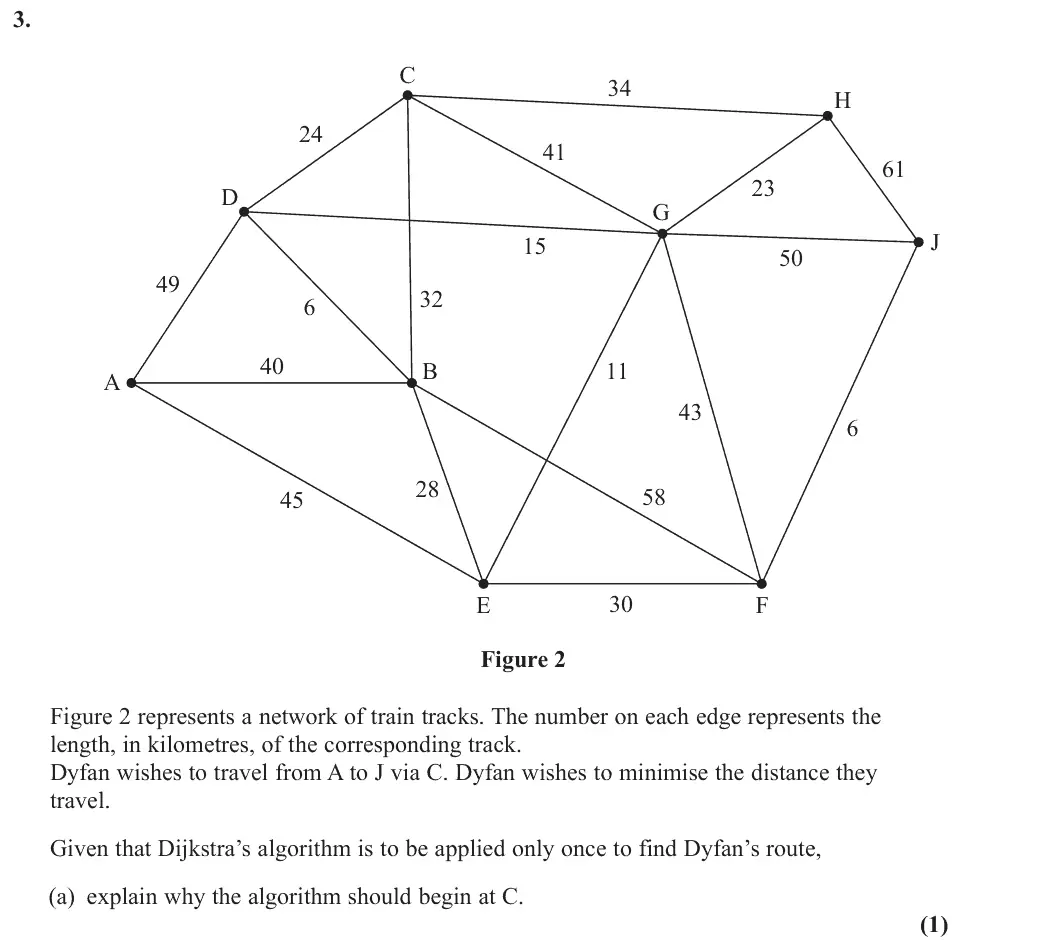
In part (a) candidates were asked to explain why Dijkstra’s algorithm should begin at C (to find the route from A to J via C) and most candidates struggled with this part. Examiners commented that it was very rare for candidates to state that as Dijkstra’s algorithm only finds the shortest path from a given starting node to all other nodes (in the network) therefore, if the shortest route from A to J via C is required, then this is equivalent to finding the shortest paths from C to A and C to J and so therefore (as C is common to both paths) then this is where the algorithm should begin. It was disappointing therefore in part (b) that almost half the candidates applied Dijkstra’s from A, even though part (a) had told them it should begin at C. Those that did apply Dijkstra’s from A could score at most three of the six marks available. Many candidates, who did start at C, gained all six marks for correctly using Dijkstra’s algorithm, though errors were often seen in the order of labelling. There were a few isolated scripts with just one working value at every vertex, which scored no marks. In part (c) many candidates did apply Prim’s algorithm correctly
Key points from the mark scheme and examiner's report
Dijkstra finds shortest paths from one start vertex to all others, so starting at C gives both C to A and C to J in one application
very rarely explained
June 2023 · AS Paper 2 (Decision 1) · Q3(b)6 marks
Mark scheme (whole question; this part is marked with the orange bar)
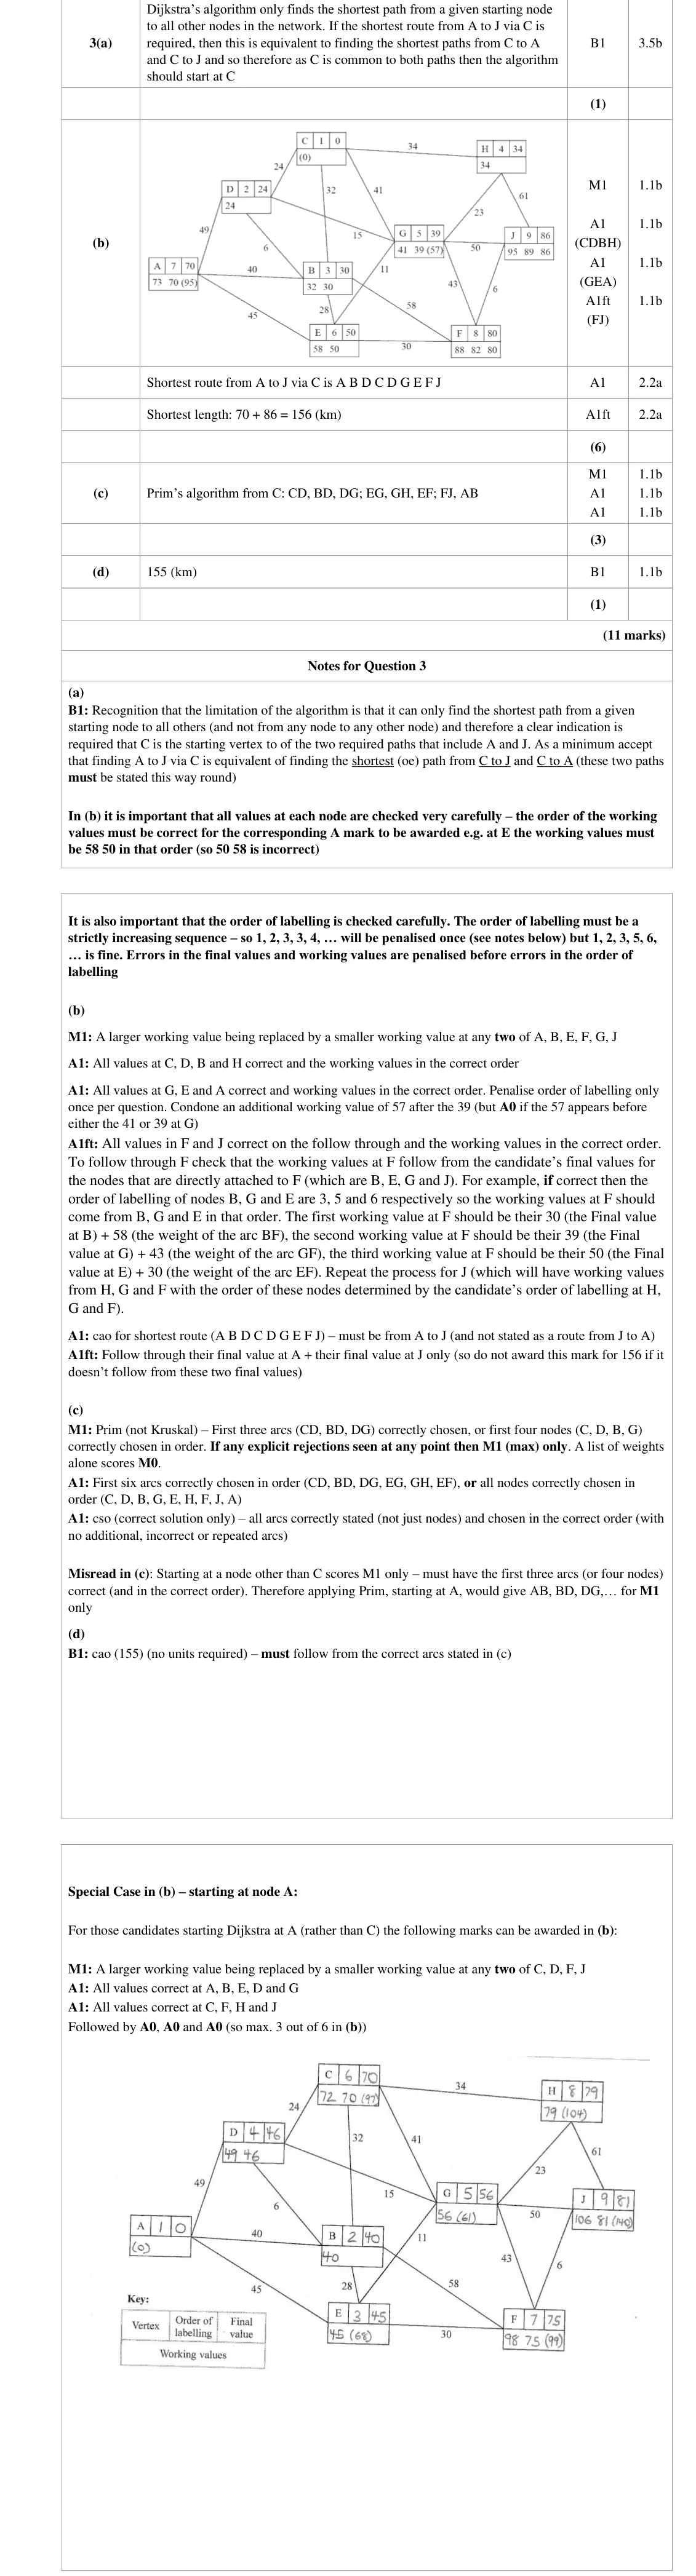
Examiner's comment
It was disappointing therefore in part (b) that almost half the candidates applied Dijkstra’s from A, even though part (a) had told them it should begin at C. Those that did apply Dijkstra’s from
Key points from the mark scheme and examiner's report
start at C: route A B D C D G E F J, length 70 + 86 = 156 km
almost half started at A (max 3/6)
labelling order errors
June 2023 · AS Paper 2 (Decision 1) · Q3(c)3 marks
Mark scheme (whole question; this part is marked with the orange bar)
Examiner's comment
vertex, which scored no marks. In part (c) many candidates did apply Prim’s algorithm correctly (from C) but it was common to see candidates scoring only one mark in this part for explicitly rejecting arcs (by design Prim’s algorithm grows in a connected fashion by only considering nodes that are not already part of the MST and therefore cycles are never formed (and therefore there is no need to ‘reject’ arcs)). Those candidates who had found the correct MST usually went on to score the mark in part (d) for stating its total length.
Key points from the mark scheme and examiner's report
from C: CD, BD, DG, EG, GH, EF, FJ, AB
Prim never needs rejections, explicit rejections cap the score at M1
June 2023 · AS Paper 2 (Decision 1) · Q3(d)1 mark
Mark scheme (whole question; this part is marked with the orange bar)
Examiner's comment
went on to score the mark in part (d) for stating its total length.
Key points from the mark scheme and examiner's report
155 km
June 2023 · Paper 3D (Decision 1) · Q1(e)1 mark
Mark scheme (whole question; this part is marked with the orange bar)
Examiner's comment
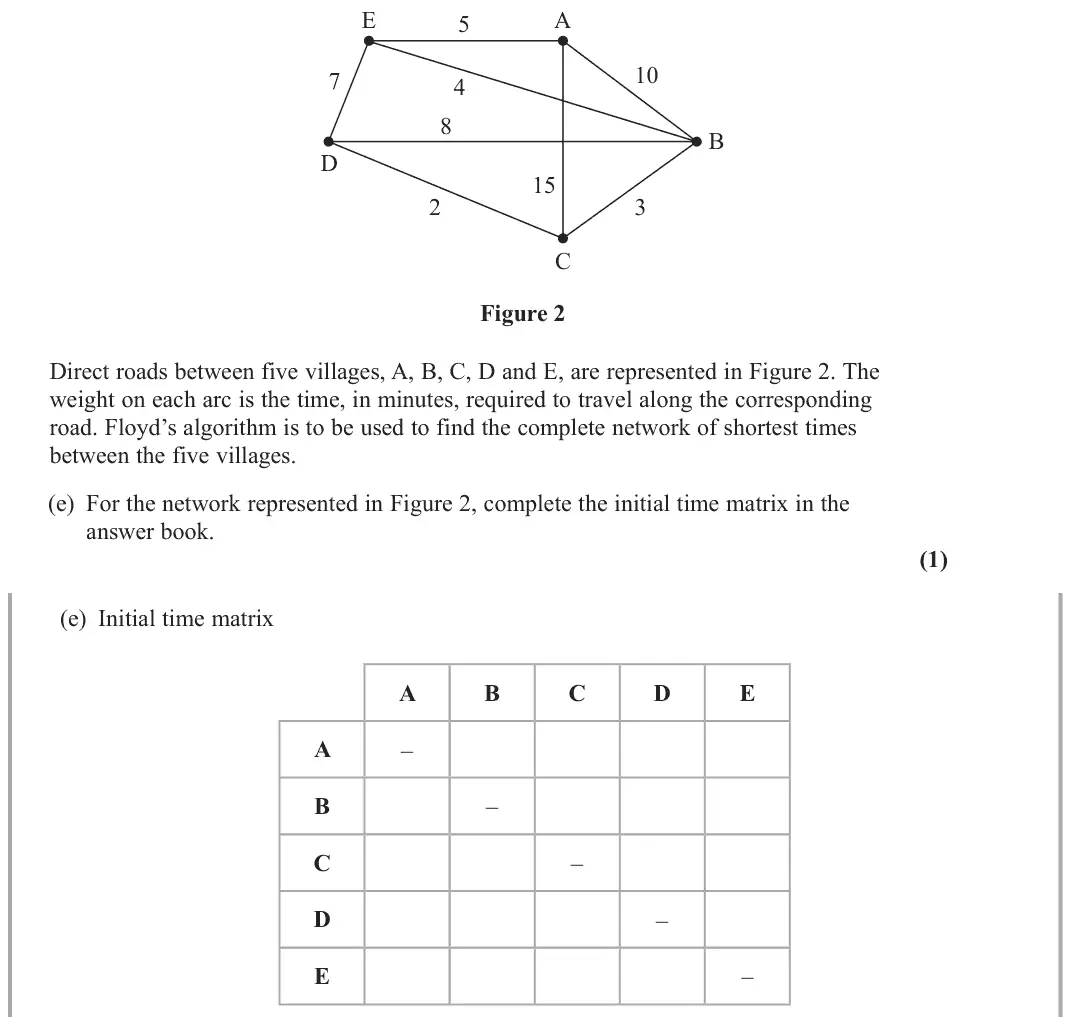
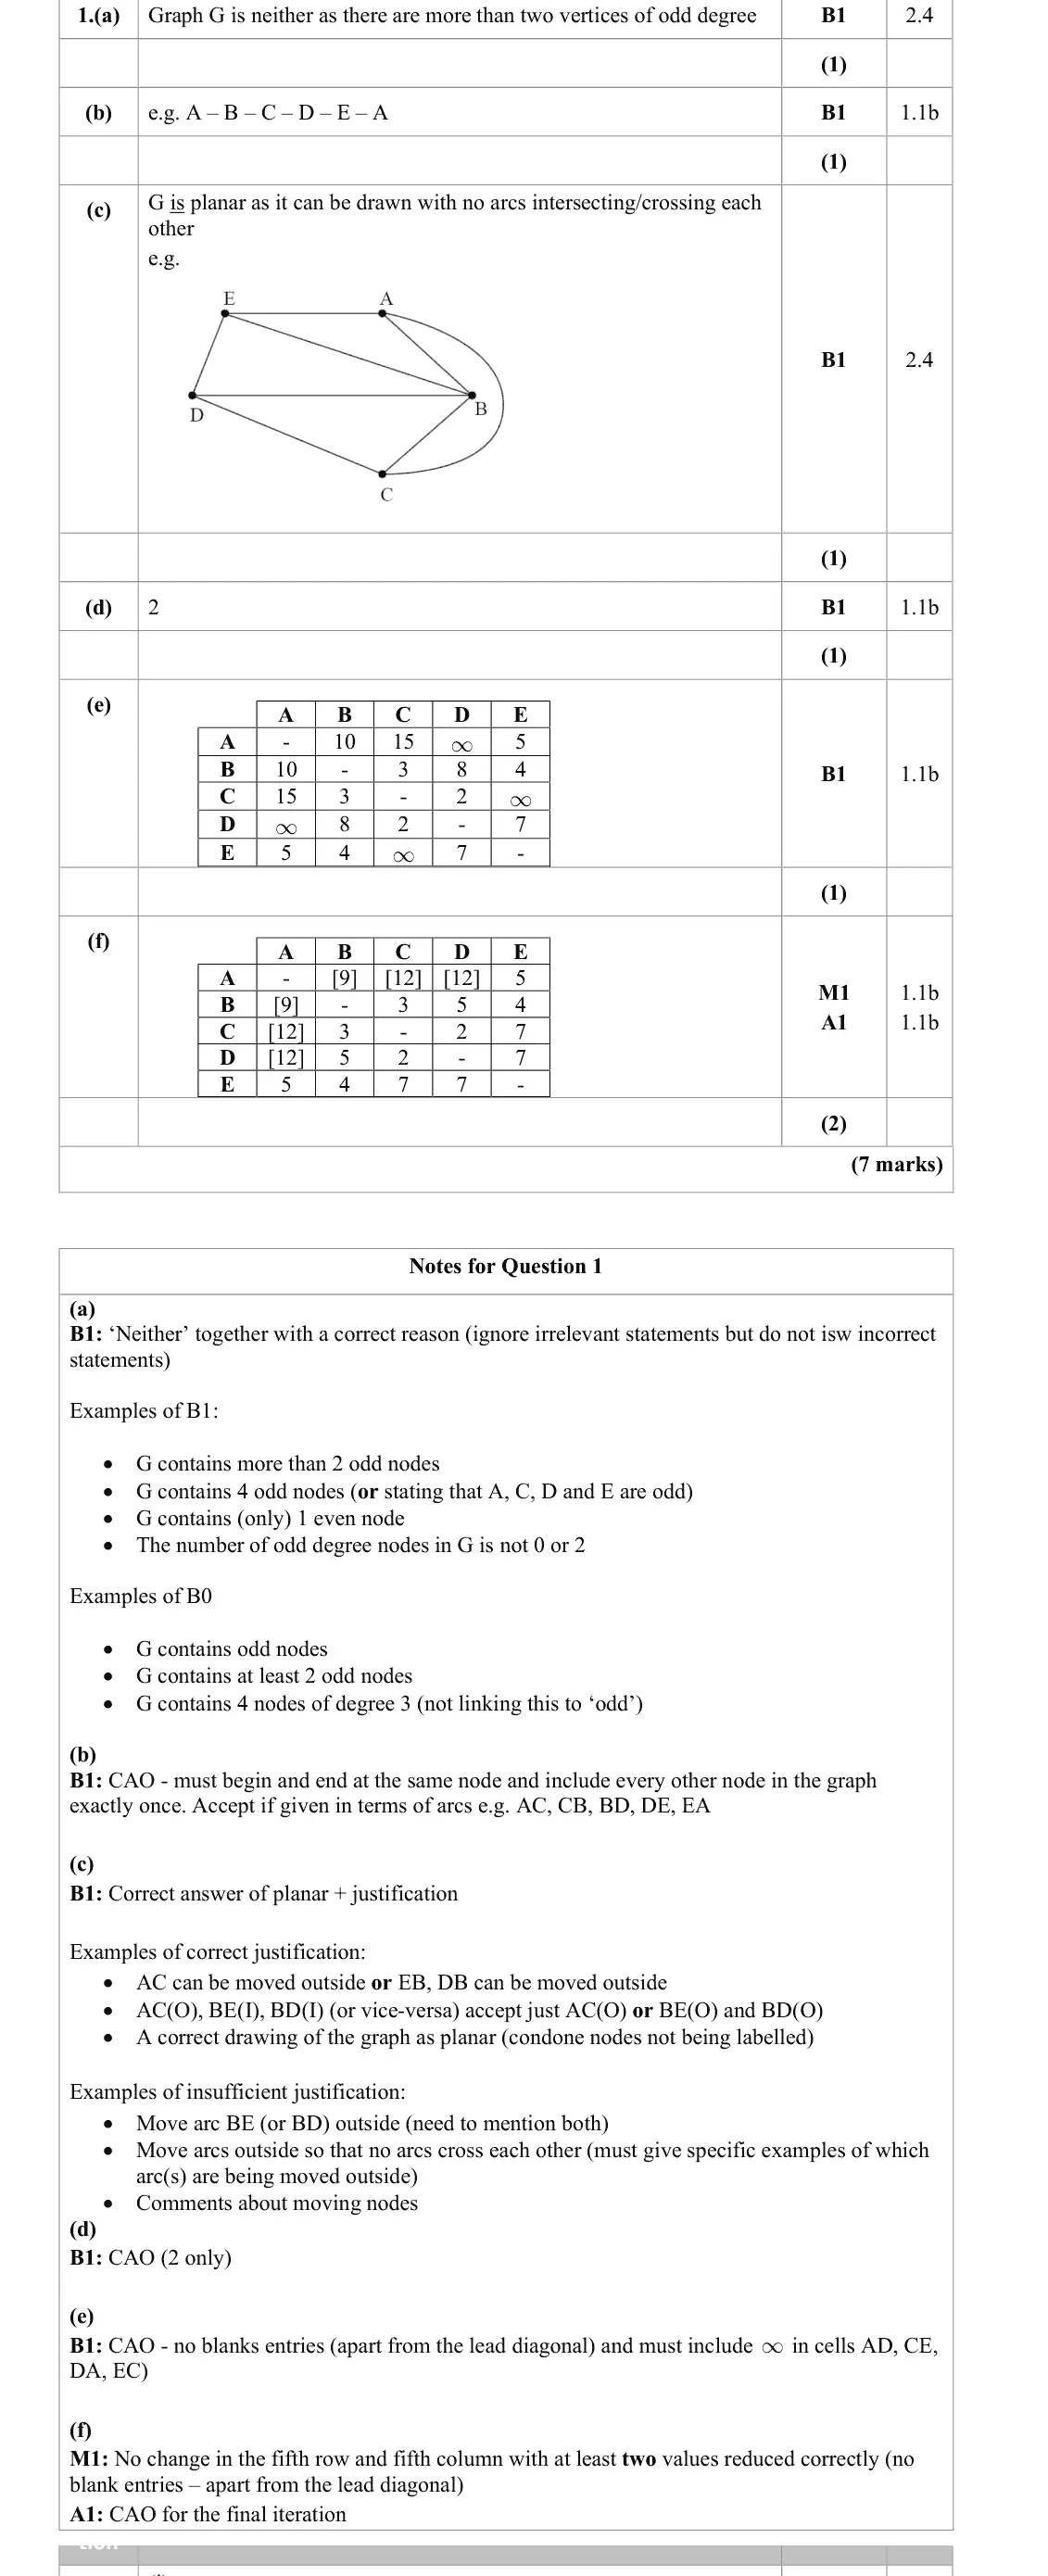
Examiners noted that very few incorrect answers were seen to part (e) but where they did it was usually a lack of infinity symbols (in cells AD, CE, DA and EC) or a simple slip on one or more of the values. Most candidates in the final part achieved full marks but some made simply arithmetical slips
Key points from the mark scheme and examiner's report
initial matrix from Figure 2 with ∞ in AD, CE, DA, EC
the blank matrix is in the answer book
June 2023 · Paper 3D (Decision 1) · Q1(f)2 marks
Mark scheme (whole question; this part is marked with the orange bar)
Examiner's comment
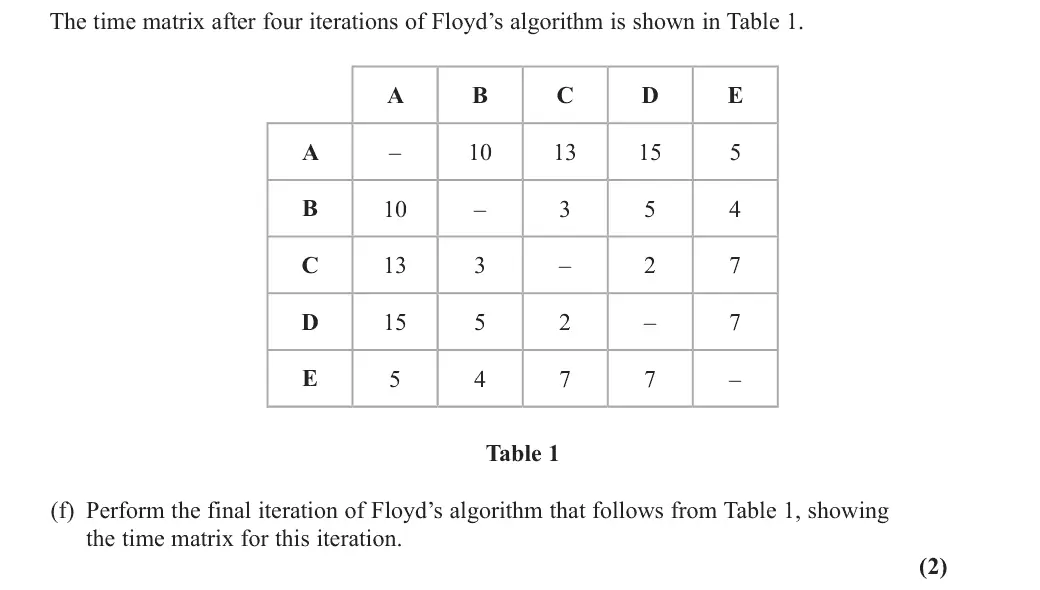
Most candidates in the final part achieved full marks but some made simply arithmetical slips (often having a 10 instead of 9 or a 13 instead of 12).
Key points from the mark scheme and examiner's report
5th iteration via E: row and column E unchanged
AB 9, AC 12, AD 12
slips gave 10 or 13
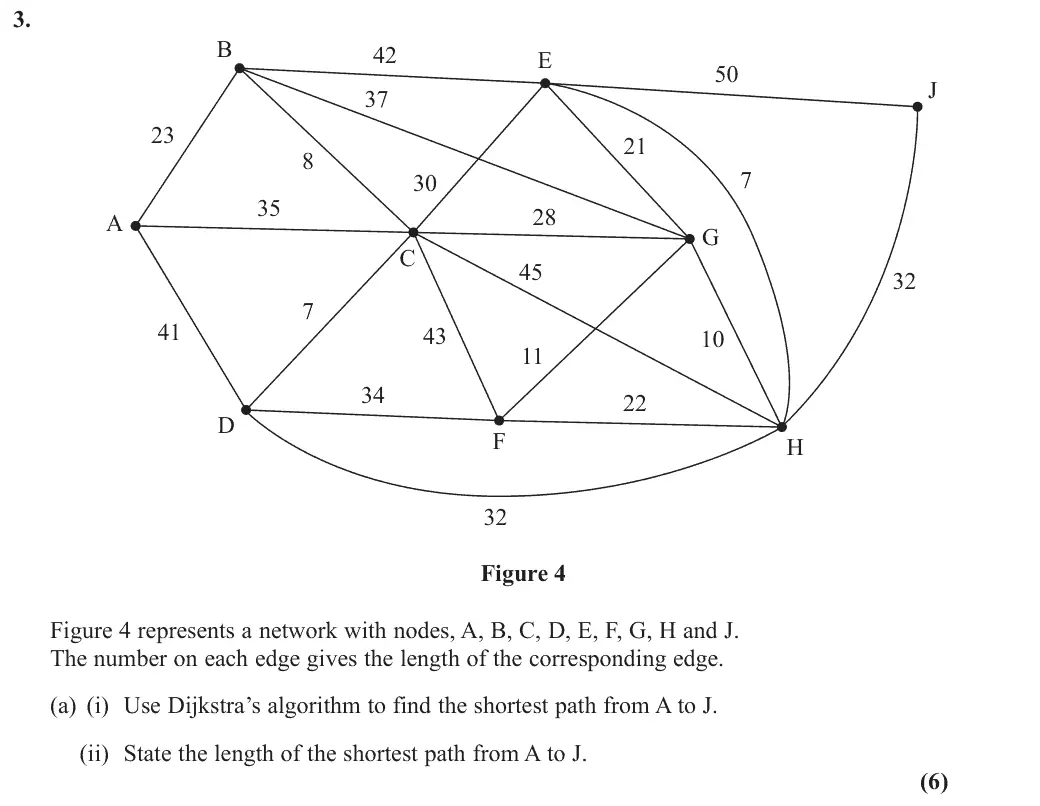
June 2023 · Paper 3D (Decision 1) · Q3(a)6 marks
Mark scheme (whole question; this part is marked with the orange bar)
Examiner's comment
Part (a) was generally well answered, with common errors being that not all attached nodes were updated every time a new node was considered. A few candidates, it would seem, still fill in the working values at the end of the process (leading to several errors), but nearly all showed the necessary replacement of working values (which is the key to this shortest path algorithm). The most common error was that node D was frequently overlooked when node C was the node being actively considered. There were very few issues with the order of labelling (of the nodes) reported by examiners. When applying Dijkstra’s algorithm, and specifically the updating of the working values, we cannot stress enough that candidates should never cross out any of their previous working values as it is often very difficult for these values to be read. It is vital that examiners can read these values as these alone provide the complete evidence that the algorithm has been applied correctly.
Key points from the mark scheme and examiner's report
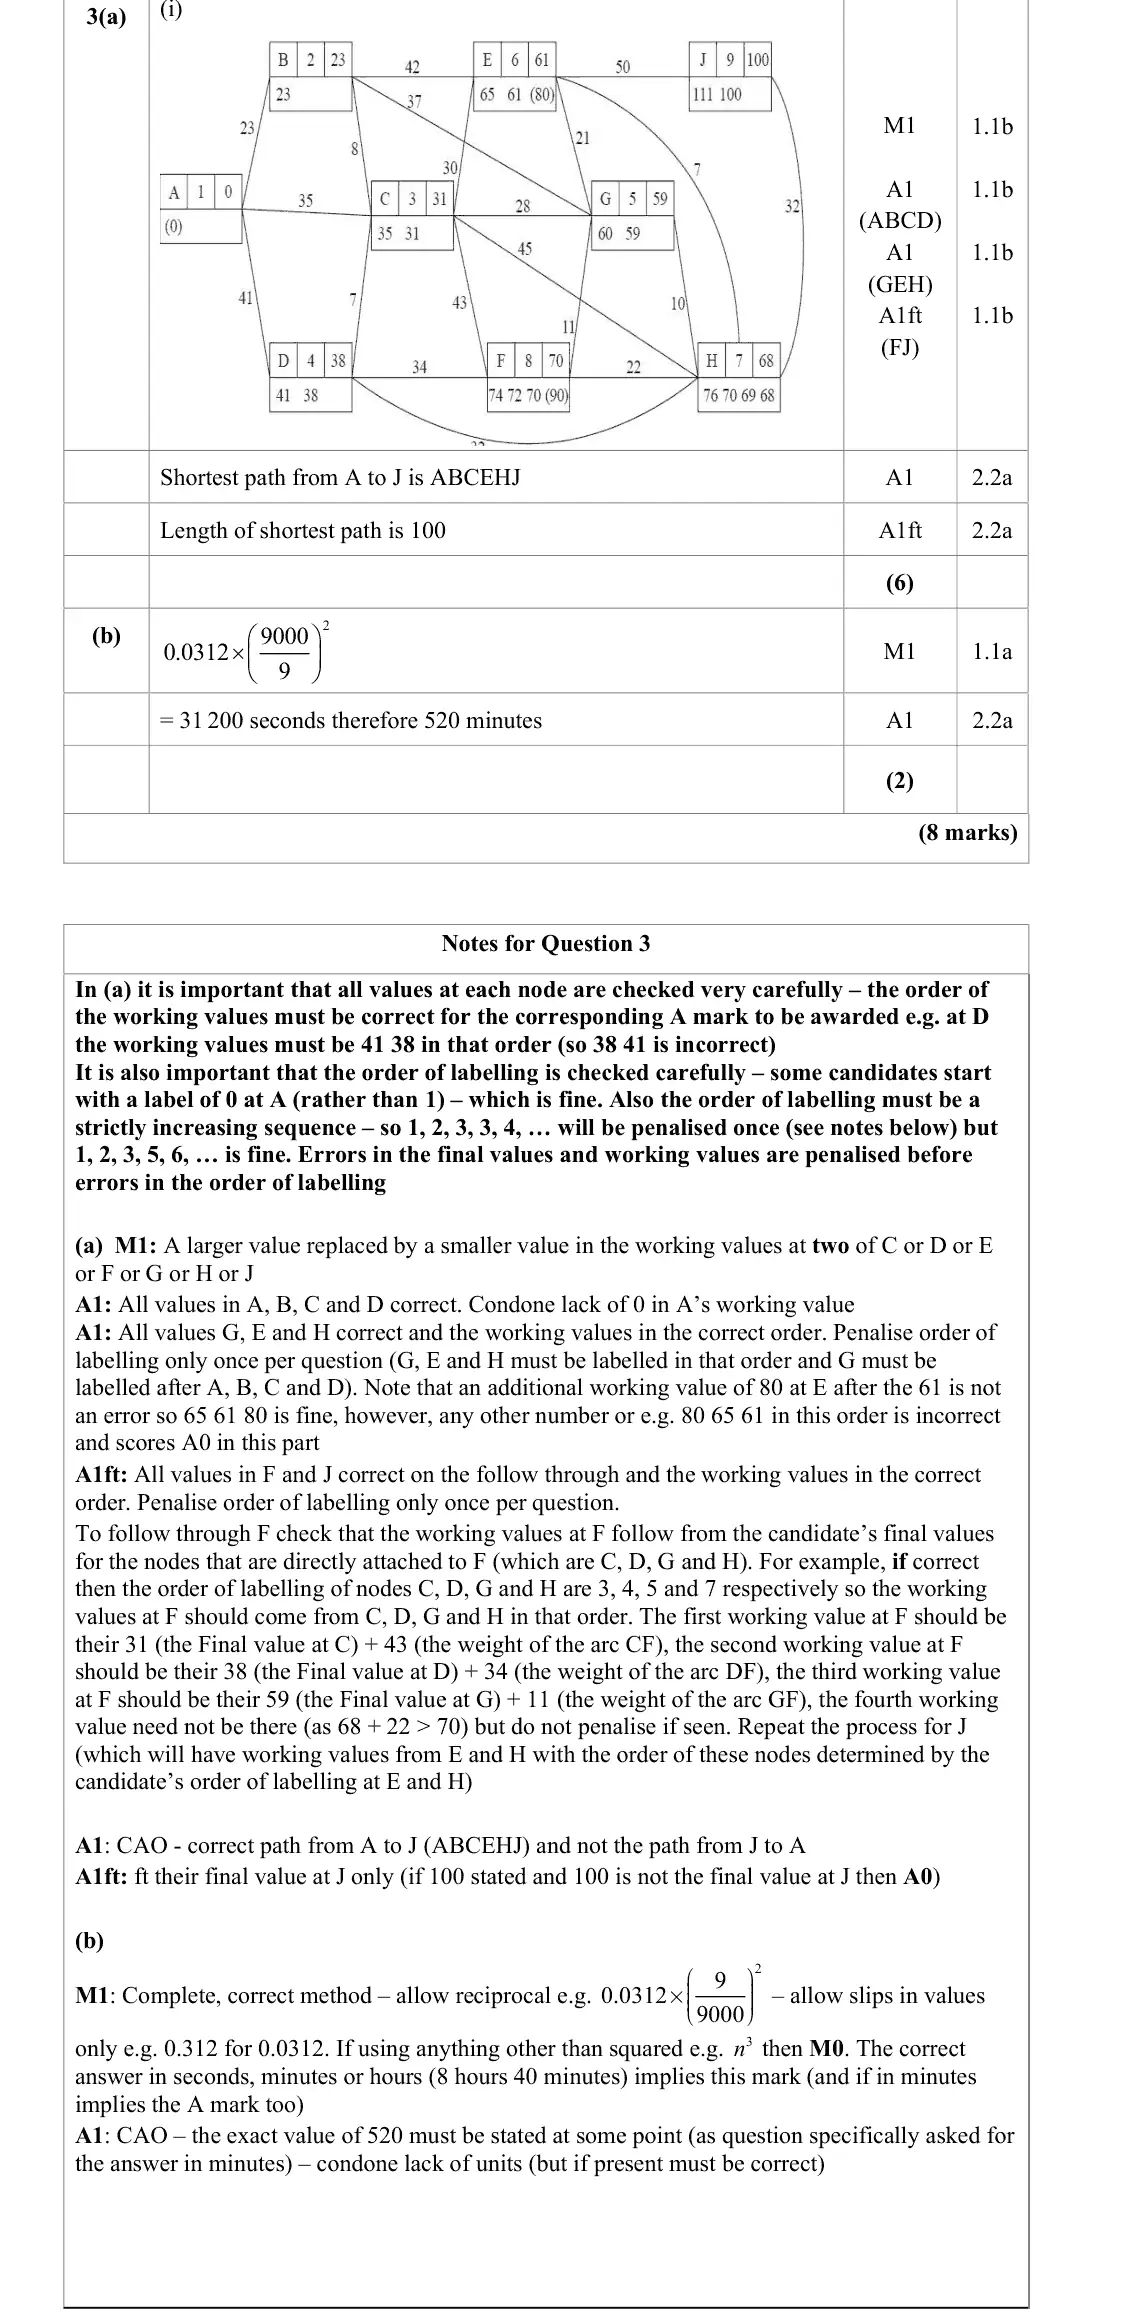
ABCEHJ, length 100
update every node joined to the newly labelled node (D often missed from C)
never cross out working values
working values in order
June 2023 · Paper 3D (Decision 1) · Q5(b)3 marks
Mark scheme (whole question; this part is marked with the orange bar)
Examiner's comment
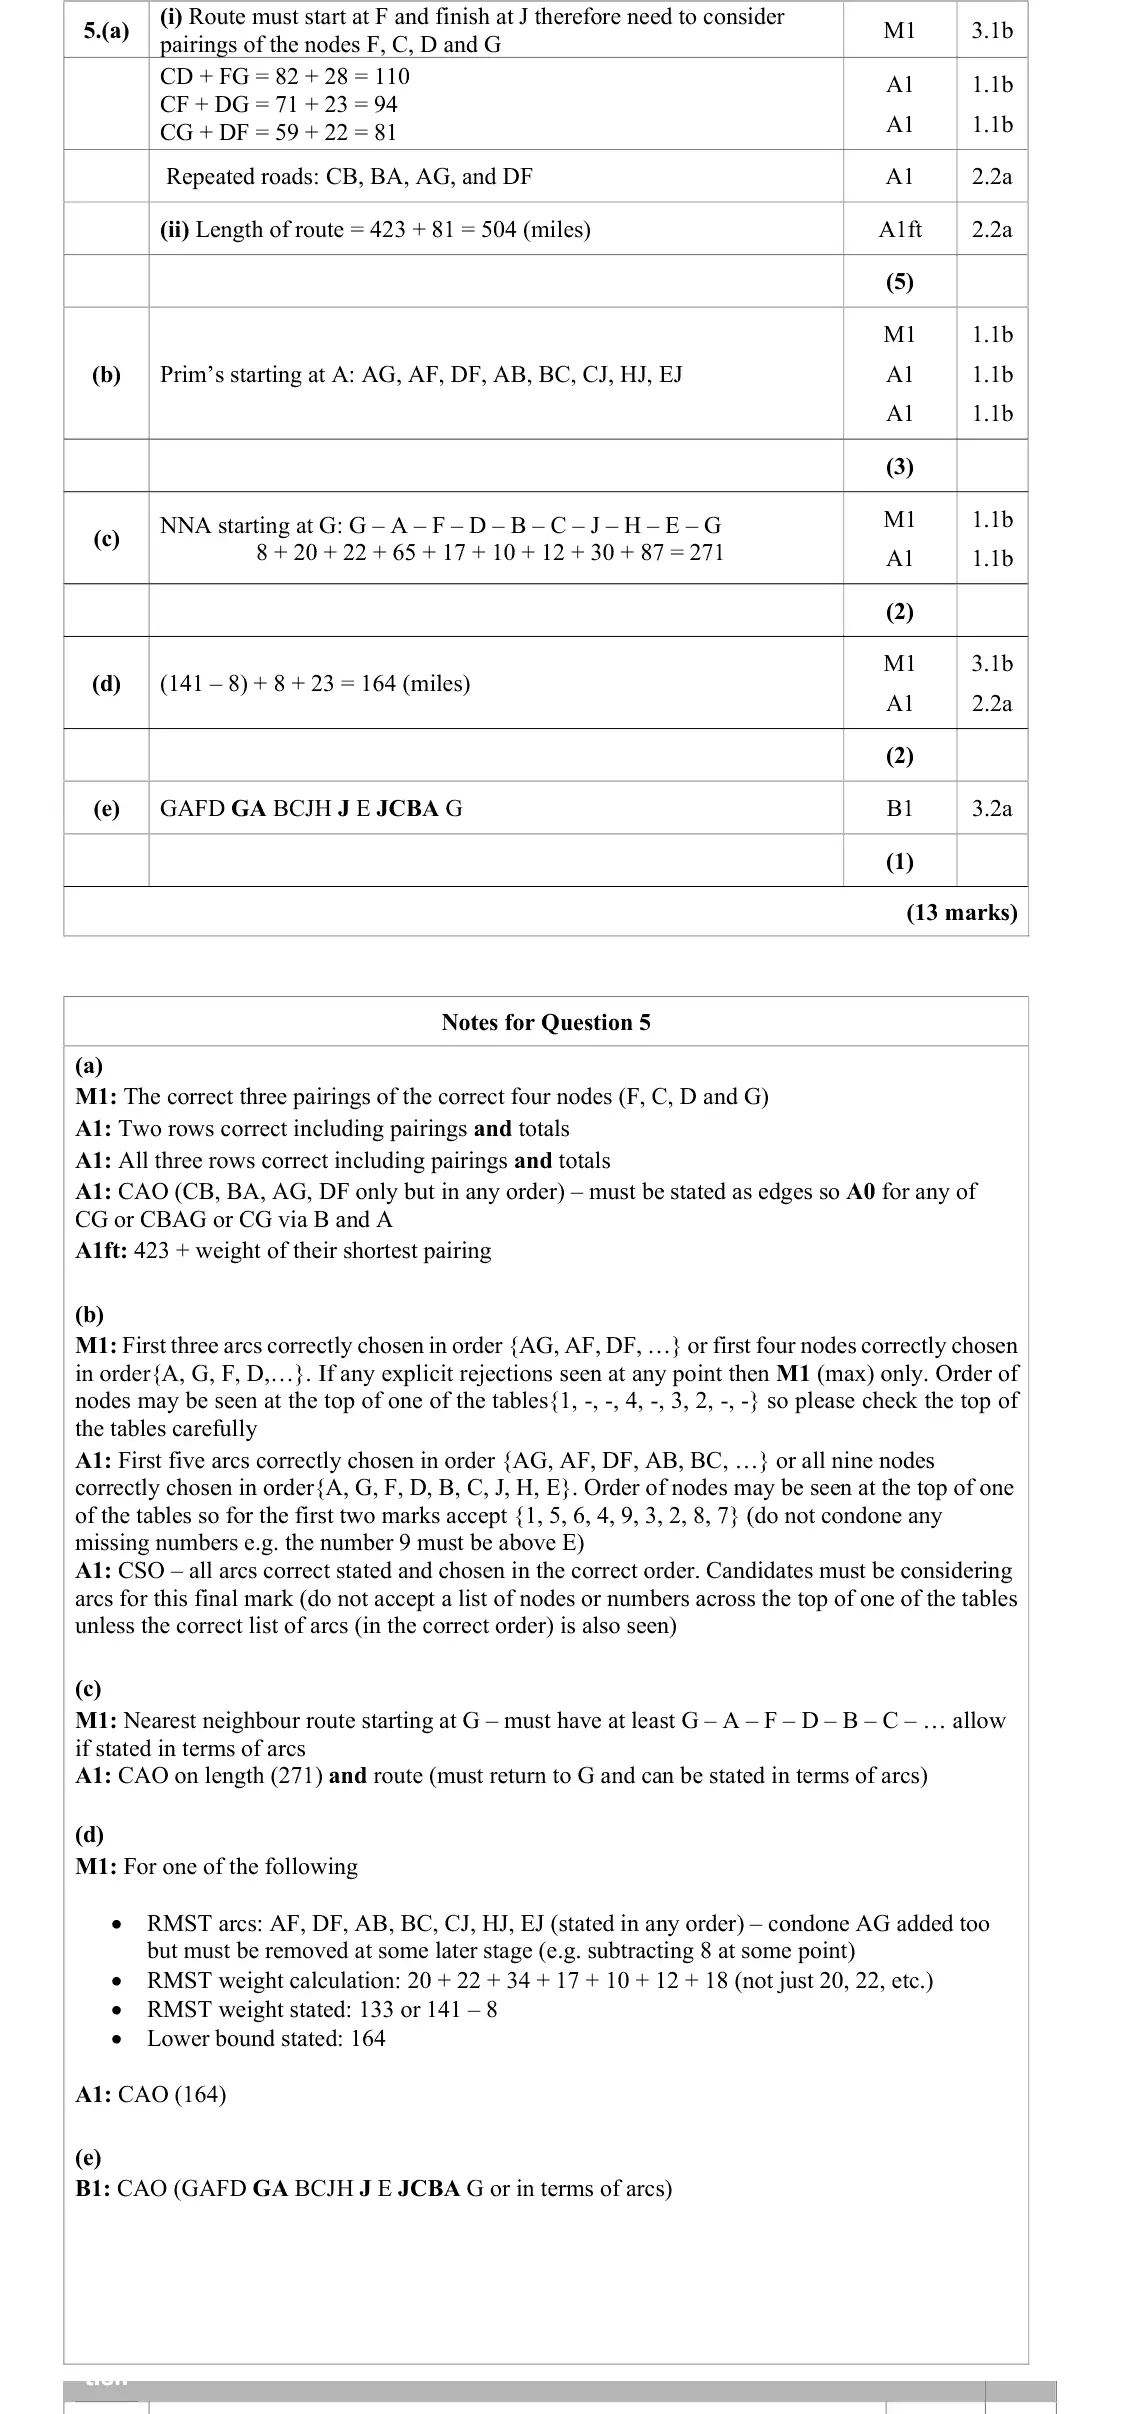
Part (b) was generally well answered, with a good number scoring full marks. Many candidates were able to accurately apply Prim’s algorithm, but some candidates worked solely on the table, and did not follow the instruction to state the order in which arcs were selected which lost them the final accuracy mark. A minority of candidates used a version of the Nearest Neighbour Algorithm to generate a spanning tree. Several candidates found the weight of their MST which was not required for part (b), although it could be used when finding the RMST later.
Key points from the mark scheme and examiner's report
Prim from A on the table: AG, AF, DF, AB, BC, CJ, HJ, EJ
state the arcs in order, not just numbers on the table
June 2022 · AS Paper 2 (Decision 1) · Q1(b)3 marks
Mark scheme (whole question; this part is marked with the orange bar)
Examiner's comment
Examiners commented on the fact that many fully complete and correct responses were seen to the sort to be completed in ascending order). In (b) (applying Kruskal’s algorithm) full marks was the modal score, though occasionally incorrect arcs were seen (or correct arcs seen but stated in the wrong order). A small minority failed to mention/show any rejections, therefore scoring no marks, as this is the key process when applying Kruskal’s algorithm. Some candidates wasted time writing our “reject, forms a cycle” several times, which is better abbreviated as simply ‘reject’. Occasionally Prim’s algorithm was used. In (c) those who had
Key points from the mark scheme and examiner's report
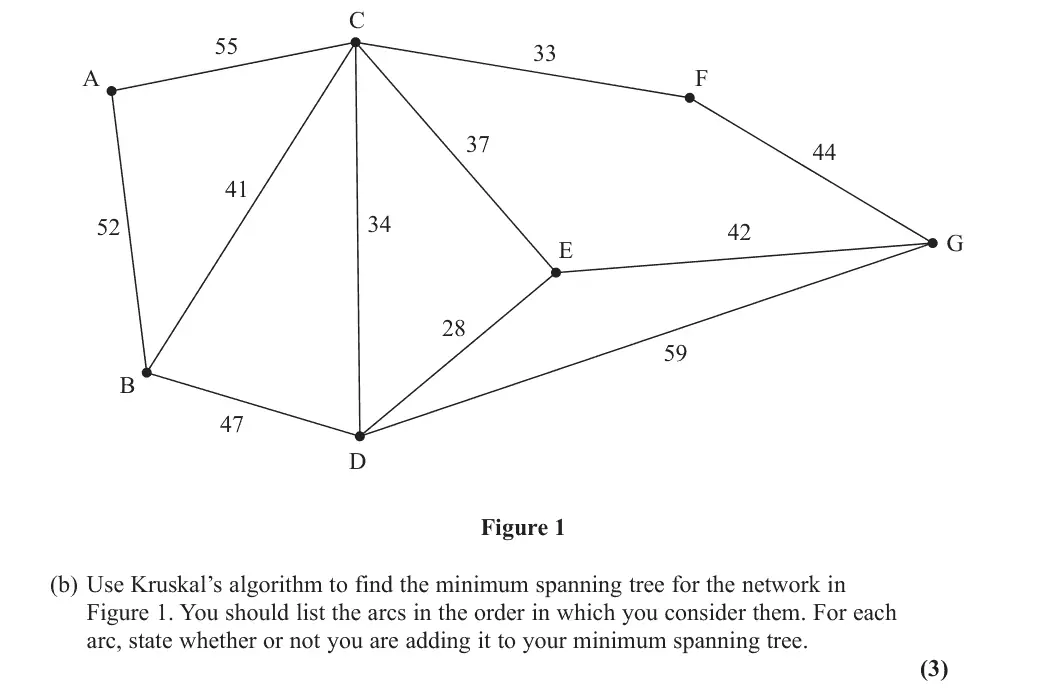
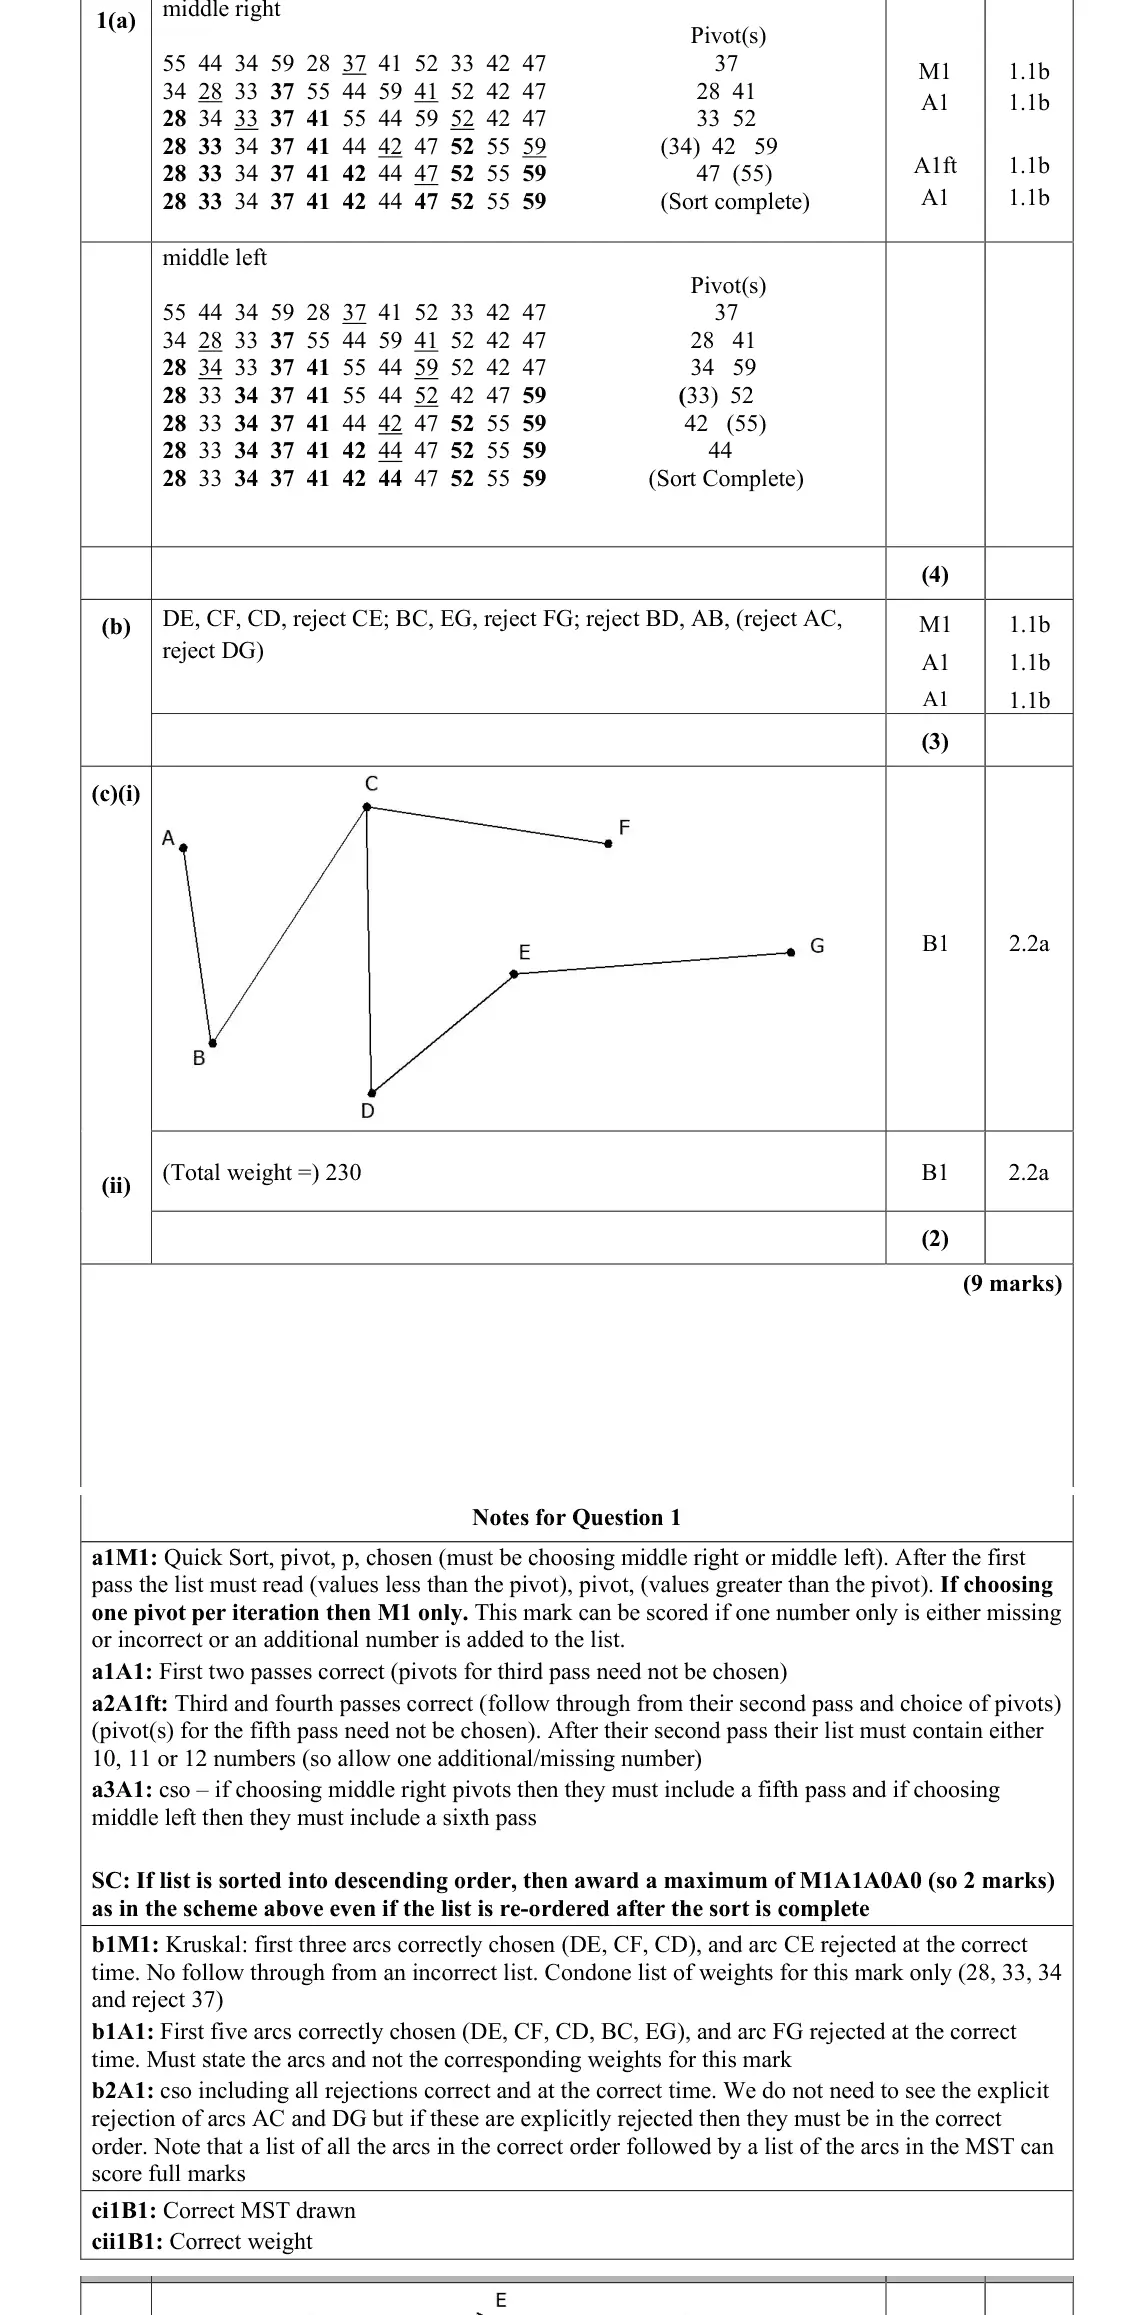
DE, CF, CD, reject CE, BC, EG, reject FG, reject BD, AB
rejections must be shown (none shown scores 0)
arcs not weights
Prim's occasionally used
June 2022 · AS Paper 2 (Decision 1) · Q1(c)2 marks
Mark scheme (whole question; this part is marked with the orange bar)
Examiner's comment
Examiners commented on the fact that many fully complete and correct responses were seen to abbreviated as simply ‘reject’. Occasionally Prim’s algorithm was used. In (c) those who had answered (b) correctly almost always scored both marks for the correct diagram and the correct total weight of the minimum spanning tree.
Key points from the mark scheme and examiner's report
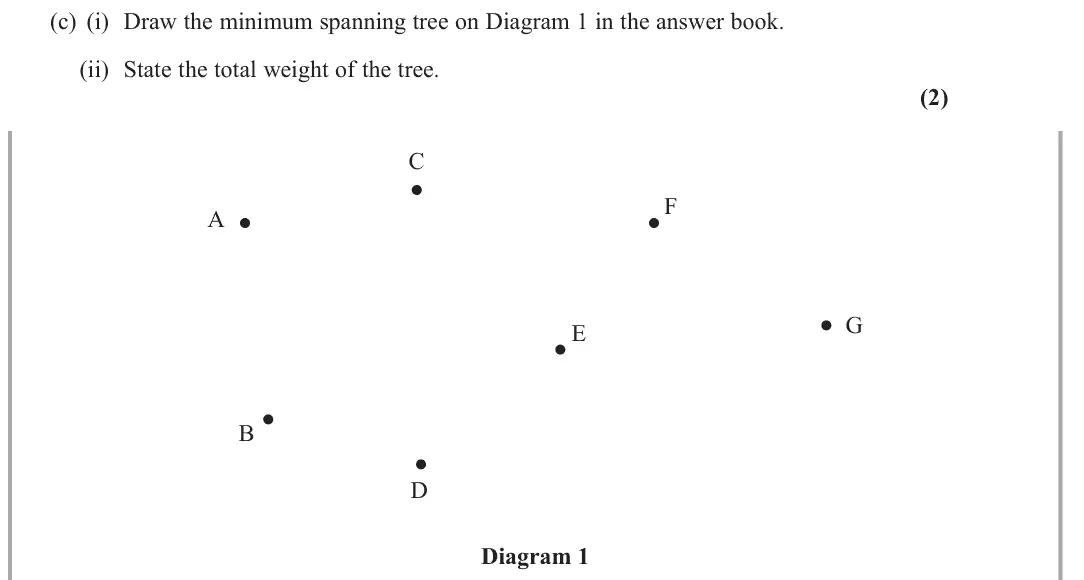
tree AB, BC, CF, CD, DE, EG
total weight 230
June 2022 · AS Paper 2 (Decision 1) · Q3(c)5 marks
Mark scheme (whole question; this part is marked with the orange bar)
Examiner's comment
correctly using Dijkstra’s algorithm in (c), though errors were often seen in the order of labelling. There were a few isolated scripts with just one working value at every vertex, which scored no marks. In (d) some candidates did recognise that it was necessary to use the route
Key points from the mark scheme and examiner's report
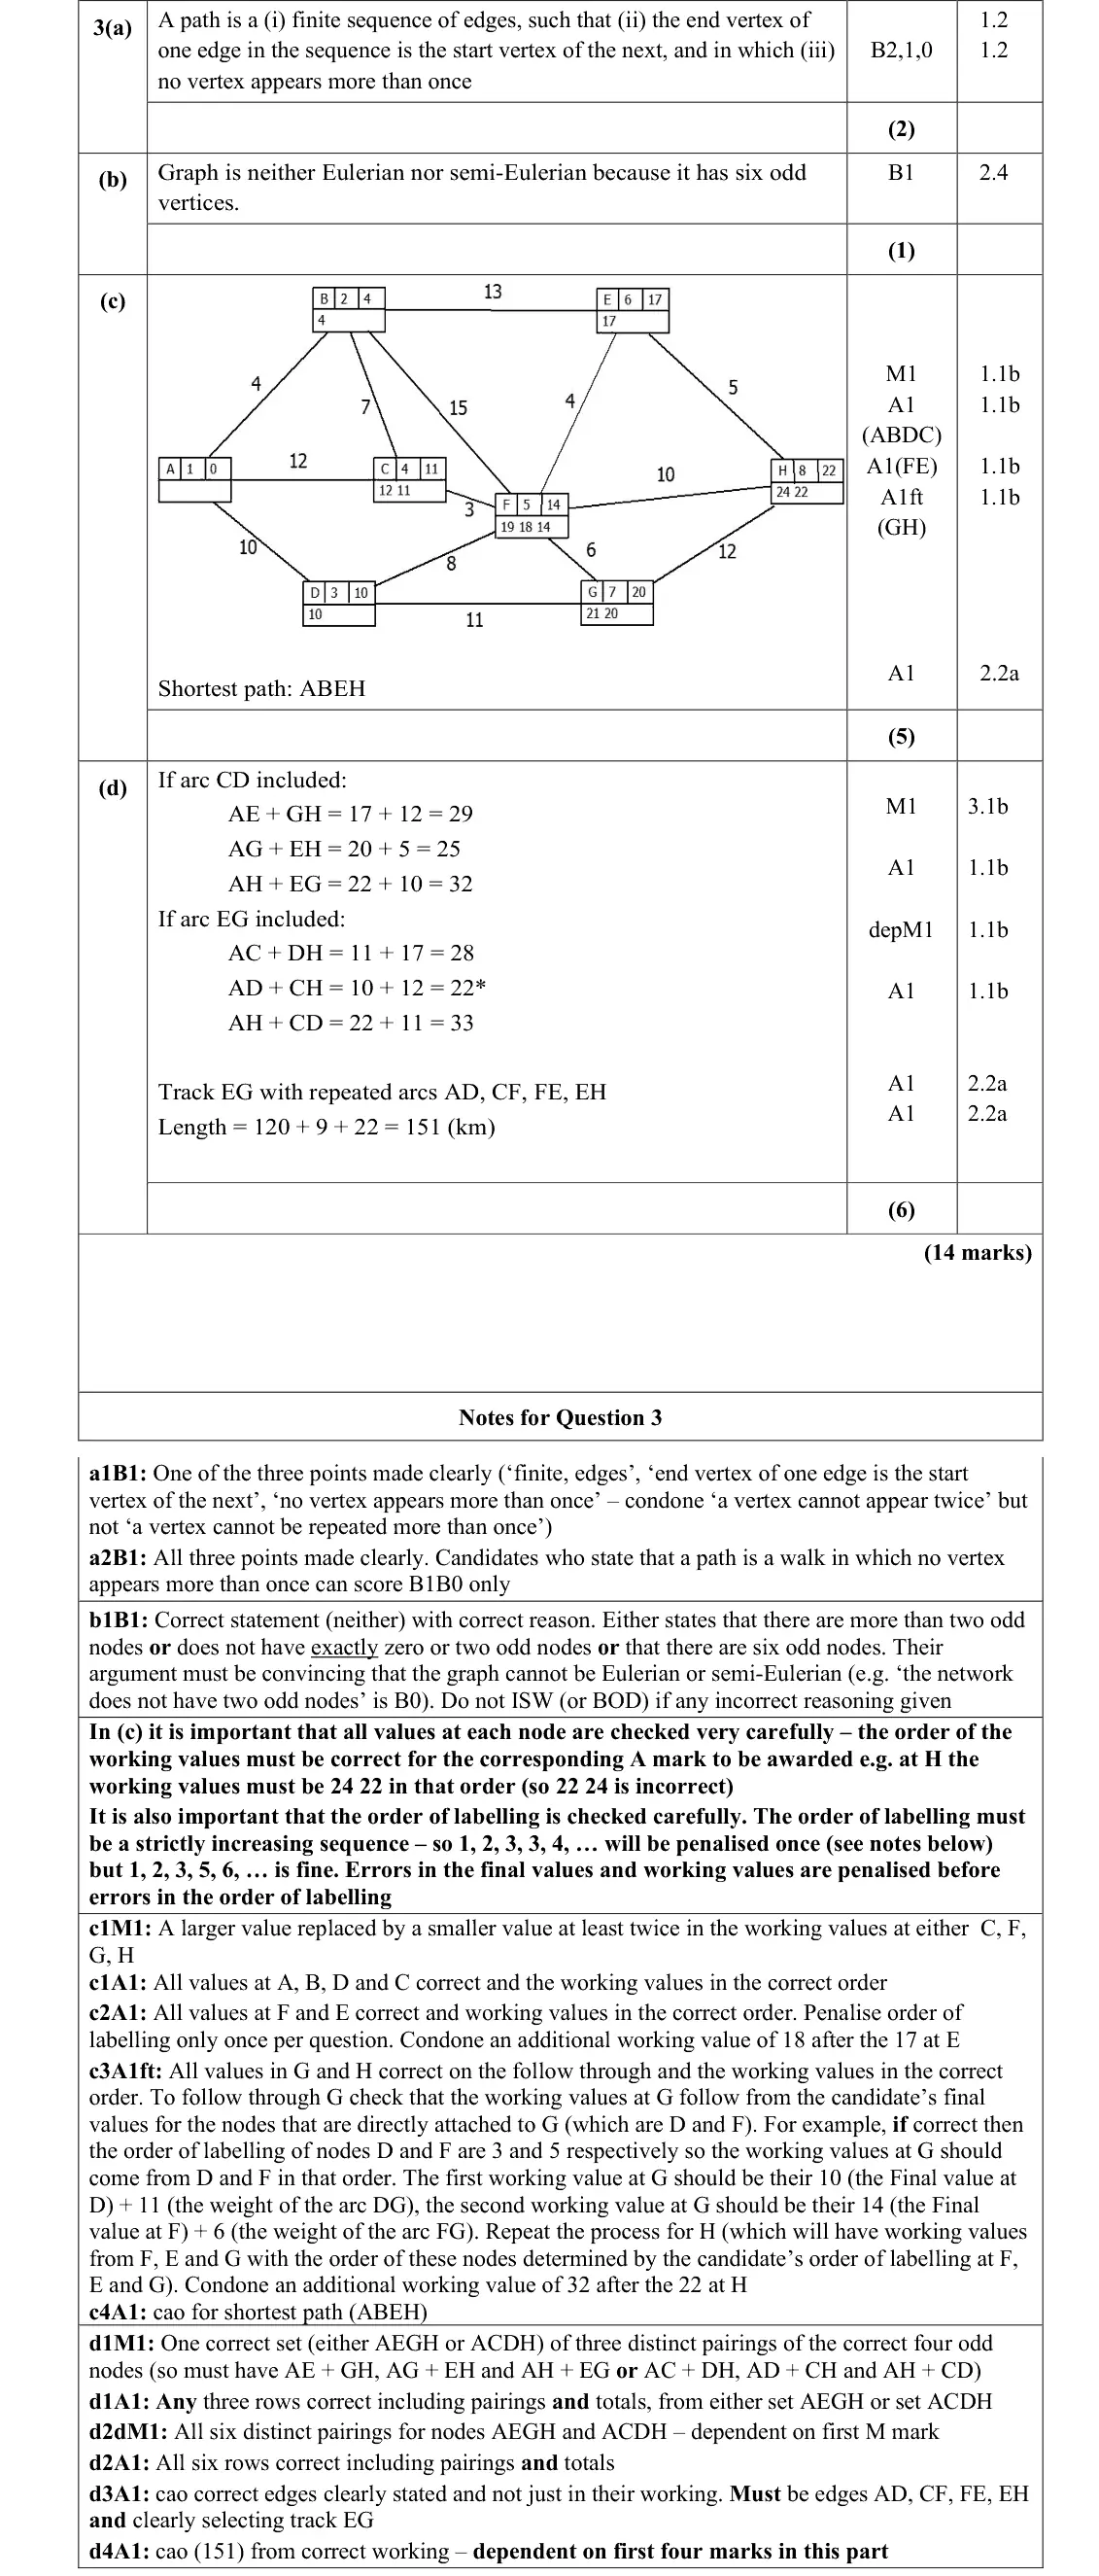
shortest path ABEH, length 22 km
working values in the correct order (24 22 at H)
labelling order errors were common
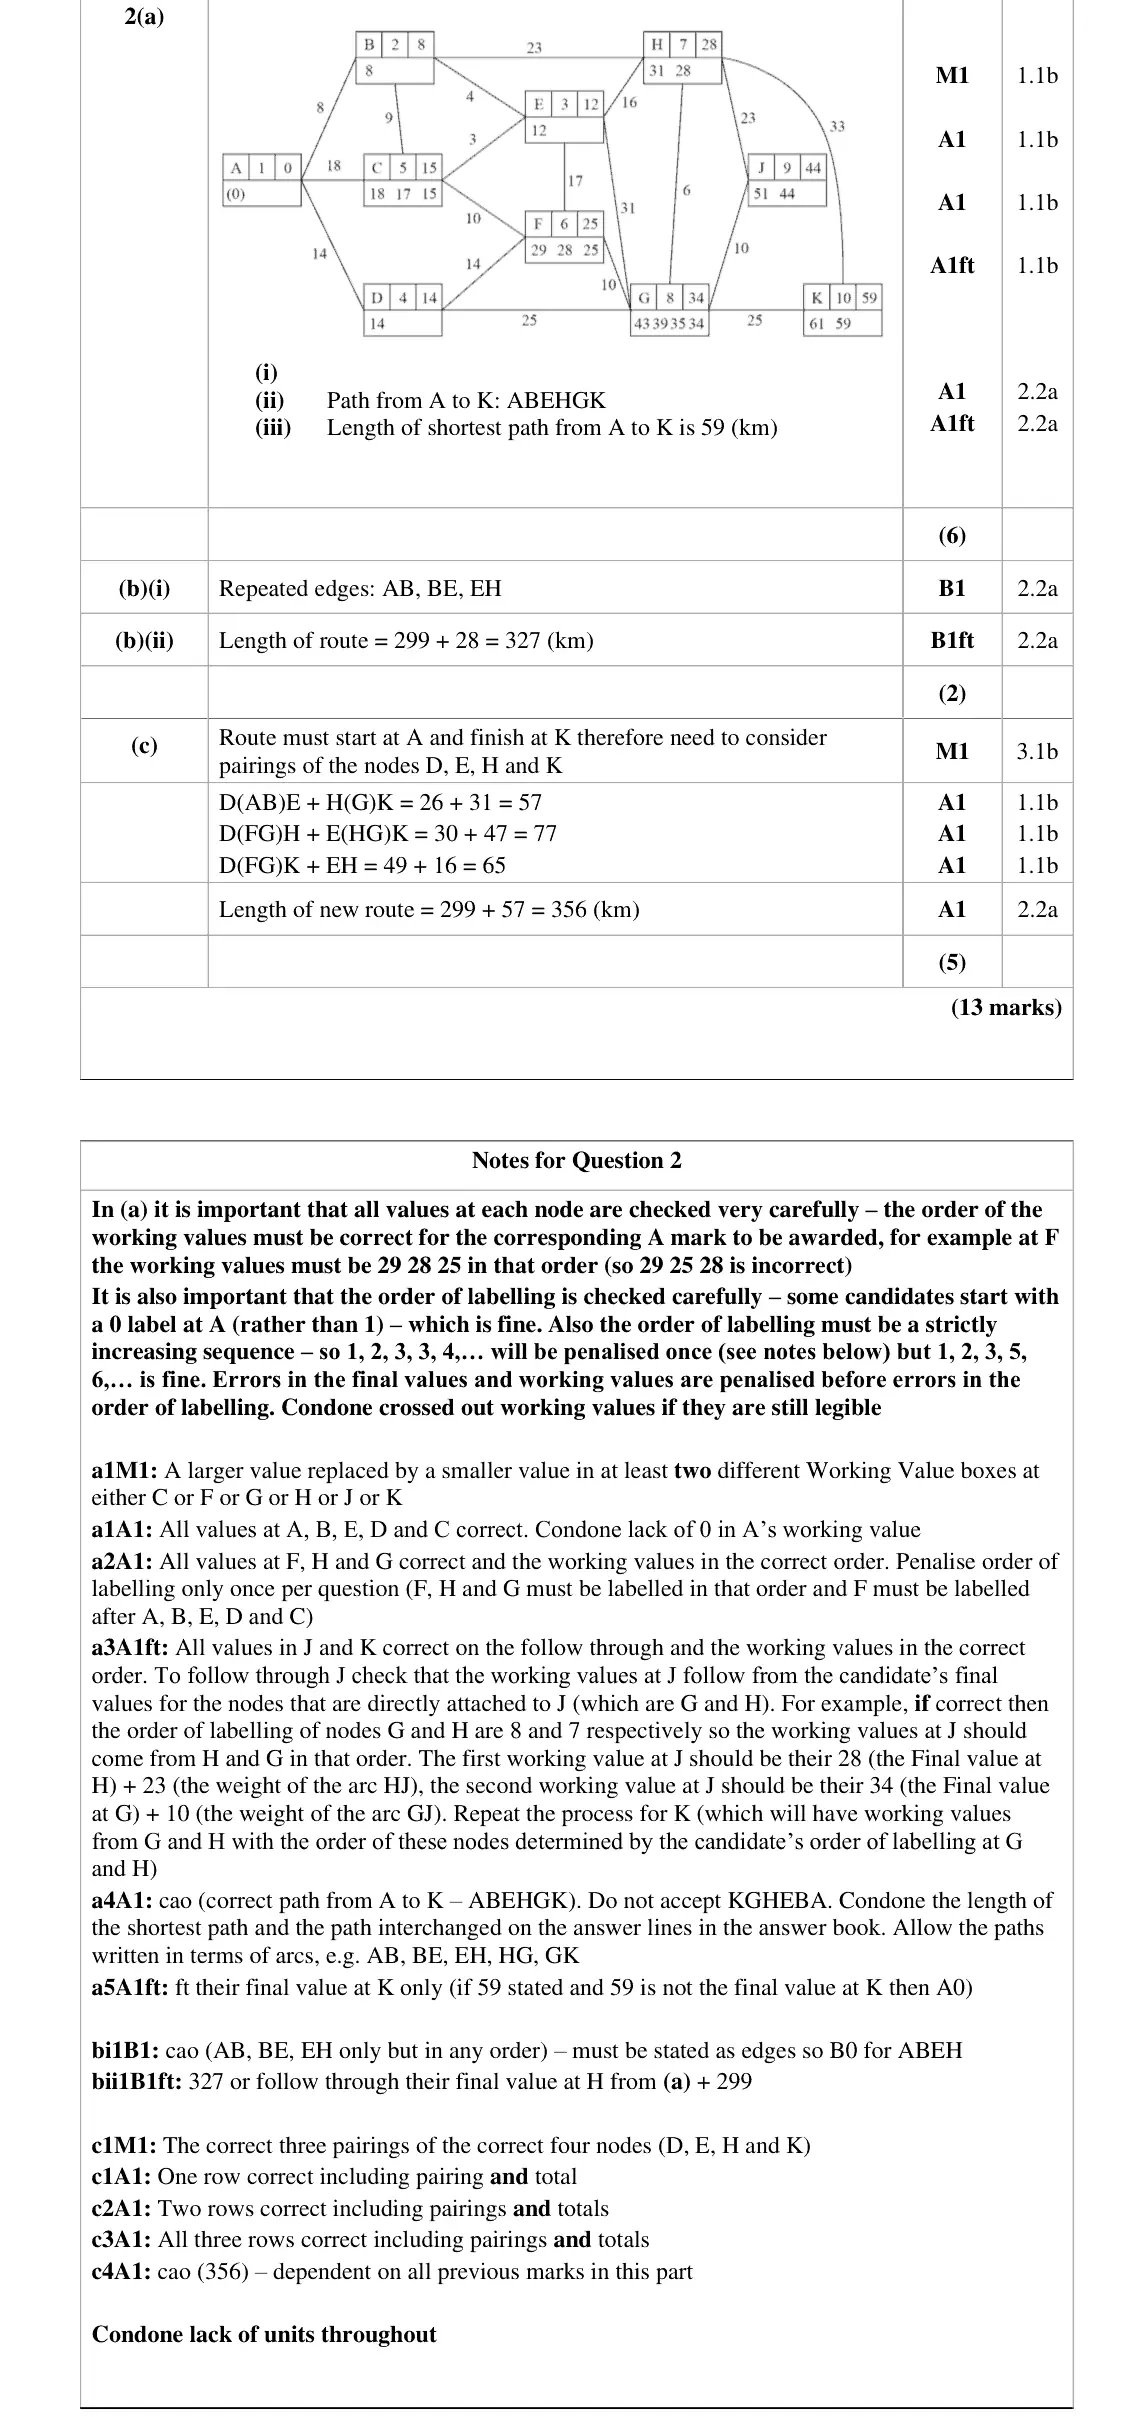
June 2022 · Paper 3D (Decision 1) · Q2(a)6 marks
Mark scheme (whole question; this part is marked with the orange bar)
Examiner's comment
Part (a) was done extremely well with most candidates applying Dijkstra’s algorithm correctly. Where full marks were not awarded, this was usually the result of arithmetic errors or missing temporary labels. In most cases, the correct shortest path and length were identified.
Key points from the mark scheme and examiner's report
ABEHGK, 59 km
working values in the correct order (F: 29 28 25)
errors usually arithmetic or missing temporary labels
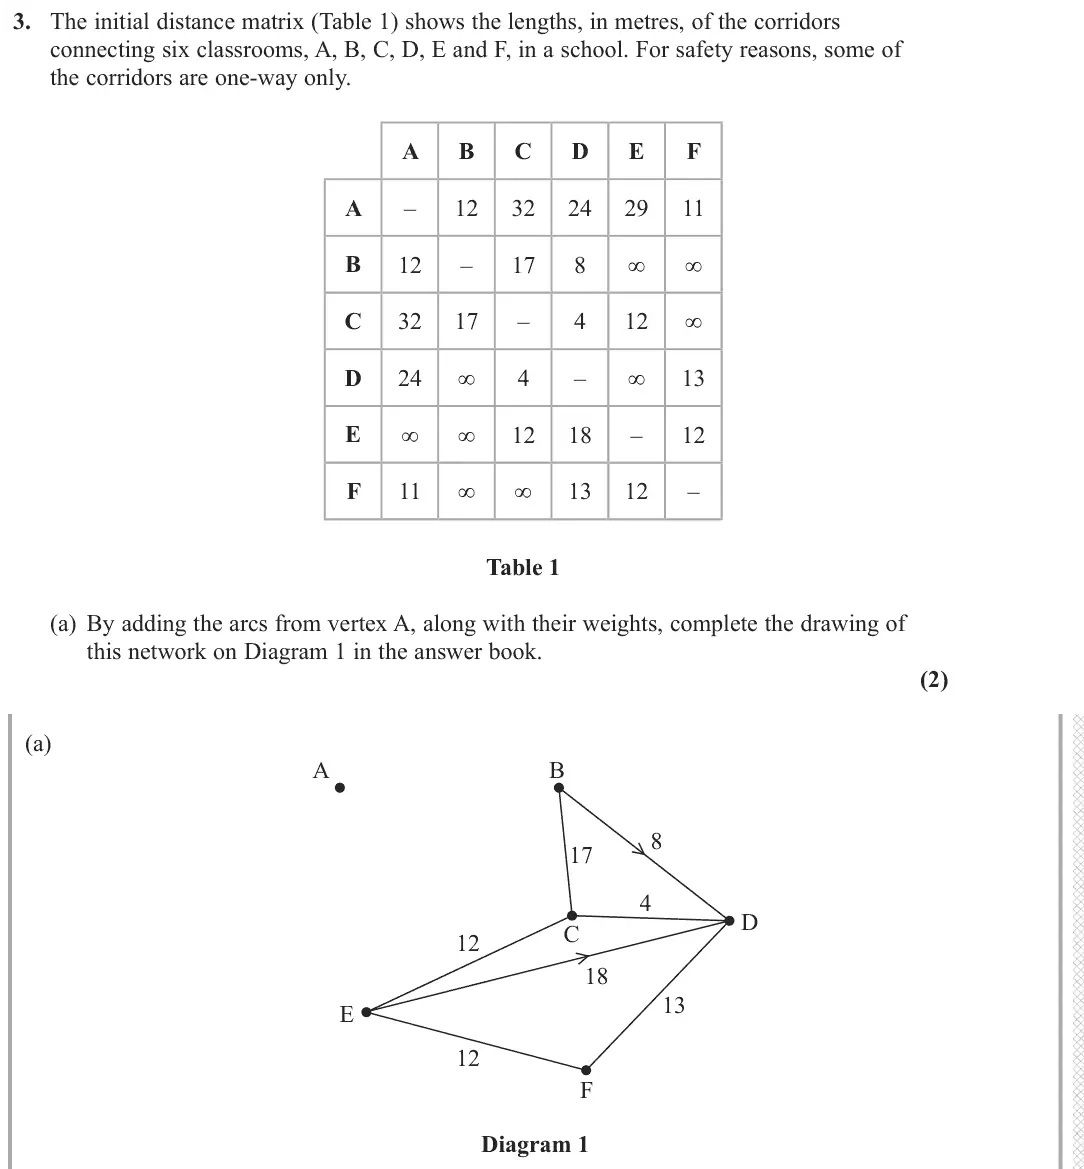
June 2022 · Paper 3D (Decision 1) · Q3(a)2 marks
Mark scheme (whole question; this part is marked with the orange bar)
Examiner's comment
A high proportion of candidates gained the two marks in (a), adding the correct five arcs, although a few omitted AE. It is possible that some did not know how to represent this directed arc (from A to E), as a small number omitted the arrow. However, there were already directed arcs on the diagram with arrows to assist candidates with this. The only other error noted by examiners was a small number of candidates transcribing a weight incorrectly or omitting one altogether. Many candidates drew AF and AD around the outsides of the network (therefore preserving planarity) which was not essential but made their answers easier to mark. The second part of the question required candidates to complete two iterations of Floyd’s
Key points from the mark scheme and examiner's report
add AB 12, AC 32, AD 24, AF 11 and the directed arc A→E 29 (arrow needed)
AE was often omitted
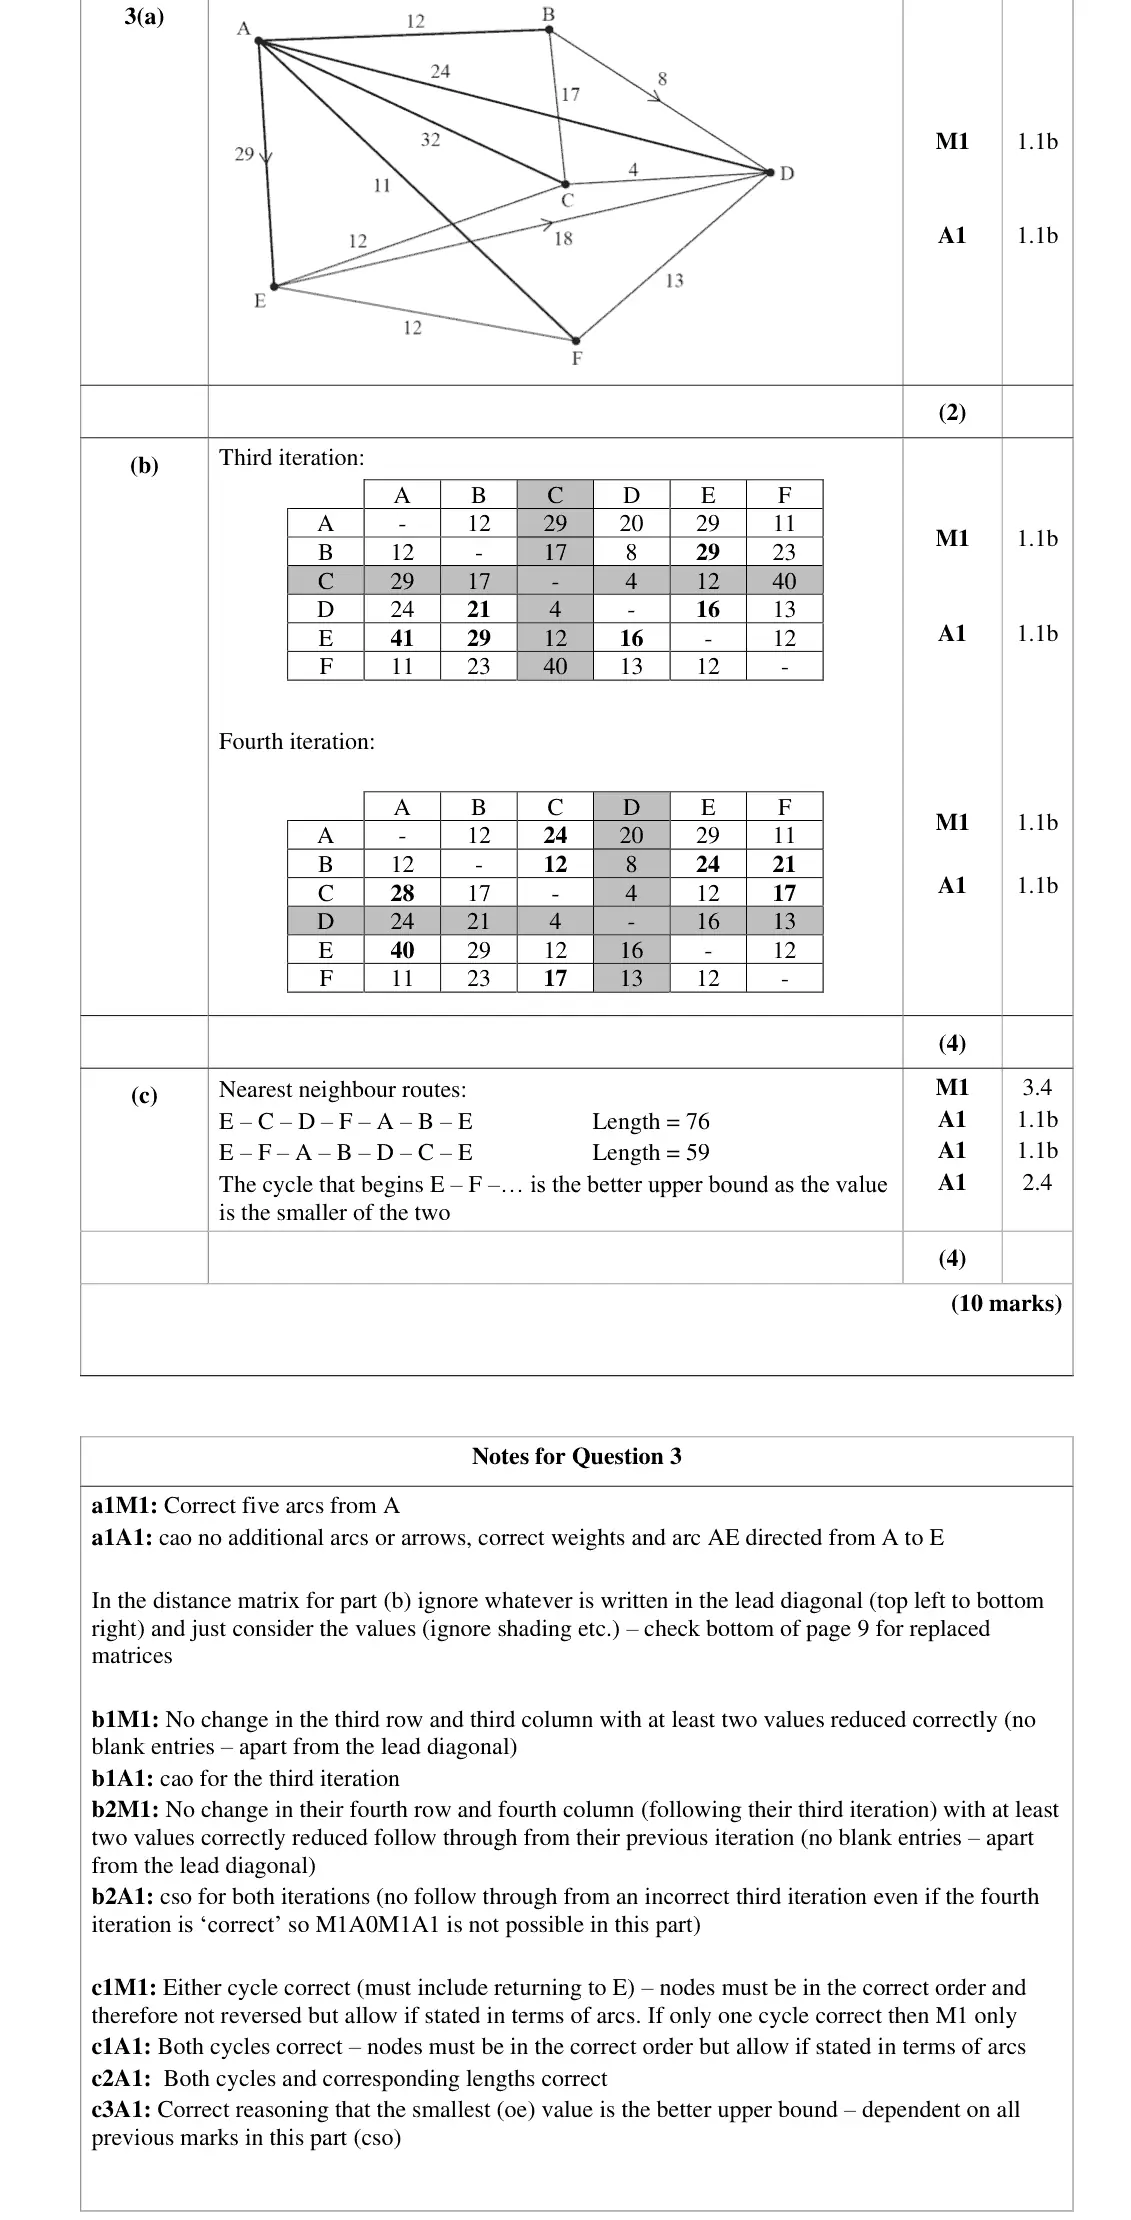
June 2022 · Paper 3D (Decision 1) · Q3(b)4 marks
Mark scheme (whole question; this part is marked with the orange bar)
Examiner's comment
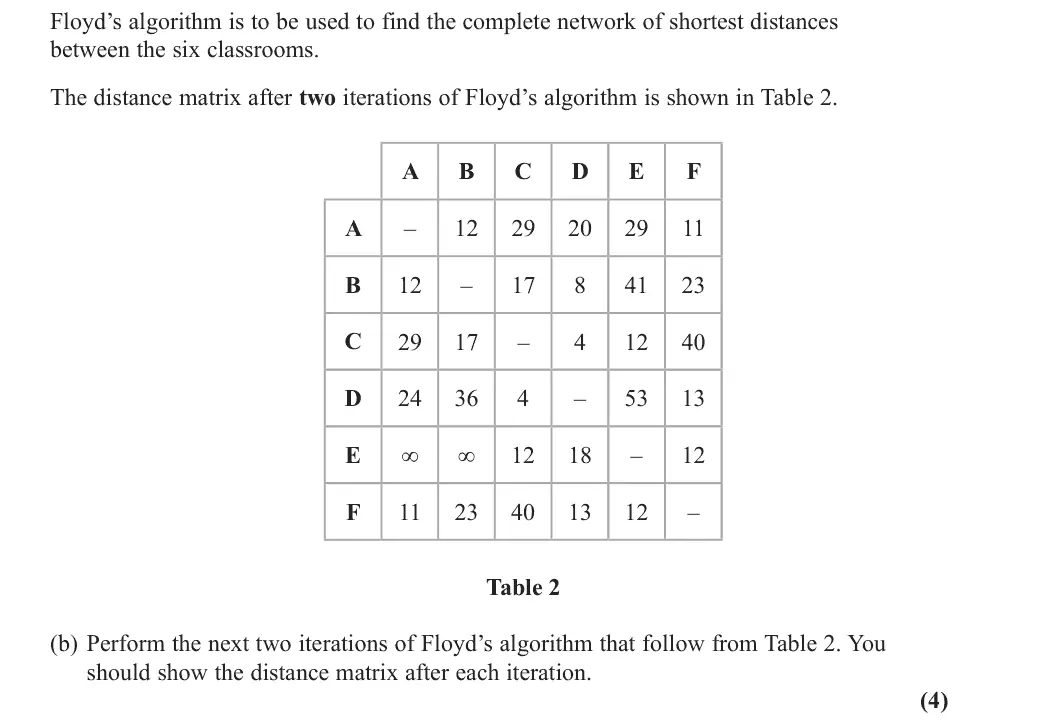
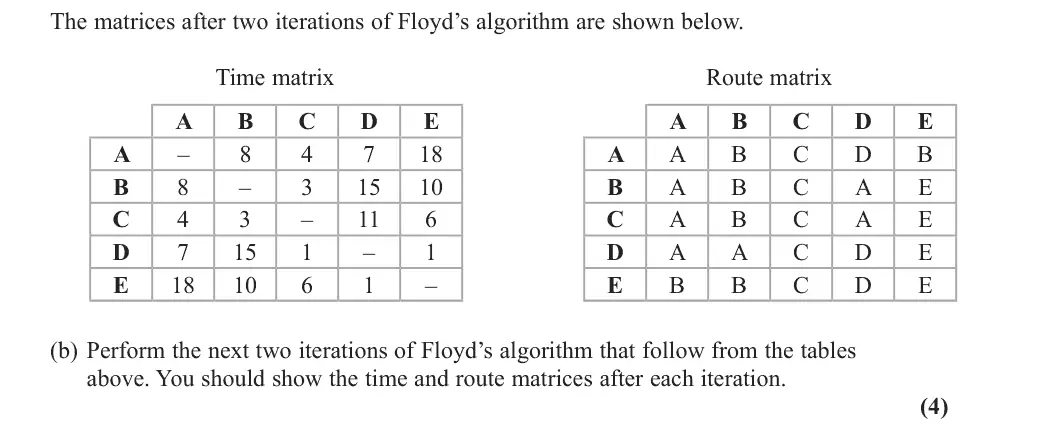
The second part of the question required candidates to complete two iterations of Floyd’s Algorithm. Almost all candidates gained the two method marks, and many scored all four marks in this part, as very few instances were seen of candidates changing entries in rows/columns that they should have been leaving unchanged for that iteration. Several cases were noted of candidates leaving one cell blank in their second table. When errors did occur, it was most often a single mistake in the first table. Entries AE and BE had most errors, some clearly arithmetic, others apparently due to reading from the wrong row or column rather than not understanding the method. In the second table it was again entry AE that occasionally caused the loss of the final mark, as it was left as 41 rather than improved to 40. It was the final part of this question that caused most problems for candidates. As has been
Key points from the mark scheme and examiner's report
3rd (via C) and 4th (via D) iterations from Table 2
row and column k unchanged
AE stays 29 then BE 24
final EA should be 40 not 41
no blank cells
Nov 2021 · Paper 3D (Decision 1) · Q3(a)3 marks
Mark scheme (whole question; this part is marked with the orange bar)
Examiner's comment
This was the best answered question on the paper covering the topic of minimum connectors and the travelling salesperson problem. Most candidates correctly saw the link between finding the MST and its weight in parts (a) and (b), and the link to the lower bound in (d).
Key points from the mark scheme and examiner's report
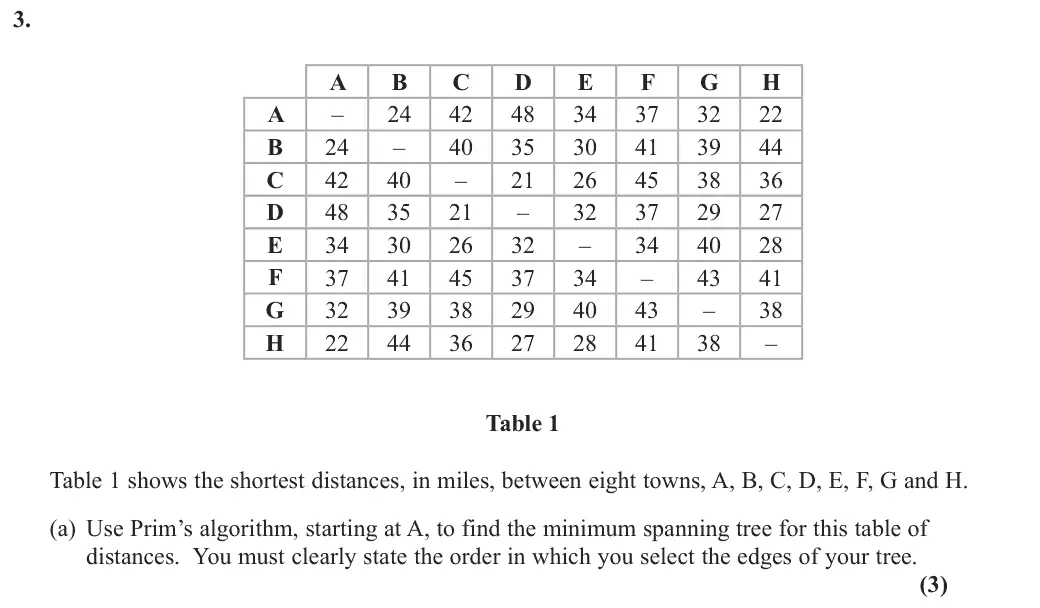
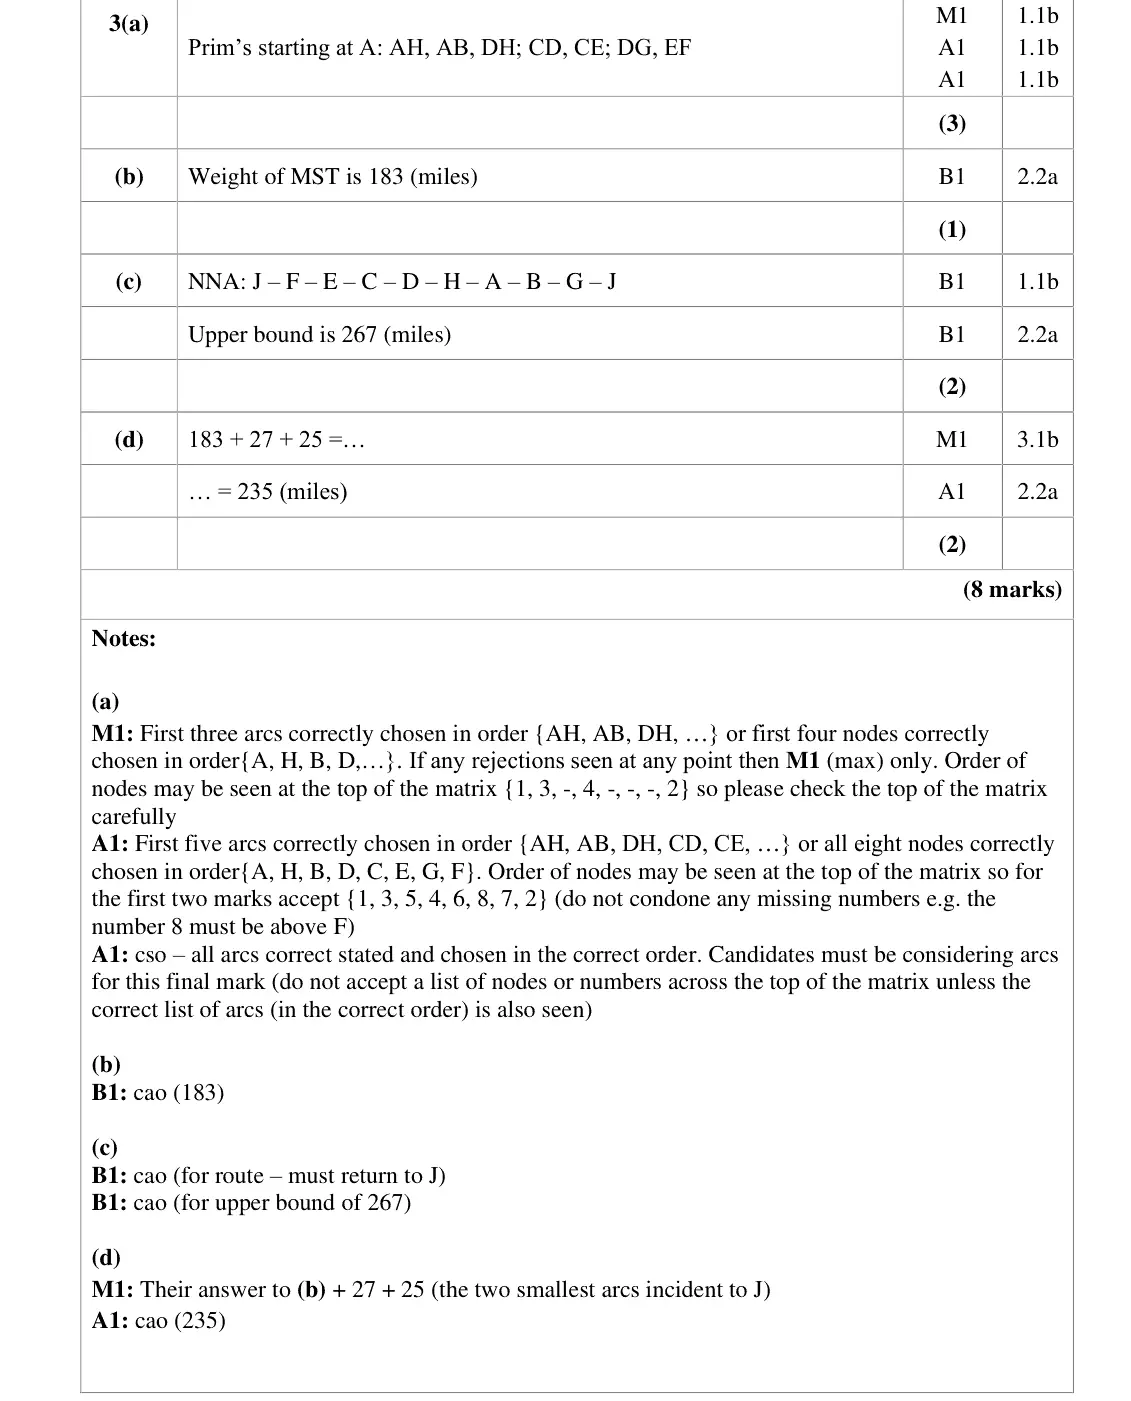
Prim on the matrix from A: AH, AB, DH, CD, CE, DG, EF
arcs in order, no rejections (Kruskal-style rejections cap at M1)
Nov 2021 · Paper 3D (Decision 1) · Q3(b)1 mark
Mark scheme (whole question; this part is marked with the orange bar)
Examiner's comment
This was the best answered question on the paper covering the topic of minimum connectors and the travelling salesperson problem. Most candidates correctly saw the link between finding the MST and its weight in parts (a) and (b), and the link to the lower bound in (d).
Key points from the mark scheme and examiner's report
183 miles
Nov 2021 · Paper 3D (Decision 1) · Q4(a)1 mark
Mark scheme (whole question; this part is marked with the orange bar)
Examiner's comment
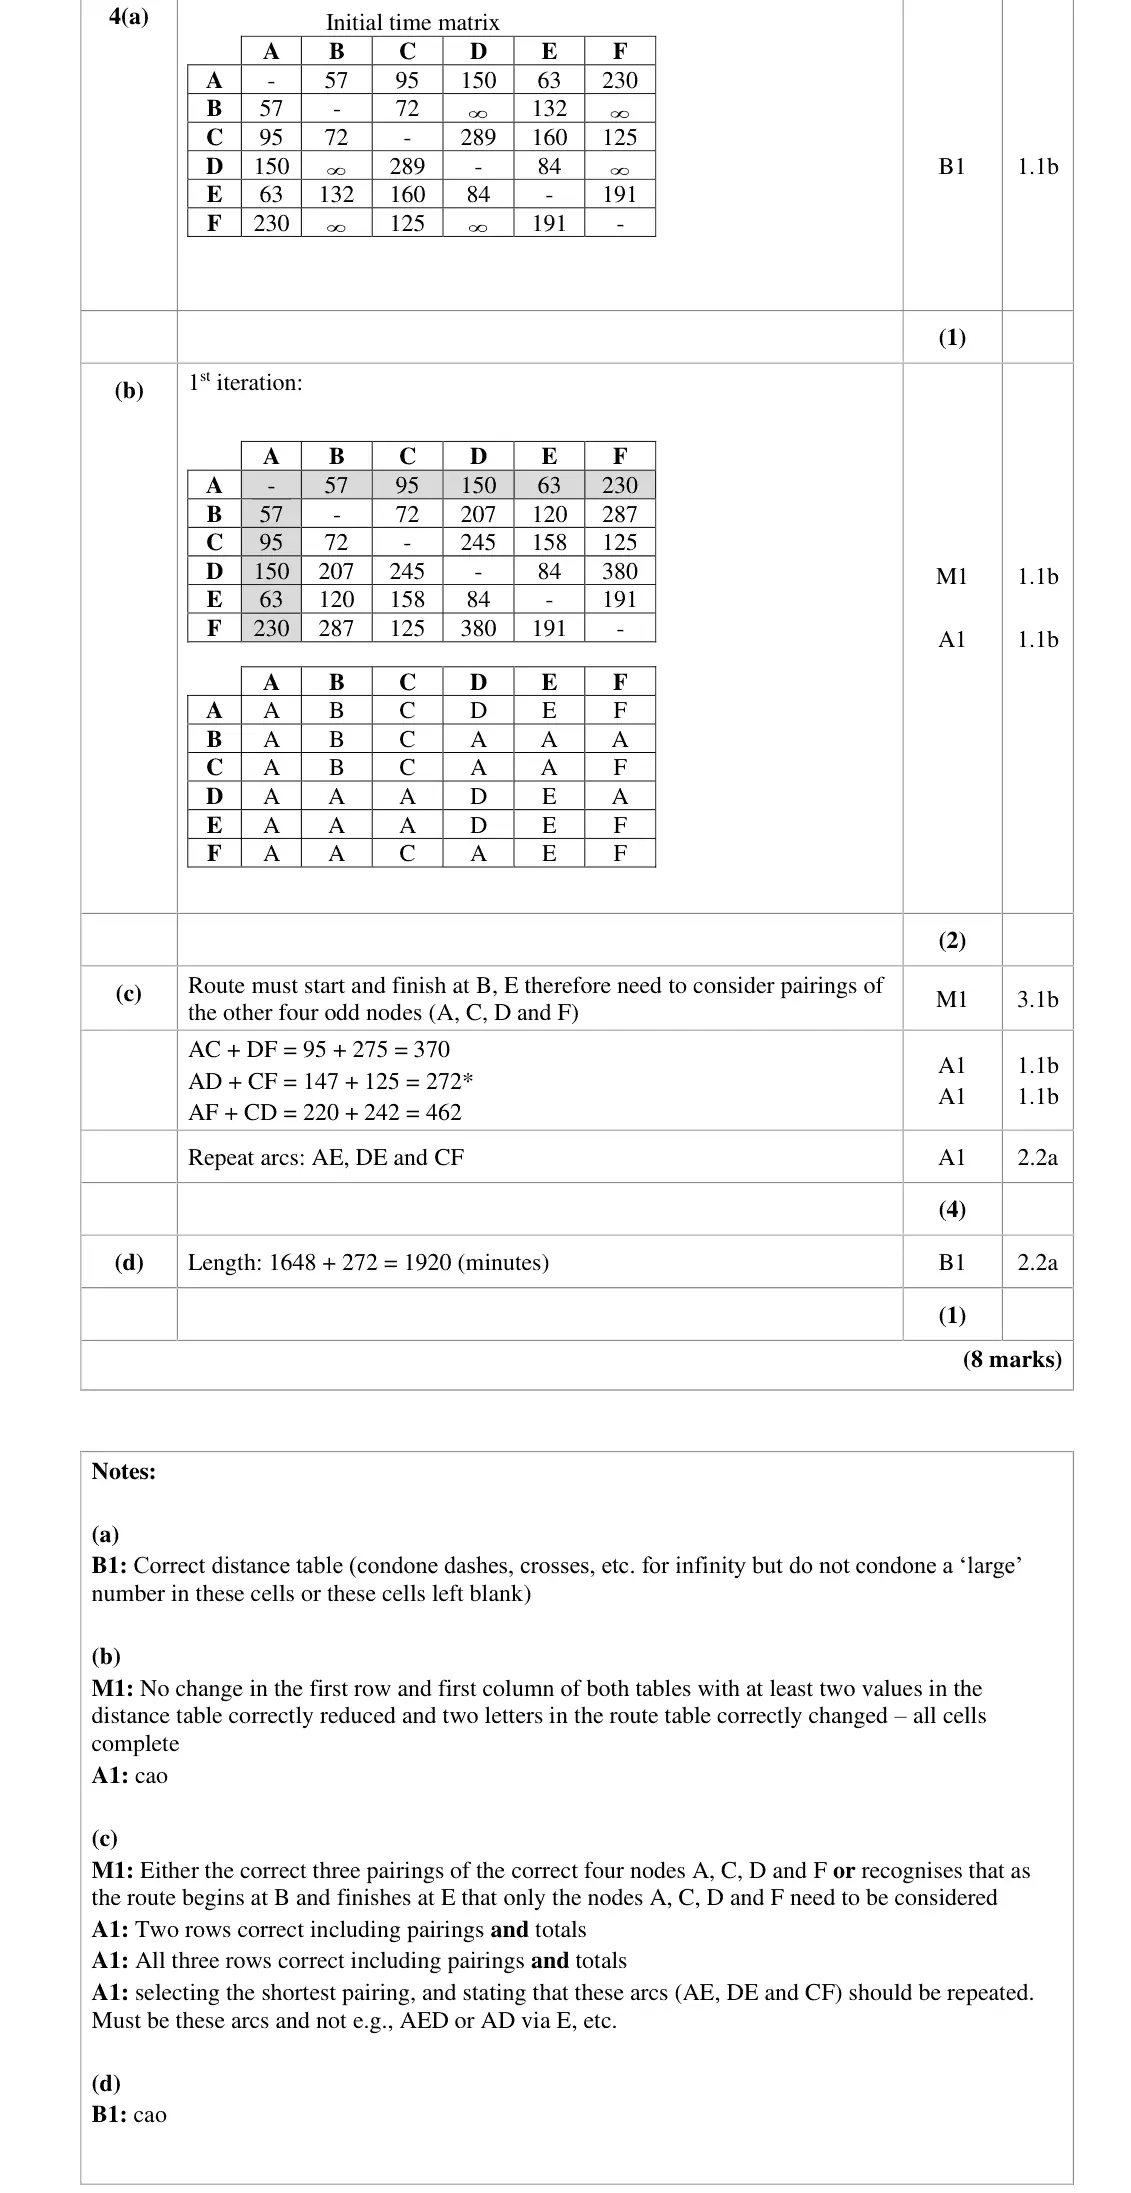
Almost all candidates correctly set up the initial time matrix in (a) and scored at least the method mark in (b) for attempting the first iteration of Floyd’s algorithm. When errors occurred,
Key points from the mark scheme and examiner's report
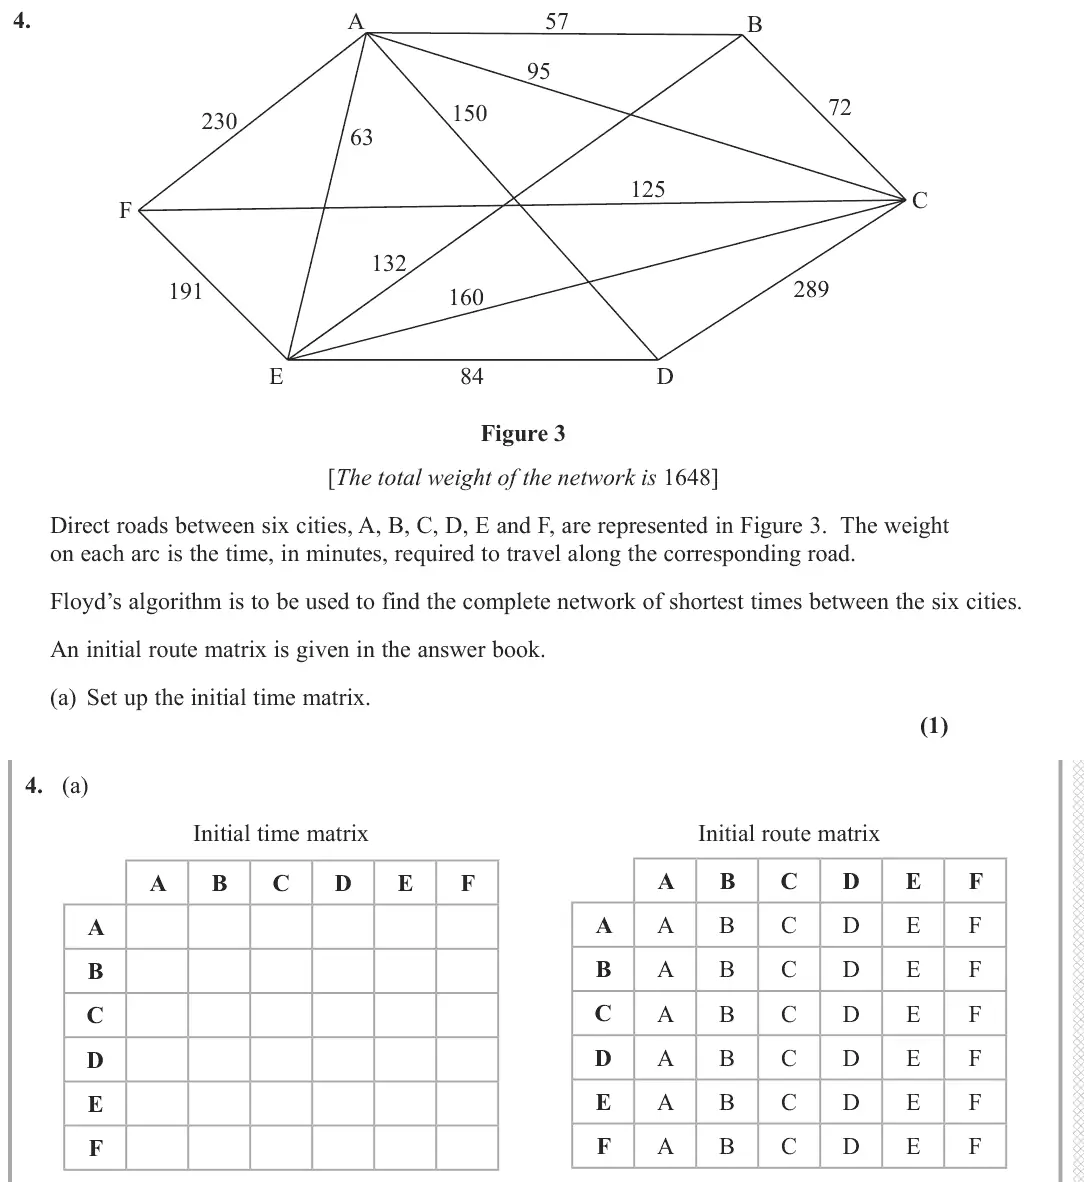
initial time matrix with ∞ where there is no direct road (blank cells or large numbers not accepted)
Nov 2021 · Paper 3D (Decision 1) · Q4(b)2 marks
Mark scheme (whole question; this part is marked with the orange bar)
Examiner's comment
method mark in (b) for attempting the first iteration of Floyd’s algorithm. When errors occurred, it was usually down to arithmetical slips rather than a lack of understanding of the algorithm. In
Key points from the mark scheme and examiner's report
first iteration via A: row and column A unchanged
e.g. BD 207, BE 120, DF 380
route entries changed to A
Nov 2021 · Paper 3D (Decision 1) · Q6(a)6 marks
Mark scheme (whole question; this part is marked with the orange bar)
Examiner's comment
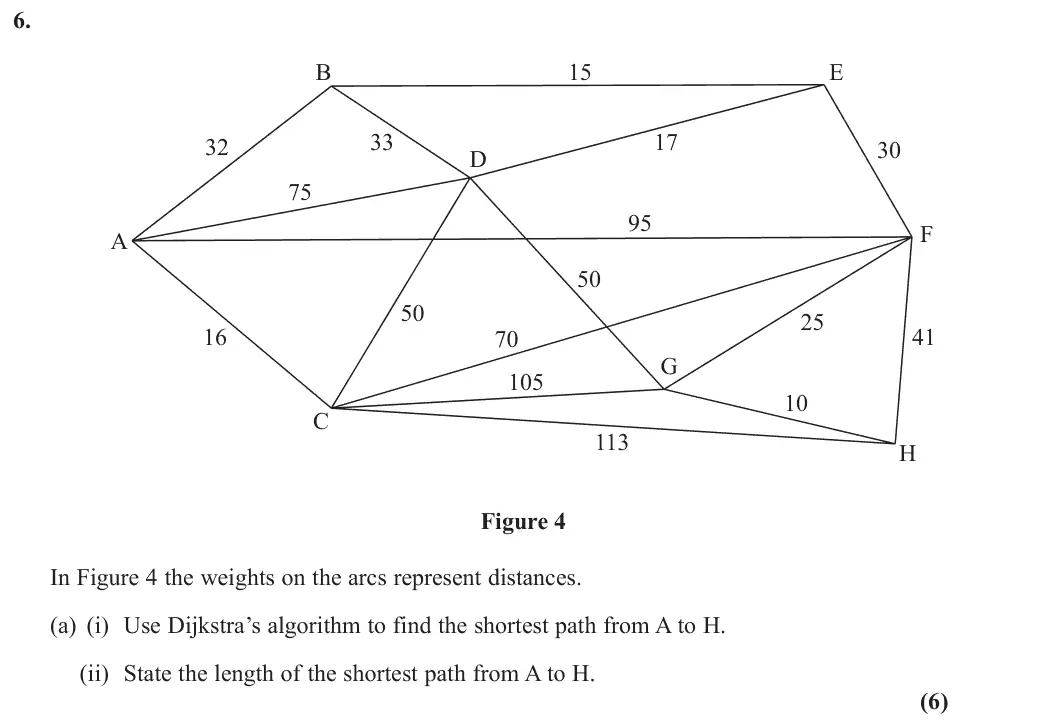
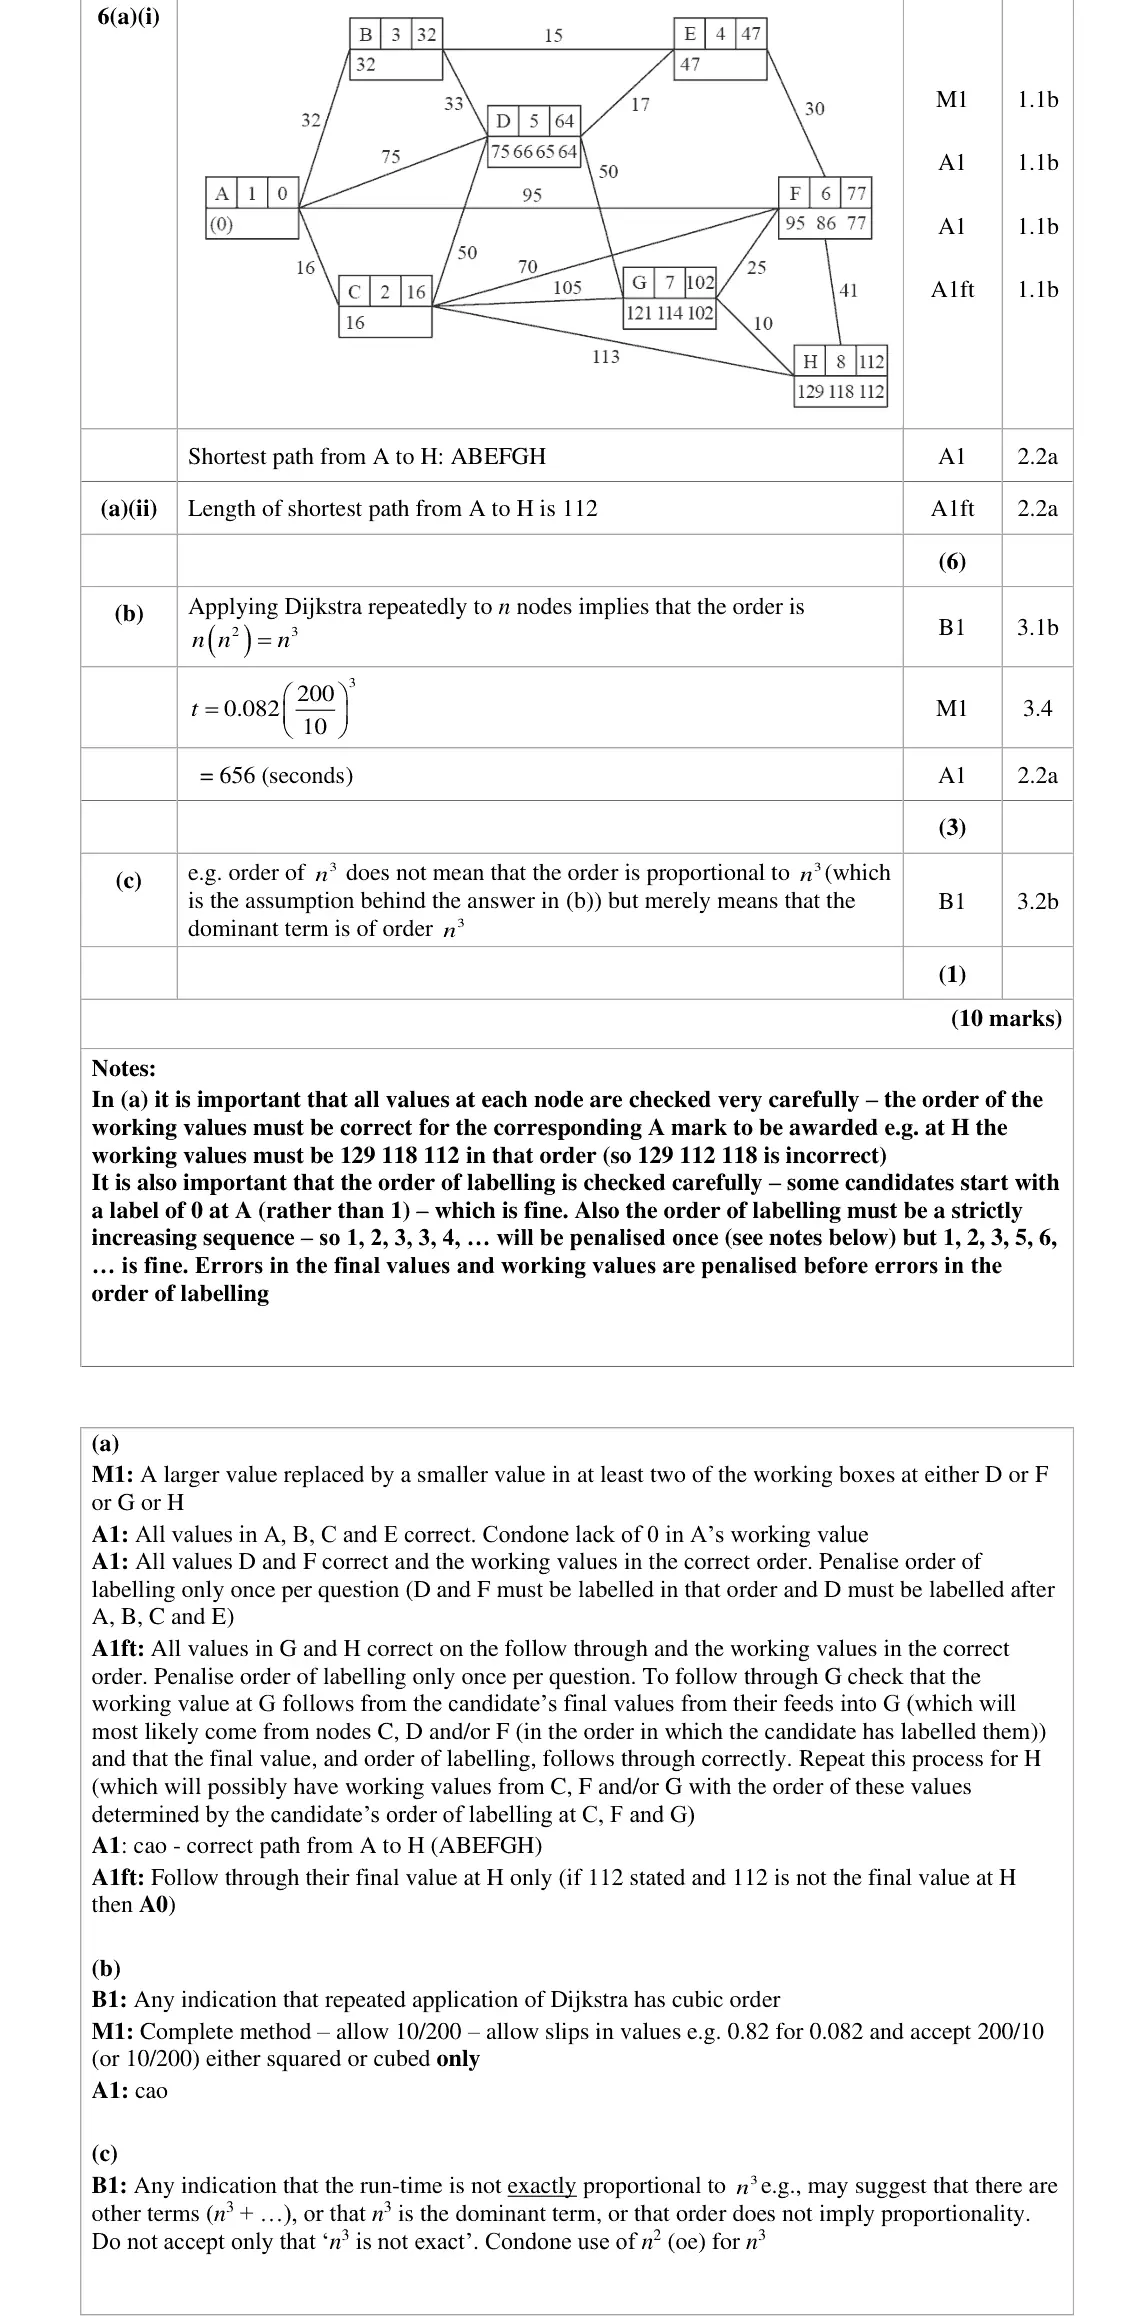
Part (a) was done extremely well with most students correctly applying Dijkstra’s algorithm.
Key points from the mark scheme and examiner's report
ABEFGH, length 112
working values in order (H: 129 118 112)
labelling order strictly increasing
done very well
Oct 2020 · AS Paper 2 (Decision 1) · Q3(b)3 marks
Mark scheme (whole question; this part is marked with the orange bar)
Examiner's comment
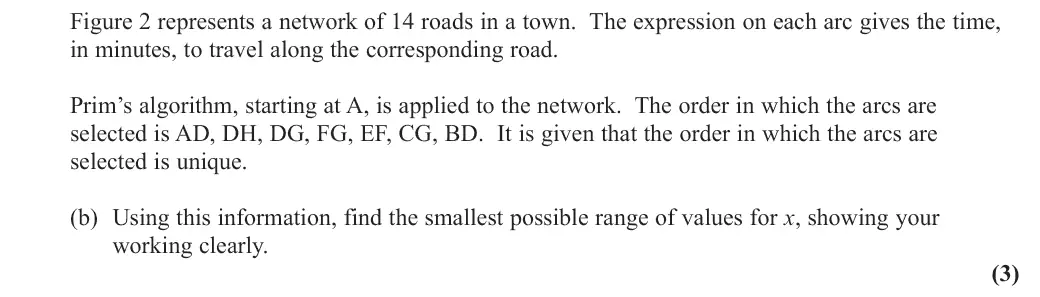
In part (b) candidates had to use the information about the order in which the arcs were added to the minimum spanning tree using Prim’s algorithm to find the smallest possible range of values for x. Therefore, because arc AD, not AB, was added to the tree first this implies that the weight of arc AB must be greater than the weight of arc AD and hence 2 10 3 2 12. x x x + > - ⇒ < Furthermore as the final arc added to the tree was BD this implies that's the weight of BD must be less than the weight of all the other arcs incident to B and hence 2 10 20 5. x x + > ⇒ > The final part of this question required candidates to use an appropriate algorithm, in this case
Key points from the mark scheme and examiner's report
AD chosen before AB so 2x + 10 > 3x − 2, x < 12
BD (20) chosen last for B so 2x + 10 > 20, x > 5
5 < x < 12
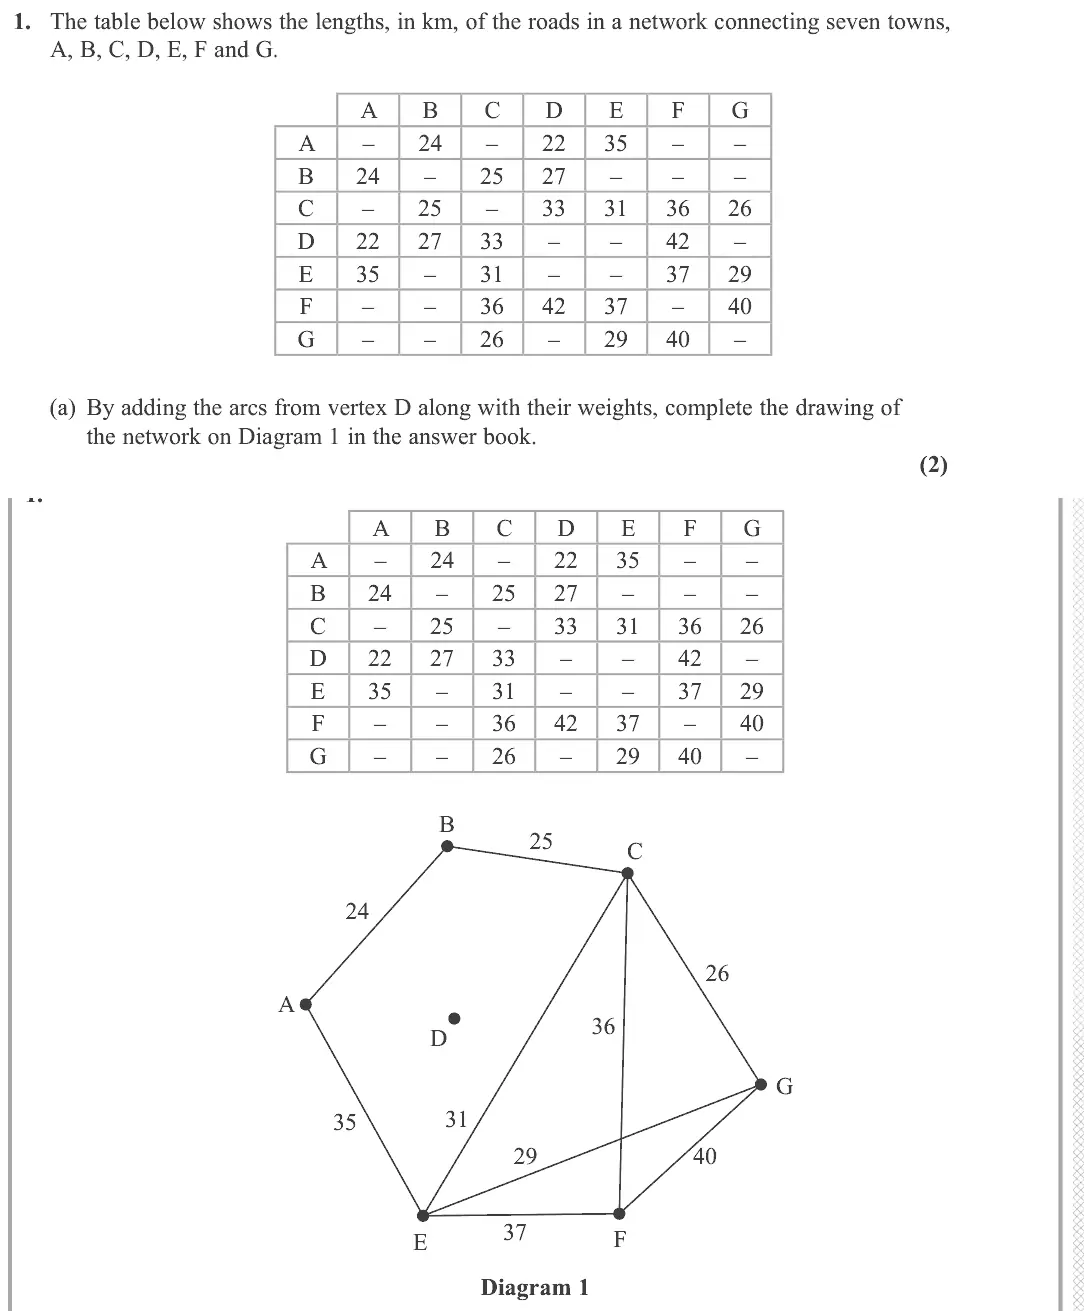
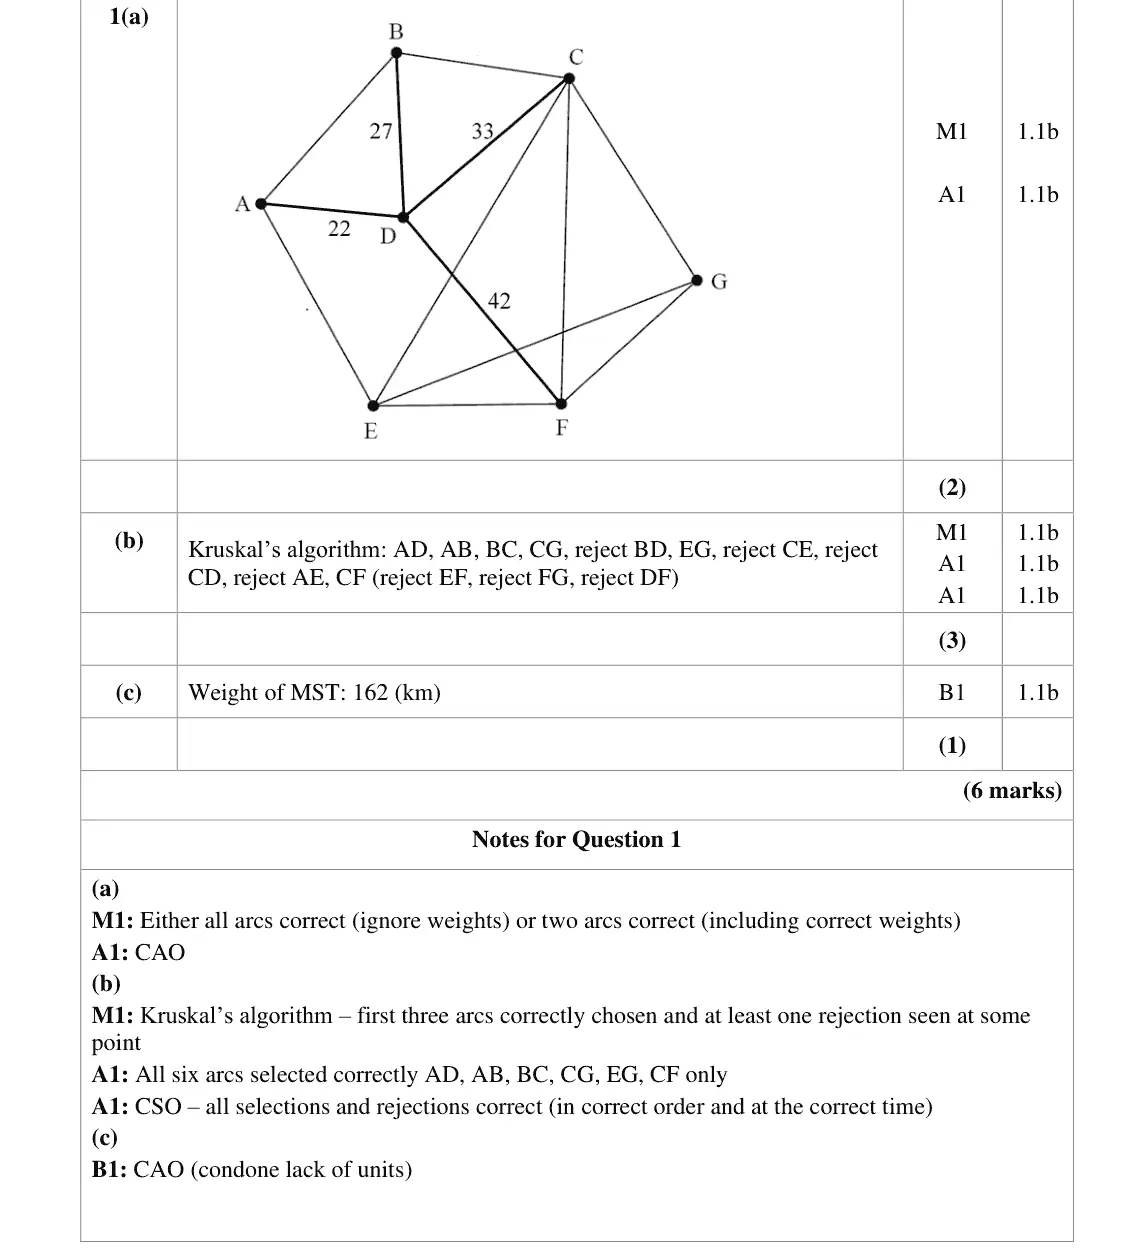
Oct 2020 · Paper 3D (Decision 1) · Q1(a)2 marks
Mark scheme (whole question; this part is marked with the orange bar)
Examiner's comment
Almost all candidates scored both marks in (a), with just a few omitting one of the arcs. Although the majority correctly applied Kruskal’s algorithm to find the MST, a surprising number of candidates lost two of the three marks here, due to including extra arcs such as BD or AE. As ever, a few listed only those arcs selected, without any reference to rejections, consequently losing all three marks for failing to demonstrate their use of the algorithm. Also a few candidates lost the marks for using Prim instead. Presentation of the answer can create difficulties both for candidates and examiners. Listing the arcs vertically down the page, in ascending order, with ticks or crosses to indicate selections and rejections, generally proves the best way for candidates. Those that insist on writing “reject, forms a cycle” many times are simply wasting time. Part (c)
Key points from the mark scheme and examiner's report
add DA 22, DB 27, DC 33, DF 42 to Diagram 1
one arc was occasionally omitted
Oct 2020 · Paper 3D (Decision 1) · Q1(b)3 marks
Mark scheme (whole question; this part is marked with the orange bar)
Examiner's comment
Almost all candidates scored both marks in (a), with just a few omitting one of the arcs. Although the majority correctly applied Kruskal’s algorithm to find the MST, a surprising number of candidates lost two of the three marks here, due to including extra arcs such as BD or AE. As ever, a few listed only those arcs selected, without any reference to rejections, consequently losing all three marks for failing to demonstrate their use of the algorithm. Also a few candidates lost the marks for using Prim instead. Presentation of the answer can create difficulties both for candidates and examiners. Listing the arcs vertically down the page, in ascending order, with ticks or crosses to indicate selections and rejections, generally proves the best way for candidates. Those that insist on writing “reject, forms a cycle” many times are simply wasting time. Part (c) was almost always correct if following the correct MST.
Key points from the mark scheme and examiner's report
extra arcs such as BD or AE and using Prim lost marks
Oct 2020 · Paper 3D (Decision 1) · Q1(c)1 mark
Mark scheme (whole question; this part is marked with the orange bar)
Examiner's comment
on writing “reject, forms a cycle” many times are simply wasting time. Part (c) was almost always correct if following the correct MST.
Key points from the mark scheme and examiner's report
162 km
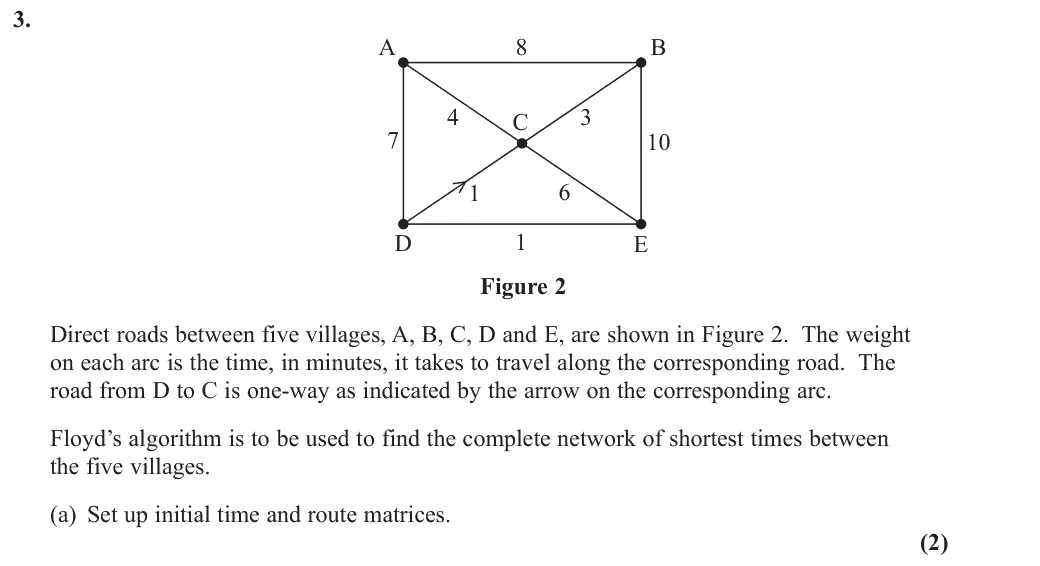
Oct 2020 · Paper 3D (Decision 1) · Q3(a)2 marks
Mark scheme (whole question; this part is marked with the orange bar)
Examiner's comment
Floyd’s algorithm is another topic new on the specification. Most candidates were
Key points from the mark scheme and examiner's report
∞ where there is no direct road
DC is one-way (CD = ∞)
route matrix columns hold their own letters
Oct 2020 · Paper 3D (Decision 1) · Q3(b)4 marks
Mark scheme (whole question; this part is marked with the orange bar)
Examiner's comment
Floyd’s algorithm is another topic new on the specification. Most candidates were well prepared to use the algorithm scoring well on (a) and (b) accurately completing both the distance and route tables. Only a few candidates failed to start by filling in infinity symbols where there is no direct route. In (b), however, some candidates had not read the question carefully and therefore attempted to complete first and second iterations, rather than third and fourth, losing at least two of the four marks. Only a minority of candidates found the correct Hamiltonian cycle ACBEDA in (c)(i), realising the necessity to use the nearest
Key points from the mark scheme and examiner's report
perform the 3rd (via C) and 4th (via D) iterations from the given tables, not the 1st and 2nd
row and column k unchanged in iteration k
e.g. final AE = 8, EA = 6
Oct 2020 · Paper 3D (Decision 1) · Q6(b)9 marks
Mark scheme (whole question; this part is marked with the orange bar)
Examiner's comment
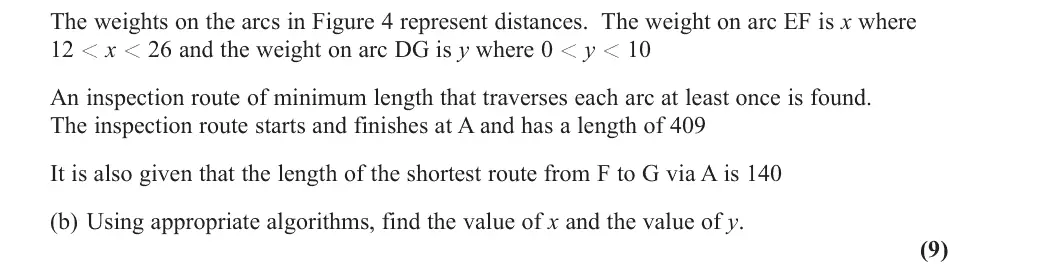
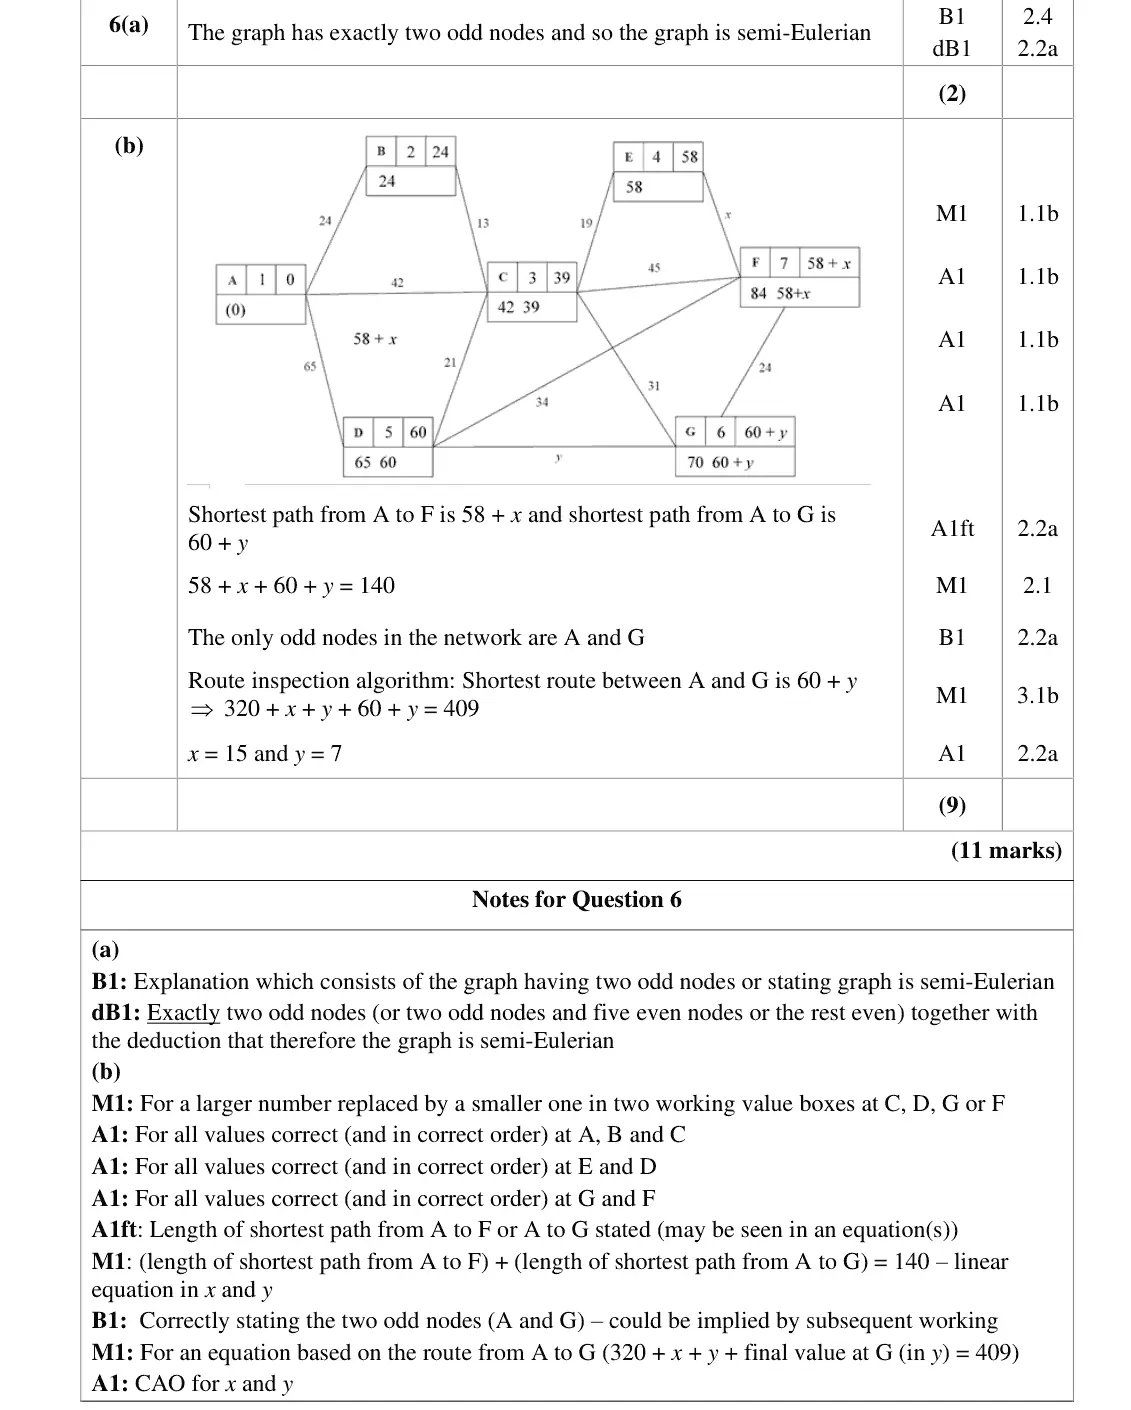
Surprisingly some candidates left part (a) blank. Others correctly stated that the graph was semi-Eulerian with their reason that it had two odd nodes but omitted the word ‘exactly’ (or equivalent), losing the second mark. It is worth noting that the two odd nodes were A and G, which is key information to be used later in the question. It is commonly the case that candidates would be well advised to keep earlier content in mind throughout questions. Although the question said ‘using appropriate algorithms’, the diagram in the answer book provided a strong clue to use Dijkstra and route inspection was also clearly indicated. Almost all candidates set about filling in labels and values on the diagram, applying the algorithm largely correctly, with many realising that expressions in x and y resulted as the second working values at F and G respectively, and therefore their final values. As is always the case, the length(s) of the resulting shortest path(s) should be stated too. A minority of candidates scored M0, and lost the next four marks too, due to stating only one working value at all vertices, including C, D, F and G. They should be reminded that the working values demonstrate the application of the correct method for this algorithm. Many candidates struggled with the remainder of this question, though some scored just one mark by adding their two lengths to equal 140, obtaining an equation in x and y. Use of the two odd nodes A and G along with 409 produced a variety of second equations in x and y, but some correctly added AG(= 60 + y) to 320 + x + y to complete their solution, by solving the two equations simultaneously.
Key points from the mark scheme and examiner's report
Dijkstra from A gives AF = 58 + x, AG = 60 + y
58 + x + 60 + y = 140
repeat the shortest path A to G: 320 + x + y + 60 + y = 409
x = 15, y = 7
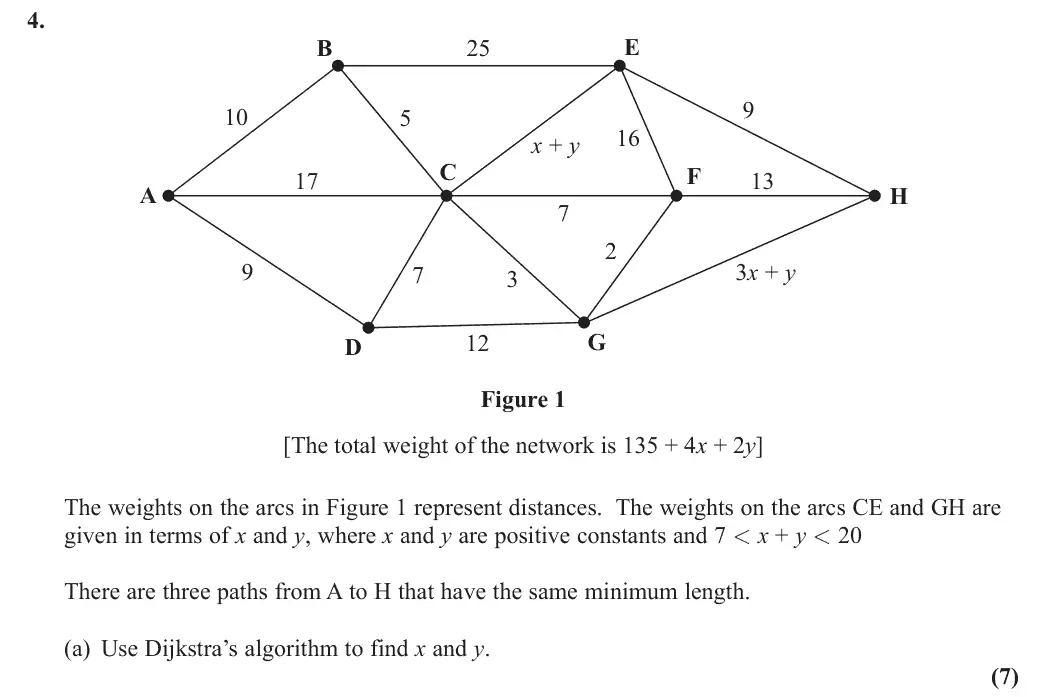
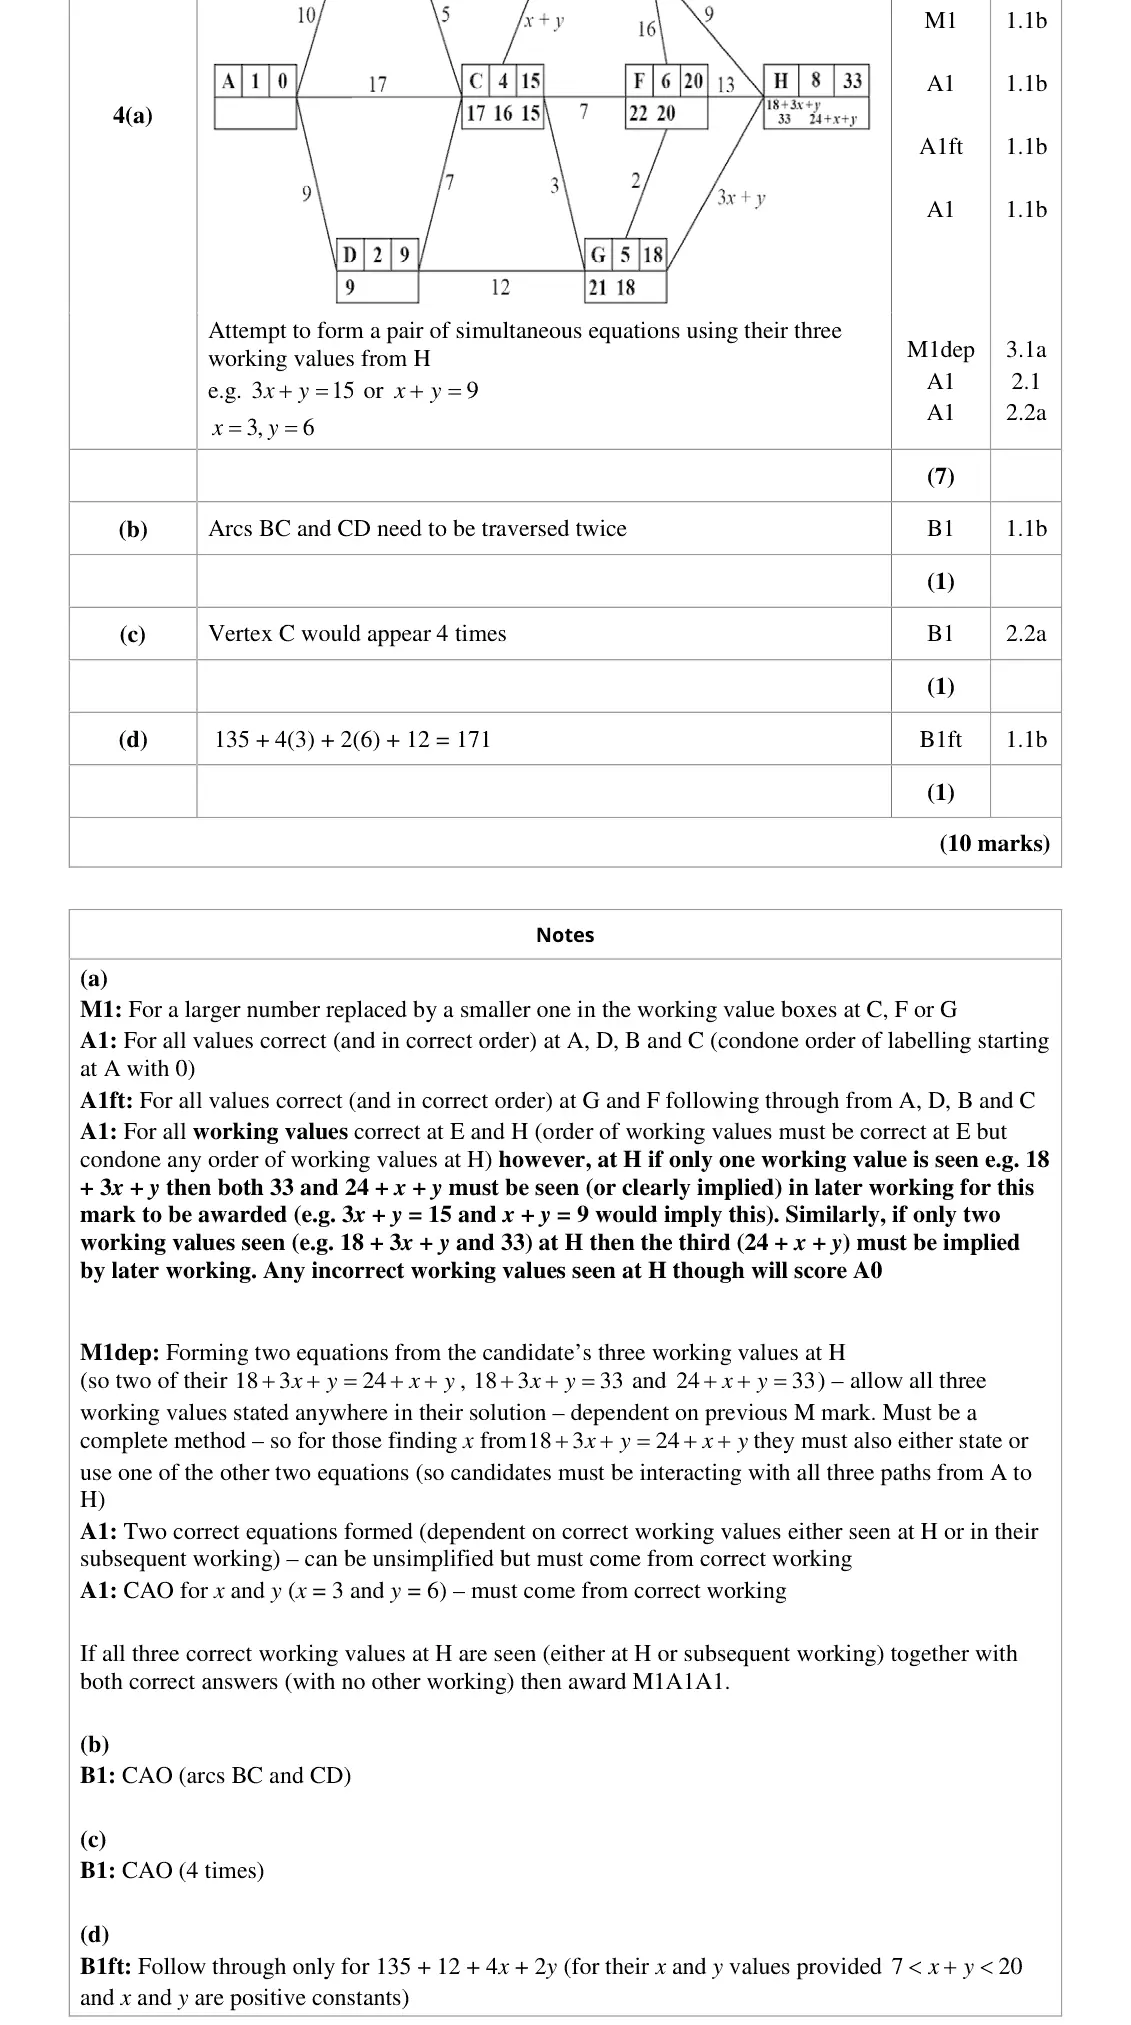
June 2019 · AS Paper 2 (Decision 1) · Q4(a)7 marks
Mark scheme (whole question; this part is marked with the orange bar)
Examiner's comment
Most candidates were able to earn at least some of the marks in part (a) for applying Dijkstra’s algorithm for the network at least up to vertex E. There were the usual issues with order of working values with issues occasionally cropping up at C, F and G. Also, order of labelling was sometimes problematic with repeated labels occurring, from time to time at B and D or F and G. Up to vertex E was, however, comfortable territory for most and correspondingly well completed. The introduction of the algebraic weights for CE and GH was, of course, less familiar and some candidates were unsure how to proceed. A good proportion however, were unfazed and correctly stated working values at E and H. Sometimes only one working value was given at H (and the other two often shown later in working) probably because candidates had been told that the three paths to H have equal length. Sometimes 36 made an appearance at E and this was penalised. Of course, earlier errors in the network sometimes led to incorrect expressions at E and/or H. Some candidates believed that they had completed part (a) with the diagram and did not proceed to determine the values of x and y. Those that did however, were often successful provided they had managed to identify the expressions for the three paths. Occasionally, an extra value of 44 appeared at H which sometimes led to incorrect calculations. Other times, candidates did not identify the three different lengths of the paths and so ended up with a single equation to solve in two variables. It was surprising to examiners that part (b) seemed to be problematic for so many. The majority of
Key points from the mark scheme and examiner's report
three working values at H: 18 + 3x + y, 33, 24 + x + y
equate to 33 to get x = 3, y = 6
36 at E penalised
order of labelling and working values errors at C, F, G
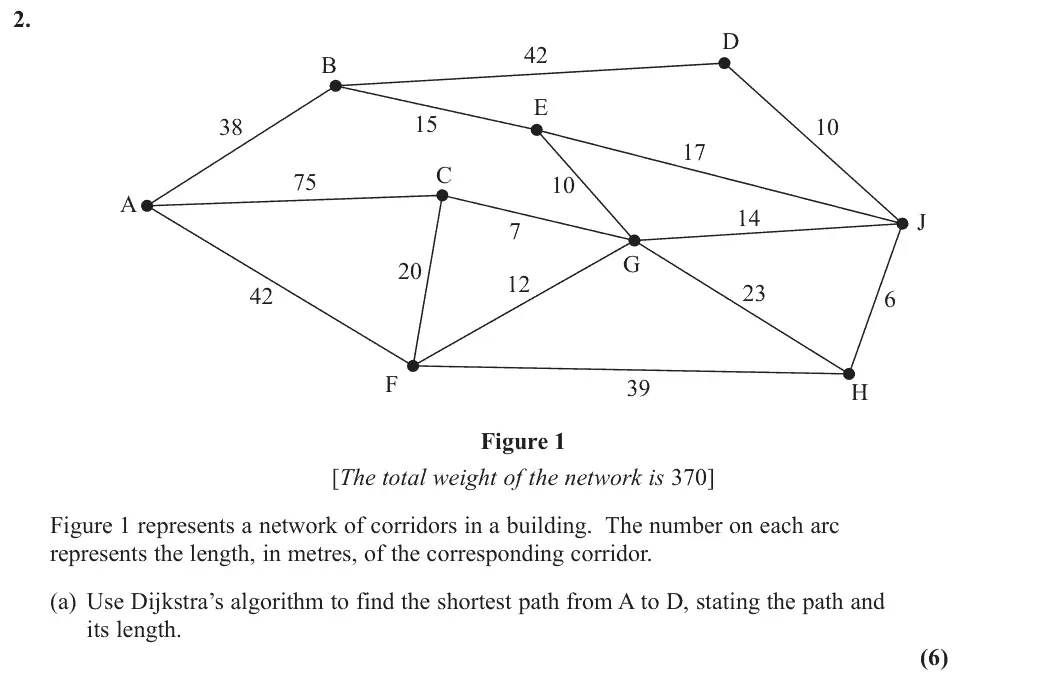
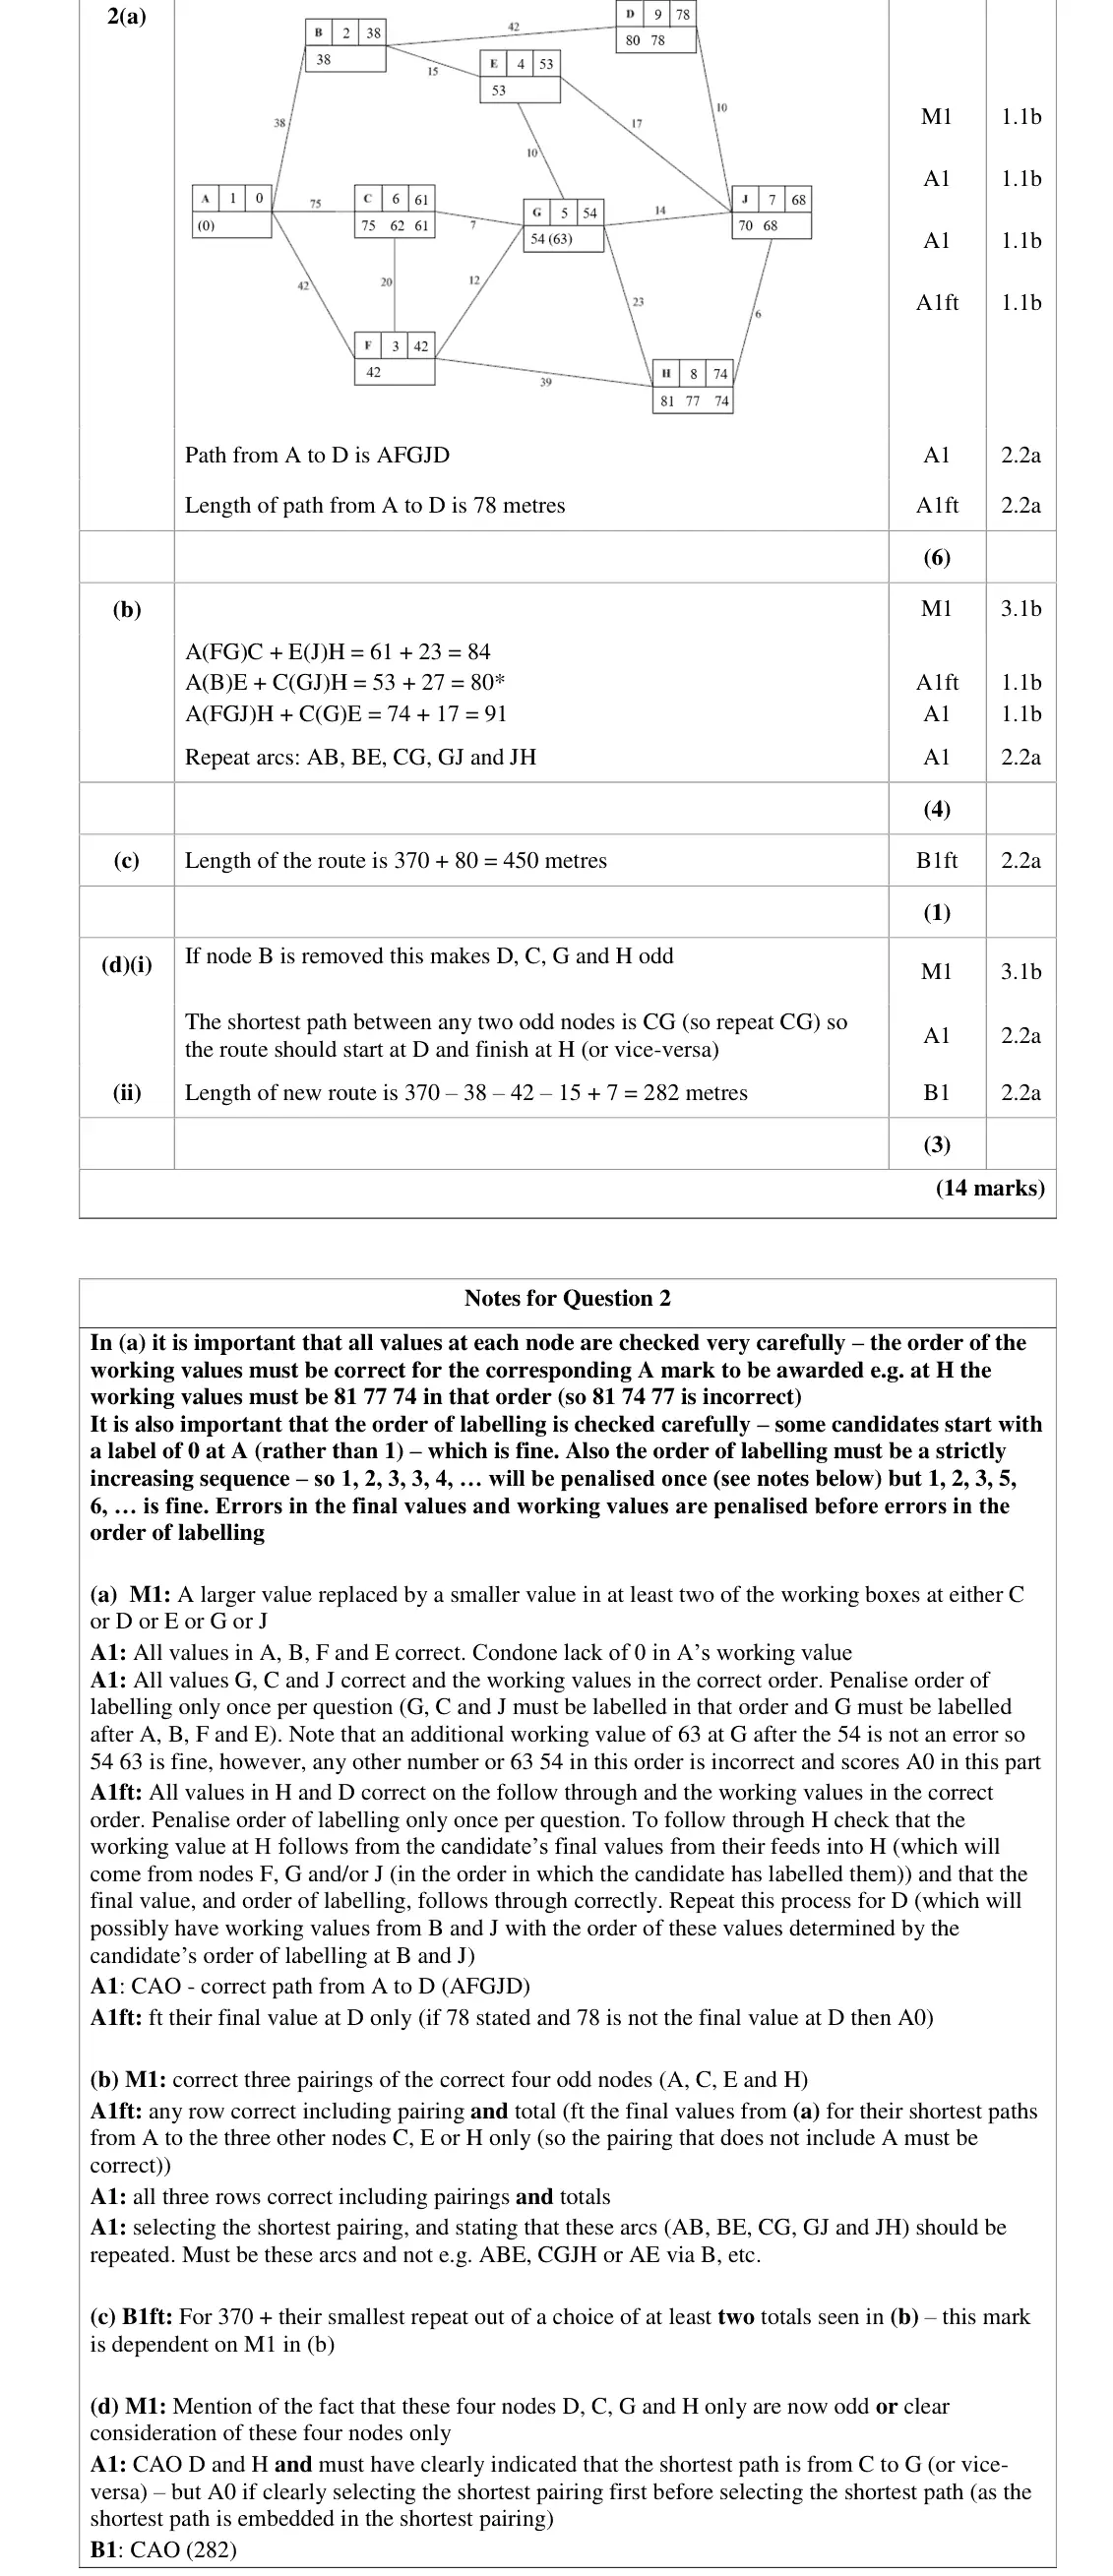
June 2019 · Paper 3D (Decision 1) · Q2(a)6 marks
Mark scheme (whole question; this part is marked with the orange bar)
Examiner's comment
This question was generally well attempted. Most candidates were clearly well prepared for Dijkstra’s algorithm with most errors in part (a) arising from slips rather than lack of understanding. Values at nodes A, B, F, E and G were generally correct with errors most commonly occurring at C and/or H. Most candidates were able to correctly state the path from A to D and the corresponding length. There were the standard errors in order of working values and/or extra or missing working values and examiners saw several cases where there was no replacement of working values whatsoever. As is often the case, handwriting presented something of a challenge when deciphering working values. Candidates should be reminded of the importance of working values in judging the application of the method by examiners and so candidates should ensure their presentation is clear and it cannot be stressed enough that working values should NOT be crossed out.
Key points from the mark scheme and examiner's report
AFGJD, 78 m
working values in the correct order (H: 81 77 74)
order of labelling strictly increasing
errors usually at C or H
June 2019 · Paper 3D (Decision 1) · Q3(a)2 marks
Mark scheme (whole question; this part is marked with the orange bar)
Examiner's comment
Many candidates seemed to find the first part of this question on Floyd’s algorithm relatively straight forward, even though it is a newly examined topic, with many scoring a significant number of marks. The route table in part (a) was almost unanimously done correctly, and most of the distance tables were too. A small number had one or two incorrect values in the distance table, and a very small number of candidates confused the rows and columns in the distance table. It was clear that most candidates were using the method displayed in the new Pearson textbook to complete the iterations of the distance and route tables, though of course those using alternative approaches were given equal credit for their responses. A significant number of candidates made one or two errors causing them to drop the final accuracy mark in part (b), but a mark of 5 or 6 out of total of 7 (for parts (a) and (b)) was very common. Only a very small proportion of candidates lost method marks for changing entries in rows/columns that they should have been leaving unchanged for that iteration. It was part (c) and (d) that caused most problems for candidates. In part (c) several candidates were able
Key points from the mark scheme and examiner's report
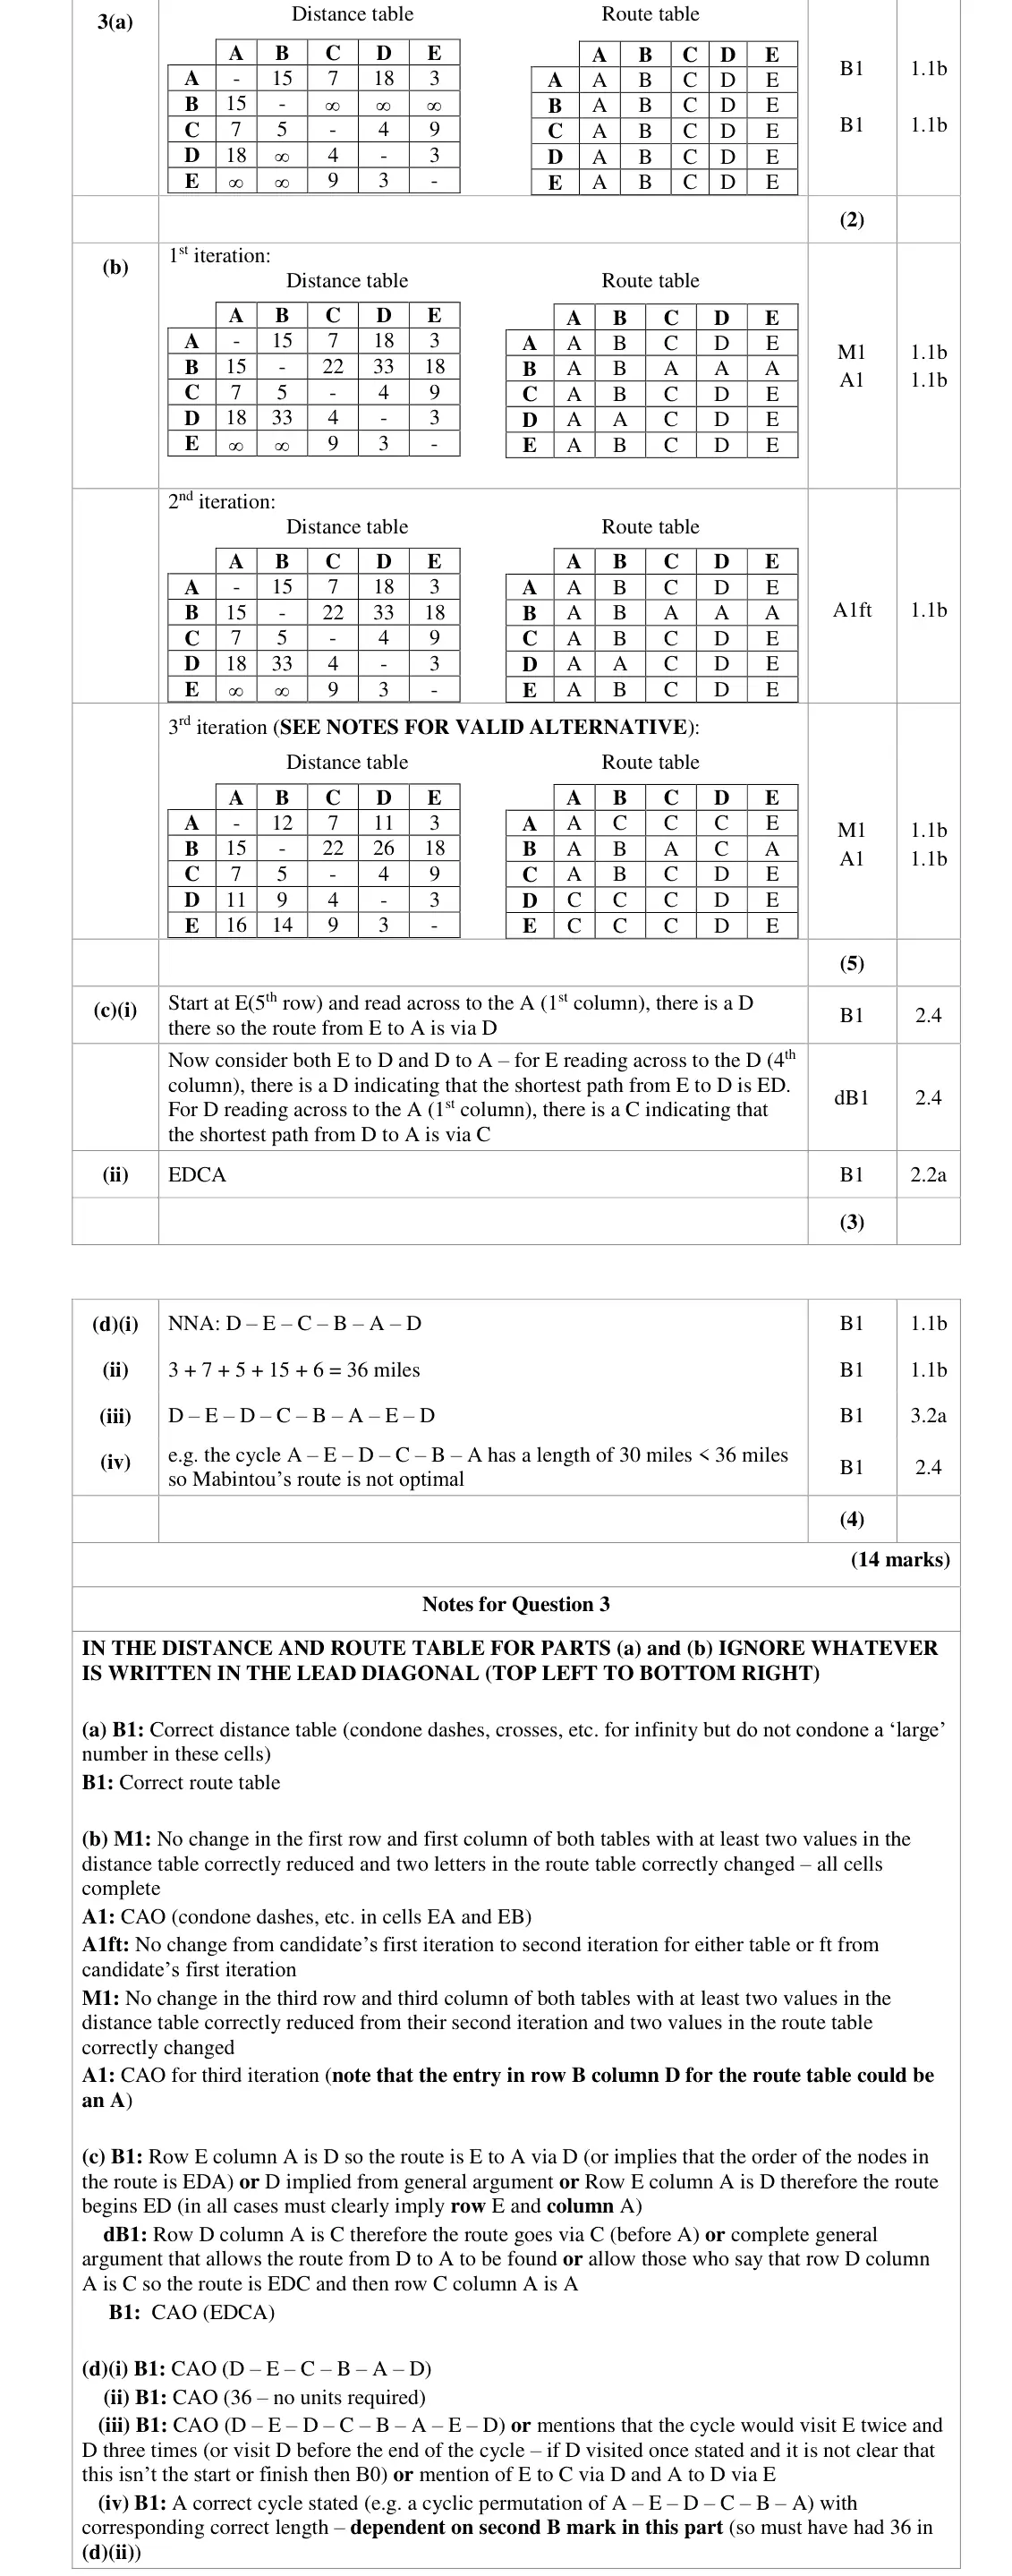
initial distance table with ∞ for no direct arc and the one-way roads AE, CB respected
route table has each column's own letter
tables are in the answer book
June 2019 · Paper 3D (Decision 1) · Q3(b)5 marks
Mark scheme (whole question; this part is marked with the orange bar)
Examiner's comment
or two errors causing them to drop the final accuracy mark in part (b), but a mark of 5 or 6 out of total of 7 (for parts (a) and (b)) was very common. Only a very small proportion of candidates lost method marks for changing entries in rows/columns that they should have been leaving unchanged for that iteration. It was part (c) and (d) that caused most problems for candidates. In part (c) several candidates were able
Key points from the mark scheme and examiner's report
iteration k leaves row k and column k unchanged
2nd iteration has no change
3rd iteration via C (e.g. AB 12, AD 11)
one or two slips usually cost the last A mark
June 2019 · Paper 3D (Decision 1) · Q3(c)3 marks
Mark scheme (whole question; this part is marked with the orange bar)
Examiner's comment
It was part (c) and (d) that caused most problems for candidates. In part (c) several candidates were able to score full marks for a near full (but not totally complete) response, due to the varying nature of the different methods. Many lost marks though as they were not clear about how to use the tables, many did not mention rows and columns specifically, which lost the first two marks in this part. Also, the second (dependent) B mark was especially rarely scored as many candidates did not fully consider the route from D to A. Meanwhile many candidates who lost these first two B marks still earnt the third for a correct route EDCA. Candidates should be aware of the level of detail required for a question that requires them to explain a method.
Key points from the mark scheme and examiner's report
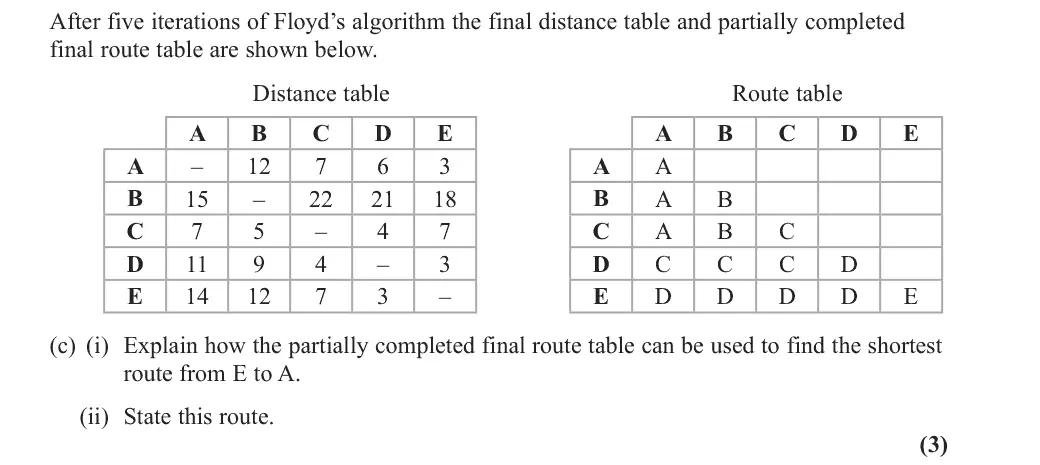
row E column A is D, so E→A via D
then row E column D (D) and row D column A (C), row C column A (A)
route EDCA
must refer to rows and columns explicitly
D to A step often omitted
June 2018 · AS Paper 2 (Decision 1) · Q1(a)6 marks
Mark scheme (whole question; this part is marked with the orange bar)
Examiner's comment
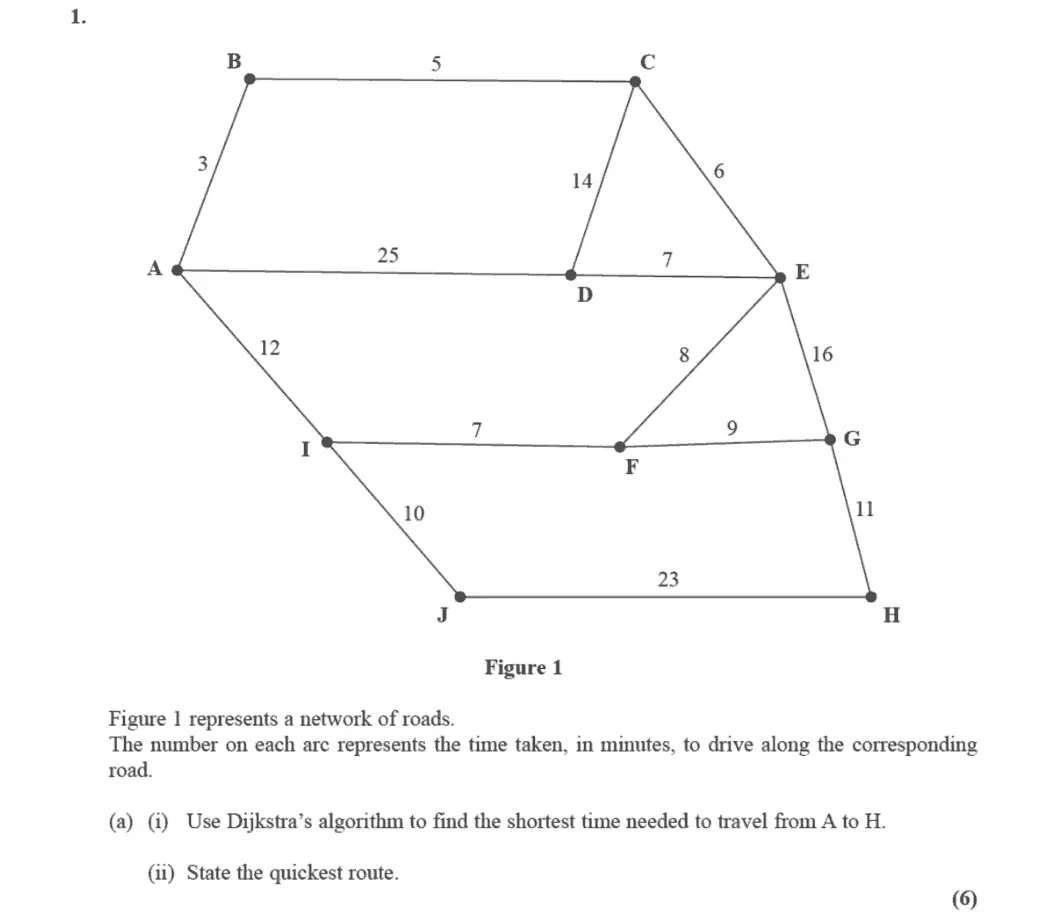
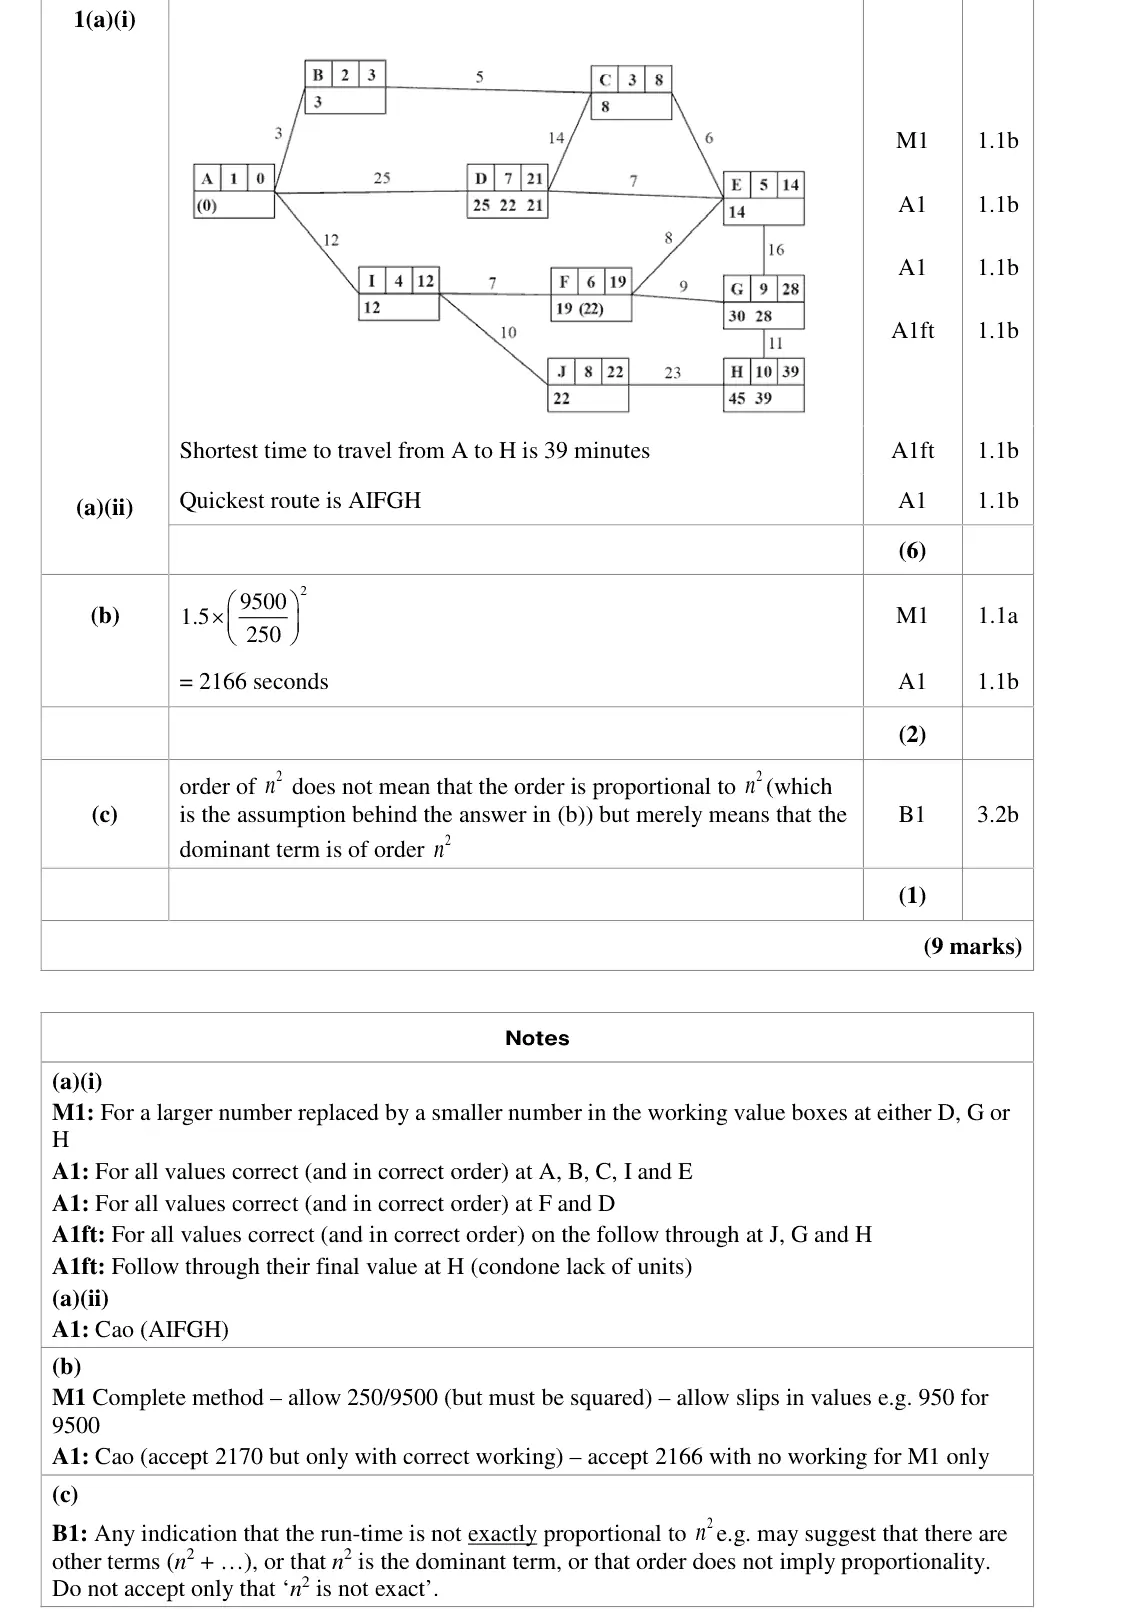
This question was the most successfully attempted question on the paper. Application of Dijkstra’s algorithm in (a) is familiar fare and most students made reasonable attempts. There were a number of common errors including: Missing out the labelling of node D. Order of labelling errors with two or more nodes having the same label. The working values were sometimes incorrect with a ‘55’ instead of a ‘45’ at H. A number of errors in the order of the working values, for example, at node G and sometimes extra working values appeared, for example, a value of 35 at C. A few responses contained no working values. Overall students appeared to find it more challenging than might have been the case for a similar question in recent sessions for the legacy module 6689/01. Often students neglected to state the shortest time and/or the quickest route. Part (b) was generally well attempted. A significant proportion
Key points from the mark scheme and examiner's report
39 minutes, route AIFGH
working values must be in the correct order with no extra values
D often left unlabelled
many forgot to state the time and/or the route
Find an Edexcel Further Maths tutor
Stuck on this? Book a trial lesson with our Further Maths tutor.