Notes, worked examples and practice for this topic are being written by our tutors. The past-paper questions below are ready now: work each one on paper, then open the mark scheme and the examiner's comment.
Tap a question to zoom it. Mark scheme and examiner's comment open under each question.
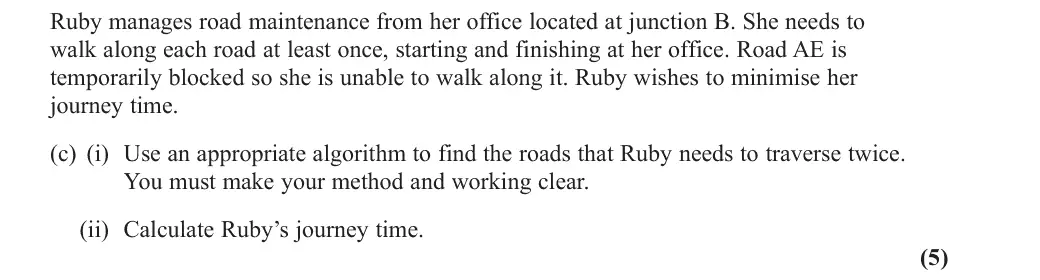
June 2025 · AS Paper 2 (Decision 1) · Q3(c)5 marks
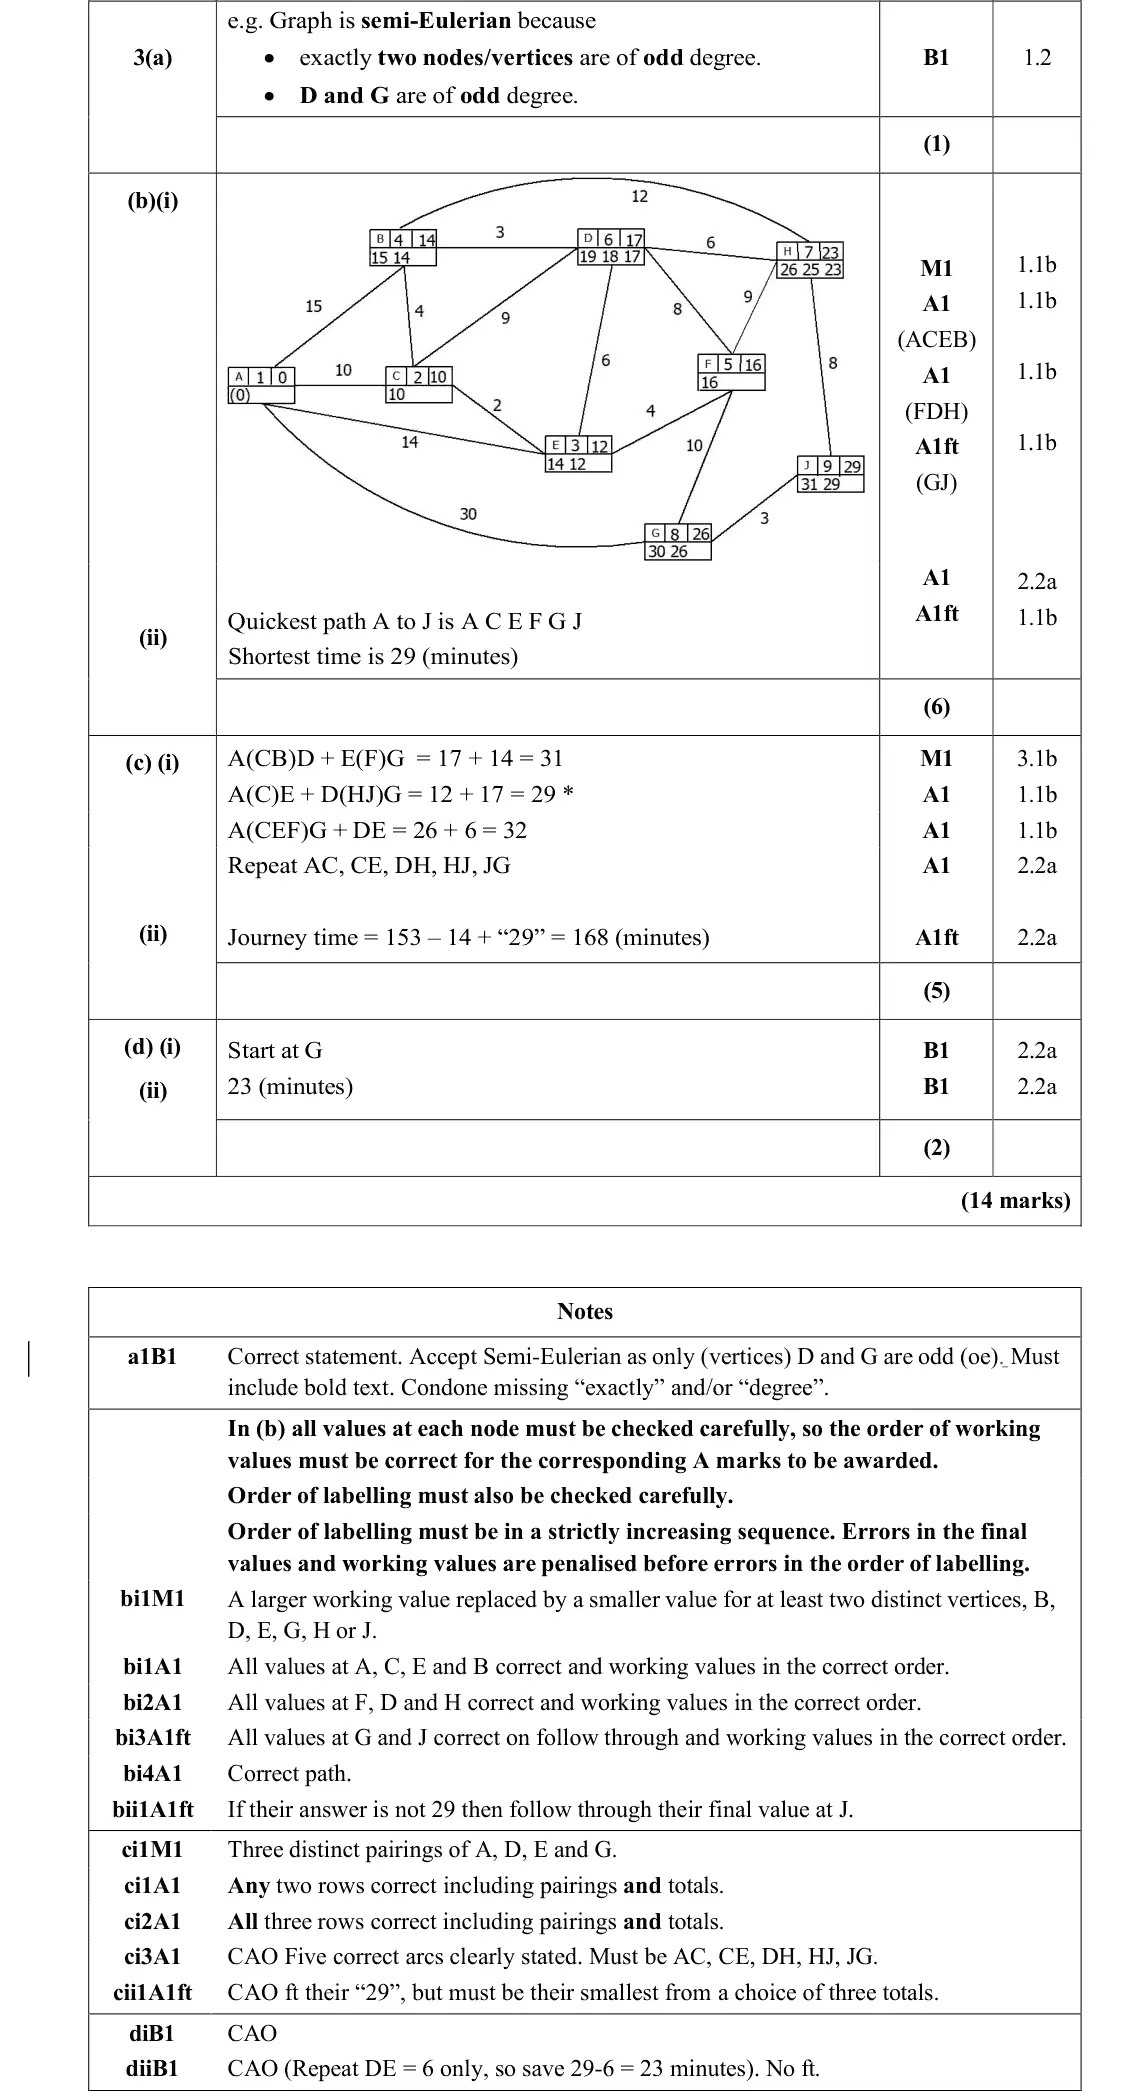
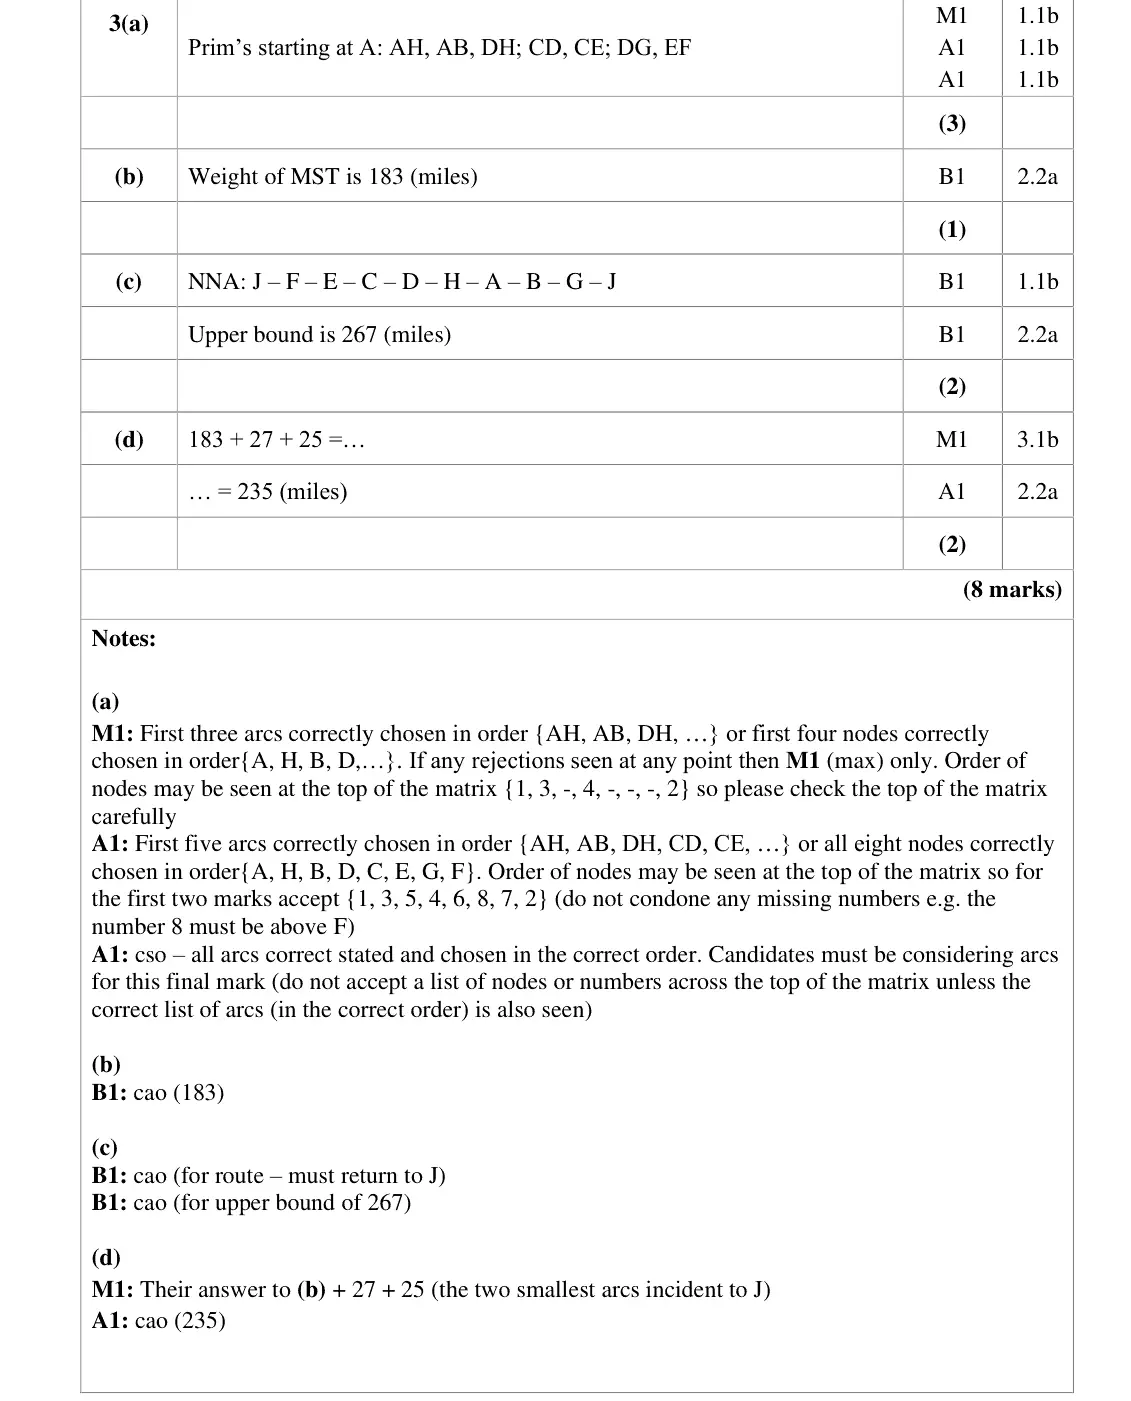
Mark scheme (whole question; this part is marked with the orange bar)
Examiner's comment
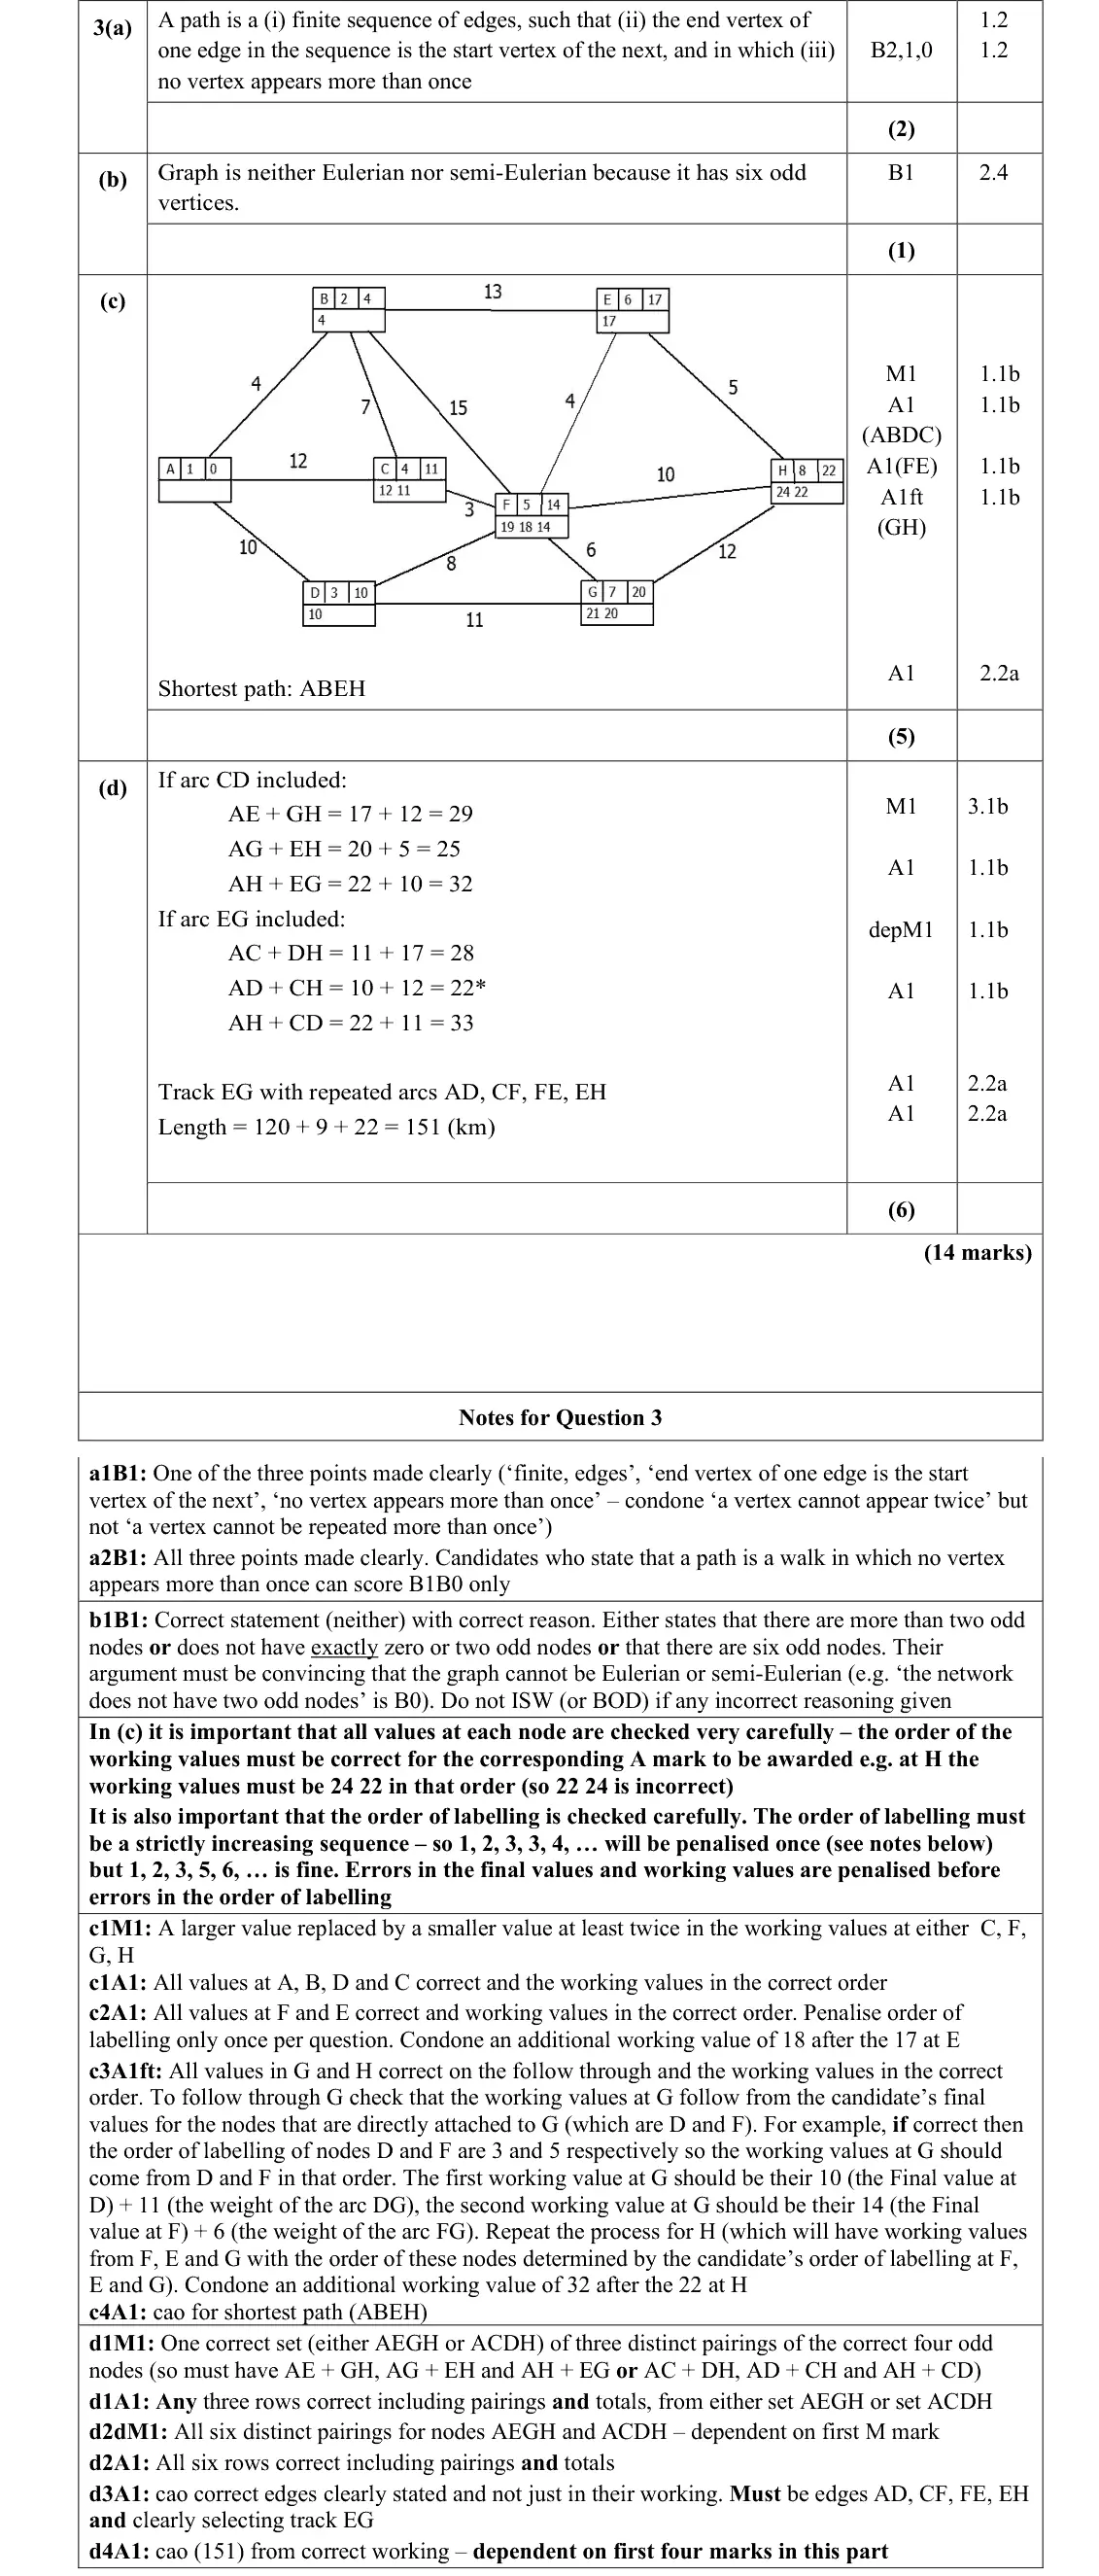
Part (c); although most learners found the correct set of nodes to pair up, the Route Inspection component caused significantly more challenge, with a surprising number of blank and nil responses on this question. Of those who understood the assignment, learners generally found correct pairings of the odd nodes and at least two correct totals. A number of learners interpreted the question to mean that the pairing involving AE could not be found; these learners lost at least 2 and usually 3 marks. Errors occurred in AC and DG (total 30 using DFG) or AD and EG total 32. A pleasing majority of those who found the correct optimal arcs also stated fully the arcs to be repeated, showing improvement from previous sessions. However, a majority of learners struggled with cii), failing to delete the arc AE’s weight and giving an answer of 182. Part d), again, discriminated well between the strongest learners and was not completed by a significant number. A reasonable number selected G as the start point (potentially as a guess), however E, D and A were popular incorrect alternatives. A relatively low number of learners correctly found dii), potentially due to misunderstanding the consideration of the pairings correctly, but also due to incorrect pairings in part c).
Key points from the mark scheme and examiner's report
remove AE (14): odd vertices A, D, E, G
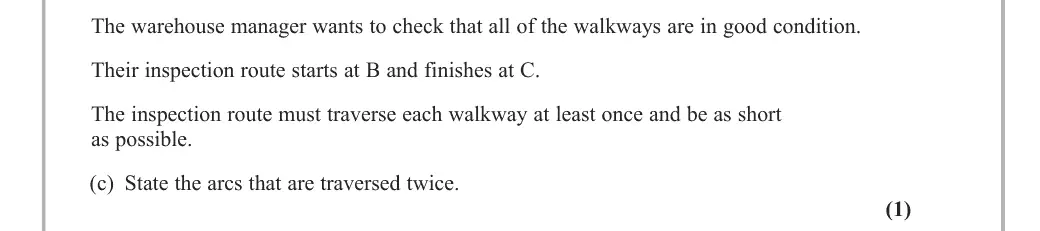
pairings 31, 29, 32: repeat AC, CE, DH, HJ, JG
time 153 − 14 + 29 = 168 minutes
many forgot to remove AE (182)
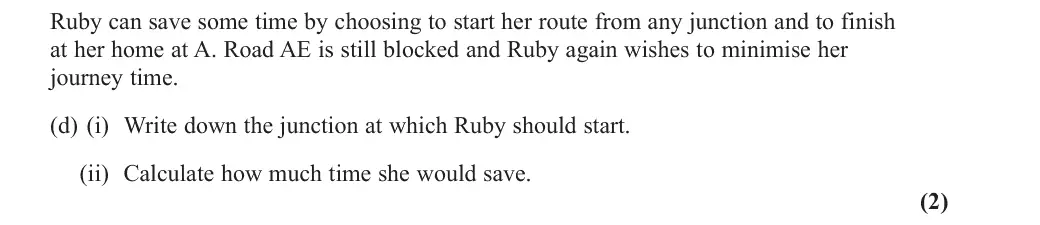
June 2025 · AS Paper 2 (Decision 1) · Q3(d)2 marks
Mark scheme (whole question; this part is marked with the orange bar)
Examiner's comment
This was a standard Dijkstra/Route Inspection question, and the first half of the question was generally very well-answered. Again, the second half created a level of differentiation among the learners.
Key points from the mark scheme and examiner's report
finishing at A, start at G and repeat only DE (6): saves 29 − 6 = 23 minutes
E, D or A were common wrong starts
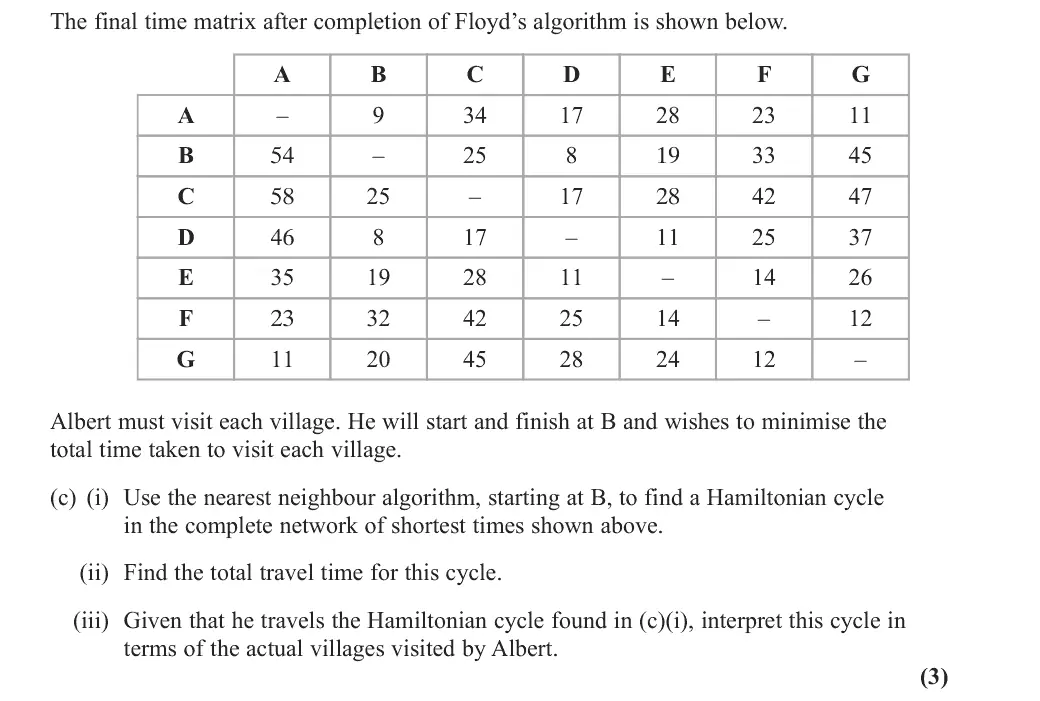
June 2025 · Paper 3D (Decision 1) · Q3(c)3 marks
Mark scheme (whole question; this part is marked with the orange bar)
Examiner's comment
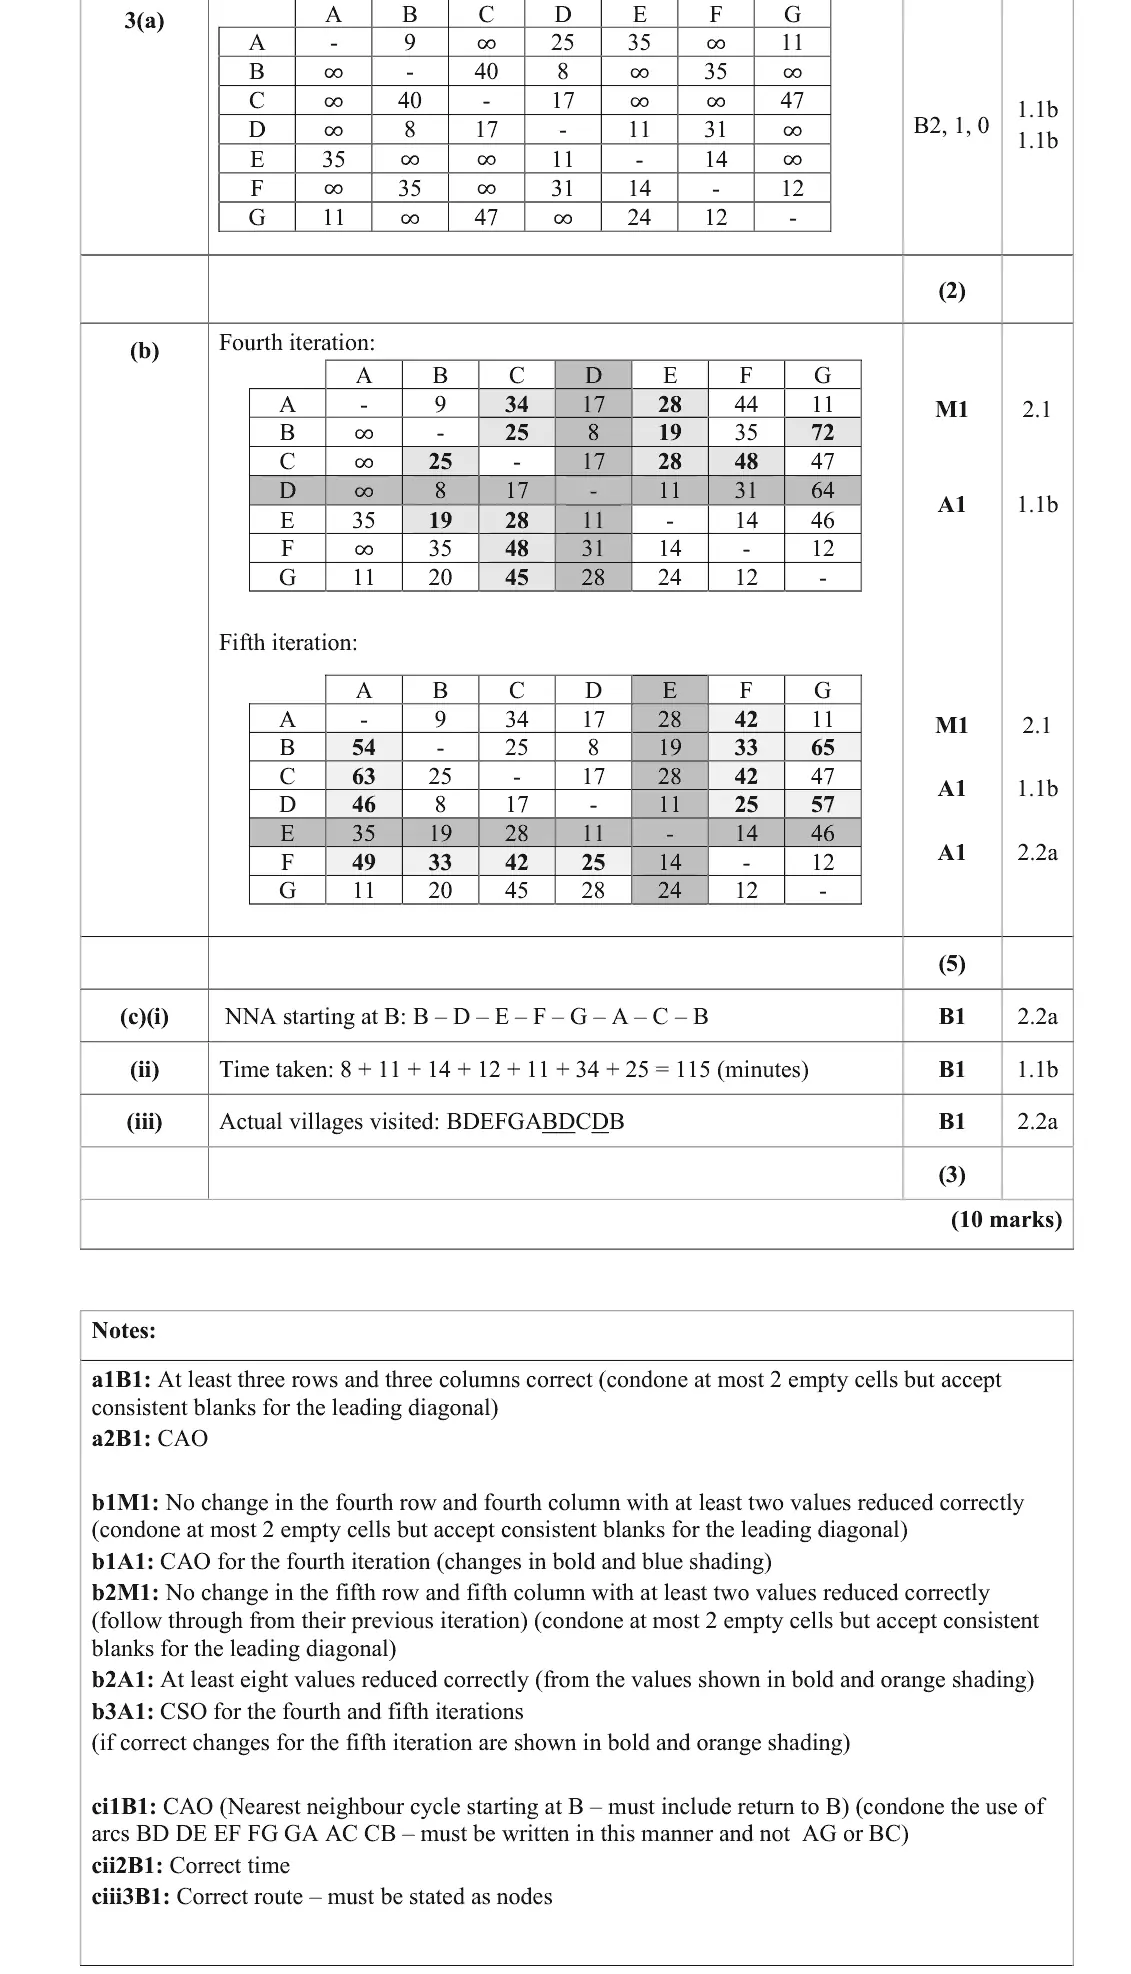
Part (c) (i) was answered well and did not rely on part (b) being correct. Errors in (ii) were typically in computing a time of 139 and not correctly reading off the distance values from the fifth iteration. However, in the final part a significant number of candidates failed to correctly interpret this cycle in terms of the actual villages visited, with many just requoting their answer to (i).
Key points from the mark scheme and examiner's report
NNA from B along rows: B–D–E–F–G–A–C–B
115 minutes (139 a common slip)
actual villages B D E F G A B D C D B
many just repeated the cycle
June 2025 · Paper 3D (Decision 1) · Q4(b)5 marks
Mark scheme (whole question; this part is marked with the orange bar)
Examiner's comment
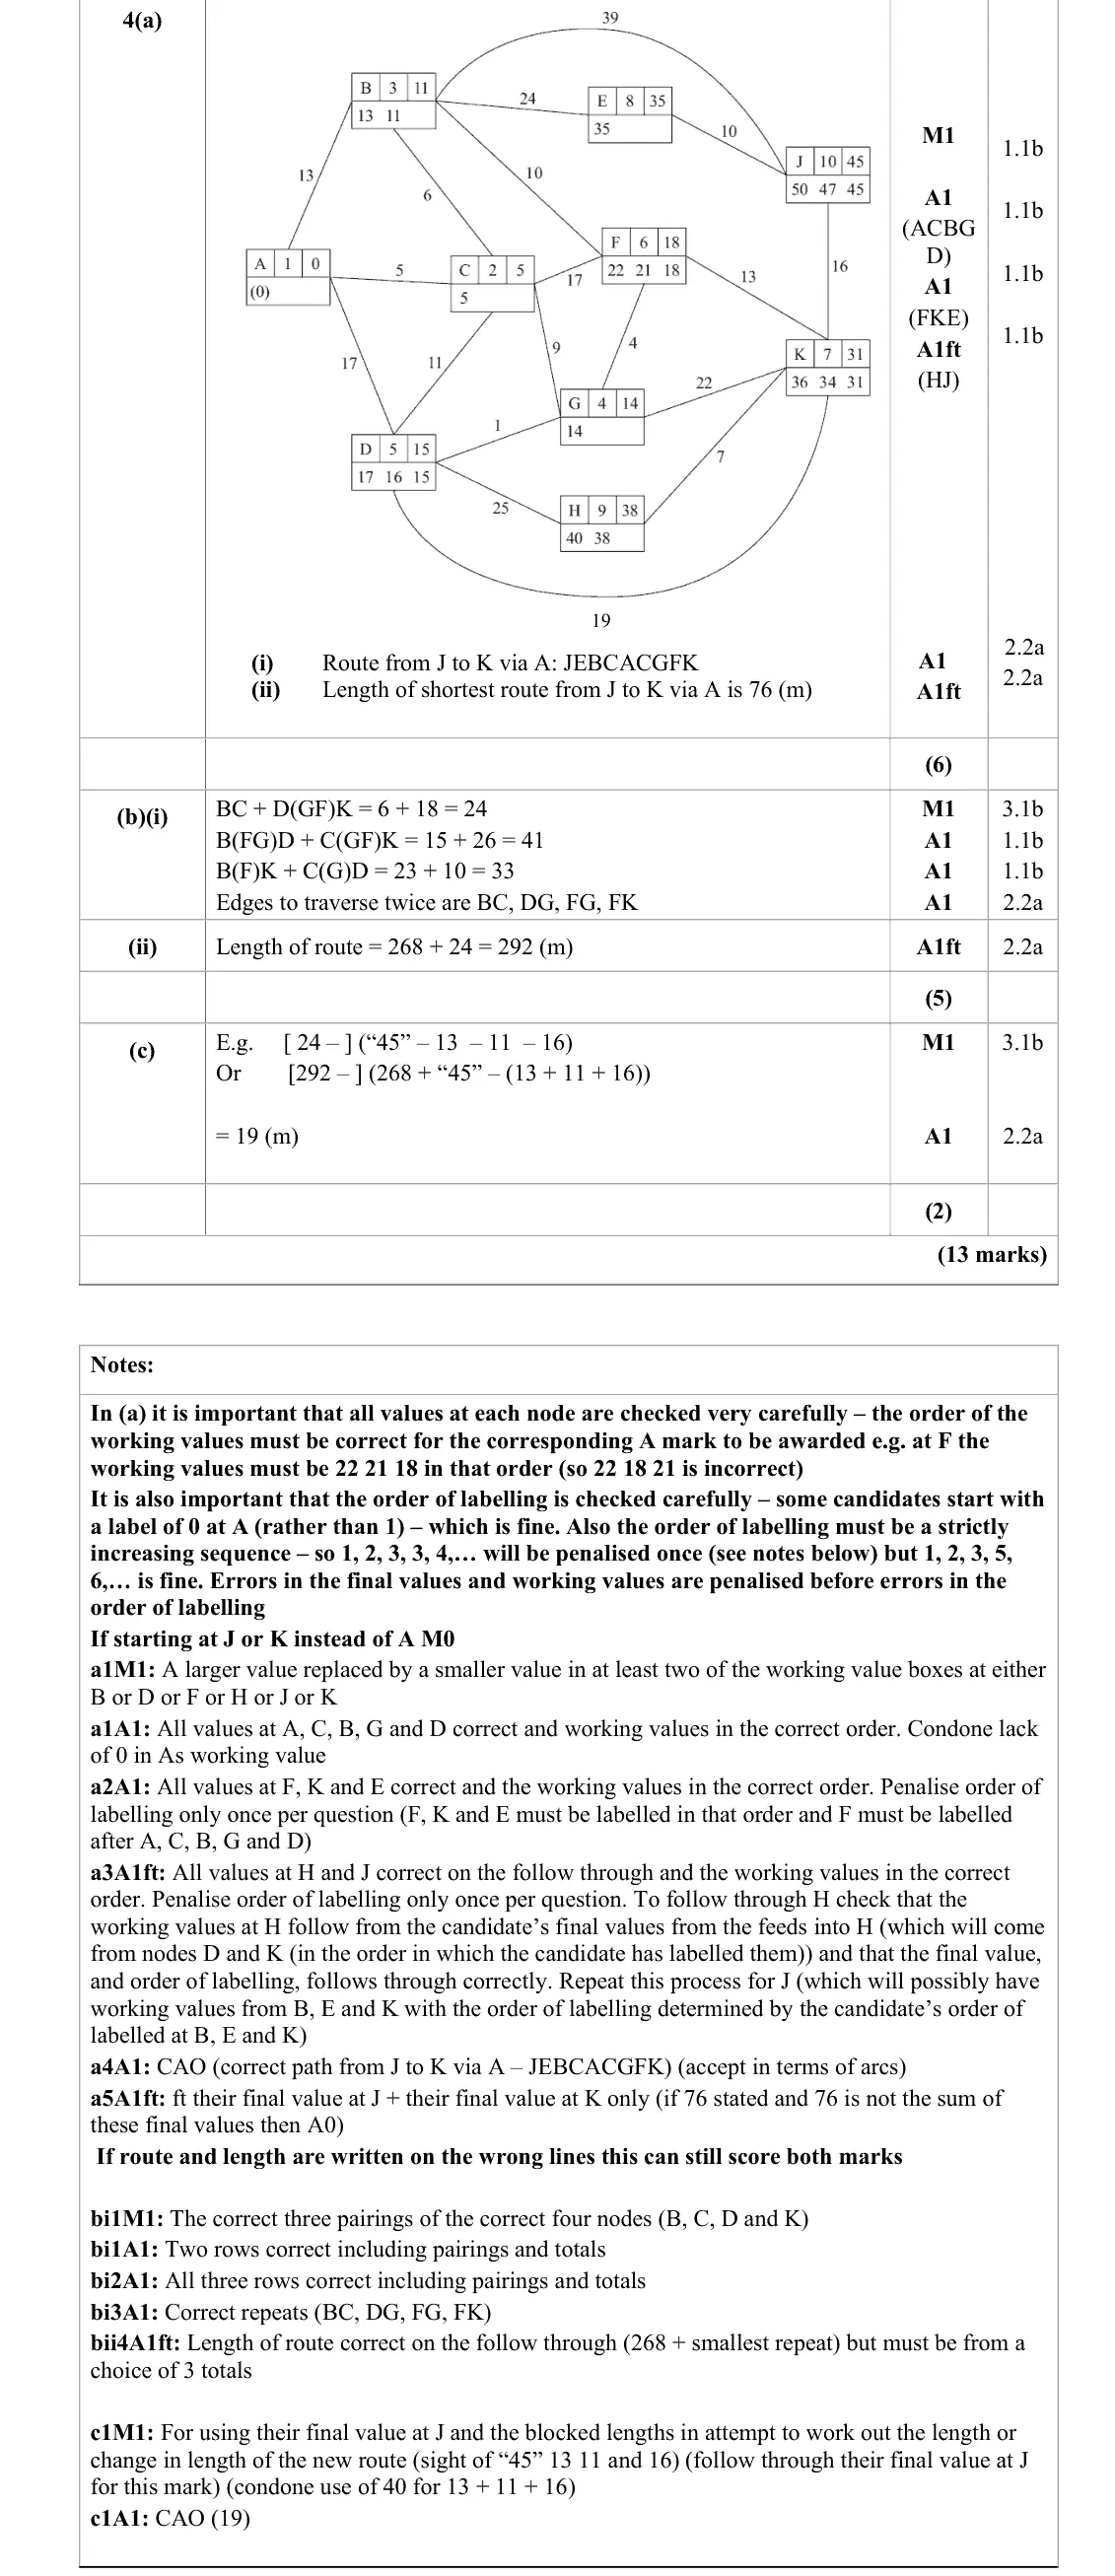
Part (b) was attempted by most candidates with reasonable success. Most were able to identify the correct four odd-valency nodes (B, C, D, and K). However, errors frequently occurred in the calculation of route totals, with 25 and 42 often appearing instead of the correct 24 and 41. A significant issue was candidates listing only the node pairs rather than explicitly stating the arcs traversed twice. Many missed that DGFK is a shorter path than DK (18 vs 19), which affected route selection and overall accuracy.
Key points from the mark scheme and examiner's report
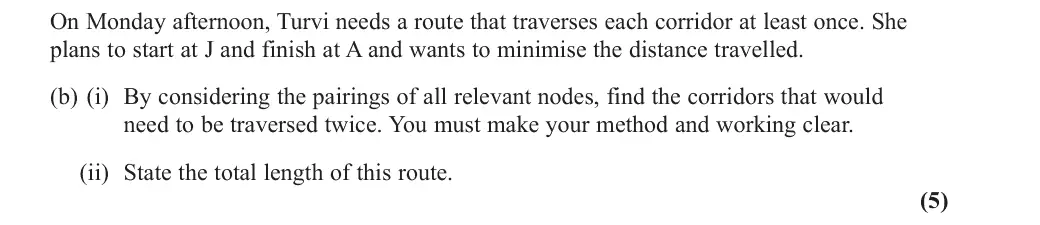
start J, finish A so pair the other odd nodes B, C, D, K
BC + DK via G, F = 6 + 18 = 24 smallest (DGFK 18 beats DK 19)
repeat BC, DG, FG, FK
268 + 24 = 292 m
give corridors, not pairs
June 2025 · Paper 3D (Decision 1) · Q4(c)2 marks
Mark scheme (whole question; this part is marked with the orange bar)
Examiner's comment
Part (c) was poorly answered across the board. Although many candidates made attempts, few demonstrated understanding of the task. Most failed to use the shortest route to J (which is 45) or neglected to include the correct number of arcs. Overall, this section revealed a lack of understanding on what the question required.
Key points from the mark scheme and examiner's report
removing AB, CD, JK leaves only J and A odd: 268 − 40 + 45 = 273 m, so the difference is 292 − 273 = 19 m
few used the shortest J to A of 45
June 2024 · AS Paper 2 (Decision 1) · Q3(c)1 mark
Mark scheme (whole question; this part is marked with the orange bar)
Examiner's comment
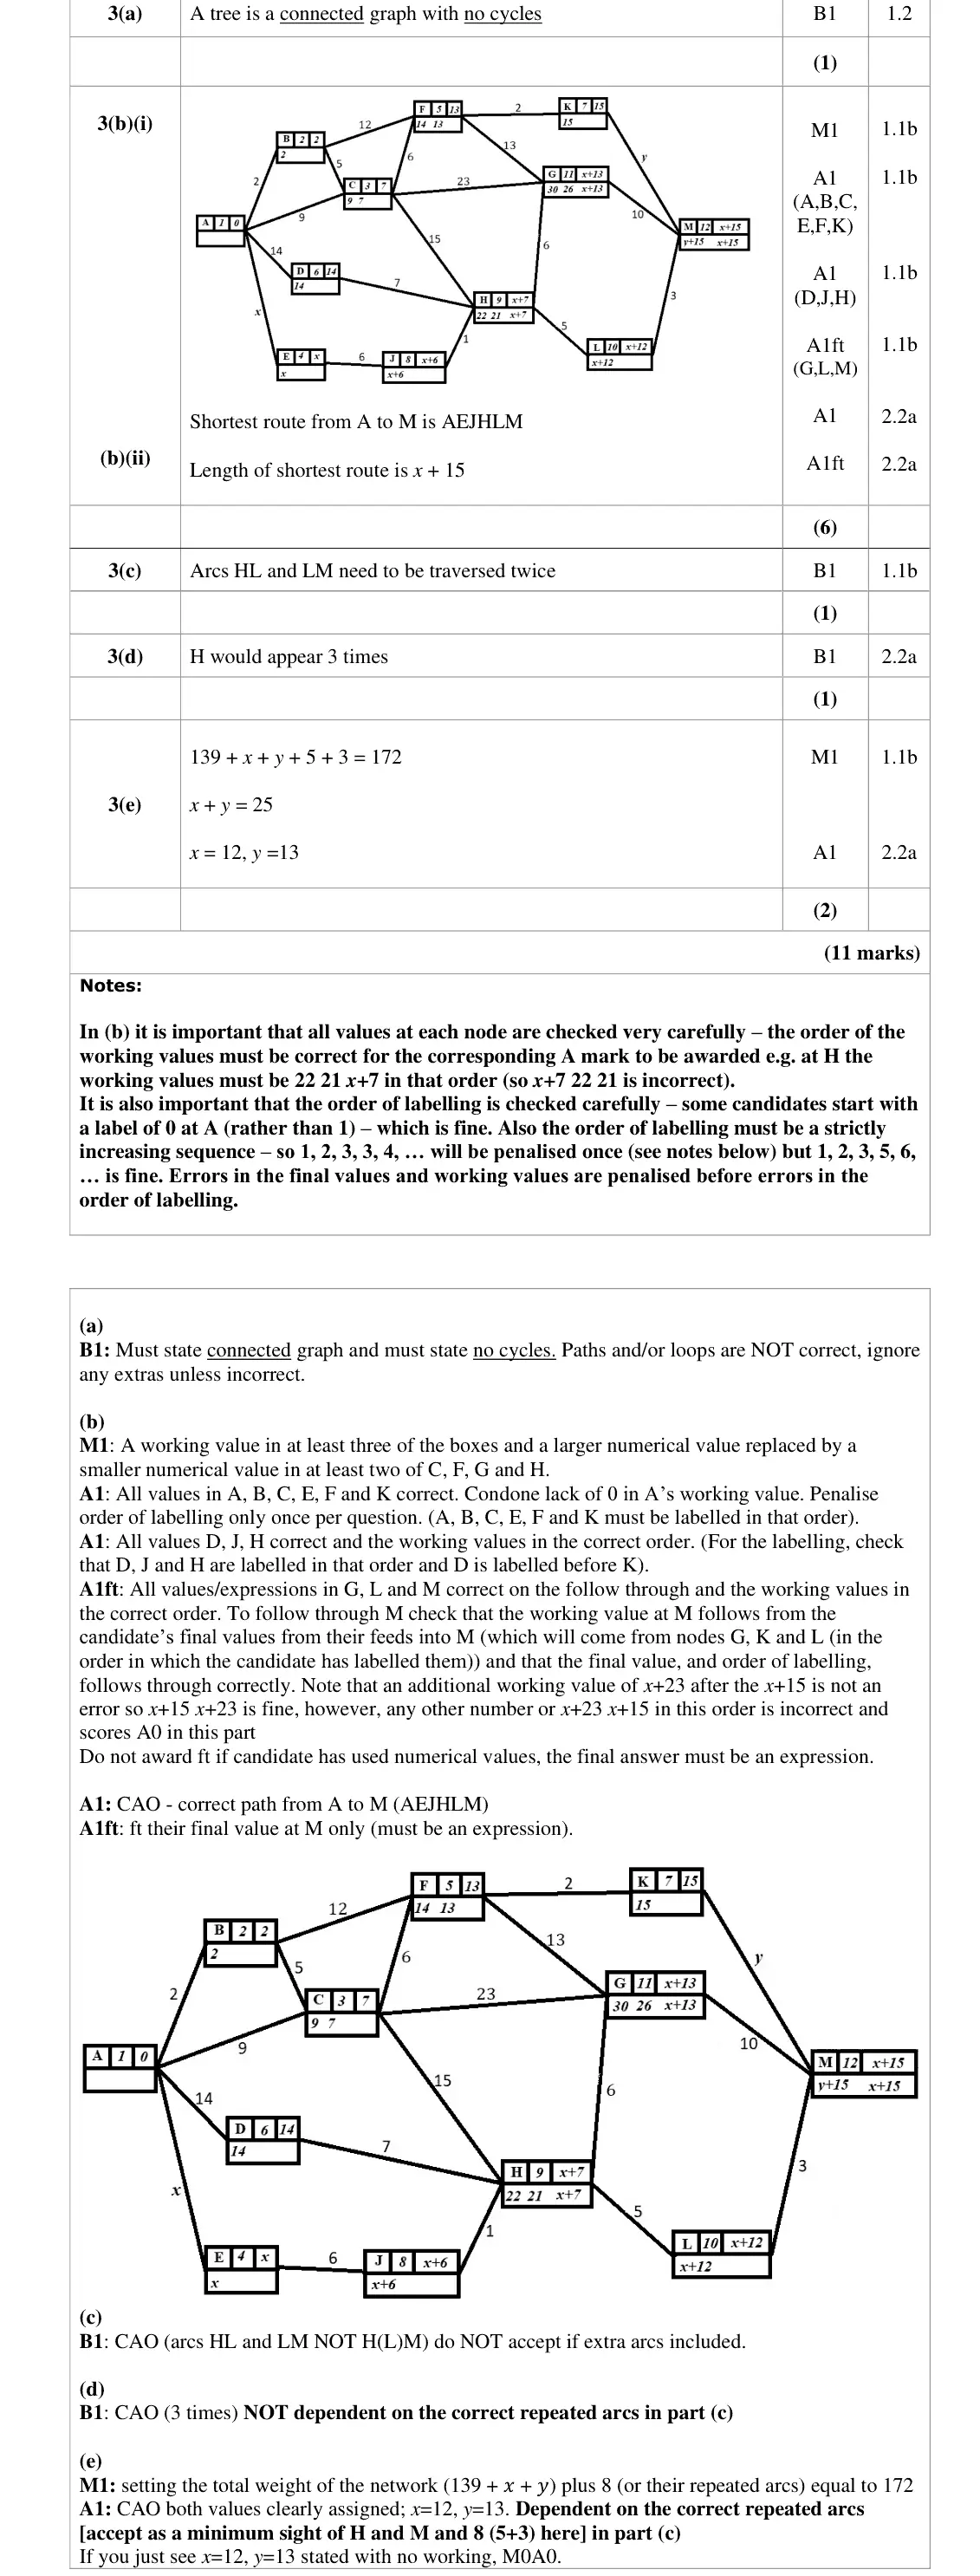
This question saw a much wider range of scores awarded. Part a) required pupils to accurately define a “tree”, however few candidates correctly used the appropriate technical terms; those that did had clearly learnt the definition. Many incorrectly described a spanning tree or used “loops” instead of “cycles” or missed that it needed to be connected. Candidates were clearly unfamiliar with how to accurately convey the definition and often confused it with elements of other definitions that have been previously assessed and hence this part was often omitted. In part b) it was clear that candidates had learned Dijkstra’s algorithm, however the use of unknowns proved too much for some who either tried to deal with purely numerical values, or quickly made significant errors. However, a pleasing number of candidates scored 4, 5 or 6 marks on part i) for generally accurate attempts along with correct routes and lengths in terms of x. Common errors tended to occur at H (either 22 or 21 missing), G (30 or 26 missing), E and F or G and L labelled in the wrong order. Most candidates achieved the shortest route from A to M, but candidates were not necessarily clear that the length of their shortest route could be given as an expression, even though the question asked for the answer in this format. Some candidates are still obliterating their working values or writing them down in the incorrect order, indicating a lack of understanding of the process required. In part c) most candidates recognised the nodes BCHM as odd, however the most common response was to fail to appreciate that B and C were the start and end nodes and were not required as part of the correct calculation. Those that did identify HM as the pair, generally gave the correct arcs, however it was not uncommon to see vertices listed as opposed to arcs. Part d) produced a slender majority of correct answers, however frequently candidates stated 2, 6, or other integers, possibly from listing the nodes as opposed to the arcs. Most understood the need to add in the length of the repeated arcs from c) in part e). Those that had listed BC as one of their arcs ended up with e.g. x + y = 20 and were then able to progress further, often giving a wrong answer such as x = 9, y = 11. Those that correctly identified HL and LM in c) generally achieved both marks in e).
Key points from the mark scheme and examiner's report
odd nodes B, C, H, M but route starts at B and ends at C, so only H and M are paired: repeat HL and LM
BC wrongly included by many
arcs, not vertices
June 2024 · AS Paper 2 (Decision 1) · Q3(d)1 mark
Mark scheme (whole question; this part is marked with the orange bar)
Examiner's comment
This question saw a much wider range of scores awarded. Part a) required pupils to accurately define a “tree”, however few candidates correctly used the appropriate technical terms; those that did had clearly learnt the definition. Many incorrectly described a spanning tree or used “loops” instead of “cycles” or missed that it needed to be connected. Candidates were clearly unfamiliar with how to accurately convey the definition and often confused it with elements of other definitions that have been previously assessed and hence this part was often omitted. In part b) it was clear that candidates had learned Dijkstra’s algorithm, however the use of unknowns proved too much for some who either tried to deal with purely numerical values, or quickly made significant errors. However, a pleasing number of candidates scored 4, 5 or 6 marks on part i) for generally accurate attempts along with correct routes and lengths in terms of x. Common errors tended to occur at H (either 22 or 21 missing), G (30 or 26 missing), E and F or G and L labelled in the wrong order. Most candidates achieved the shortest route from A to M, but candidates were not necessarily clear that the length of their shortest route could be given as an expression, even though the question asked for the answer in this format. Some candidates are still obliterating their working values or writing them down in the incorrect order, indicating a lack of understanding of the process required. In part c) most candidates recognised the nodes BCHM as odd, however the most common response was to fail to appreciate that B and C were the start and end nodes and were not required as part of the correct calculation. Those that did identify HM as the pair, generally gave the correct arcs, however it was not uncommon to see vertices listed as opposed to arcs. Part d) produced a slender majority of correct answers, however frequently candidates stated 2, 6, or other integers, possibly from listing the nodes as opposed to the arcs. Most understood the need to add in the length of the repeated arcs from c) in part e). Those that had listed BC as one of their arcs ended up with e.g. x + y = 20 and were then able to progress further, often giving a wrong answer such as x = 9, y = 11. Those that correctly identified HL and LM in c) generally achieved both marks in e).
Key points from the mark scheme and examiner's report
H has order 4 plus one repeated arc HL, so appears 3 times
June 2024 · AS Paper 2 (Decision 1) · Q3(e)2 marks
Mark scheme (whole question; this part is marked with the orange bar)
Examiner's comment
This question saw a much wider range of scores awarded. Part a) required pupils to accurately define a “tree”, however few candidates correctly used the appropriate technical terms; those that did had clearly learnt the definition. Many incorrectly described a spanning tree or used “loops” instead of “cycles” or missed that it needed to be connected. Candidates were clearly unfamiliar with how to accurately convey the definition and often confused it with elements of other definitions that have been previously assessed and hence this part was often omitted. In part b) it was clear that candidates had learned Dijkstra’s algorithm, however the use of unknowns proved too much for some who either tried to deal with purely numerical values, or quickly made significant errors. However, a pleasing number of candidates scored 4, 5 or 6 marks on part i) for generally accurate attempts along with correct routes and lengths in terms of x. Common errors tended to occur at H (either 22 or 21 missing), G (30 or 26 missing), E and F or G and L labelled in the wrong order. Most candidates achieved the shortest route from A to M, but candidates were not necessarily clear that the length of their shortest route could be given as an expression, even though the question asked for the answer in this format. Some candidates are still obliterating their working values or writing them down in the incorrect order, indicating a lack of understanding of the process required. In part c) most candidates recognised the nodes BCHM as odd, however the most common response was to fail to appreciate that B and C were the start and end nodes and were not required as part of the correct calculation. Those that did identify HM as the pair, generally gave the correct arcs, however it was not uncommon to see vertices listed as opposed to arcs. Part d) produced a slender majority of correct answers, however frequently candidates stated 2, 6, or other integers, possibly from listing the nodes as opposed to the arcs. Most understood the need to add in the length of the repeated arcs from c) in part e). Those that had listed BC as one of their arcs ended up with e.g. x + y = 20 and were then able to progress further, often giving a wrong answer such as x = 9, y = 11. Those that correctly identified HL and LM in c) generally achieved both marks in e).
Key points from the mark scheme and examiner's report
139 + x + y + 8 = 172 gives x + y = 25, with 9 < x < y < 14: x = 12, y = 13
June 2024 · Paper 3D (Decision 1) · Q2(d)1 mark
Mark scheme (whole question; this part is marked with the orange bar)
Examiner's comment
In part (d) the majority of candidate realised they needed to double the weight of their minimum spanning tree to obtain the upper bound although some candidates were confused here with the method for the calculation of the lower bound and instead added ‘two shortest lengths’ or sometimes added just AD.
Key points from the mark scheme and examiner's report
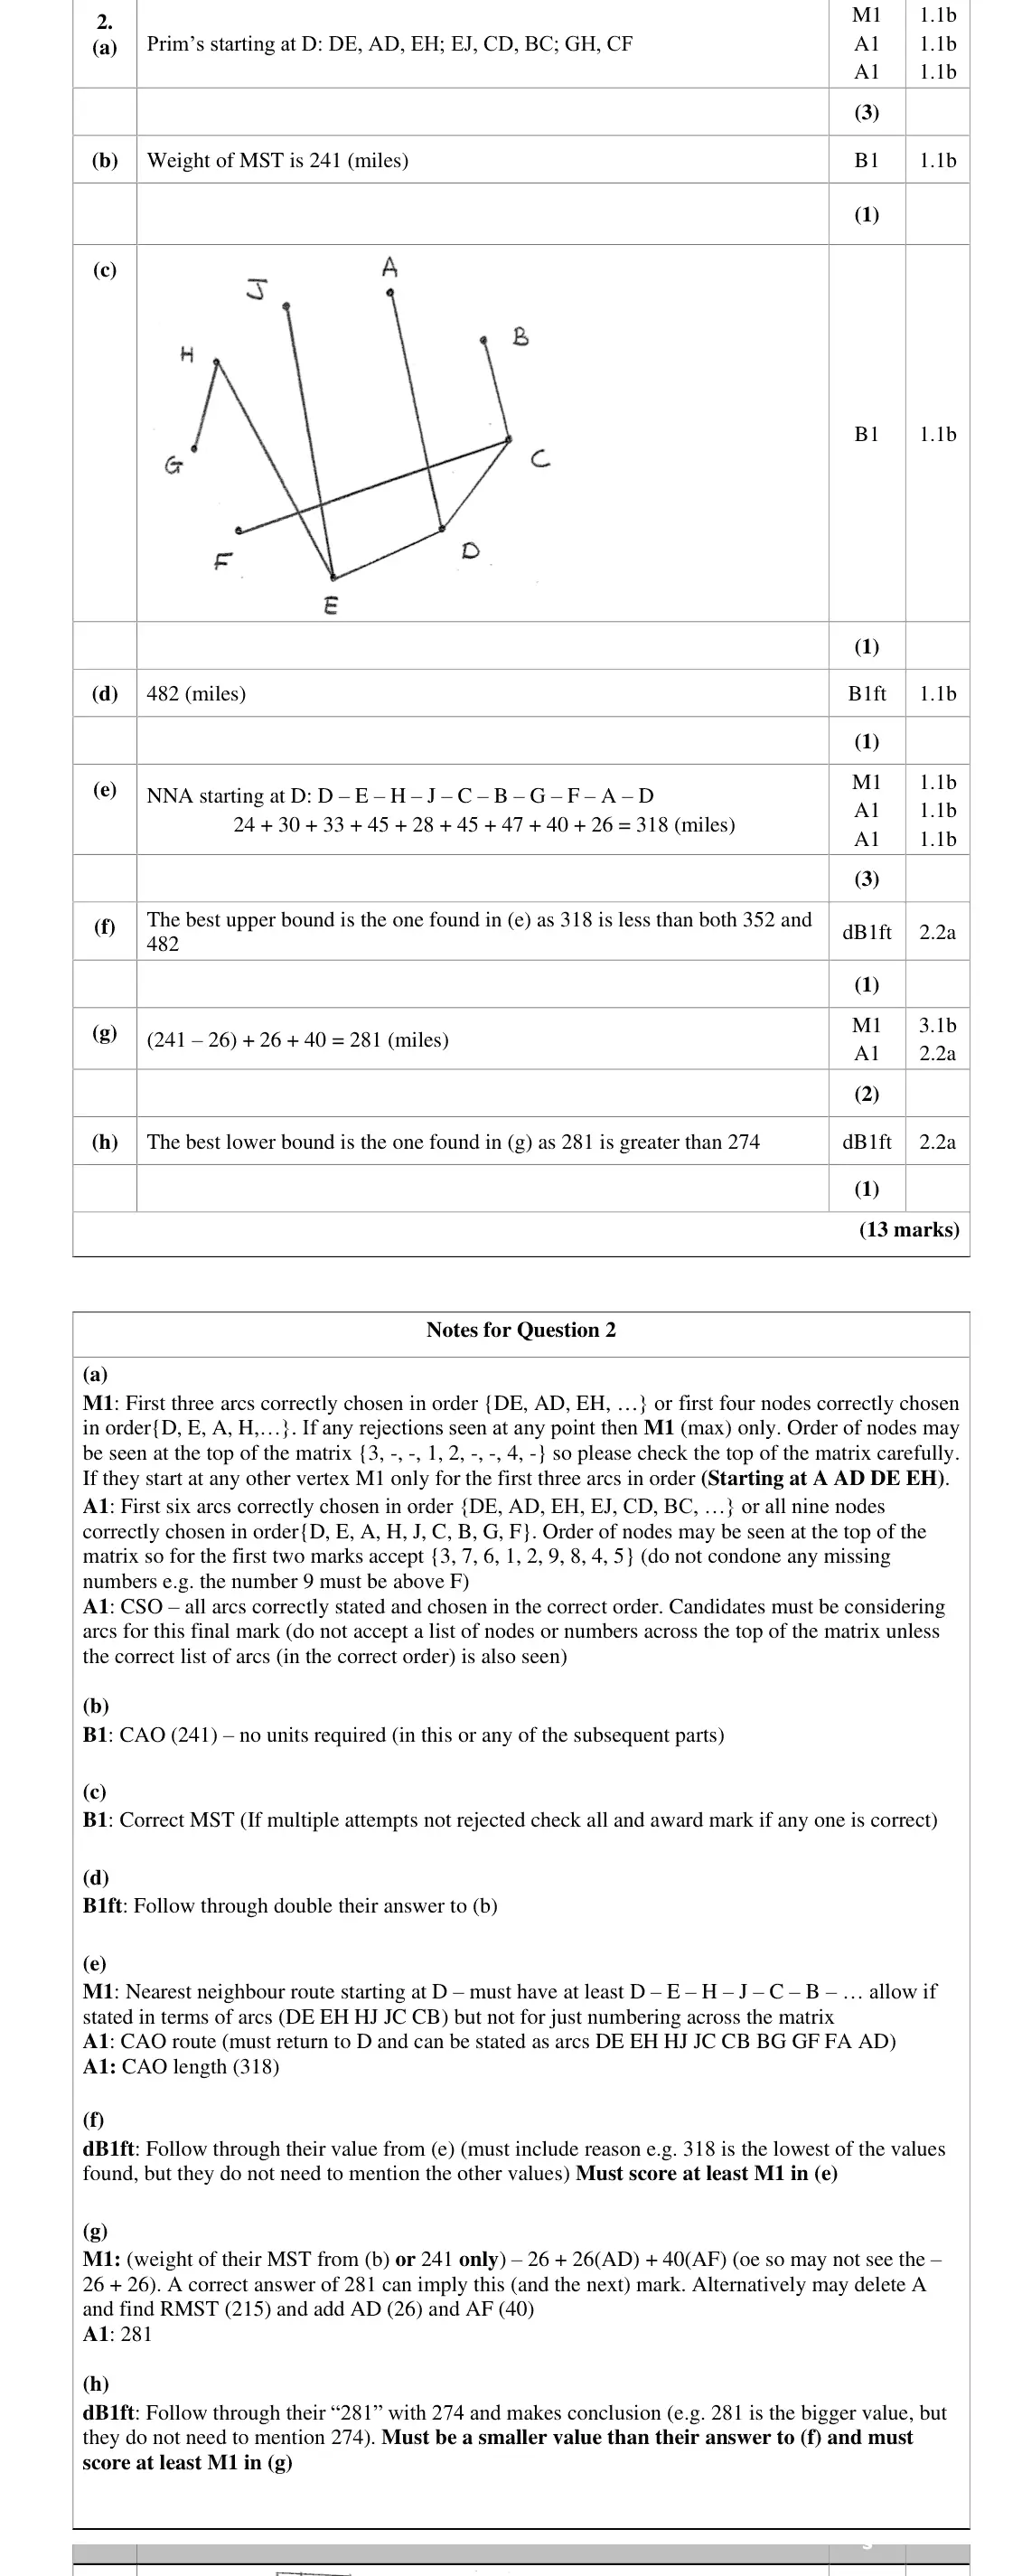
initial upper bound is twice the MST: 482
some added the two shortest arcs (lower-bound method)
June 2024 · Paper 3D (Decision 1) · Q2(e)3 marks
Mark scheme (whole question; this part is marked with the orange bar)
Examiner's comment
In part (e), the nearest neighbour algorithm was usually successfully applied with the most common error being the omission of returning to the starting vertex or sometimes due to missing a node en route.
Key points from the mark scheme and examiner's report
NNA from D: D–E–H–J–C–B–G–F–A–D = 318 miles
must return to D
June 2024 · Paper 3D (Decision 1) · Q2(f)1 mark
Mark scheme (whole question; this part is marked with the orange bar)
Examiner's comment
In the comparison of upper and lower bounds in parts (f) and (h), it was clear that most candidates understood which would be the preferred option in either case and could clearly explain why. Some candidates were not quite specific enough though, giving explanations about the range being reduced rather than comparing the relevant values. The question was well answered overall, with most lost marks being due to slips rather than a misunderstanding of the content being assessed.
Key points from the mark scheme and examiner's report
best upper bound is the smallest: 318 (less than 352 and 482)
vague comments about reducing the range scored 0
June 2024 · Paper 3D (Decision 1) · Q2(g)2 marks
Mark scheme (whole question; this part is marked with the orange bar)
Examiner's comment
In part (g), many candidates started again, rather than adapting the work already done. Those who used their minimum spanning tree from part (a) generally made fewer errors than those
Key points from the mark scheme and examiner's report
adapt the MST: RMST = 241 − 26 = 215, plus AD 26 and AF 40 = 281
reusing the MST avoided errors
June 2024 · Paper 3D (Decision 1) · Q2(h)1 mark
Mark scheme (whole question; this part is marked with the orange bar)
Examiner's comment
In the comparison of upper and lower bounds in parts (f) and (h), it was clear that most candidates understood which would be the preferred option in either case and could clearly explain why. Some candidates were not quite specific enough though, giving explanations about the range being reduced rather than comparing the relevant values. The question was well answered overall, with most lost marks being due to slips rather than a misunderstanding of the content being assessed.
Key points from the mark scheme and examiner's report
best lower bound is the largest: 281 > 274
June 2024 · Paper 3D (Decision 1) · Q3(b)6 marks
Mark scheme (whole question; this part is marked with the orange bar)
Examiner's comment
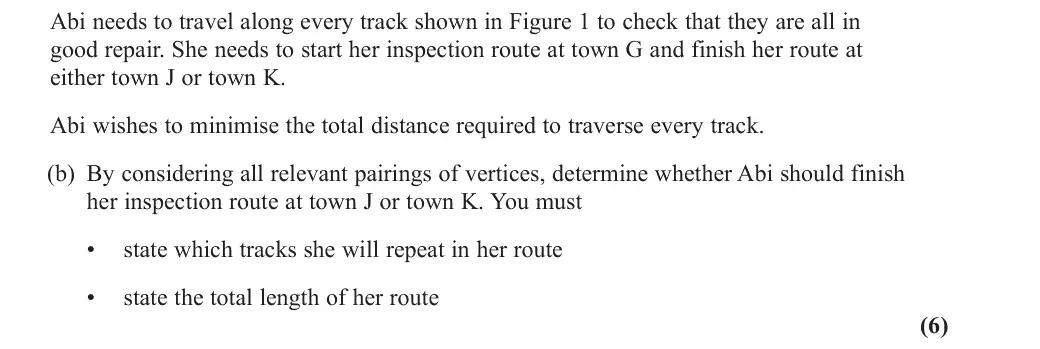
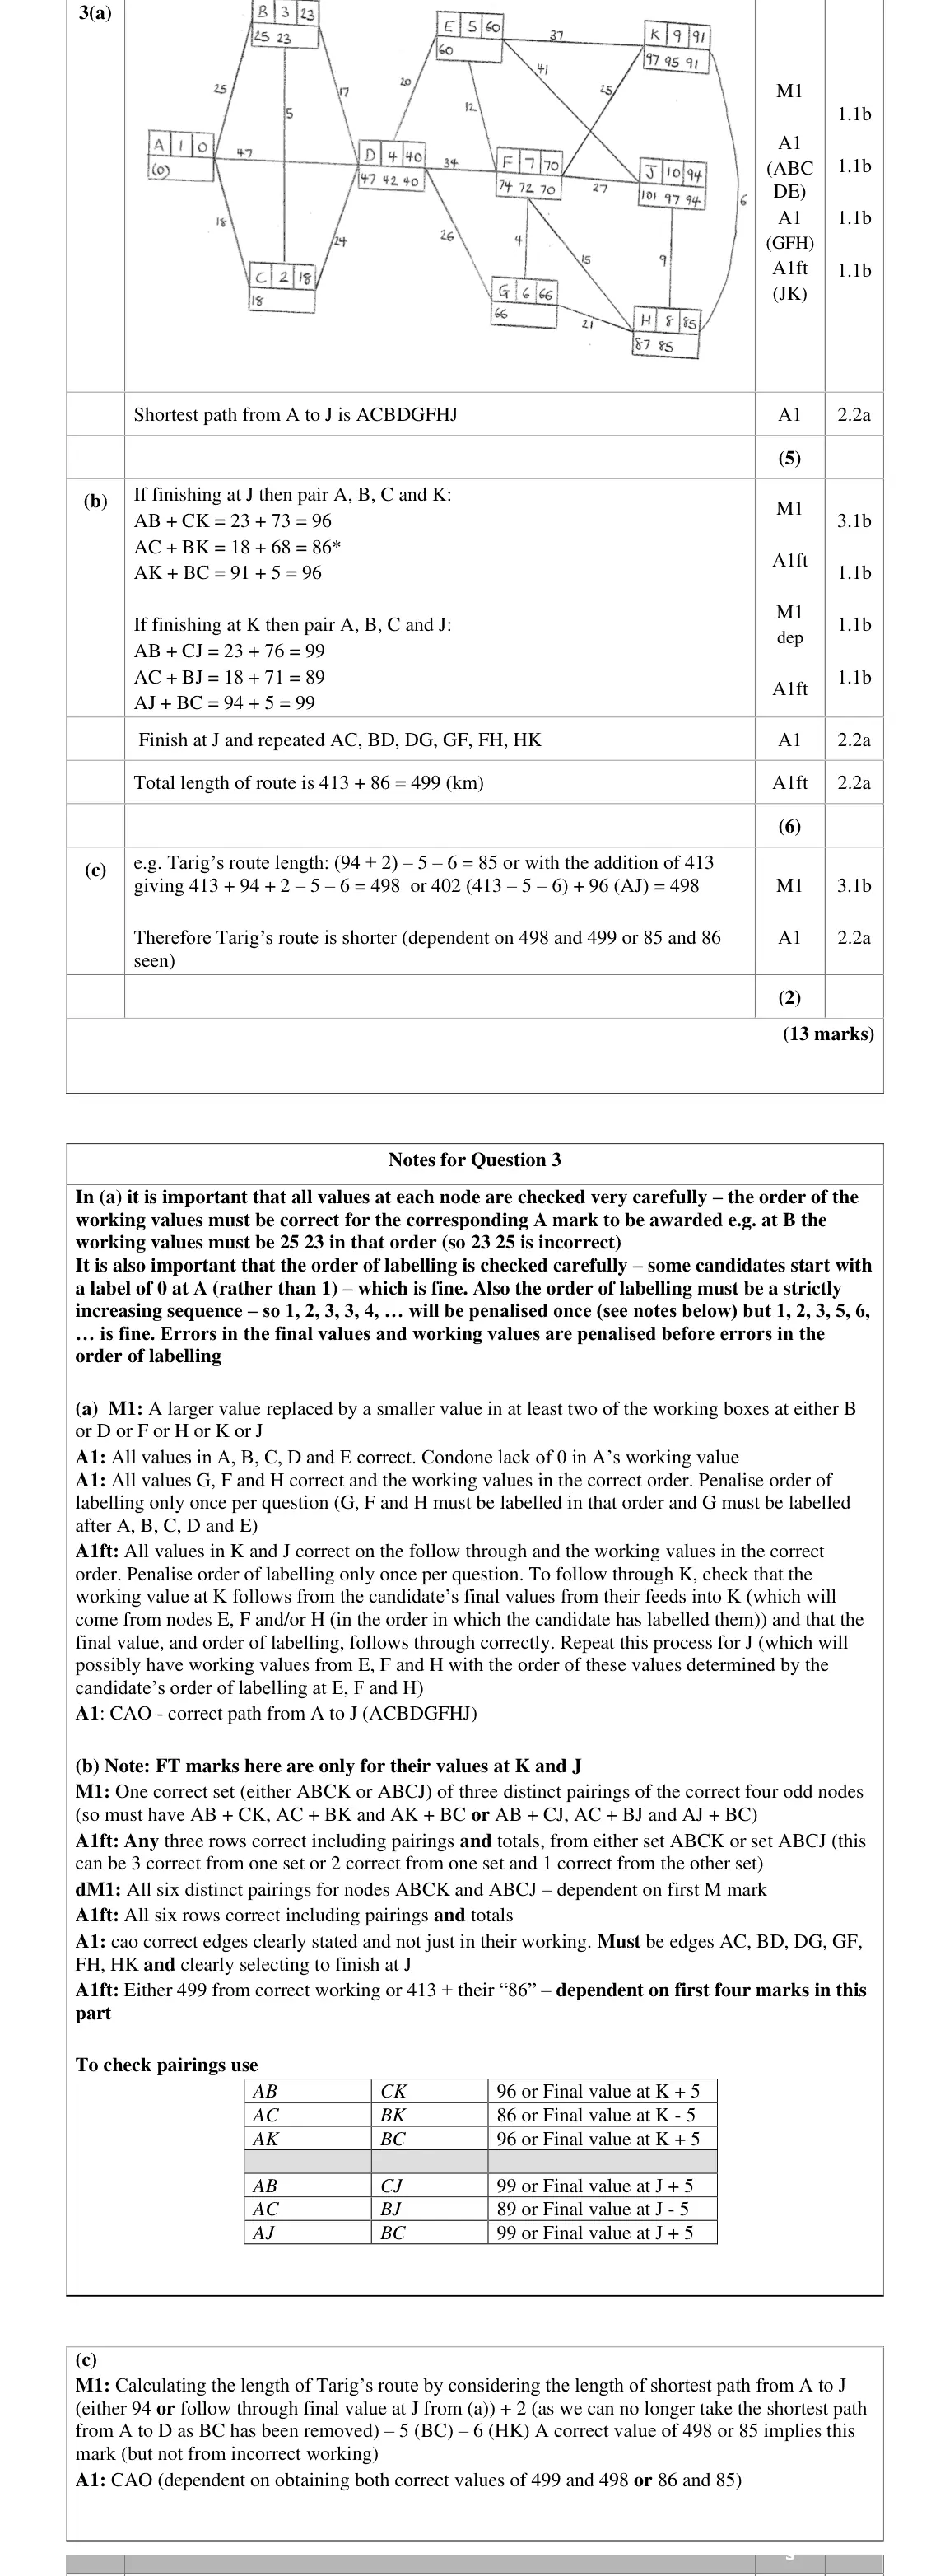
In part (b) most candidates could identify the five nodes which should be considered, but some were apparently at a loss for how to separate out into the cases of finishing at K or finishing at J in order to apply the route inspection algorithm. A small number of responses included G to have six odd nodes and attempted three pairings. For those candidates who did apply the correct approach, arithmetic errors were common, despite correct values having been obtained in part (a). It is apparent that many candidates are unaware of how to use the result of Dijkstra in the route inspection. Some failed to provide two full sets of pairings of the odd nodes and others did not give totals for each pairing. Candidates would benefit from more practice in presenting their solutions to this type of question to ensure that all steps are included. It was not uncommon, for example, to see the penultimate mark lost here due to the omission of either the repeated arcs being stated explicitly (often BK being stated rather than BD DG GF FH HK in full), or the lack of a conclusion of which node should be the finishing node. Credit was given to those candidates who had made an error in calculating the final values at J and K in part (a), but who used their values correctly.
Key points from the mark scheme and examiner's report
odd nodes A, B, C, G, J, K
start G so finish at J (pair A, B, C, K) or K (pair A, B, C, J)
six pairings
AC + BK = 86 smallest so finish at J, repeat AC, BD, DG, GF, FH, HK
413 + 86 = 499 km
June 2024 · Paper 3D (Decision 1) · Q3(c)2 marks
Mark scheme (whole question; this part is marked with the orange bar)
Examiner's comment
Part (c) provided something of a challenge to many candidates and was a good discriminator. Responses that were seen offered elements of a correct approach and it was clear that there was understanding of the new combination of paths which were required to be travelled twice. However, only the strongest candidates realised the impact of the change in available arcs and the impact on the shortest path. It was common to simply reuse AJ = 94 without adjusting the length. The failure to either subtract the two arcs which had been removed or to increase the distance from A to J by two, due to the change in path following the arc deletion, resulted in common incorrect answers of 496, 507 and 509.
Key points from the mark scheme and examiner's report
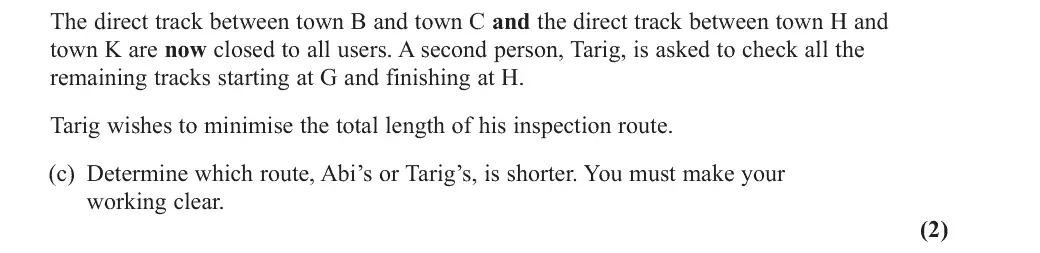
without BC and HK only A and J need pairing but the shortest A to J is now 94 + 2 = 96
413 − 5 − 6 + 96 = 498 < 499 so Tarig's route is shorter
most reused 94 unchanged
June 2023 · AS Paper 2 (Decision 1) · Q5(c)6 marks
Mark scheme (whole question; this part is marked with the orange bar)
Examiner's comment
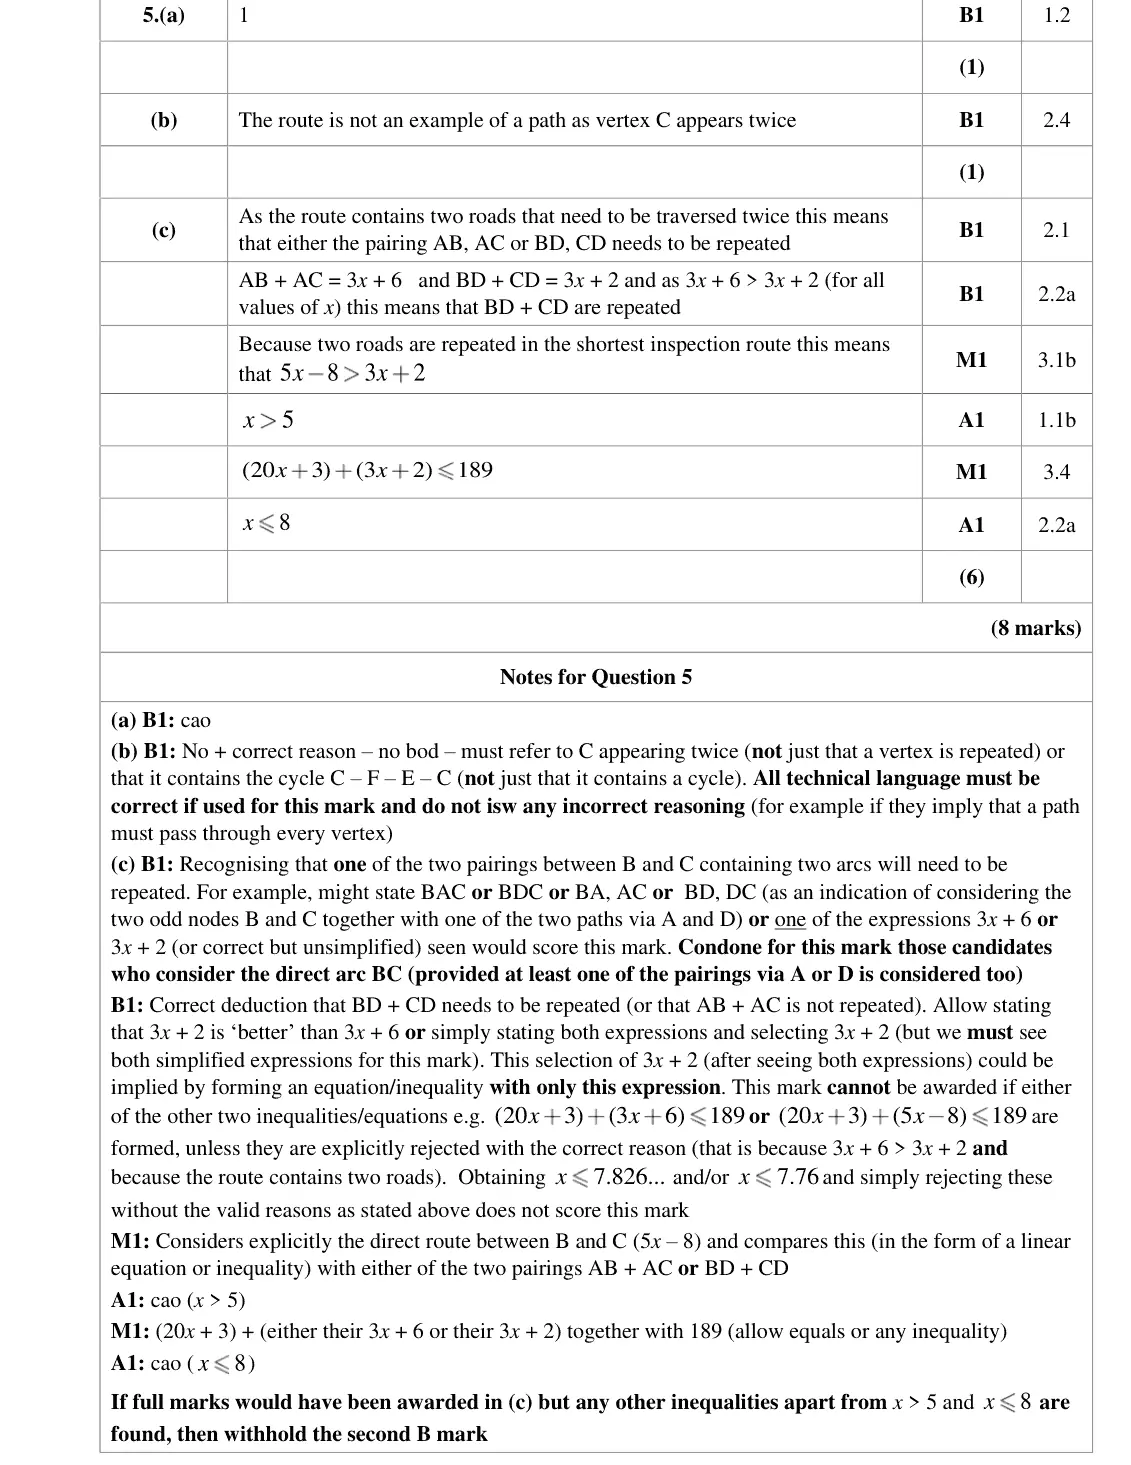
The responses to this question were mixed; some candidates left the entire question blank or responses, as expected, to part (c) were mixed with very few candidates scoring all six marks. Candidates are reminded that the number of marks is a good indication of the amount of work required when answering any question at this level. It was clear that many candidates failed to read the question carefully and did not engage with the line in the stem to part (c) that said that the given inspection route contained two roads that needed to be traversed twice (and so many formed an equation containing the incorrect expression 5x – 8). What was expected in this part was for candidates to realise that as the inspection route contained two roads (that were repeated) this therefore meant that either pairing AB, AC or BD, CD were repeated, and when considering the linear expressions for these two pairings, it was therefore clear that it was BD, CD that was repeated (as 3x + 2 < 3x + 6 for all x). Those candidates who realised this usually went on to correctly find that x was at most 8. However, this was not the end of the story as many did not then realise that as two roads were repeated in the inspection route this implied that 5x – 8 > 3x + 2 (that is the direct route of B to C must be greater than the
Key points from the mark scheme and examiner's report
odd nodes B and C
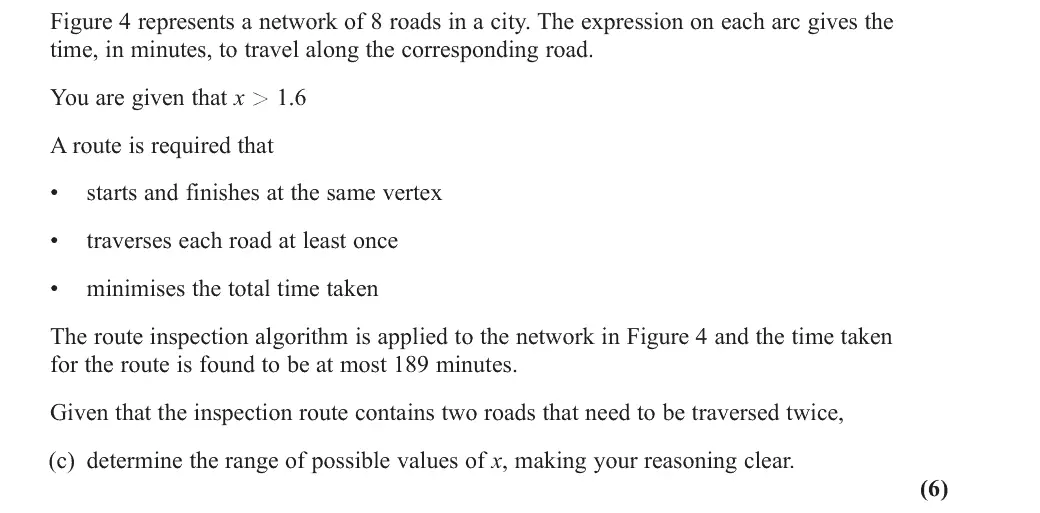
two repeated roads means BD + CD (3x + 2 < 3x + 6 via A), and 5x − 8 > 3x + 2 gives x > 5
20x + 3 + 3x + 2 ≤ 189 gives x ≤ 8
so 5 < x ≤ 8
many ignored the two-roads condition and used 5x − 8
June 2023 · Paper 3D (Decision 1) · Q5(a)5 marks
Mark scheme (whole question; this part is marked with the orange bar)
Examiner's comment
Part (a) proved discriminating as many candidates were unable to identify the correct four nodes which needed pairing for the given route, instead choosing C, D, G and J. For those that were able to identify that F needed to be considered rather than J, the overwhelming majority scored full marks in this part. A minority of candidates did not fully list the arcs to be repeated.
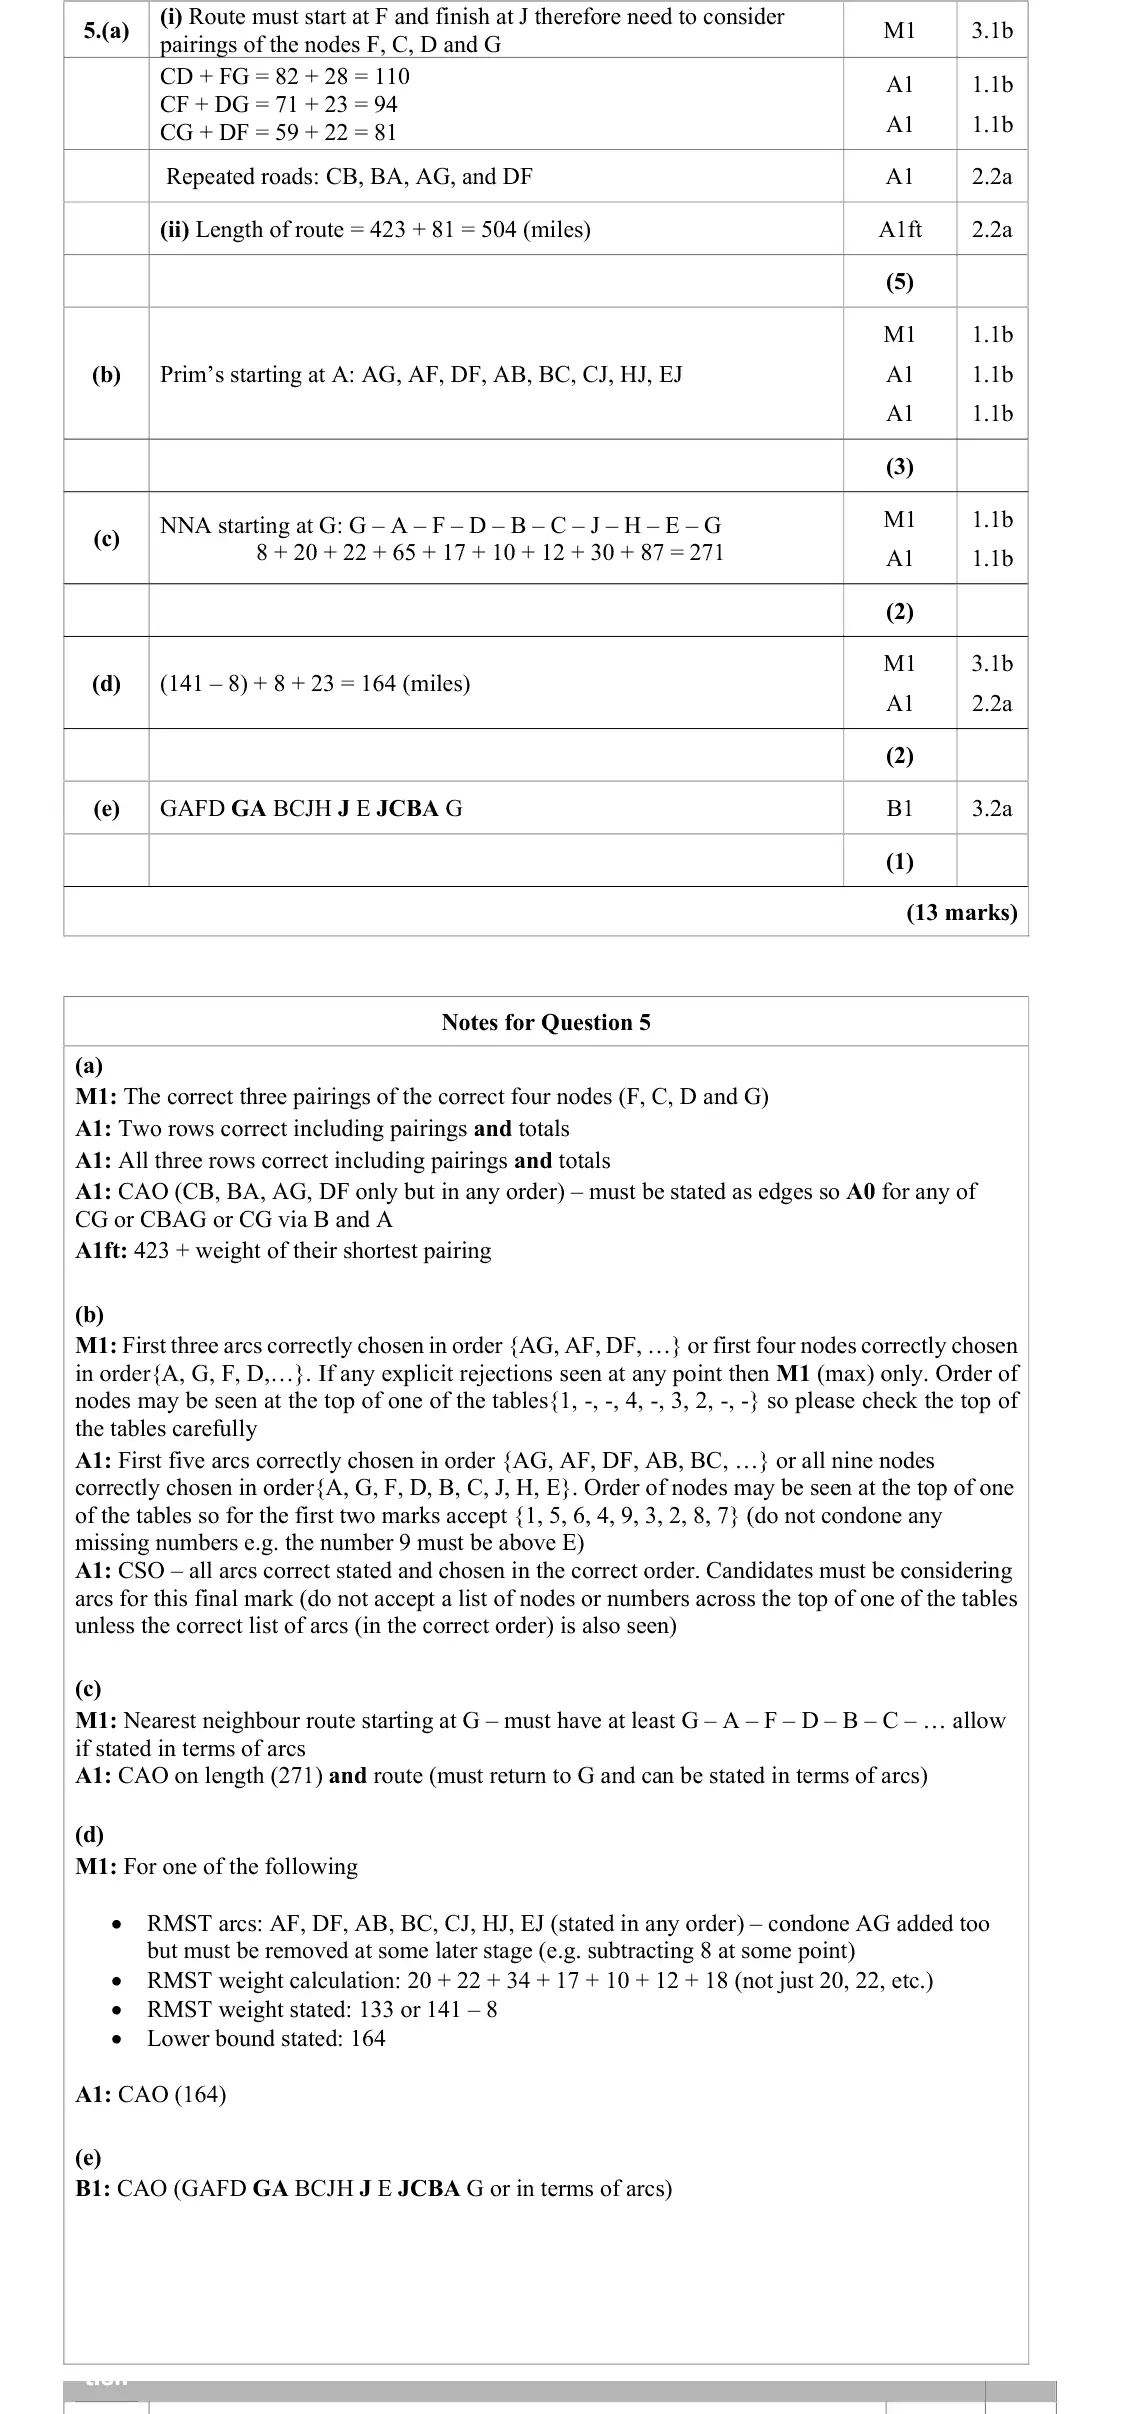
Key points from the mark scheme and examiner's report
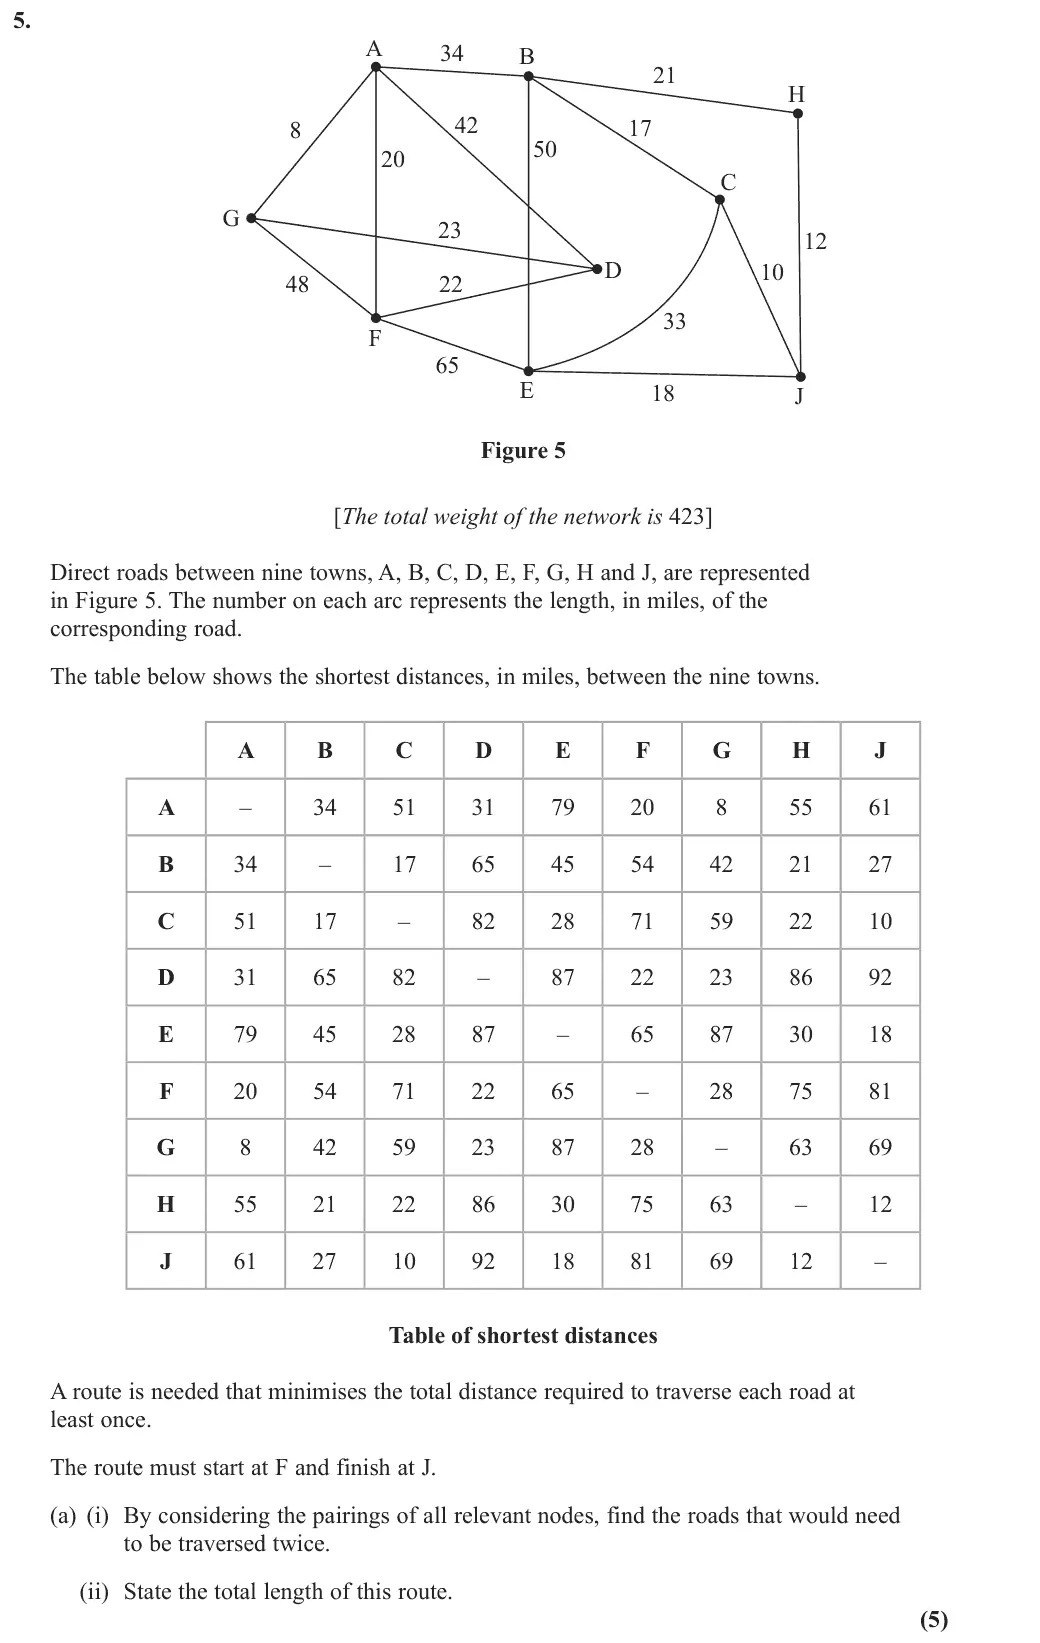
start F, finish J so pair the odd nodes F, C, D, G (not J)
CG + DF = 59 + 22 = 81 smallest
repeat CB, BA, AG, DF
423 + 81 = 504 miles
June 2023 · Paper 3D (Decision 1) · Q5(c)2 marks
Mark scheme (whole question; this part is marked with the orange bar)
Examiner's comment
Part (c) was answered well by most candidates. A minority did not complete the tour by returning to G, either failing to close their tour or by returning to A. Mistakes were made in using this to calculate an upper bound some multiplying the length of the route by 2.
Key points from the mark scheme and examiner's report
NNA from G: G–A–F–D–B–C–J–H–E–G = 271 miles
must return to G
June 2023 · Paper 3D (Decision 1) · Q5(d)2 marks
Mark scheme (whole question; this part is marked with the orange bar)
Examiner's comment
Part (d) proved more challenging and was not attempted by a significant number of candidates. Very few candidates recognised how they could adapt their MST from (b) to answer (d) efficiently and instead found the RMST again (and this was often done incorrectly). This was one of the parts of the paper most likely to be left unanswered by candidates with a significant number moving on once part (c) was completed. Those candidates who found the correct RMST tended to score both marks.
Key points from the mark scheme and examiner's report
residual MST = 141 − 8 = 133 (reuse the MST from (b) without AG) + two smallest arcs at G (8 + 23) = 164
often not attempted
June 2023 · Paper 3D (Decision 1) · Q5(e)1 mark
Mark scheme (whole question; this part is marked with the orange bar)
Examiner's comment
For part (e) many candidates did not recognise the need to state the route in terms of the actual towns visited. Some candidates gave a partial route, quite a few wrote a sentence explaining about the need to go to each town rather than explicitly stating the route, and others gave a lengthy explanation in words which did not meet the demands of the question. Again, this part was not attempted by a large proportion of candidates.
Key points from the mark scheme and examiner's report
G A F D (via G, A) B C J H (via J) E (via J, C, B, A) G
must list the actual towns, not a description
June 2022 · AS Paper 2 (Decision 1) · Q3(d)6 marks
Mark scheme (whole question; this part is marked with the orange bar)
Examiner's comment
scored no marks. In (d) some candidates did recognise that it was necessary to use the route inspection algorithm twice, though few scored full marks due to errors in the calculation of the six resulting pairings.
Key points from the mark scheme and examiner's report
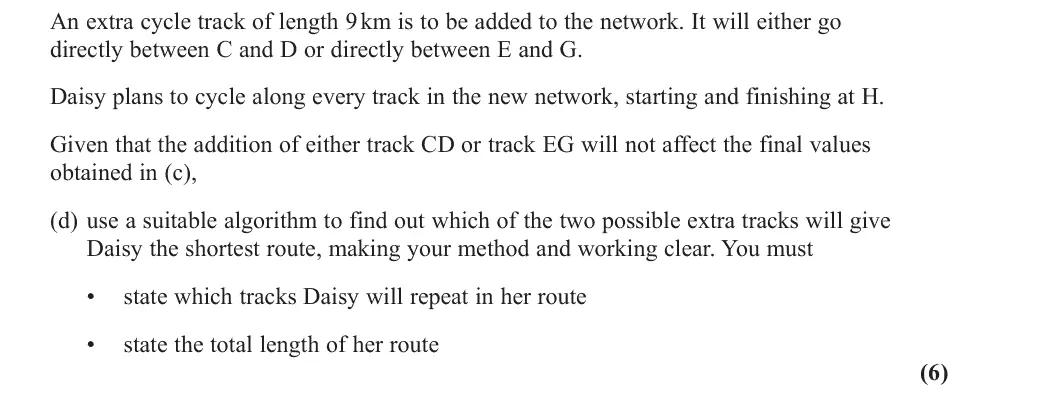
apply route inspection twice: with CD odd nodes A, E, G, H (least 25)
Mark scheme (whole question; this part is marked with the orange bar)
Examiner's comment
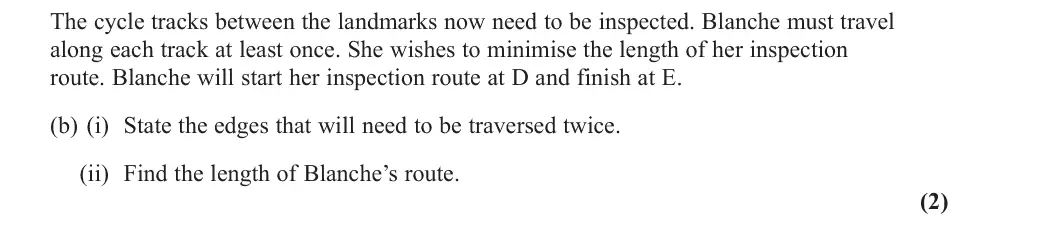
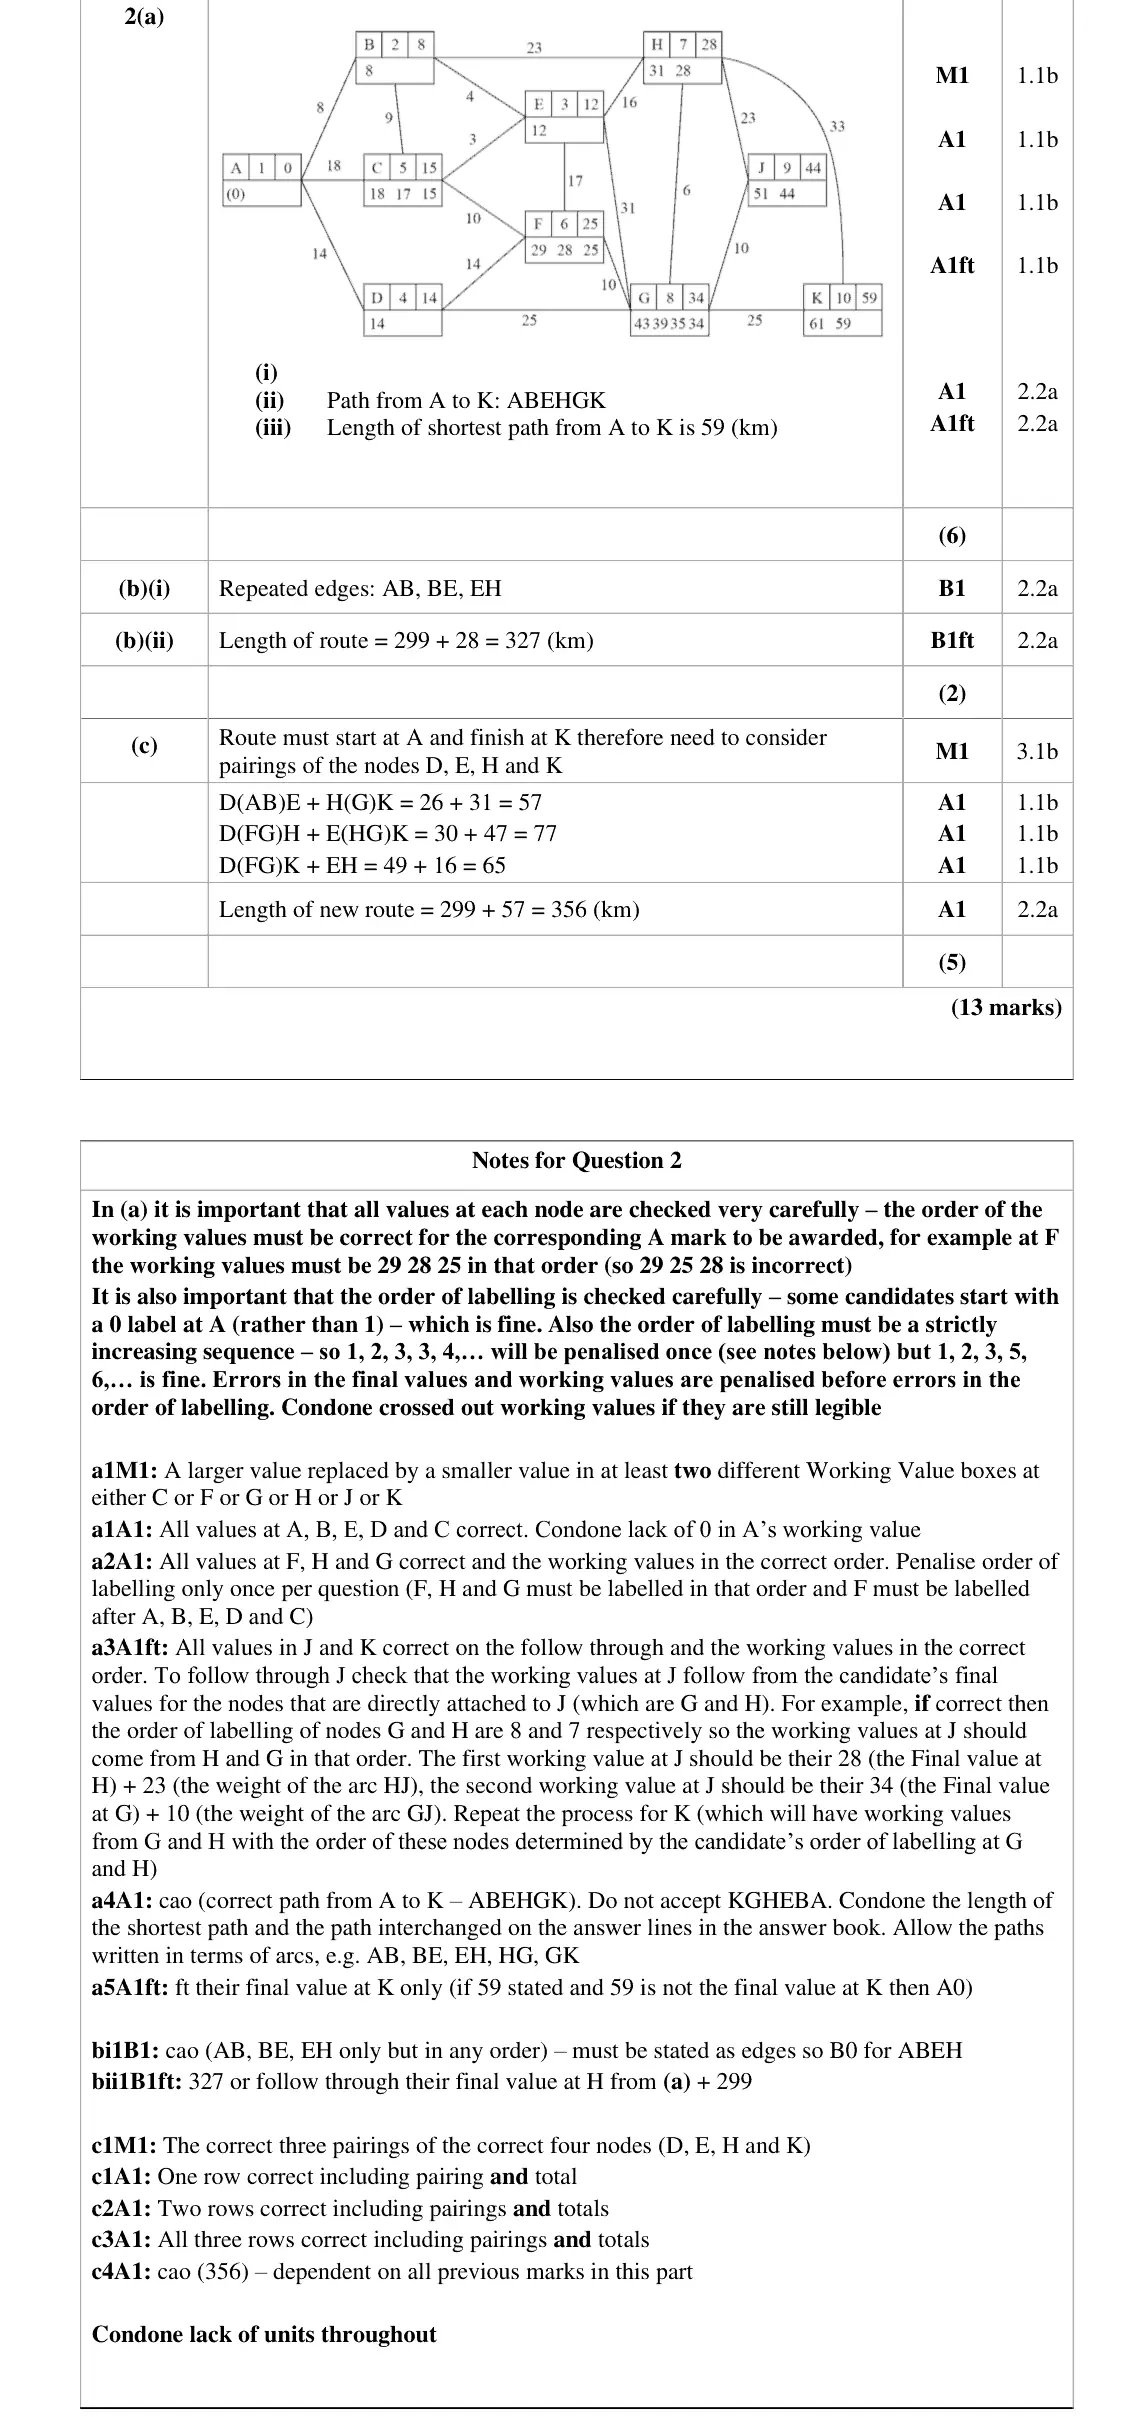
Part (b) was also generally completed well with candidates recognising which route needed to be repeated and were able to state the correct edges. Some candidates did not realise initially that for the inspection route there were only 2 odd vertices, so they clearly spent time working through pairings of odd vertices before realising this fact. Others spent time re-calculating the shortest route from A to H, not realising this could be read off their completed version of Dijkstra’s algorithm from (a). In a small number of cases, the answer was given as a path rather than a list of edges. In most cases, the length of the route was correctly found using the value at H from the graph without extensive additional work.
Key points from the mark scheme and examiner's report
with D and E as start and finish only A and H remain odd, so repeat the shortest path A–H from (a): edges AB, BE, EH
299 + 28 = 327 km
give edges, not a path
June 2022 · Paper 3D (Decision 1) · Q2(c)5 marks
Mark scheme (whole question; this part is marked with the orange bar)
Examiner's comment
Examiners reported that it was sadly rare to see a fully correct response in (c). Although most candidates that attempted this part were applying the route inspection algorithm correctly, many chose ADEH as the odd vertices that needed pairing. This resulted from not reading the question carefully, and not updating the degrees of the vertices given the information in the question. Of those that selected the correct 4 odd vertices (DEHK), some did not show all 3 pairings and thus could not gain full credit. Furthermore, very few candidates found the correct shortest distances from the graph (especially for the DE-HK pairing).
Key points from the mark scheme and examiner's report
with A and K as start/finish the odd nodes to pair are D, E, H, K (not A, D, E, H)
DE + HK = 26 + 31 = 57 smallest
299 + 57 = 356 km
all three pairings needed
fully correct answers rare
June 2022 · Paper 3D (Decision 1) · Q3(c)4 marks
Mark scheme (whole question; this part is marked with the orange bar)
Examiner's comment
It was the final part of this question that caused most problems for candidates. As has been noted before, many candidates failed to appreciate that the standard method of applying the nearest neighbour method on a table with undirected arcs would not apply in the same way with directed arcs. It would therefore be advisable to apply nearest neighbour using the rows rather than the corresponding columns. A few did not end their routes by returning to E or thought a diagram of their routes, with or without direction arrows, was sufficient. Almost all candidates with both correct routes were able to gain the final two marks for stating the corresponding lengths and choosing the shorter one as a better upper bound. This was an example of the importance of using correct methods on this paper, as very many candidates with incorrect routes had their lengths correct and an appropriate choice of upper bound but still could not score any marks. 5
Key points from the mark scheme and examiner's report
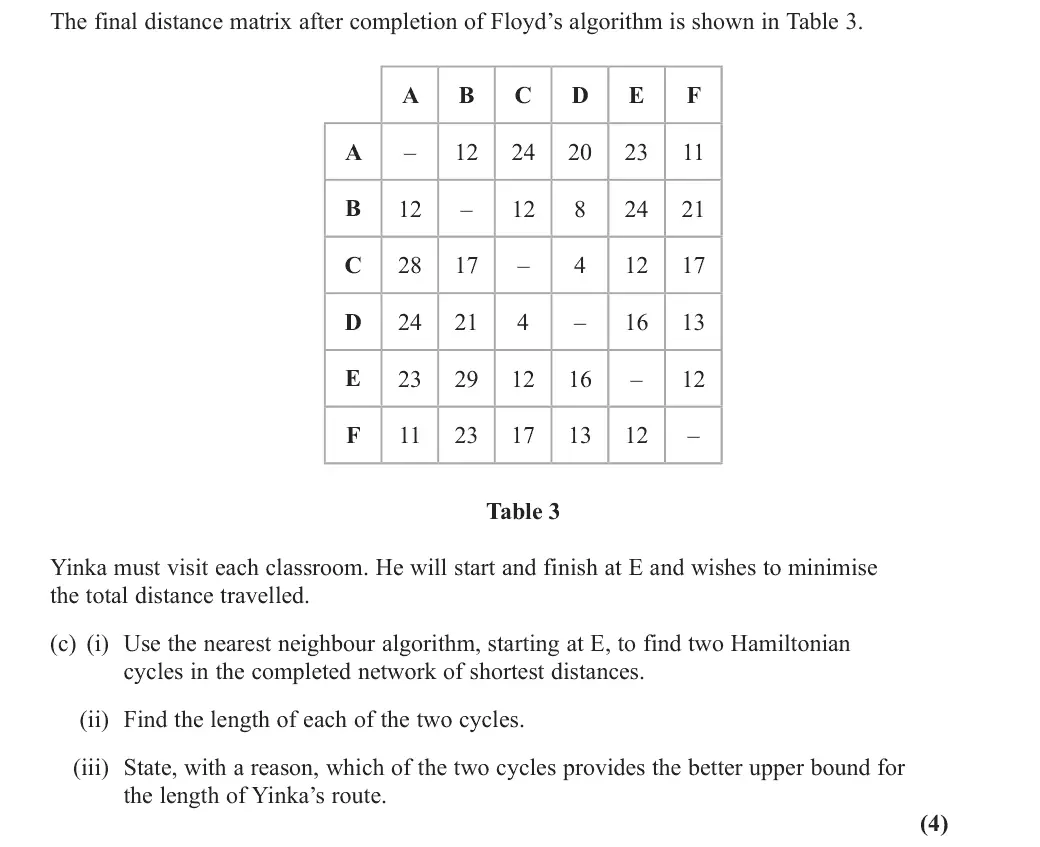
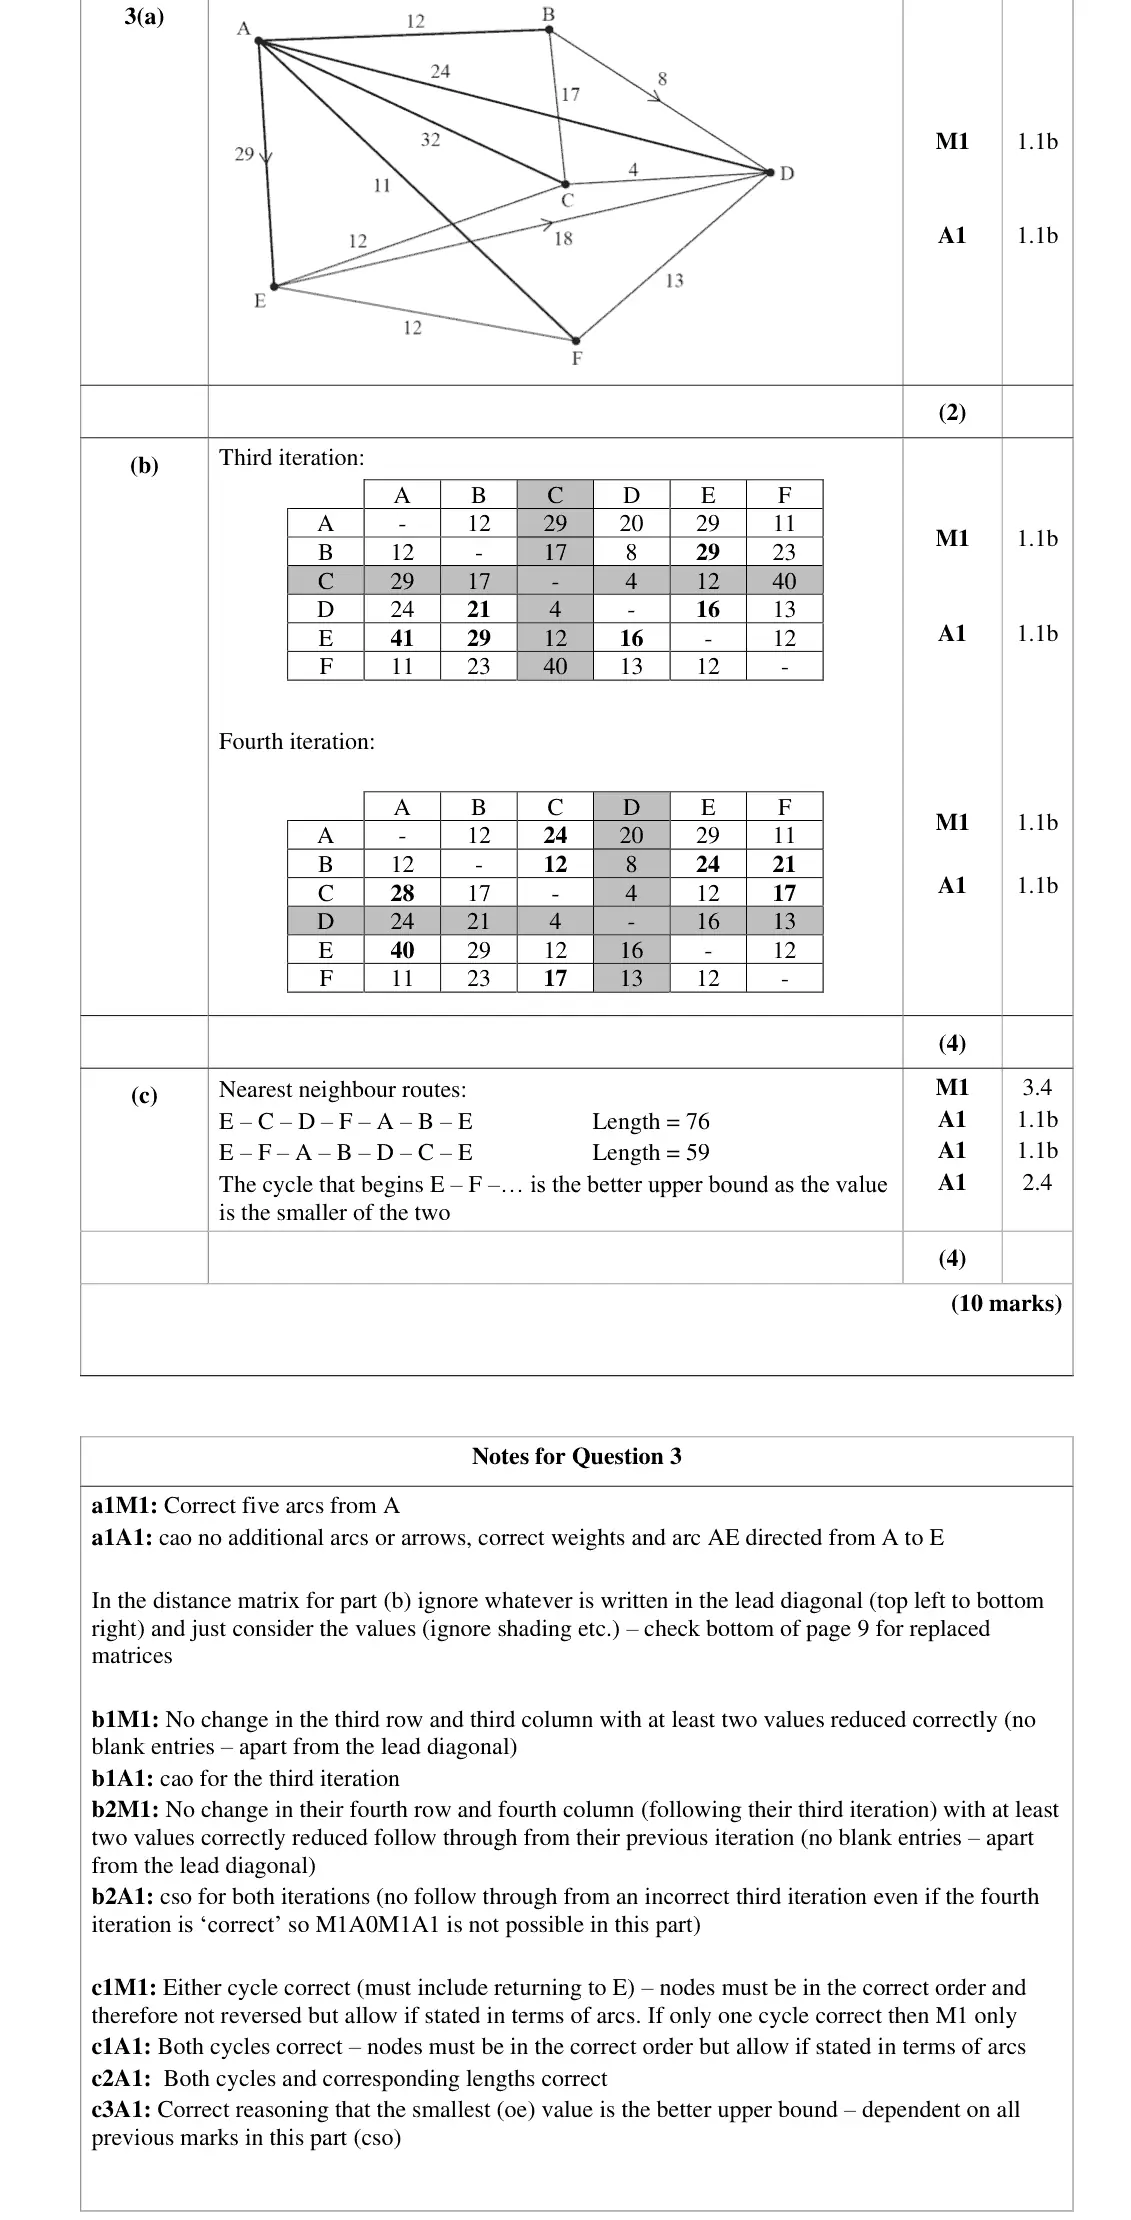
directed matrix so apply NNA along rows
two cycles from E (tie): E–C–D–F–A–B–E = 76 and E–F–A–B–D–C–E = 59
the smaller, 59, is the better upper bound
must return to E
Nov 2021 · Paper 3D (Decision 1) · Q3(c)2 marks
Mark scheme (whole question; this part is marked with the orange bar)
Examiner's comment
This was the best answered question on the paper covering the topic of minimum connectors and the travelling salesperson problem. Most candidates correctly saw the link between finding
Key points from the mark scheme and examiner's report
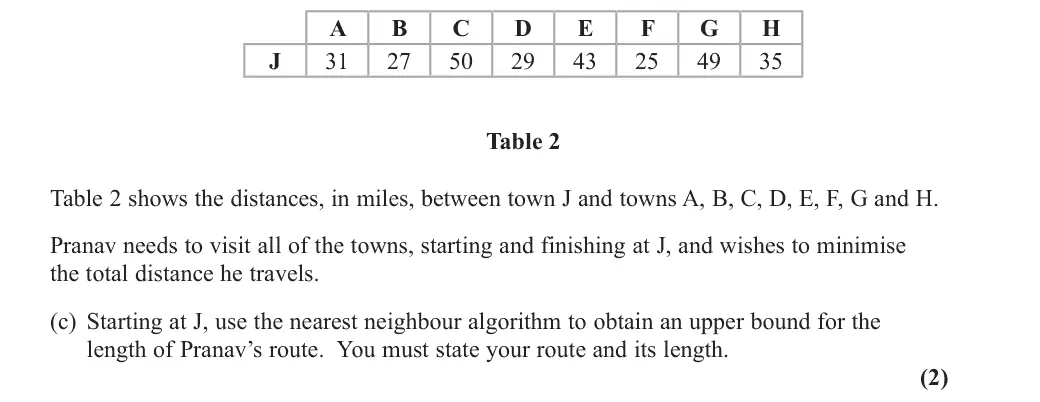
NNA from J: J–F–E–C–D–H–A–B–G–J
upper bound 267 miles
must return to J
Nov 2021 · Paper 3D (Decision 1) · Q3(d)2 marks
Mark scheme (whole question; this part is marked with the orange bar)
Examiner's comment
This was the best answered question on the paper covering the topic of minimum connectors and the travelling salesperson problem. Most candidates correctly saw the link between finding the MST and its weight in parts (a) and (b), and the link to the lower bound in (d).
Key points from the mark scheme and examiner's report
residual MST 183 + two smallest arcs at J (25 + 27) = 235 miles
Nov 2021 · Paper 3D (Decision 1) · Q4(c)4 marks
Mark scheme (whole question; this part is marked with the orange bar)
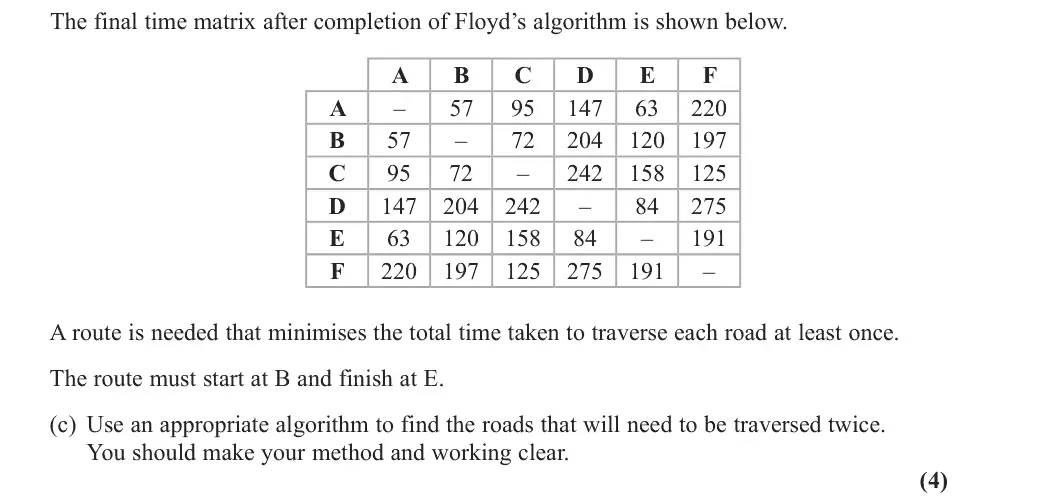
Examiner's comment
part (c) most candidates realised that the ‘appropriate’ algorithm was route inspection and correctly realised that they had to consider the pairings of nodes A, C, D and F. Most who did this were successful in the remaining two parts of the question.
Key points from the mark scheme and examiner's report
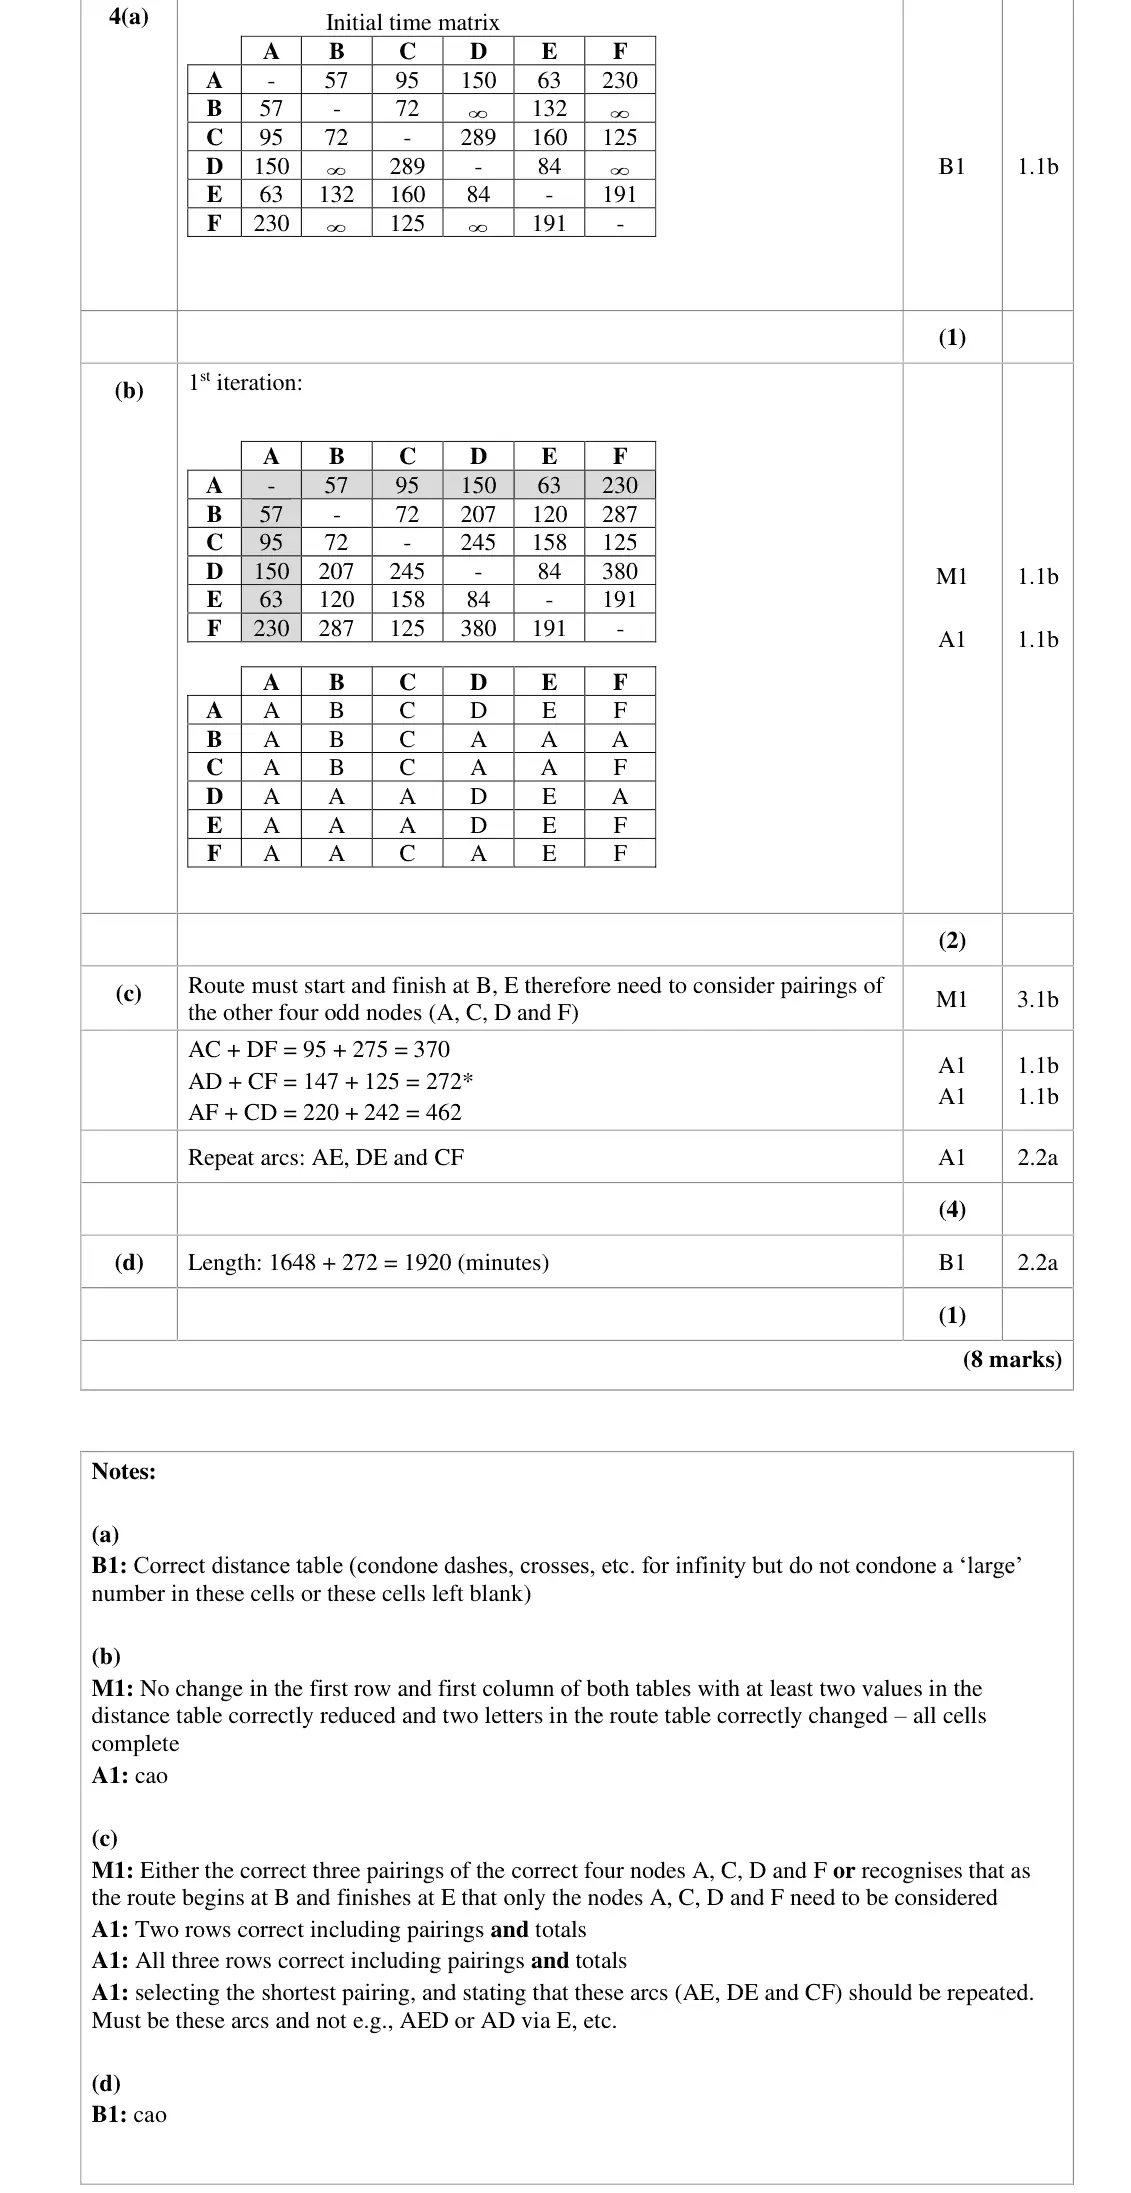
B and E are the start/finish so pair the other odd nodes A, C, D, F using the final matrix
AD + CF = 147 + 125 = 272 smallest
repeat roads AE, DE and CF (not "AD via E")
Nov 2021 · Paper 3D (Decision 1) · Q4(d)1 mark
Mark scheme (whole question; this part is marked with the orange bar)
Examiner's comment
Almost all candidates correctly set up the initial time matrix in (a) and scored at least the method mark in (b) for attempting the first iteration of Floyd’s algorithm. When errors occurred, it was usually down to arithmetical slips rather than a lack of understanding of the algorithm. In part (c) most candidates realised that the ‘appropriate’ algorithm was route inspection and correctly realised that they had to consider the pairings of nodes A, C, D and F. Most who did this were successful in the remaining two parts of the question.
Key points from the mark scheme and examiner's report
1648 + 272 = 1920 minutes
Oct 2020 · AS Paper 2 (Decision 1) · Q3(c)6 marks
Mark scheme (whole question; this part is marked with the orange bar)
Examiner's comment
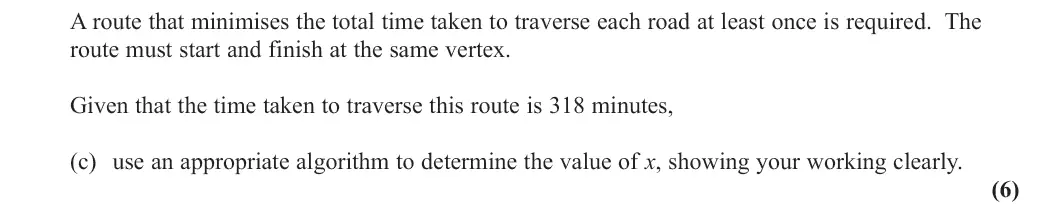
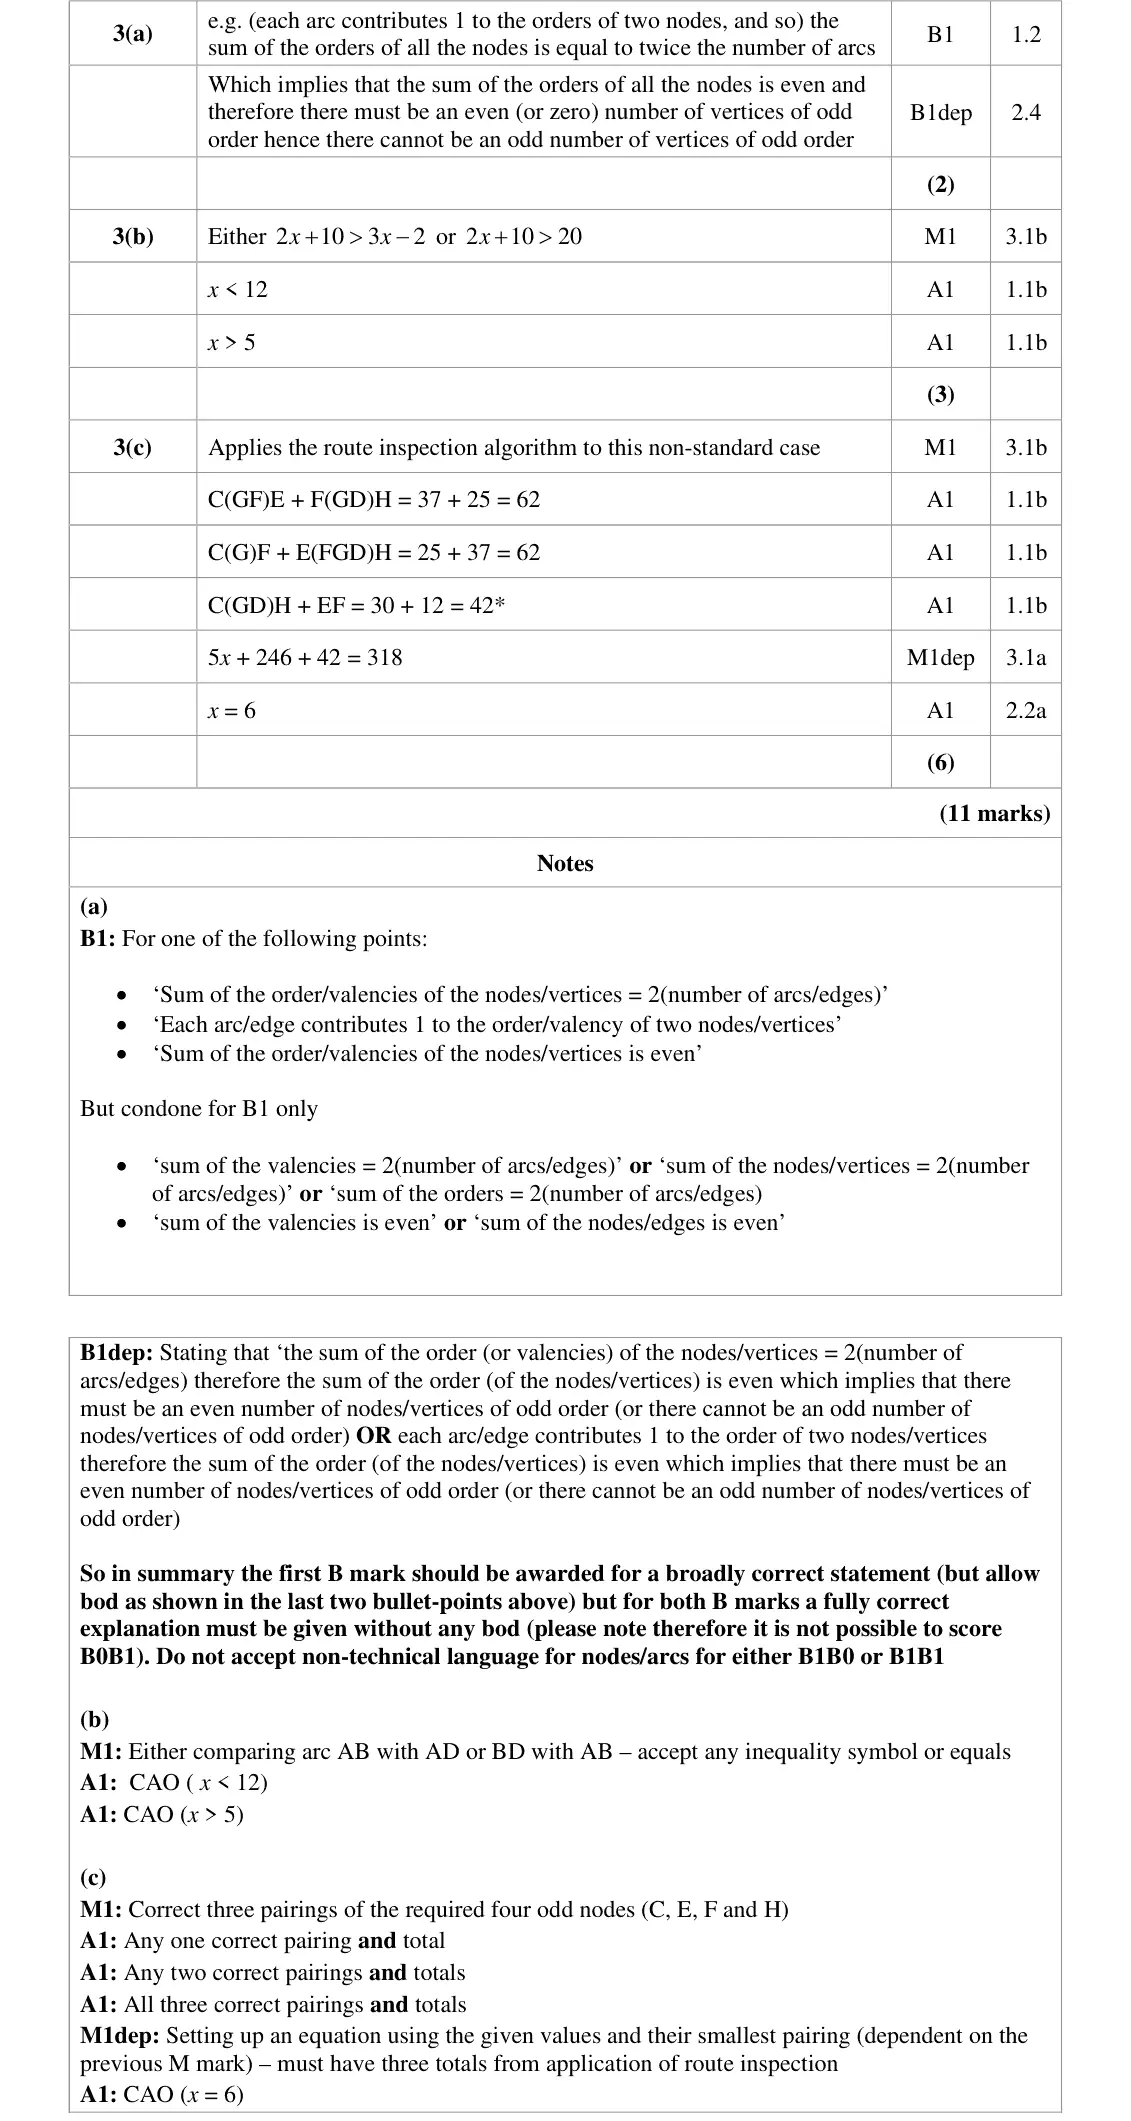
The final part of this question required candidates to use an appropriate algorithm, in this case the route inspection algorithm to determine the value of x given the time taken to traverse the route was 318 minutes. Most candidates who attempted this part realised that the network had four odd nodes C, E, F & H and correctly formed all three pairings of these four of nodes and many then went on to obtain the correct answer that x = 6.
Key points from the mark scheme and examiner's report
odd nodes C, E, F, H
pairings 62, 62 and CH + EF = 30 + 12 = 42 (least)
5x + 246 + 42 = 318 gives x = 6
Oct 2020 · Paper 3D (Decision 1) · Q3(c)3 marks
Mark scheme (whole question; this part is marked with the orange bar)
Examiner's comment
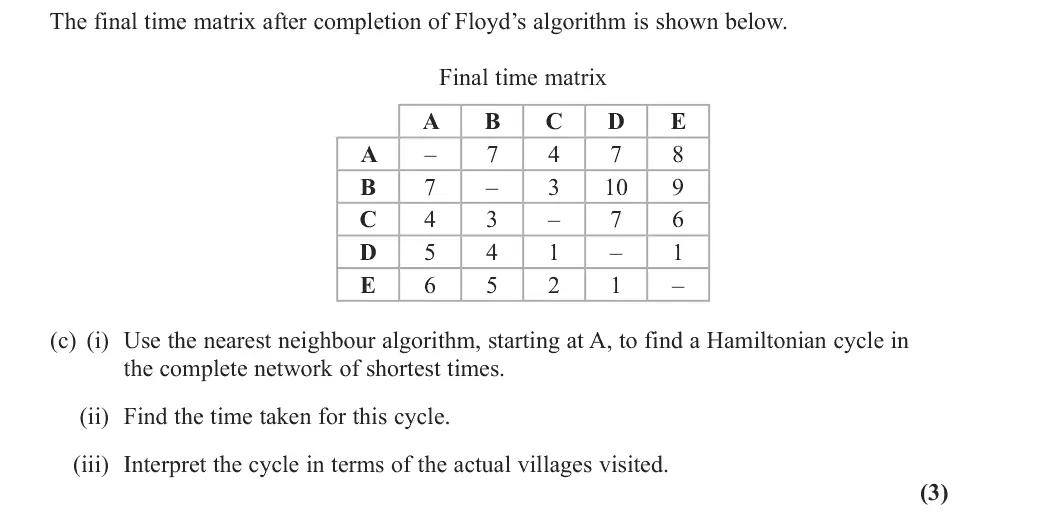
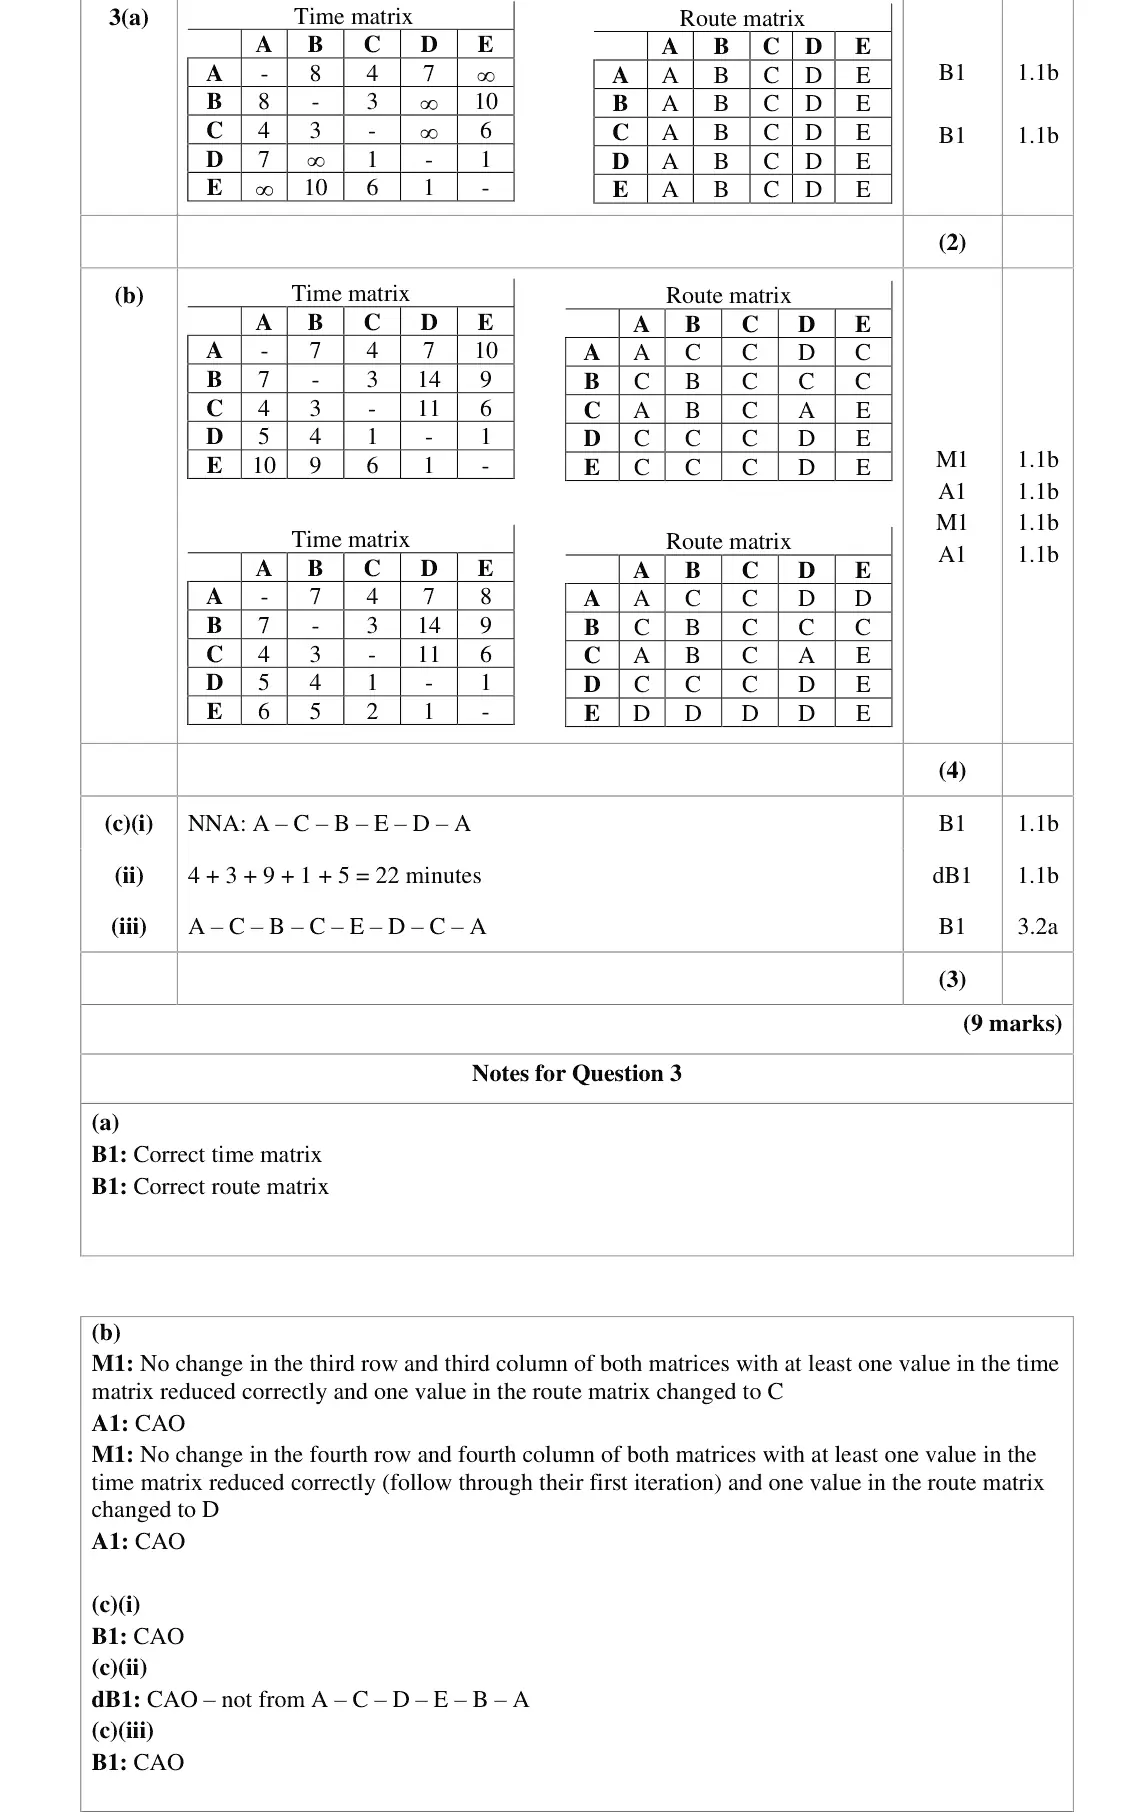
Floyd’s algorithm is another topic new on the specification. Most candidates were Hamiltonian cycle ACBEDA in (c)(i), realising the necessity to use the nearest neighbour algorithm across rows, rather than down columns, due to the directed arc DC. The common error was cycle ACDEBA where the arc CD is incorrect. The next mark (c)(ii) was only available to those candidates with correct working In (i). Very few correct answers were seen in (iii), with some candidates misunderstanding the question and providing a description but not a route through the labelled villages.
Key points from the mark scheme and examiner's report
NNA across rows (matrix not symmetric): A–C–B–E–D–A, 22 minutes
actual route A–C–B–C–E–D–C–A
ACDEBA was the common error
interpretation rarely correct
Oct 2020 · Paper 3D (Decision 1) · Q6(b)9 marks
Mark scheme (whole question; this part is marked with the orange bar)
Examiner's comment
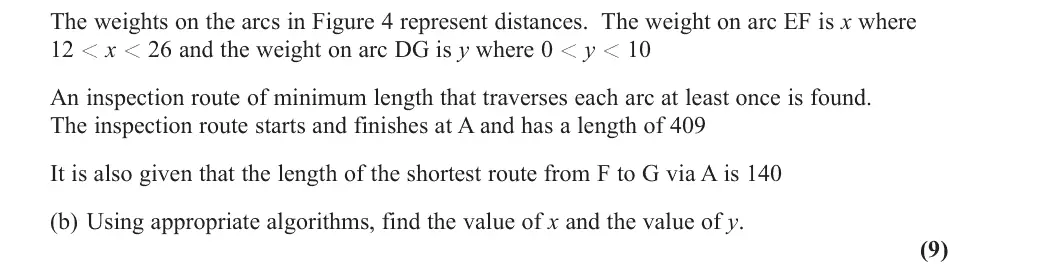
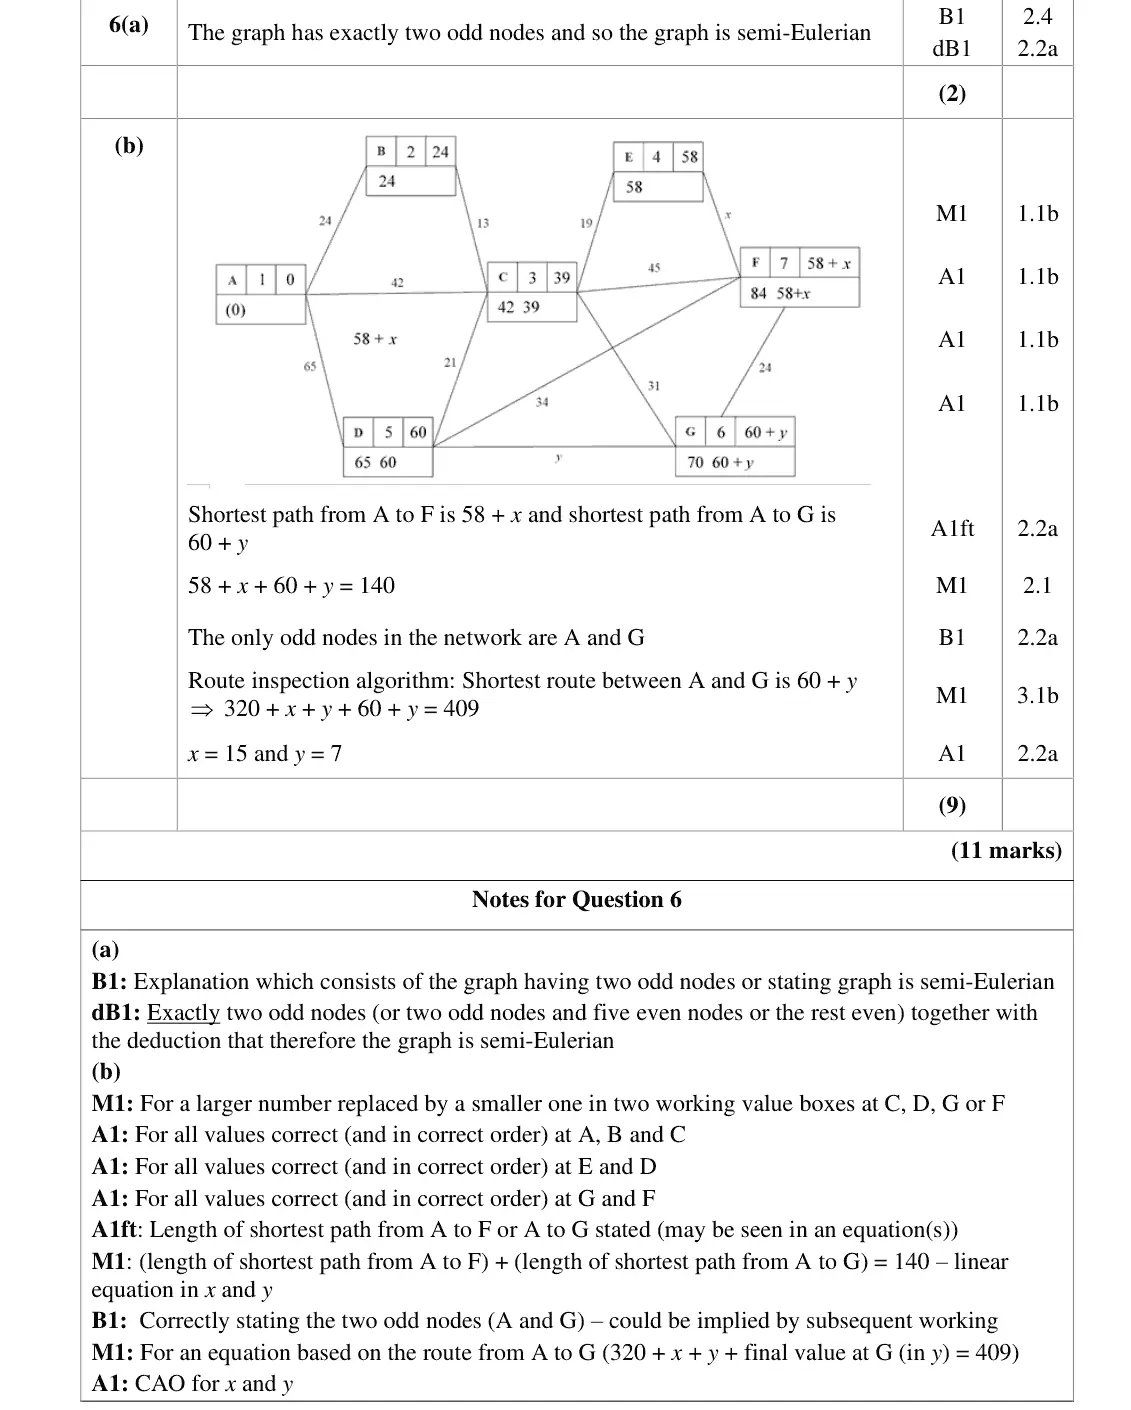
Surprisingly some candidates left part (a) blank. Others correctly stated that the graph was semi-Eulerian with their reason that it had two odd nodes but omitted the word ‘exactly’ (or equivalent), losing the second mark. It is worth noting that the two odd nodes were A and G, which is key information to be used later in the question. It is commonly the case that candidates would be well advised to keep earlier content in mind throughout questions. Although the question said ‘using appropriate algorithms’, the diagram in the answer book provided a strong clue to use Dijkstra and route inspection was also clearly indicated. Almost all candidates set about filling in labels and values on the diagram, applying the algorithm largely correctly, with many realising that expressions in x and y resulted as the second working values at F and G respectively, and therefore their final values. As is always the case, the length(s) of the resulting shortest path(s) should be stated too. A minority of candidates scored M0, and lost the next four marks too, due to stating only one working value at all vertices, including C, D, F and G. They should be reminded that the working values demonstrate the application of the correct method for this algorithm. Many candidates struggled with the remainder of this question, though some scored just one mark by adding their two lengths to equal 140, obtaining an equation in x and y. Use of the two odd nodes A and G along with 409 produced a variety of second equations in x and y, but some correctly added AG(= 60 + y) to 320 + x + y to complete their solution, by solving the two equations simultaneously.
Key points from the mark scheme and examiner's report
Dijkstra from A gives AF = 58 + x, AG = 60 + y
58 + x + 60 + y = 140
repeat the shortest path A to G: 320 + x + y + 60 + y = 409
x = 15, y = 7
June 2019 · AS Paper 2 (Decision 1) · Q4(b)1 mark
Mark scheme (whole question; this part is marked with the orange bar)
Examiner's comment
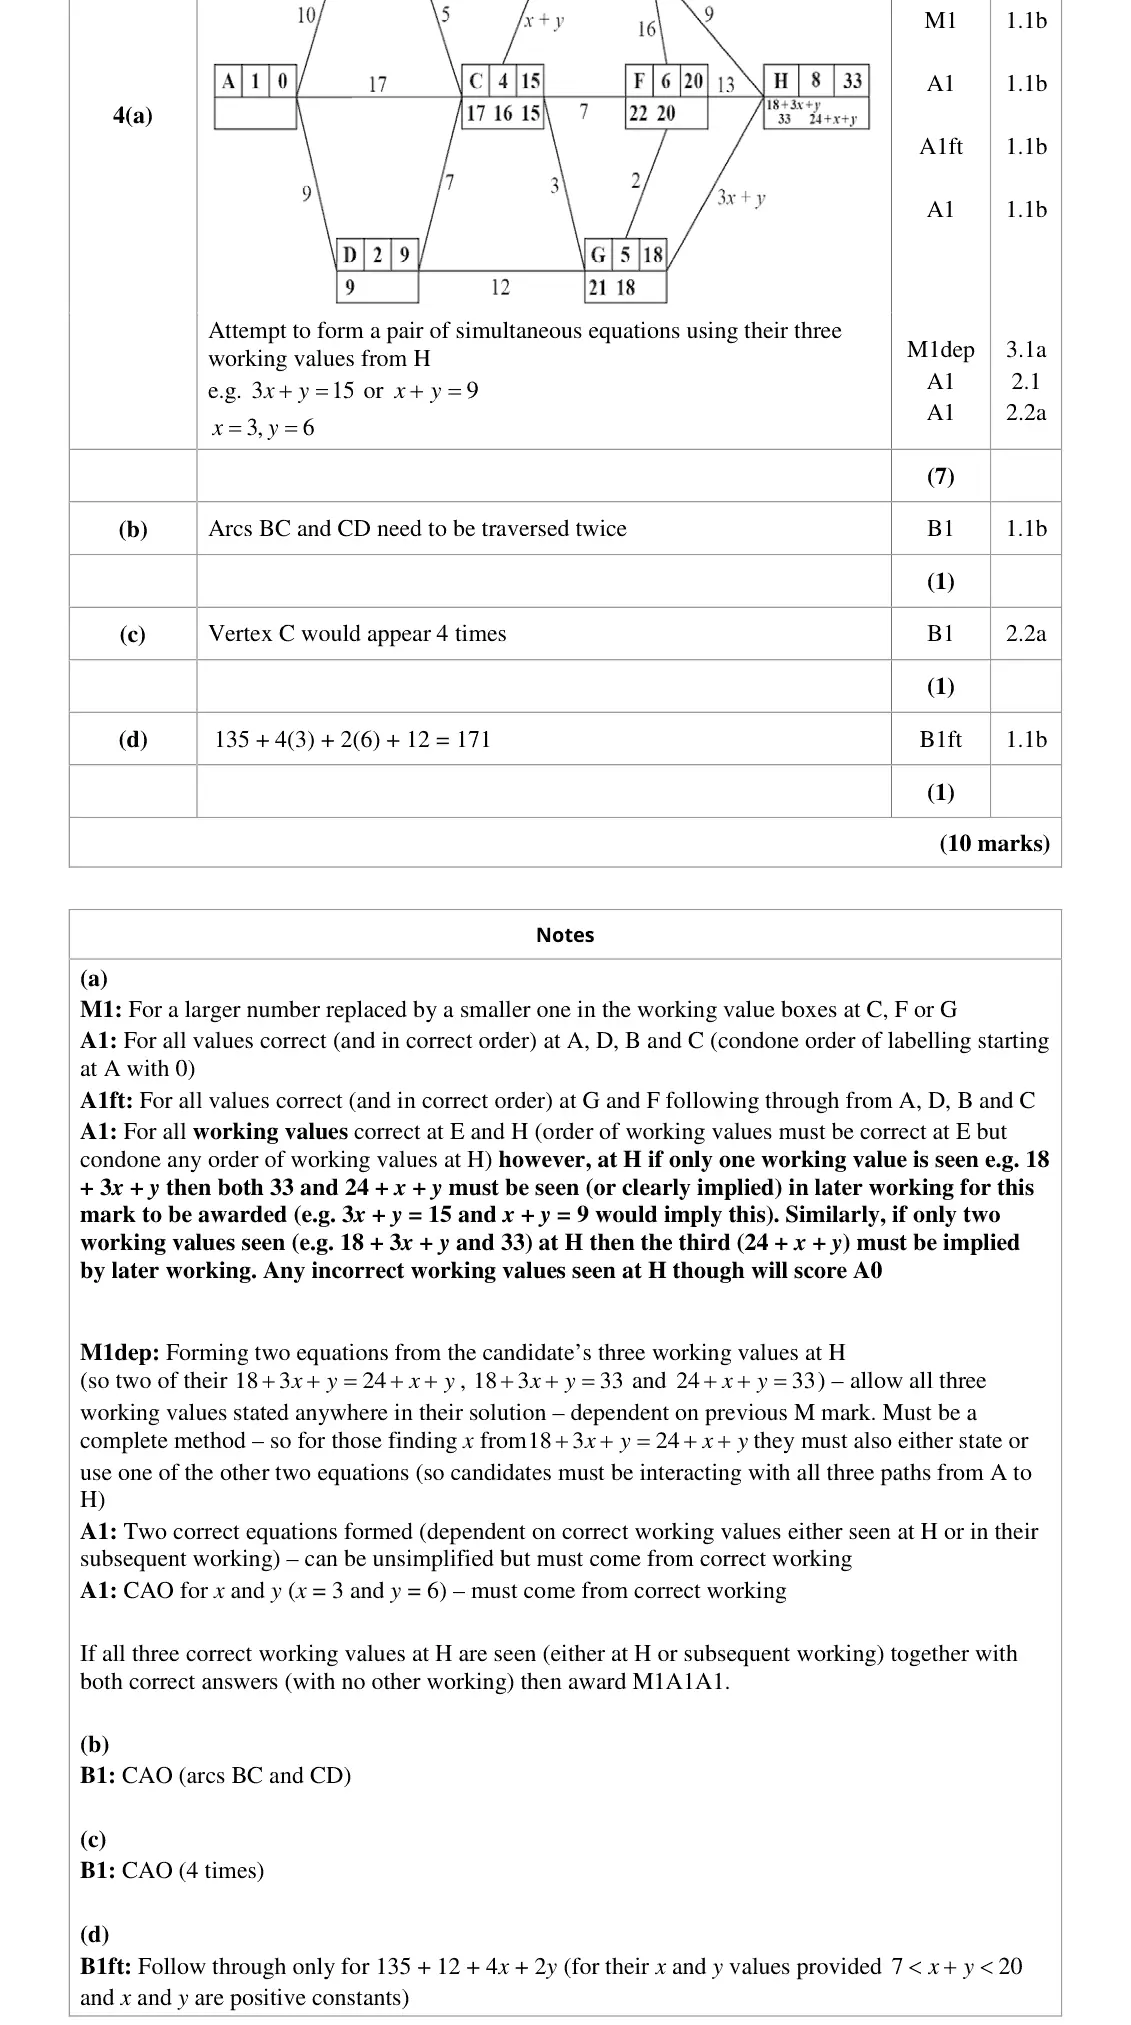
It was surprising to examiners that part (b) seemed to be problematic for so many. The majority of candidates were able to identify the four vertices with odd degree, but many had not read the question carefully and did not see that the route would start at A and end at H. Thus requiring, only, the repeat of arcs from B to D. Often, candidates proceeded down the usual route inspection method of pairing odd vertices and choosing the pairing of smallest weight – usually AD and BH. Candidates should perhaps be advised to consider the amount of work required in relation to the number of marks available and this may have been a flag to re-read the question. It was indeed rare to see the correct answer stated here. Due to a lack of success with part (b), the correct answer was relatively rarely seen in part (d). The value of 91 was often given which related to AD and BH (BC, CG, GF, FH) being repeated.
Key points from the mark scheme and examiner's report
route starts at A and ends at H, so only B and D need pairing: repeat BC and CD
many paired all four odd vertices as for a closed route
June 2019 · AS Paper 2 (Decision 1) · Q4(c)1 mark
Mark scheme (whole question; this part is marked with the orange bar)
Examiner's comment
Part (c) also presented a challenge for many candidates and it was uncommon to see the correct answer of ‘4 times’ stated here. An answer of 8 appeared frequently for candidates who appear to be counting the number of times an arc incident to C would be travelled along rather than the number of times C itself would be visited. An answer of 3 was also quite common. Due to a lack of success with part (b), the correct answer was relatively rarely seen in part (d). The
Key points from the mark scheme and examiner's report
C has order 6 plus 2 repeated arcs so appears 4 times
8 (counting arcs) and 3 were common
June 2019 · AS Paper 2 (Decision 1) · Q4(d)1 mark
Mark scheme (whole question; this part is marked with the orange bar)
Examiner's comment
Due to a lack of success with part (b), the correct answer was relatively rarely seen in part (d). The value of 91 was often given which related to AD and BH (BC, CG, GF, FH) being repeated.
Key points from the mark scheme and examiner's report
135 + 4(3) + 2(6) + 12 = 171
91-type answers came from wrongly repeating AD and BH
June 2019 · Paper 3D (Decision 1) · Q2(b)4 marks
Mark scheme (whole question; this part is marked with the orange bar)
Examiner's comment
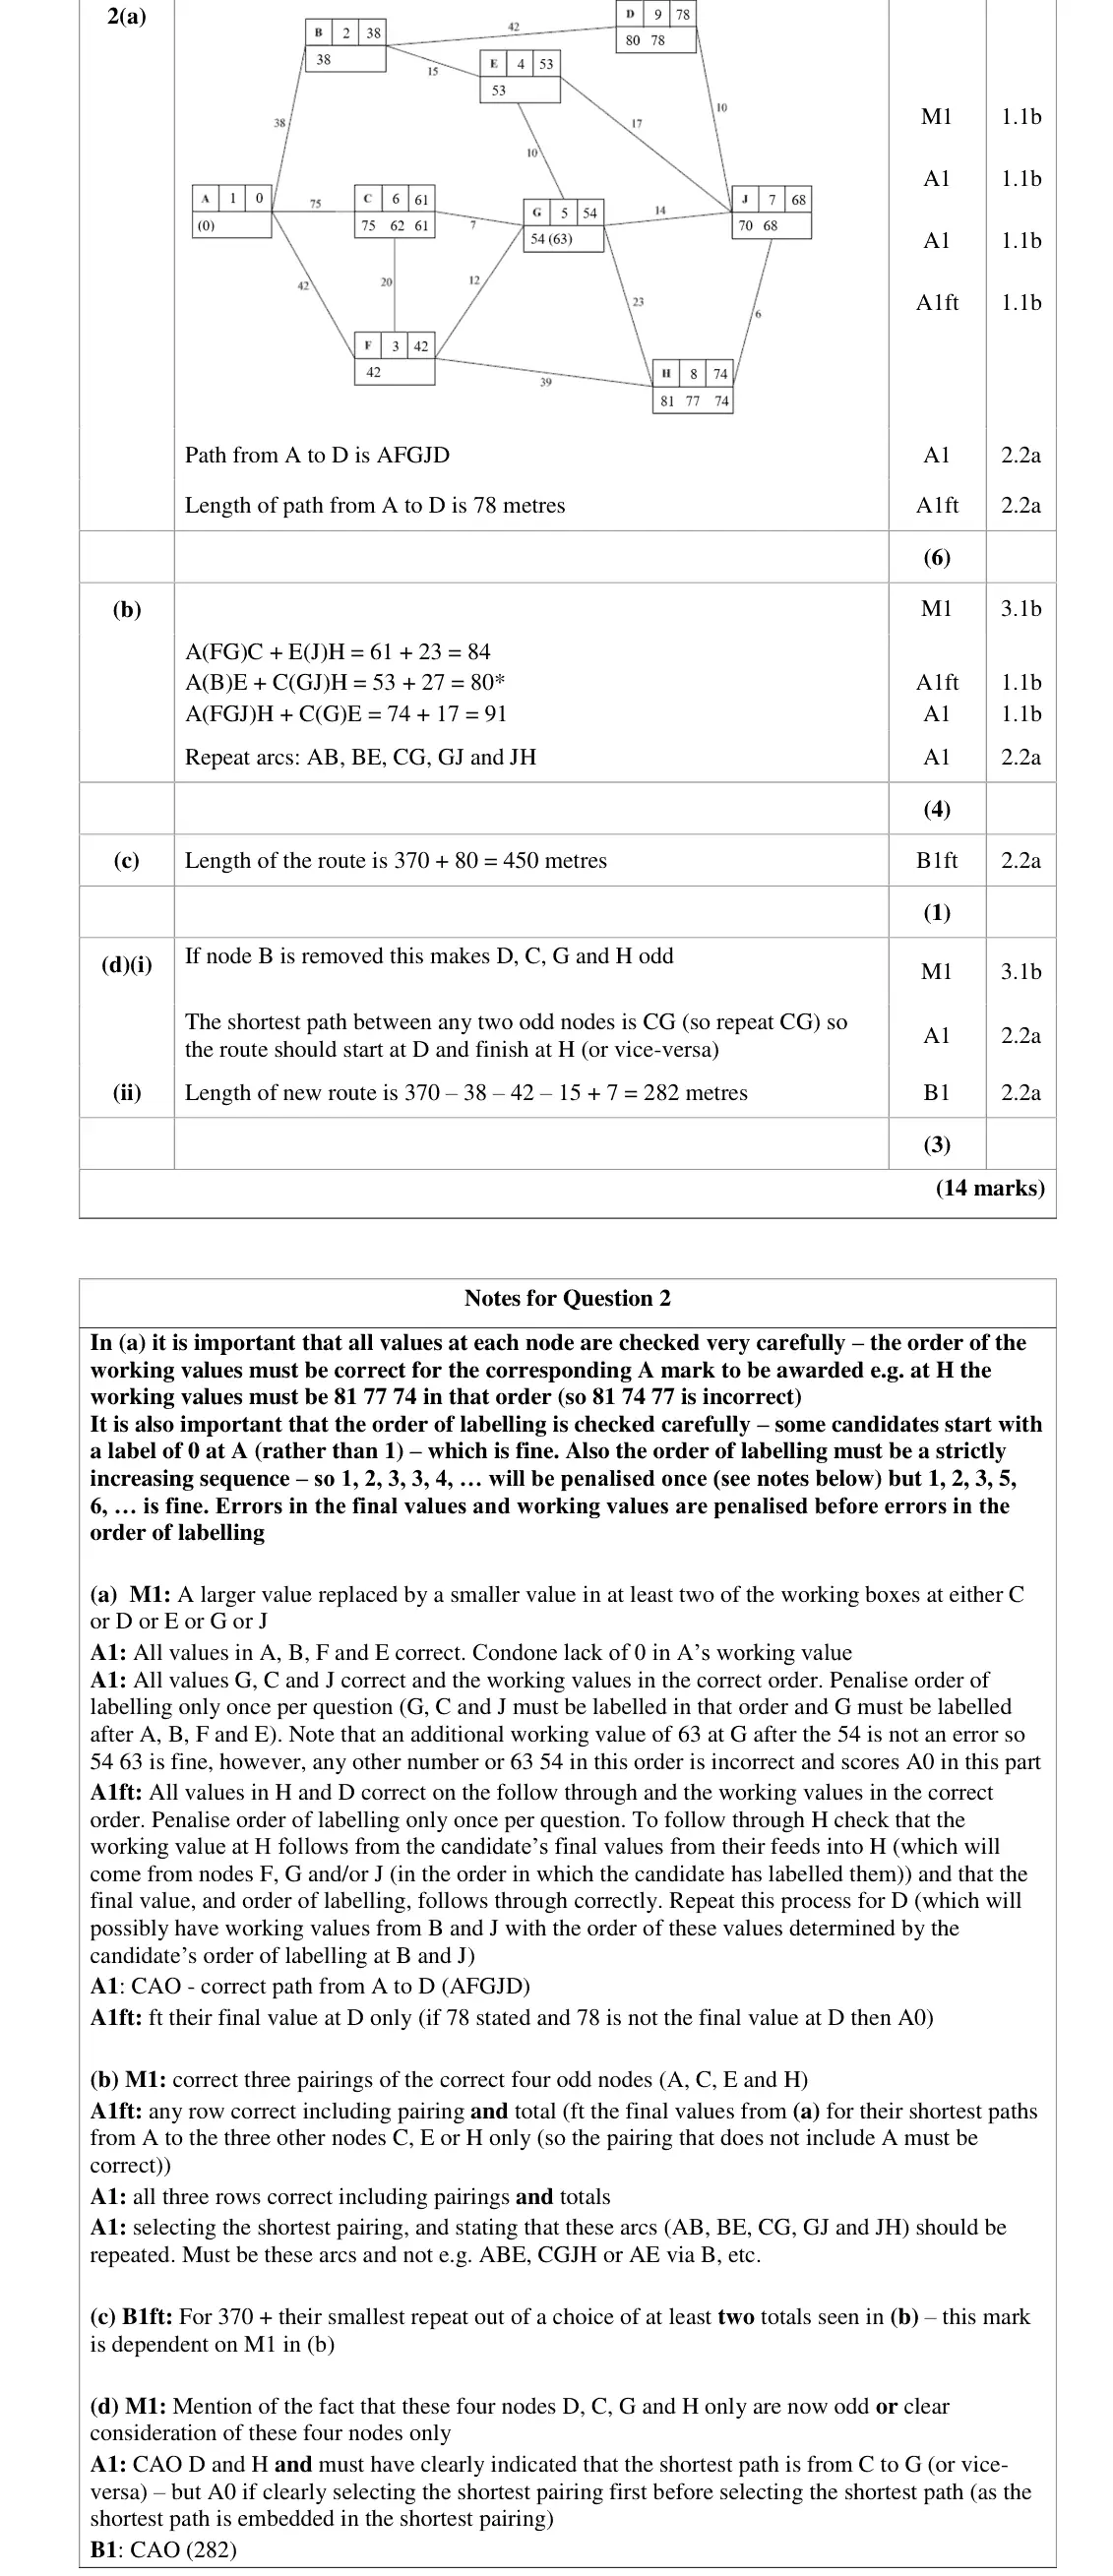
This question was generally well attempted. Most candidates were clearly well prepared for Dijkstra’s In part (b), most candidates were able to identify the correct four odd nodes and most paired them correctly. There were thankfully few candidates who made the error of considering less (or more) than the three pairings. There were however, perhaps surprisingly, frequent errors in the pairing totals. A common error arose in the pairing AH + CE. However, errors in the totals often did not affect the choice of repeated arcs which were usually stated correctly. Candidates should however note the requirement for repeated arcs rather than repeated pairings as there were several candidates who lost a mark for stating simply AE + CH. Some candidates were clearly on ‘autopilot’ and stated the length of the route here rather than (or as well as) in part (c).
Key points from the mark scheme and examiner's report
odd nodes A, C, E, H with all three pairings
AE + CH = 53 + 27 = 80 smallest
state the repeated arcs AB, BE, CG, GJ, JH (not just AE + CH)
pairing totals often added wrongly
June 2019 · Paper 3D (Decision 1) · Q2(c)1 mark
Mark scheme (whole question; this part is marked with the orange bar)
Examiner's comment
This question was generally well attempted. Most candidates were clearly well prepared for Dijkstra’s the route here rather than (or as well as) in part (c).
Key points from the mark scheme and examiner's report
370 + 80 = 450 m
June 2019 · Paper 3D (Decision 1) · Q2(d)3 marks
Mark scheme (whole question; this part is marked with the orange bar)
Examiner's comment
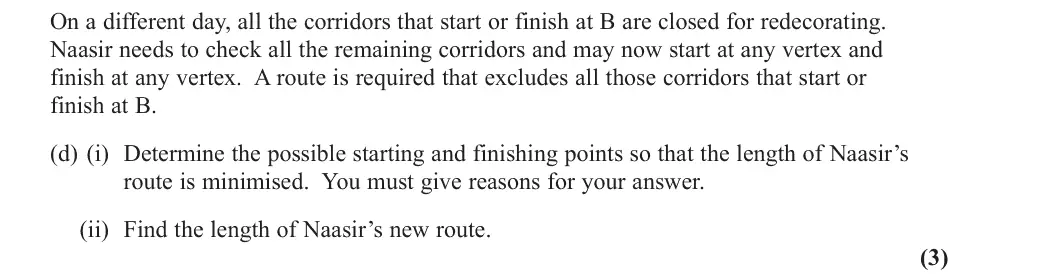
This question was generally well attempted. Most candidates were clearly well prepared for Dijkstra’s Part (d) was the most testing part of the question for a lot of candidates, with some making no attempt. Of those that did many were limited to the mark for identifying which nodes were now odd, and some candidates got stuck after “finding” there were three or five odd nodes. Some candidates who had identified the four odd nodes seemed unsure how to proceed, giving unjustified start and finish points and ignoring the arc that needed to be repeated. Other candidates were meticulous in their working listing every possible pairing with their length, then picking the shortest CG and identifying D and H as the start/finish points. Some candidates lost the accuracy mark by selecting a shortest pairing before homing in on CG. A small but worrying number of candidates persist in using the “avoid the longest of the repeats” misconception. In the final part of (d), of those who got here successfully, not all removed the three arcs from B not currently available before adding on the repeated arc CG.
Key points from the mark scheme and examiner's report
removing B makes C, D, G, H odd
repeat the shortest path CG (7) so start/finish at D and H
370 − 38 − 42 − 15 + 7 = 282 m
many found 3 or 5 odd nodes or picked a pairing first
June 2019 · Paper 3D (Decision 1) · Q3(d)4 marks
Mark scheme (whole question; this part is marked with the orange bar)
Examiner's comment
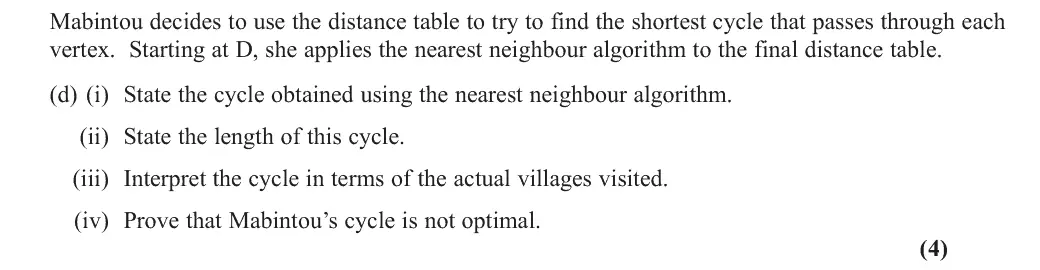
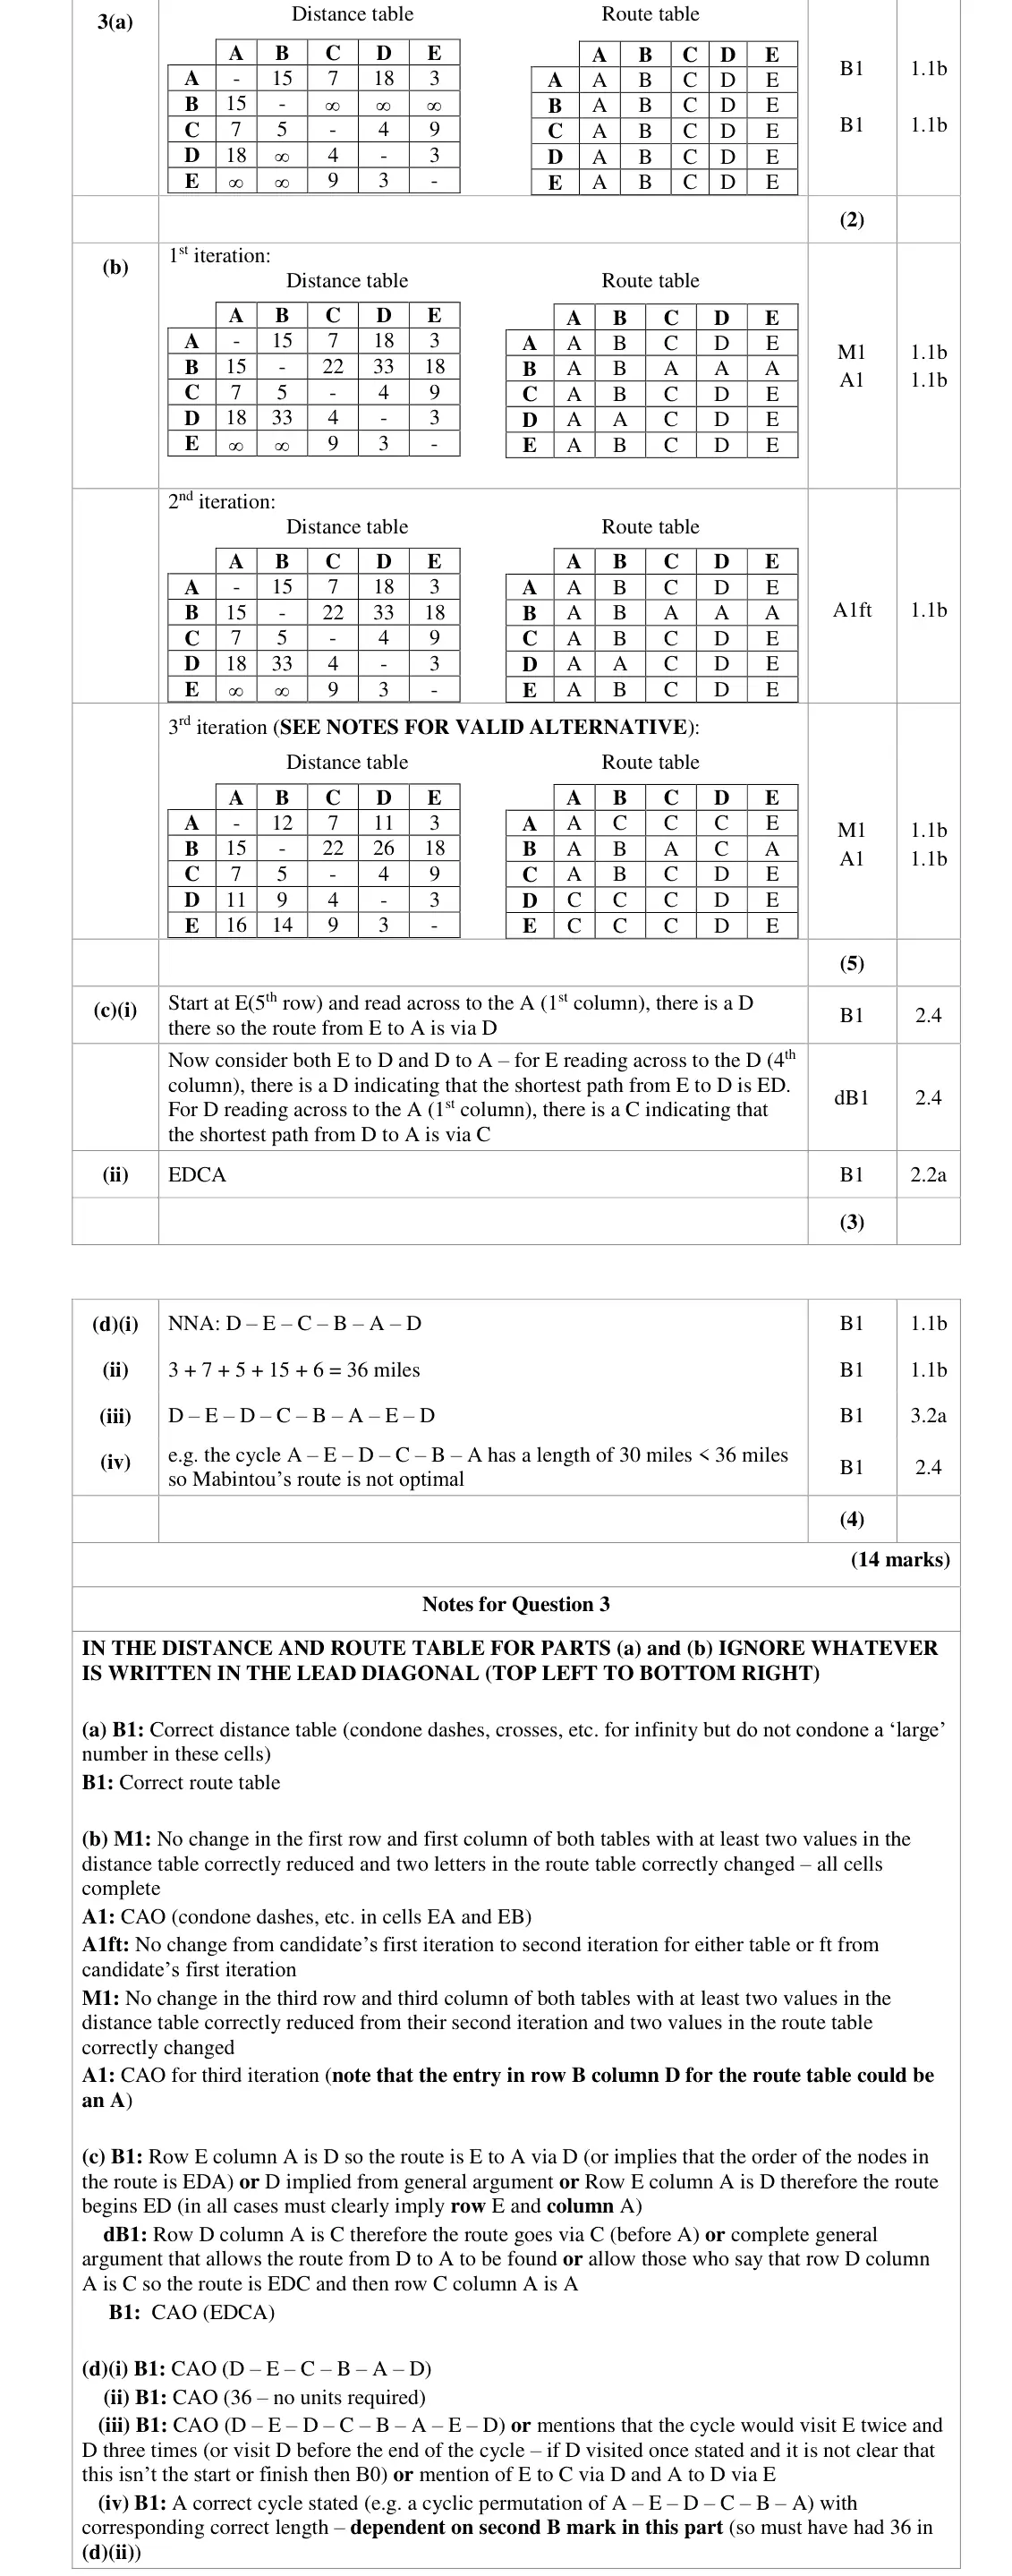
It was part (c) and (d) that caused most problems for candidates. In part (c) several candidates were able to score full marks for a near full (but not totally complete) response, due to the varying nature of the different methods. Many lost marks though as they were not clear about how to use the tables, many did not mention rows and columns specifically, which lost the first two marks in this part. Also, the second (dependent) B mark was especially rarely scored as many candidates did not fully consider the route from D to A. Meanwhile many candidates who lost these first two B marks still earnt the third for a correct route EDCA. Candidates should be aware of the level of detail required for a question that requires them to explain a method. In part (d), many candidates failed to appreciate that the standard method of applying the nearest neighbour method on a table with undirected arcs would not apply in the same way with directed arcs, so incorrectly stated the nearest neighbour route. In nearly all cases this therefore led to the rest of part (d) being incorrect so unfortunately no marks in this part was not an uncommon score. Parts (d)(iii) and (iv) proved particularly challenging with very few candidates realising that (iii) was requesting the actual route used and that (iv) required candidates to find a shorter cycle. In general, proof that a solution to any Decision Mathematics problem is non-optimal only requires a counter-example i.e. a better solution.
Key points from the mark scheme and examiner's report
NNA from D: D–E–C–B–A–D, 36 miles
actual route D–E–D–C–B–A–E–D
a cheaper cycle such as A–E–D–C–B–A = 30 proves it is not optimal
many did not interpret the cycle in terms of actual roads
Find an Edexcel Further Maths tutor
Stuck on this? Book a trial lesson with our Further Maths tutor.