Notes, worked examples and practice for this topic are being written by our tutors. The past-paper questions below are ready now: work each one on paper, then open the mark scheme and the examiner's comment.
Tap a question to zoom it. Mark scheme and examiner's comment open under each question.
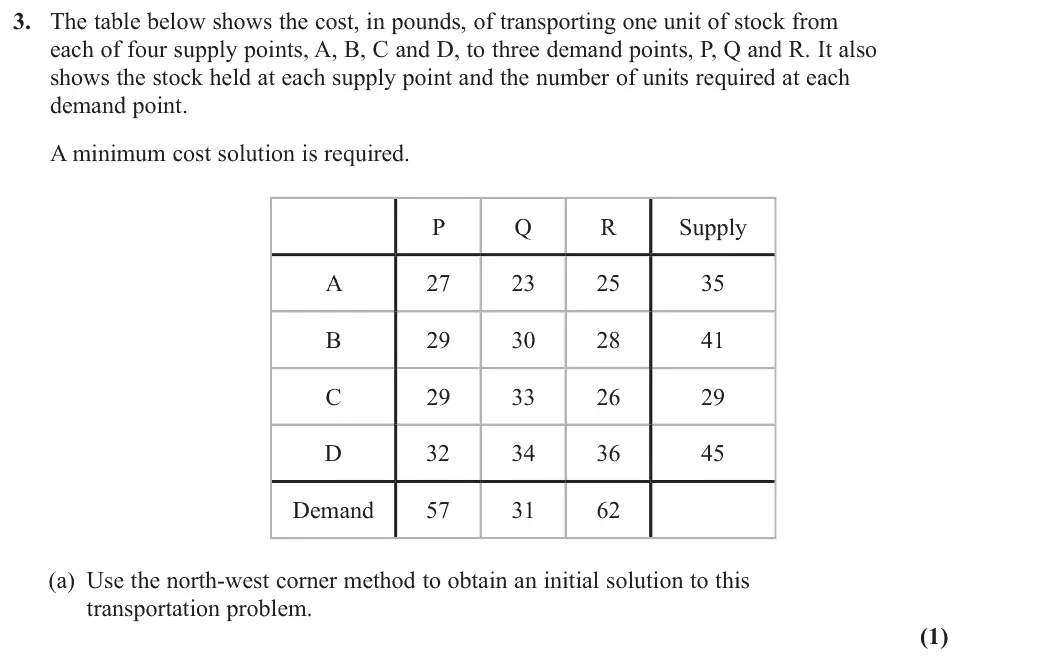
June 2025 · Paper 4D (Decision 2) · Q3(a)1 mark
Mark scheme (whole question; this part is marked with the orange bar)
Examiner's comment
Most candidates were able to write down the initial North-West corner solution and then calculate the shadow costs and improvement indices, although some made errors, e.g. by using the initial allocation instead of the costs to calculate the shadow costs. Most then used their most negative improvement index and found an improved solution, but some made errors by omitting to state the entry or exit cell or by having an additional zero in the exit cell.
Key points from the mark scheme and examiner's report
AP 35, BP 22, BQ 19, CQ 12, CR 17, DR 45
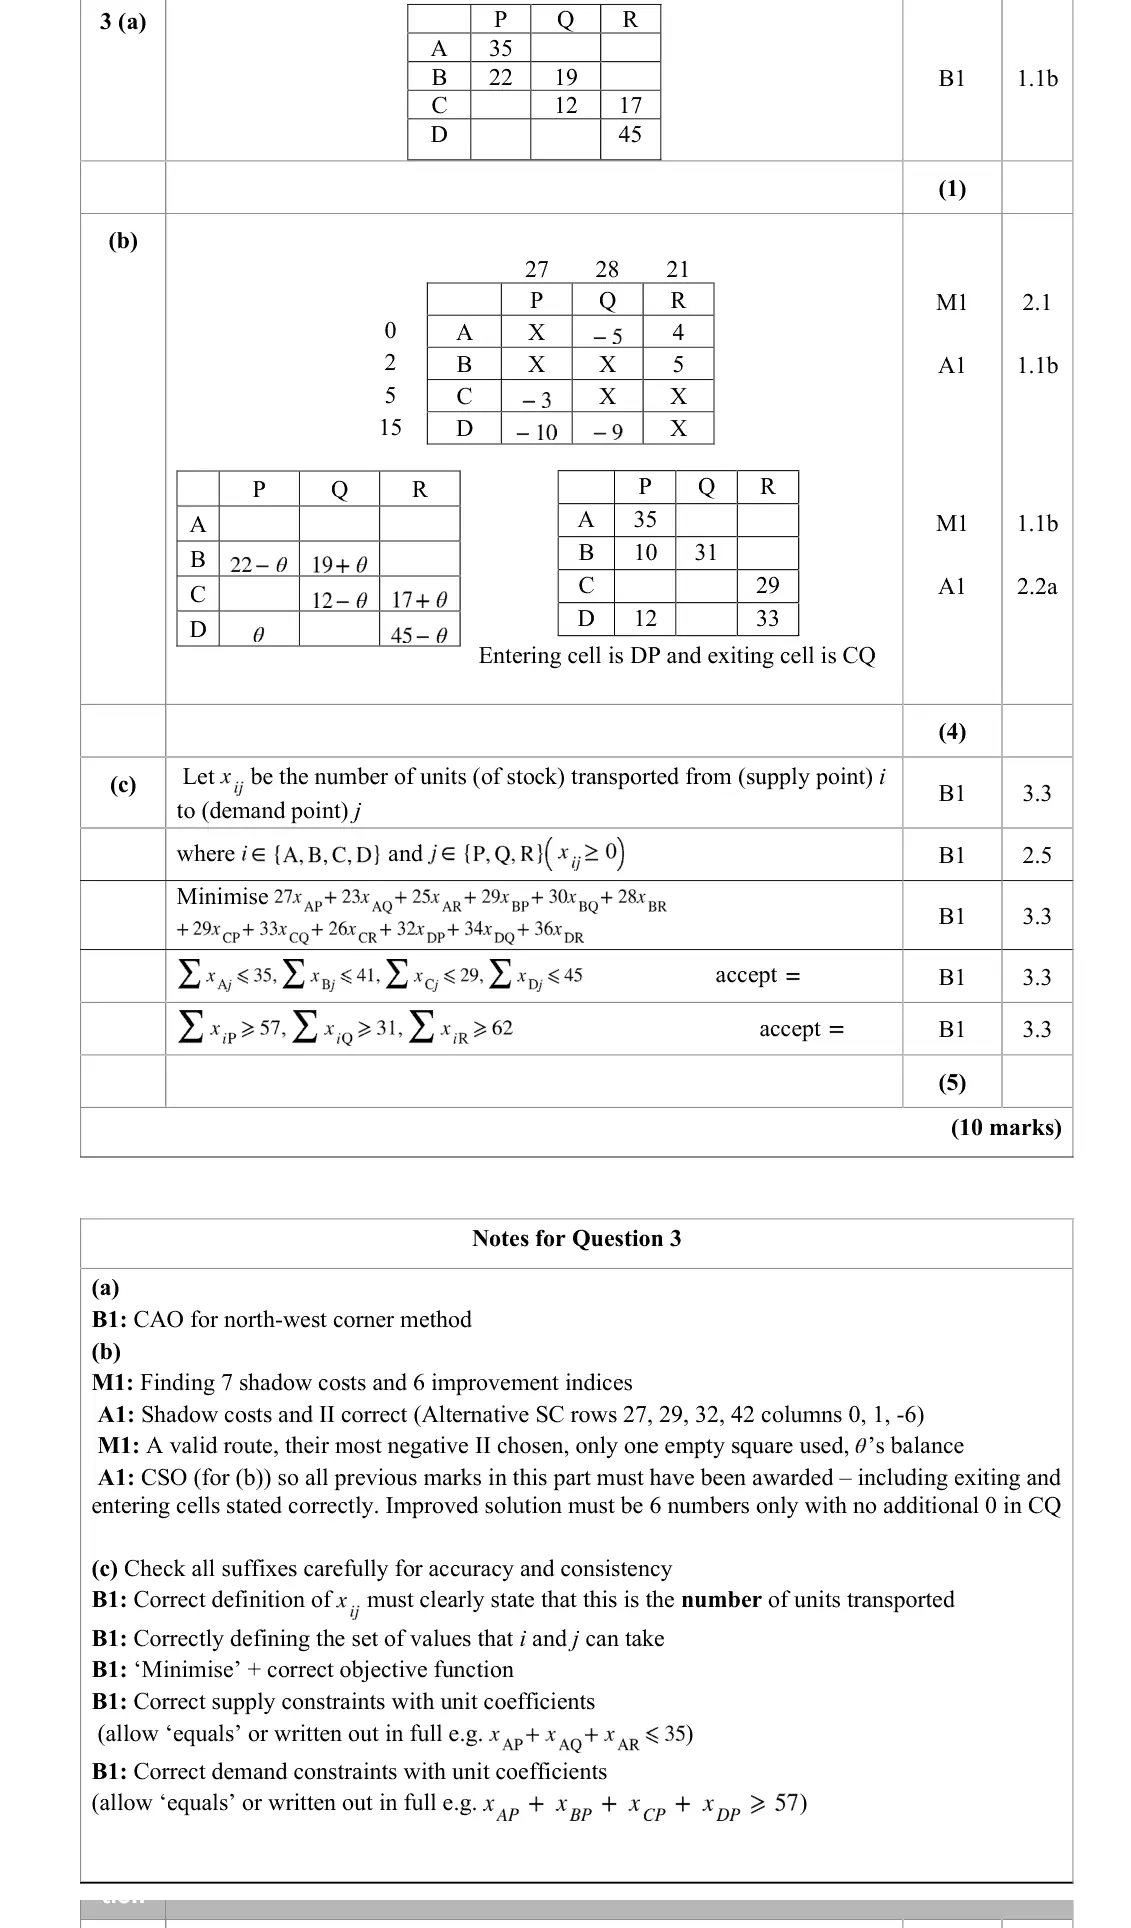
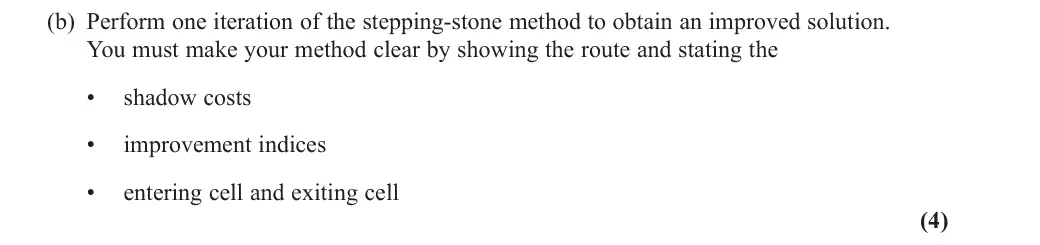
June 2025 · Paper 4D (Decision 2) · Q3(b)4 marks
Mark scheme (whole question; this part is marked with the orange bar)
Examiner's comment
In part (b) some candidates struggled to formulate the linear programming problem accurately. Common errors included not stating that xij represented the number of units transported from i to j, or failing to define i and j correctly as well as omitting the word minimise from the objective.
Key points from the mark scheme and examiner's report
7 shadow costs and 6 IIs (use costs, not allocations)
DP most negative (−10)
route DP, BP, BQ, CQ, CR, DR with theta = 12
entering DP, exiting CQ (leave it empty, not 0)
AP 35, BP 10, BQ 31, CR 29, DP 12, DR 33
June 2025 · Paper 4D (Decision 2) · Q3(c)5 marks
Mark scheme (whole question; this part is marked with the orange bar)
Examiner's comment
Most candidates were able to write down the initial North-West corner solution and then calculate the shadow costs and improvement indices, although some made errors, e.g. by using the initial allocation instead of the costs to calculate the shadow costs. Most then used their most negative improvement index and found an improved solution, but some made errors by omitting to state the entry or exit cell or by having an additional zero in the exit cell.
Key points from the mark scheme and examiner's report
x_ij = number of units transported from supply point i to demand point j, i in {A, B, C, D}, j in {P, Q, R}, x_ij ≥ 0
minimise the 12-term cost
supply ≤ 35, 41, 29, 45 and demand ≥ 57, 31, 62
common errors: not saying x_ij is the number of units, not defining i and j, omitting 'minimise'
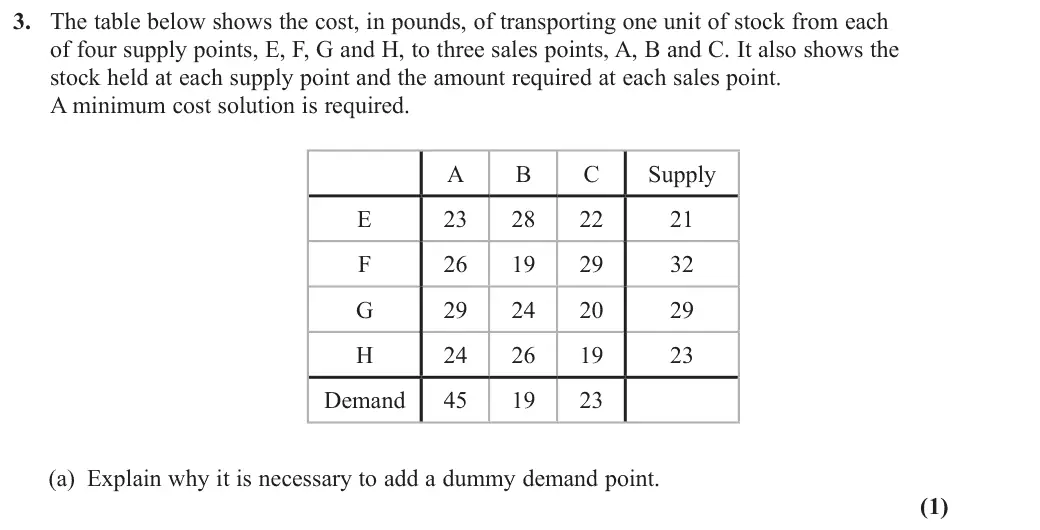
June 2024 · Paper 4D (Decision 2) · Q3(a)1 mark
Mark scheme (whole question; this part is marked with the orange bar)
Examiner's comment
This question was generally answered well, with a significant number of candidates achieving full marks. A small number of candidates misunderstood the reason for needing a dummy demand point, incorrectly thinking that we needed an n x n matrix to apply the North-West
Key points from the mark scheme and examiner's report
total supply 105 exceeds total demand 87
it is not needed to make the table square
June 2024 · Paper 4D (Decision 2) · Q3(b)1 mark
Mark scheme (whole question; this part is marked with the orange bar)
Examiner's comment
This question was generally answered well, with a significant number of candidates achieving full marks. A small number of candidates misunderstood the reason for needing a dummy demand point, incorrectly thinking that we needed an n x n matrix to apply the North-West
Key points from the mark scheme and examiner's report
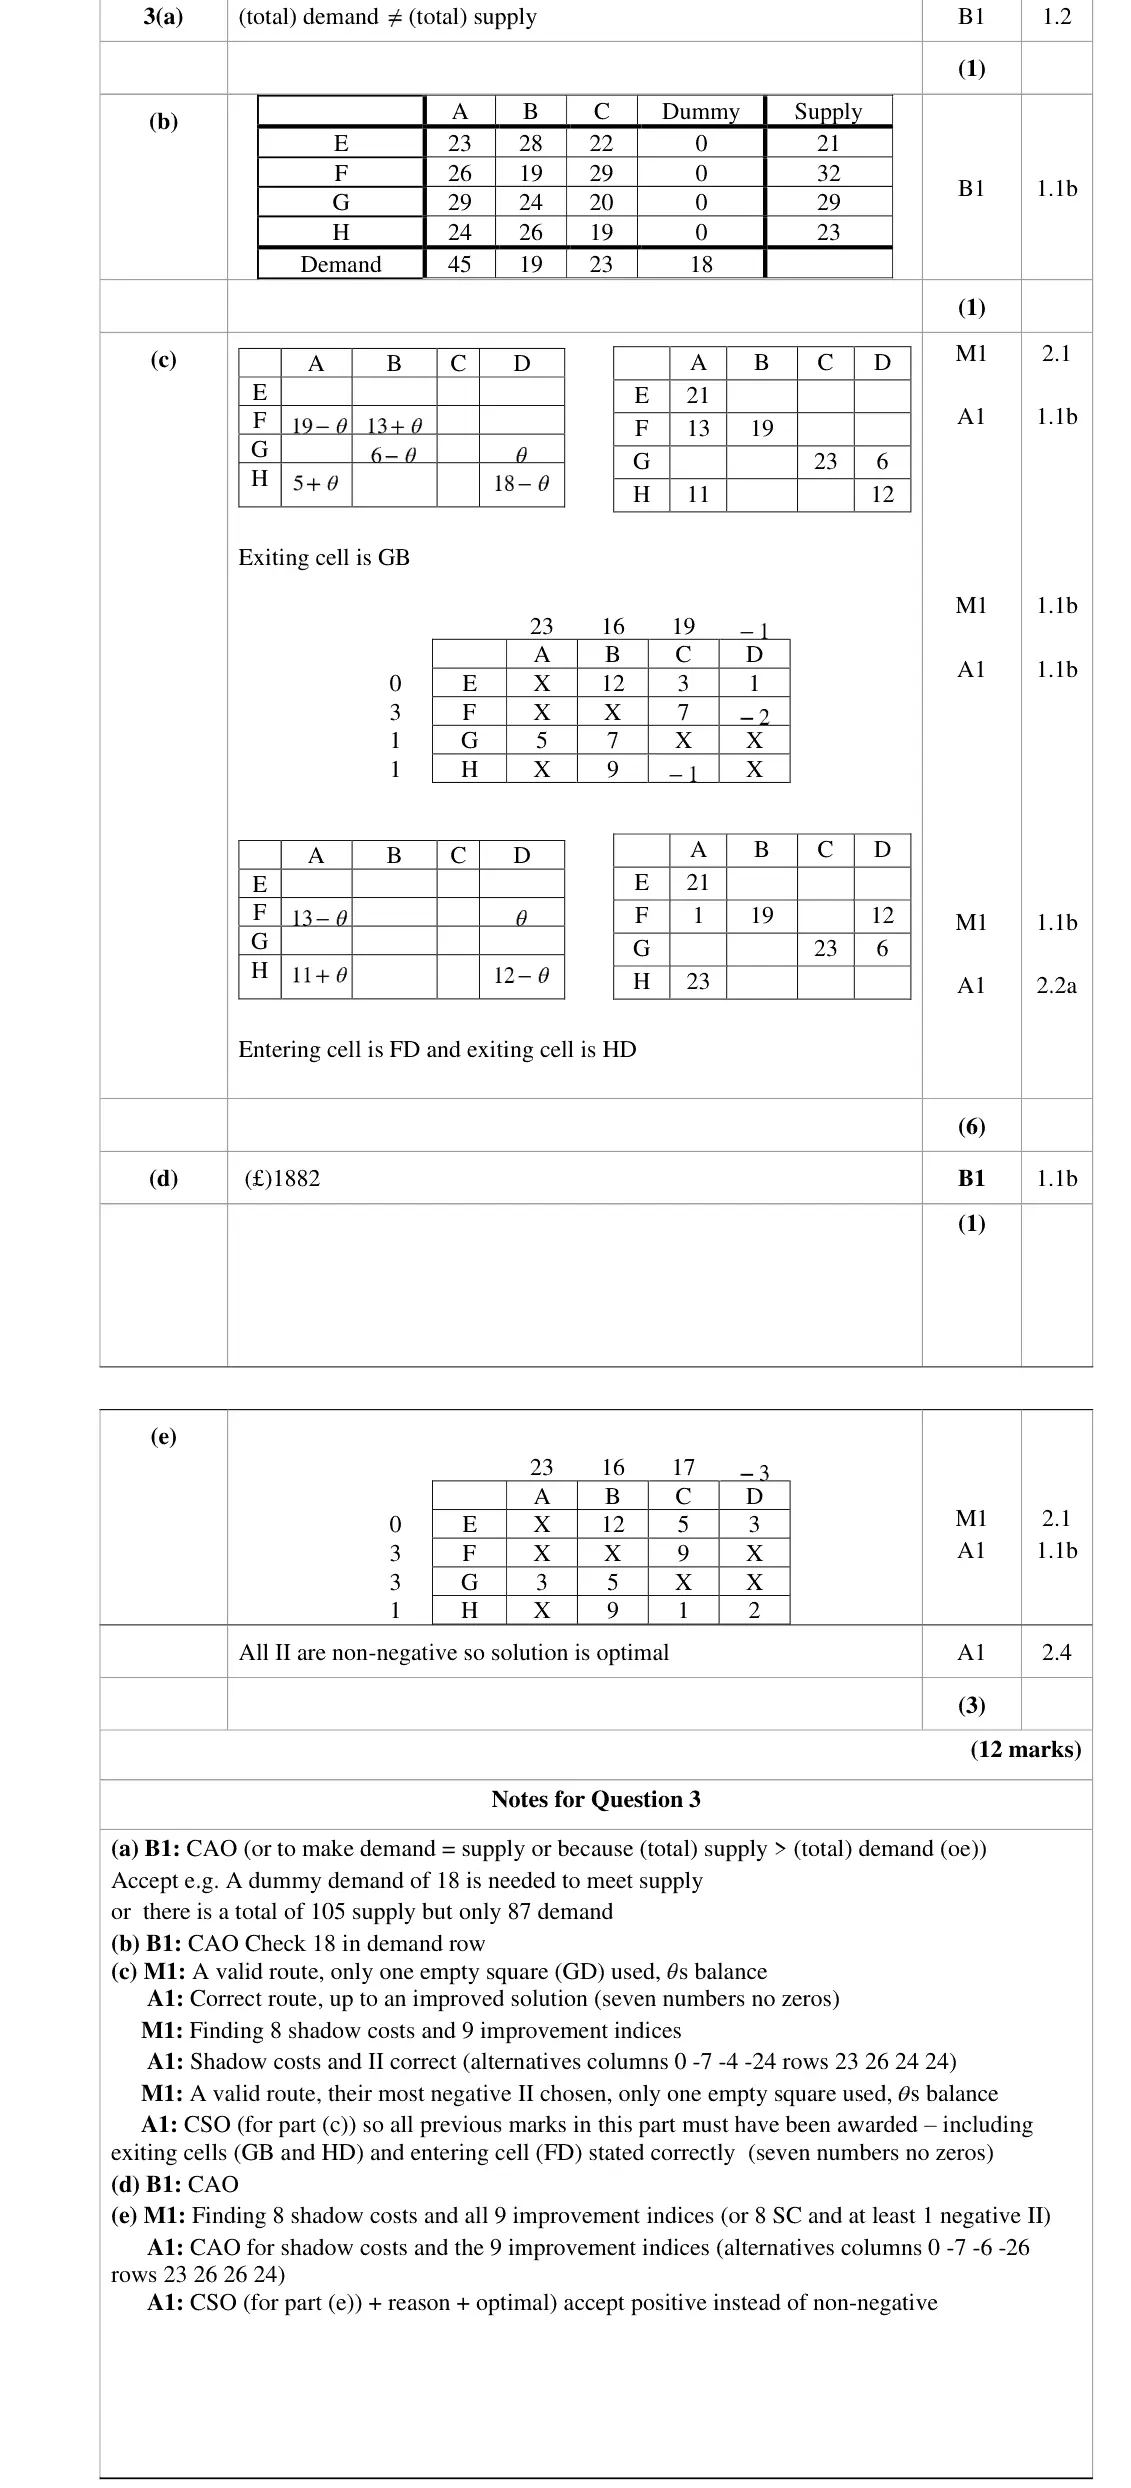
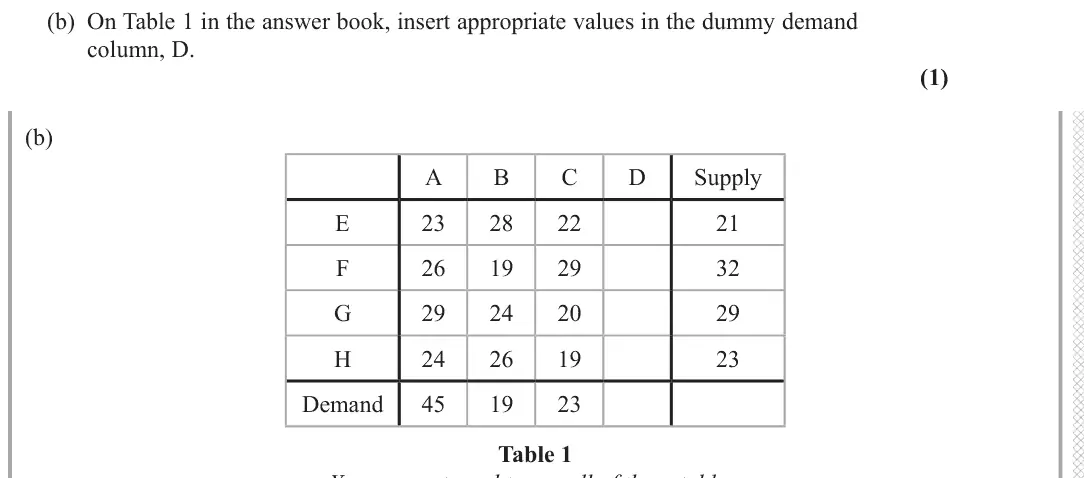
dummy column D with costs 0 and demand 18
June 2024 · Paper 4D (Decision 2) · Q3(c)6 marks
Mark scheme (whole question; this part is marked with the orange bar)
Examiner's comment
Corner method. Some candidates did not read the instructions to part (c) closely enough and caried out unnecessary calculations to determine that GD was the entering cell (even though they were told this). Some candidates made errors with their routes, or with the calculation of shadow costs and improvement indices and some didn’t include enough detail for the final mark, forgetting to mention all of the entering and exiting cells. In part (e) a small number of
Key points from the mark scheme and examiner's report
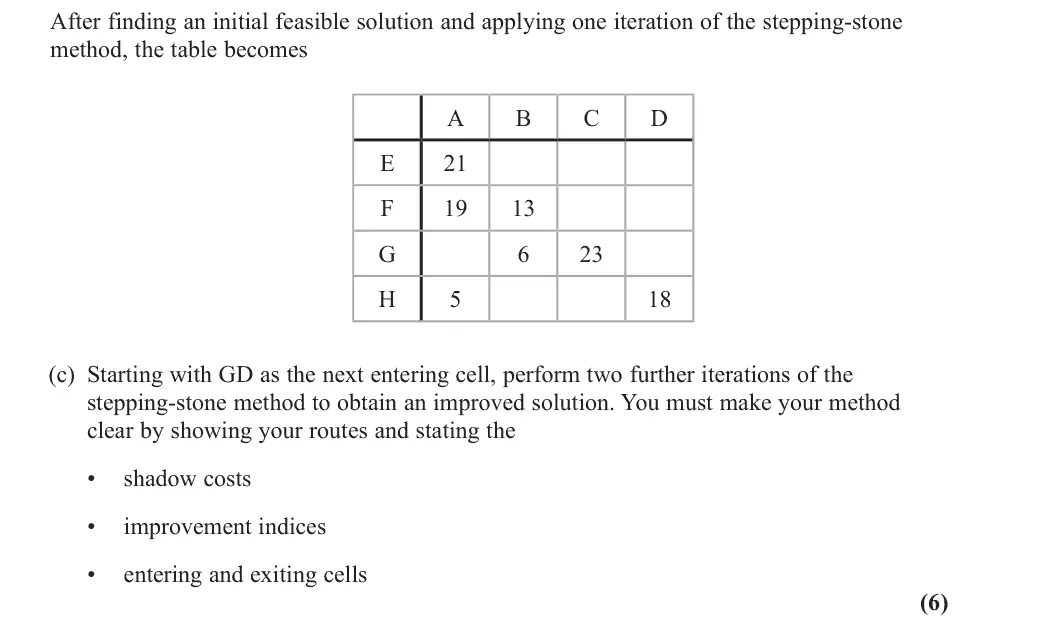
GD is given as the entering cell (no need to compute IIs first): route GD, HD, HA, FA, FB, GB, exiting GB
then 8 shadow costs and 9 IIs, FD most negative (−2), exiting HD
final EA 21, FA 1, FB 19, FD 12, GC 23, GD 6, HA 23
state all entering and exiting cells
June 2024 · Paper 4D (Decision 2) · Q3(d)1 mark
Mark scheme (whole question; this part is marked with the orange bar)
Examiner's comment
This question was generally answered well, with a significant number of candidates achieving full marks. A small number of candidates misunderstood the reason for needing a dummy demand point, incorrectly thinking that we needed an n x n matrix to apply the North-West
Key points from the mark scheme and examiner's report
cost £1882
June 2024 · Paper 4D (Decision 2) · Q3(e)3 marks
Mark scheme (whole question; this part is marked with the orange bar)
Examiner's comment
mark, forgetting to mention all of the entering and exiting cells. In part (e) a small number of candidates made errors in calculating the shadow costs and improvement indices or failed to state why their solution was optimal.
Key points from the mark scheme and examiner's report
recalculate shadow costs and all 9 IIs
all non-negative so optimal
June 2023 · Paper 4D (Decision 2) · Q3(a)2 marks
Mark scheme (whole question; this part is marked with the orange bar)
Examiner's comment
This question also proved to be accessible. Most candidates attempted to write down the constraints for the problem as inequalities, although a small number used equations, with the majority preferring to use Sigma notation. Some candidates made errors in their choice of inequality and a small number used incorrect notation. Most candidates wrote down the initial North West corner solution. Some went on to unnecessarily calculate shadow costs and improvement indices here. Most found the correct stepping stone route and improved solution, although some made errors in the route and a number incorrectly had a zero in the exiting cell (CR). Most candidates then attempted to calculate shadow costs and improvement indices, although some made numerical errors. Candidates generally used their most negative improvement index to try to find a second stepping stone route and improved solution. A number of errors were seen at this stage, either with an incorrect route, the use of costs instead of values to be transported or the failure to state the entry or exit cells.
Key points from the mark scheme and examiner's report
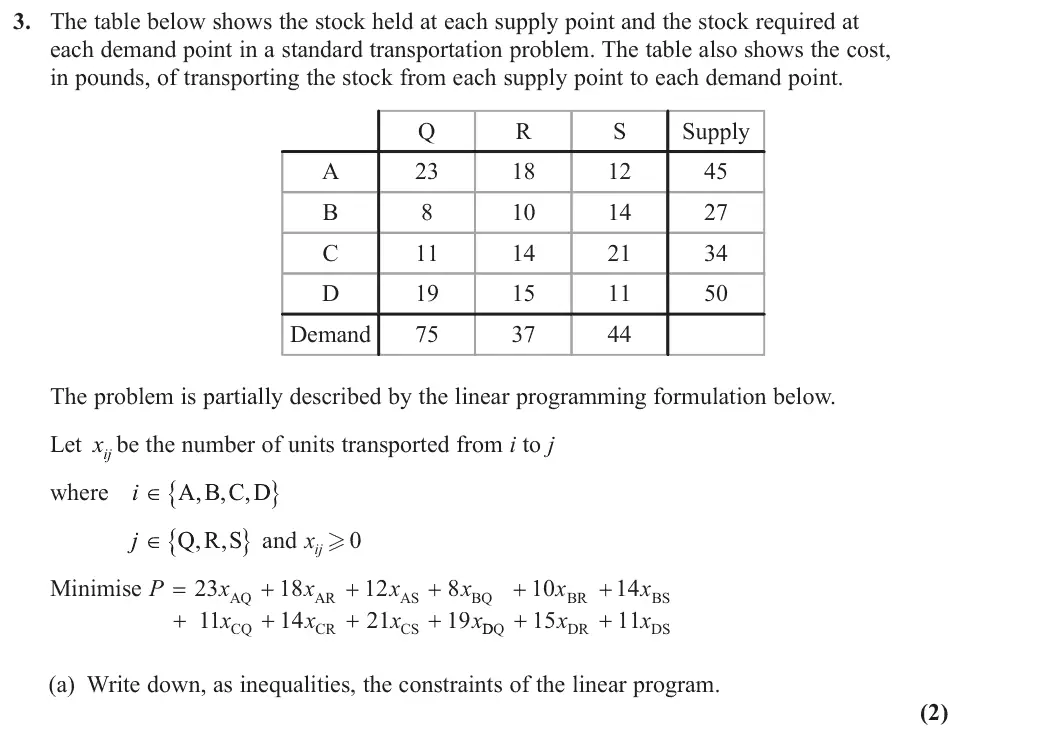
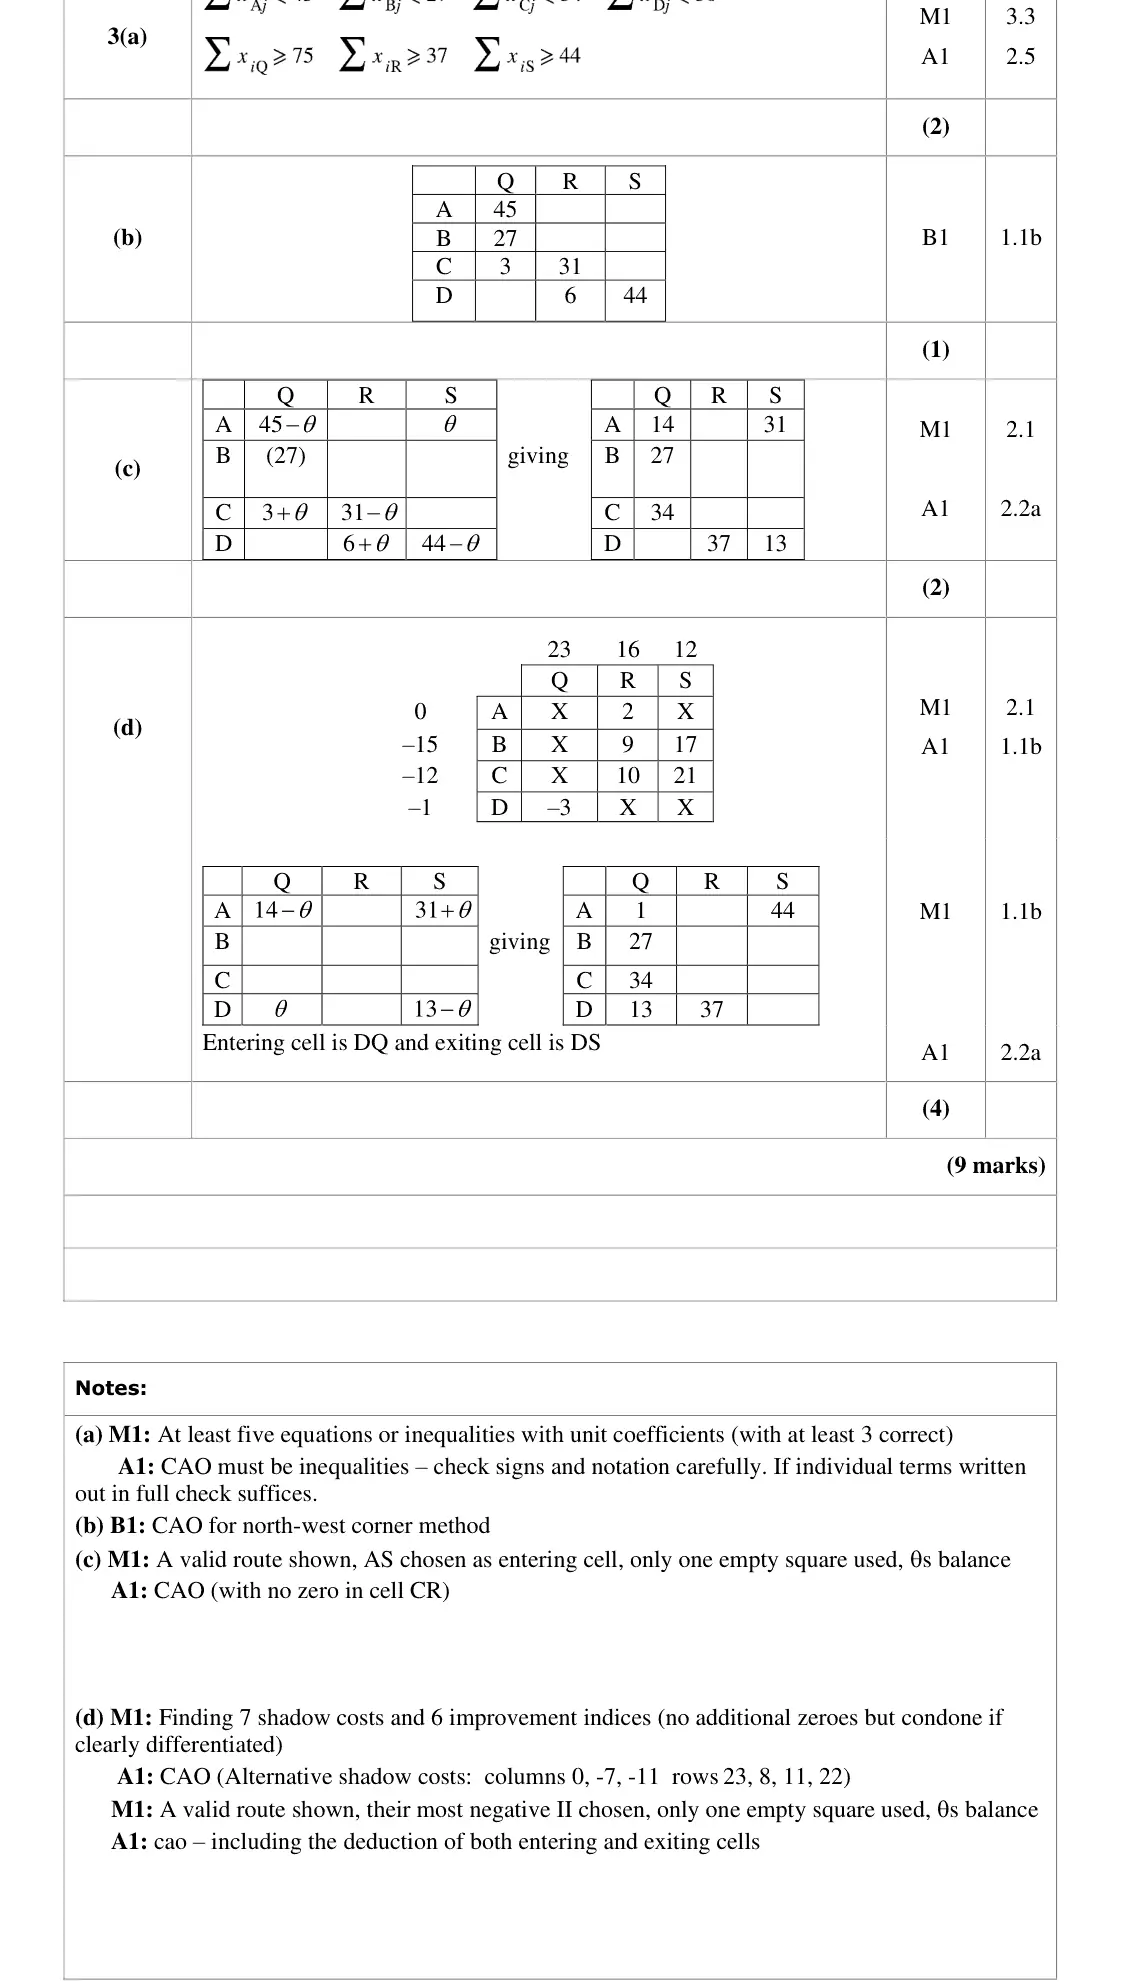
supply constraints sum of x_Aj ≤ 45, x_Bj ≤ 27, x_Cj ≤ 34, x_Dj ≤ 50
demand constraints sum of x_iQ ≥ 75, x_iR ≥ 37, x_iS ≥ 44
must be inequalities with the correct signs
June 2023 · Paper 4D (Decision 2) · Q3(b)1 mark
Mark scheme (whole question; this part is marked with the orange bar)
Examiner's comment
This question also proved to be accessible. Most candidates attempted to write down the constraints for the problem as inequalities, although a small number used equations, with the majority preferring to use Sigma notation. Some candidates made errors in their choice of inequality and a small number used incorrect notation. Most candidates wrote down the initial North West corner solution. Some went on to unnecessarily calculate shadow costs and improvement indices here. Most found the correct stepping stone route and improved solution, although some made errors in the route and a number incorrectly had a zero in the exiting cell (CR). Most candidates then attempted to calculate shadow costs and improvement indices, although some made numerical errors. Candidates generally used their most negative improvement index to try to find a second stepping stone route and improved solution. A number of errors were seen at this stage, either with an incorrect route, the use of costs instead of values to be transported or the failure to state the entry or exit cells.
Key points from the mark scheme and examiner's report
AQ 45, BQ 27, CQ 3, CR 31, DR 6, DS 44
June 2023 · Paper 4D (Decision 2) · Q3(c)2 marks
Mark scheme (whole question; this part is marked with the orange bar)
Examiner's comment
This question also proved to be accessible. Most candidates attempted to write down the constraints for the problem as inequalities, although a small number used equations, with the majority preferring to use Sigma notation. Some candidates made errors in their choice of inequality and a small number used incorrect notation. Most candidates wrote down the initial North West corner solution. Some went on to unnecessarily calculate shadow costs and improvement indices here. Most found the correct stepping stone route and improved solution, although some made errors in the route and a number incorrectly had a zero in the exiting cell (CR). Most candidates then attempted to calculate shadow costs and improvement indices, although some made numerical errors. Candidates generally used their most negative improvement index to try to find a second stepping stone route and improved solution. A number of errors were seen at this stage, either with an incorrect route, the use of costs instead of values to be transported or the failure to state the entry or exit cells.
Key points from the mark scheme and examiner's report
route AS, DS, DR, CR, CQ, AQ with theta = 31
AQ 14, AS 31, BQ 27, CQ 34, DR 37, DS 13
leave CR empty, not 0 (common error)
June 2023 · Paper 4D (Decision 2) · Q3(d)4 marks
Mark scheme (whole question; this part is marked with the orange bar)
Examiner's comment
This question also proved to be accessible. Most candidates attempted to write down the constraints for the problem as inequalities, although a small number used equations, with the majority preferring to use Sigma notation. Some candidates made errors in their choice of inequality and a small number used incorrect notation. Most candidates wrote down the initial North West corner solution. Some went on to unnecessarily calculate shadow costs and improvement indices here. Most found the correct stepping stone route and improved solution, although some made errors in the route and a number incorrectly had a zero in the exiting cell (CR). Most candidates then attempted to calculate shadow costs and improvement indices, although some made numerical errors. Candidates generally used their most negative improvement index to try to find a second stepping stone route and improved solution. A number of errors were seen at this stage, either with an incorrect route, the use of costs instead of values to be transported or the failure to state the entry or exit cells.
Key points from the mark scheme and examiner's report
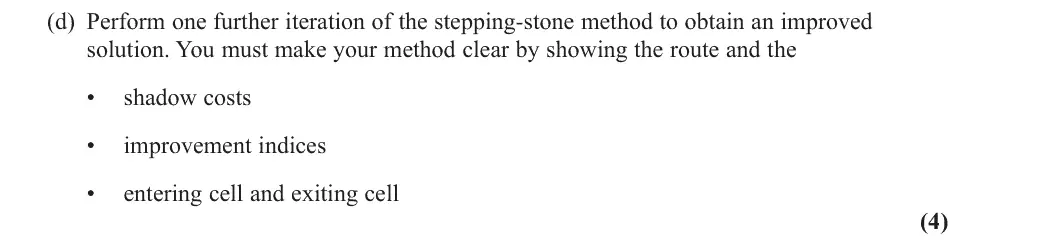
7 shadow costs and 6 IIs
DQ has II −3
route DQ, DS, AS, AQ with theta = 13
entering DQ, exiting DS
AQ 1, AS 44, BQ 27, CQ 34, DQ 13, DR 37
June 2022 · Paper 4D (Decision 2) · Q5(a)1 mark
Mark scheme (whole question; this part is marked with the orange bar)
Examiner's comment
This question was well answered by the majority of candidates. Almost all understood the relevance of a balanced problem and therefore found k to be 39. Most had a general idea of the meaning of the constraint and were able to gain one mark, but few earned two, for fully translating the constraint by mentioning supply points and the demand at destination R being not less than, or at least, 44. Most candidates wrote the correct initial north-west corner solution but many did not attempt to calculate the corresponding
Key points from the mark scheme and examiner's report
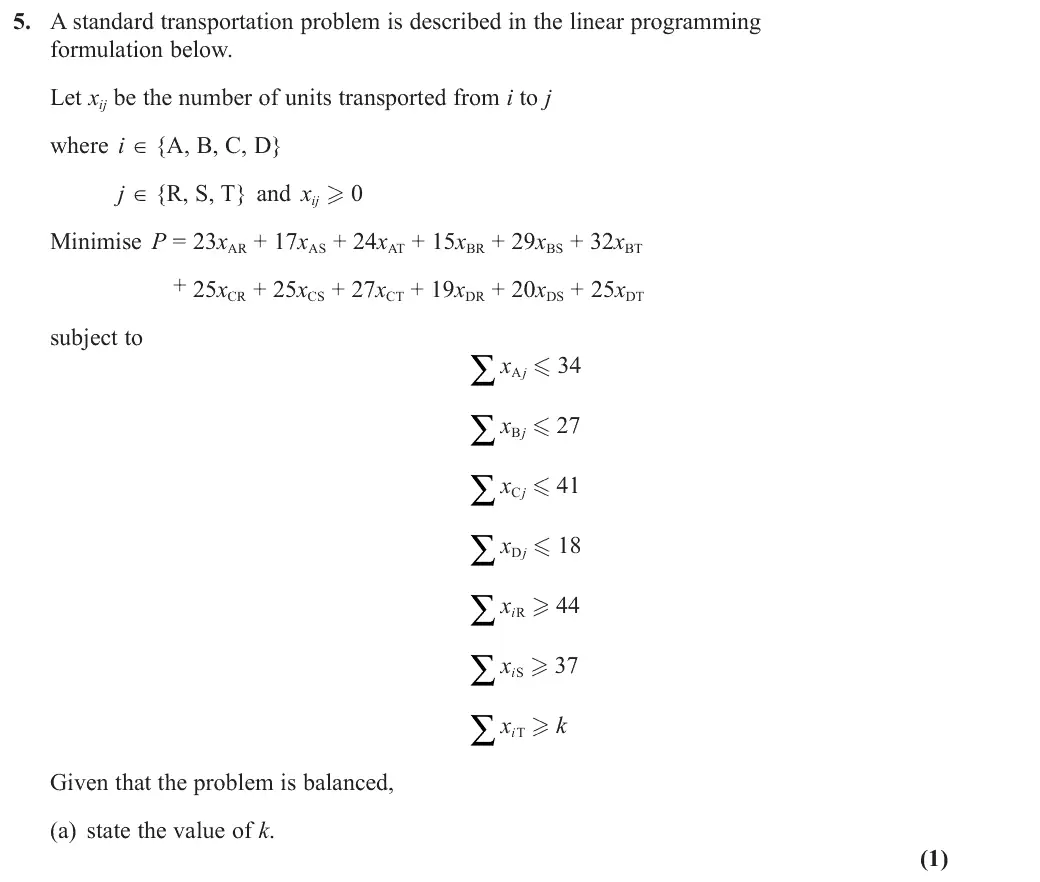
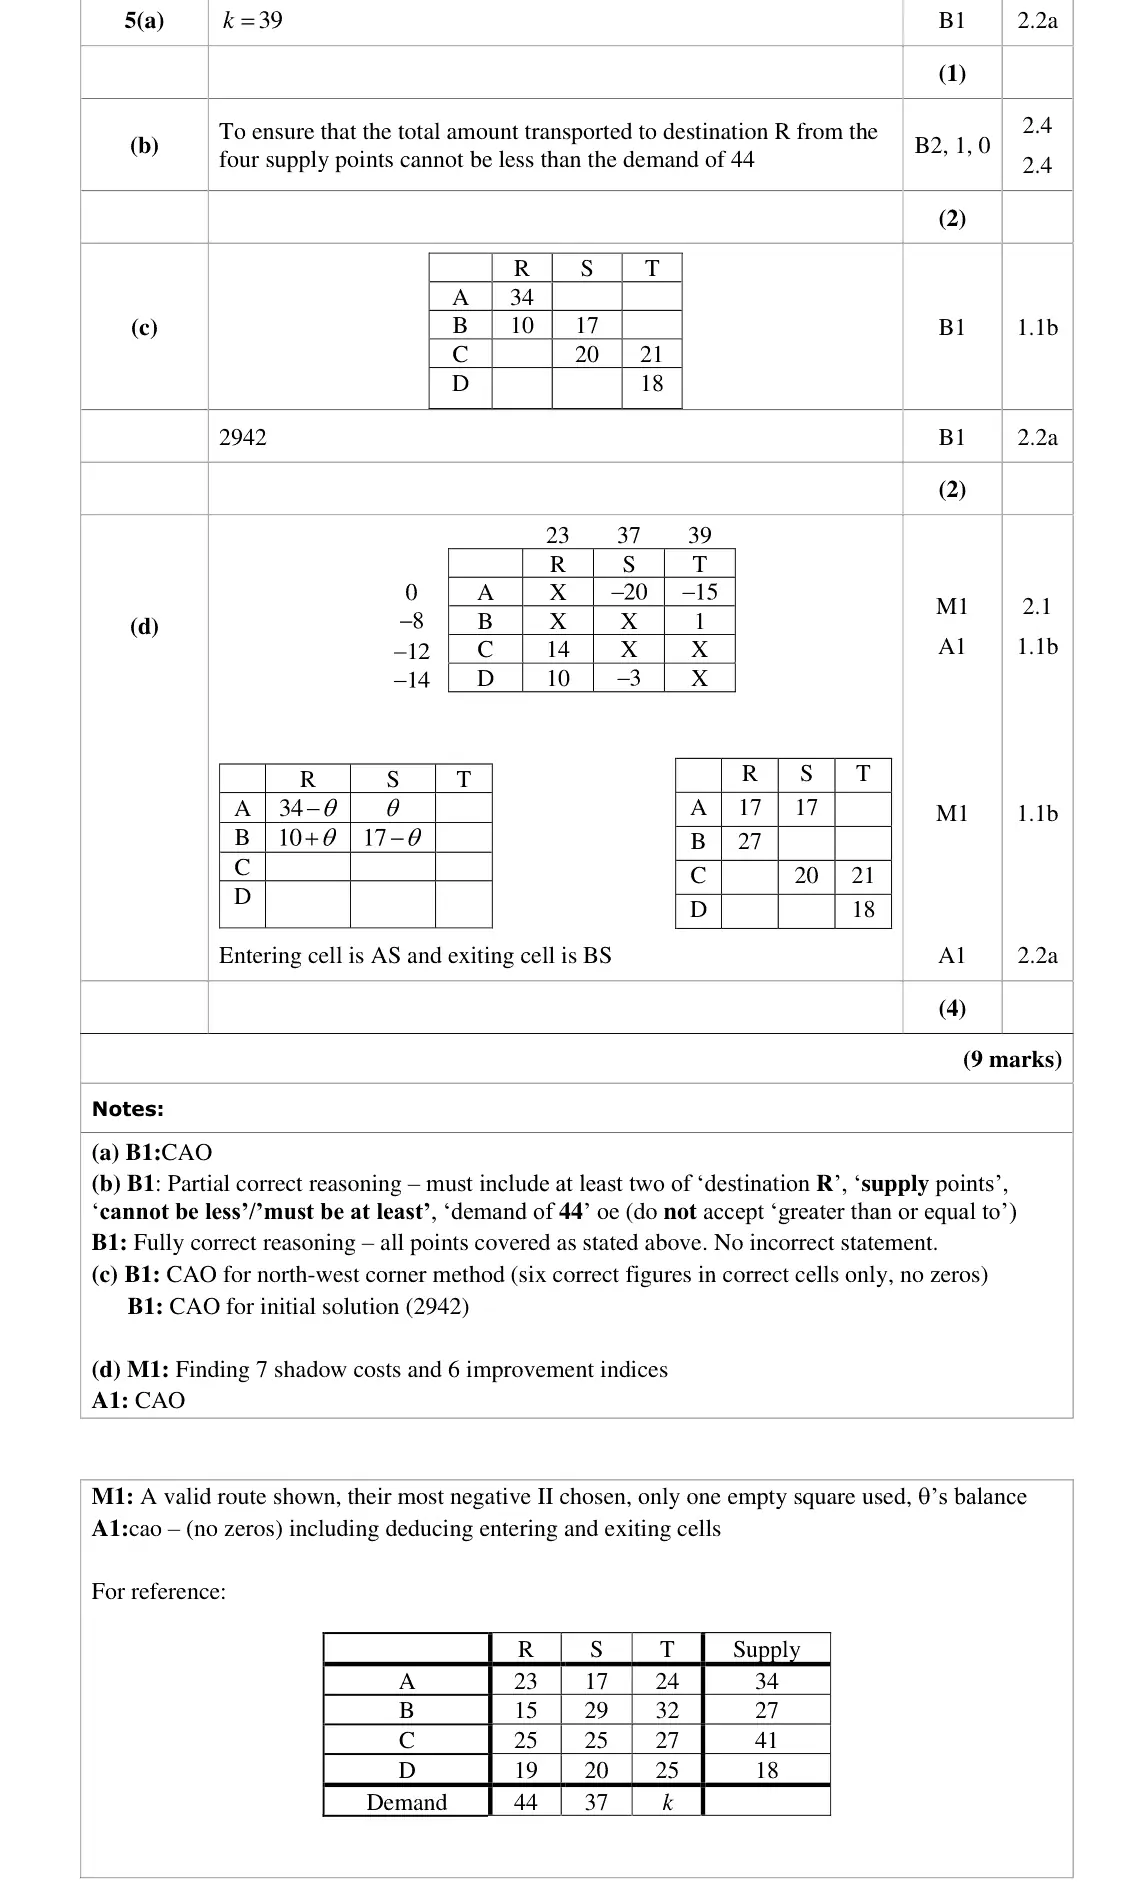
balanced so total demand = total supply 120: k = 39
June 2022 · Paper 4D (Decision 2) · Q5(b)2 marks
Mark scheme (whole question; this part is marked with the orange bar)
Examiner's comment
This question was well answered by the majority of candidates. Almost all understood the relevance of a balanced problem and therefore found k to be 39. Most had a general idea of the meaning of the constraint and were able to gain one mark, but few earned two, for fully translating the constraint by mentioning supply points and the demand at destination R being not less than, or at least, 44. Most candidates wrote the correct initial north-west corner solution but many did not attempt to calculate the corresponding
Key points from the mark scheme and examiner's report
total transported to destination R from the four supply points must be at least (cannot be less than) the demand of 44
'greater than or equal to' alone not accepted
few gave a full answer
June 2022 · Paper 4D (Decision 2) · Q5(c)2 marks
Mark scheme (whole question; this part is marked with the orange bar)
Examiner's comment
This question was well answered by the majority of candidates. Almost all understood the relevance of a balanced problem and therefore found k to be 39. Most had a general idea of the meaning of the constraint and were able to gain one mark, but few earned two, for fully translating the constraint by mentioning supply points and the demand at destination R being not less than, or at least, 44. Most candidates wrote the correct initial north-west corner solution but many did not attempt to calculate the corresponding
Key points from the mark scheme and examiner's report
AR 34, BR 10, BS 17, CS 20, CT 21, DT 18
cost 2942
many forgot to calculate the cost
June 2022 · Paper 4D (Decision 2) · Q5(d)4 marks
Mark scheme (whole question; this part is marked with the orange bar)
Examiner's comment
initial cost, and lost a relatively easy mark. The stepping-stone method, for part (d), was familiar to most candidates, who were generally able to correctly calculate shadow costs and improvement indices, with only occasional errors and omissions. It was rare for the initial solution figures to be wrongly used, instead of transportation costs, as has been seen in past series. Almost all used their most negative improvement index to identify the entering cell, AS. The correct ii for cell AS was -20, but a number of candidates mistakenly found it to be -10, leading to a more difficult s/s route and causing them to lose at least the two accuracy marks. Just a few lost a mark for failing to name the entering and exiting cells, or for including a zero in their exiting cell.
Key points from the mark scheme and examiner's report
7 shadow costs and 6 IIs
AS has II −20 (−10 was a common error)
route AS, BS, BR, AR, theta = 17
entering AS, exiting BS
AR 17, AS 17, BR 27, CS 20, CT 21, DT 18
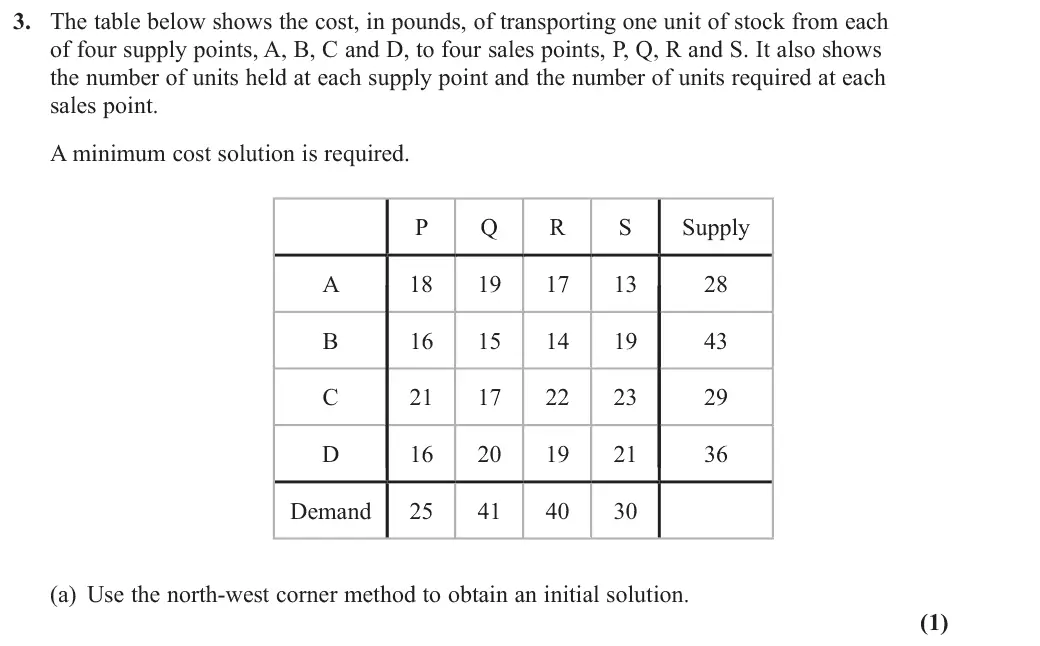
Nov 2021 · Paper 4D (Decision 2) · Q3(a)1 mark
Mark scheme (whole question; this part is marked with the orange bar)
Key points from the mark scheme and examiner's report
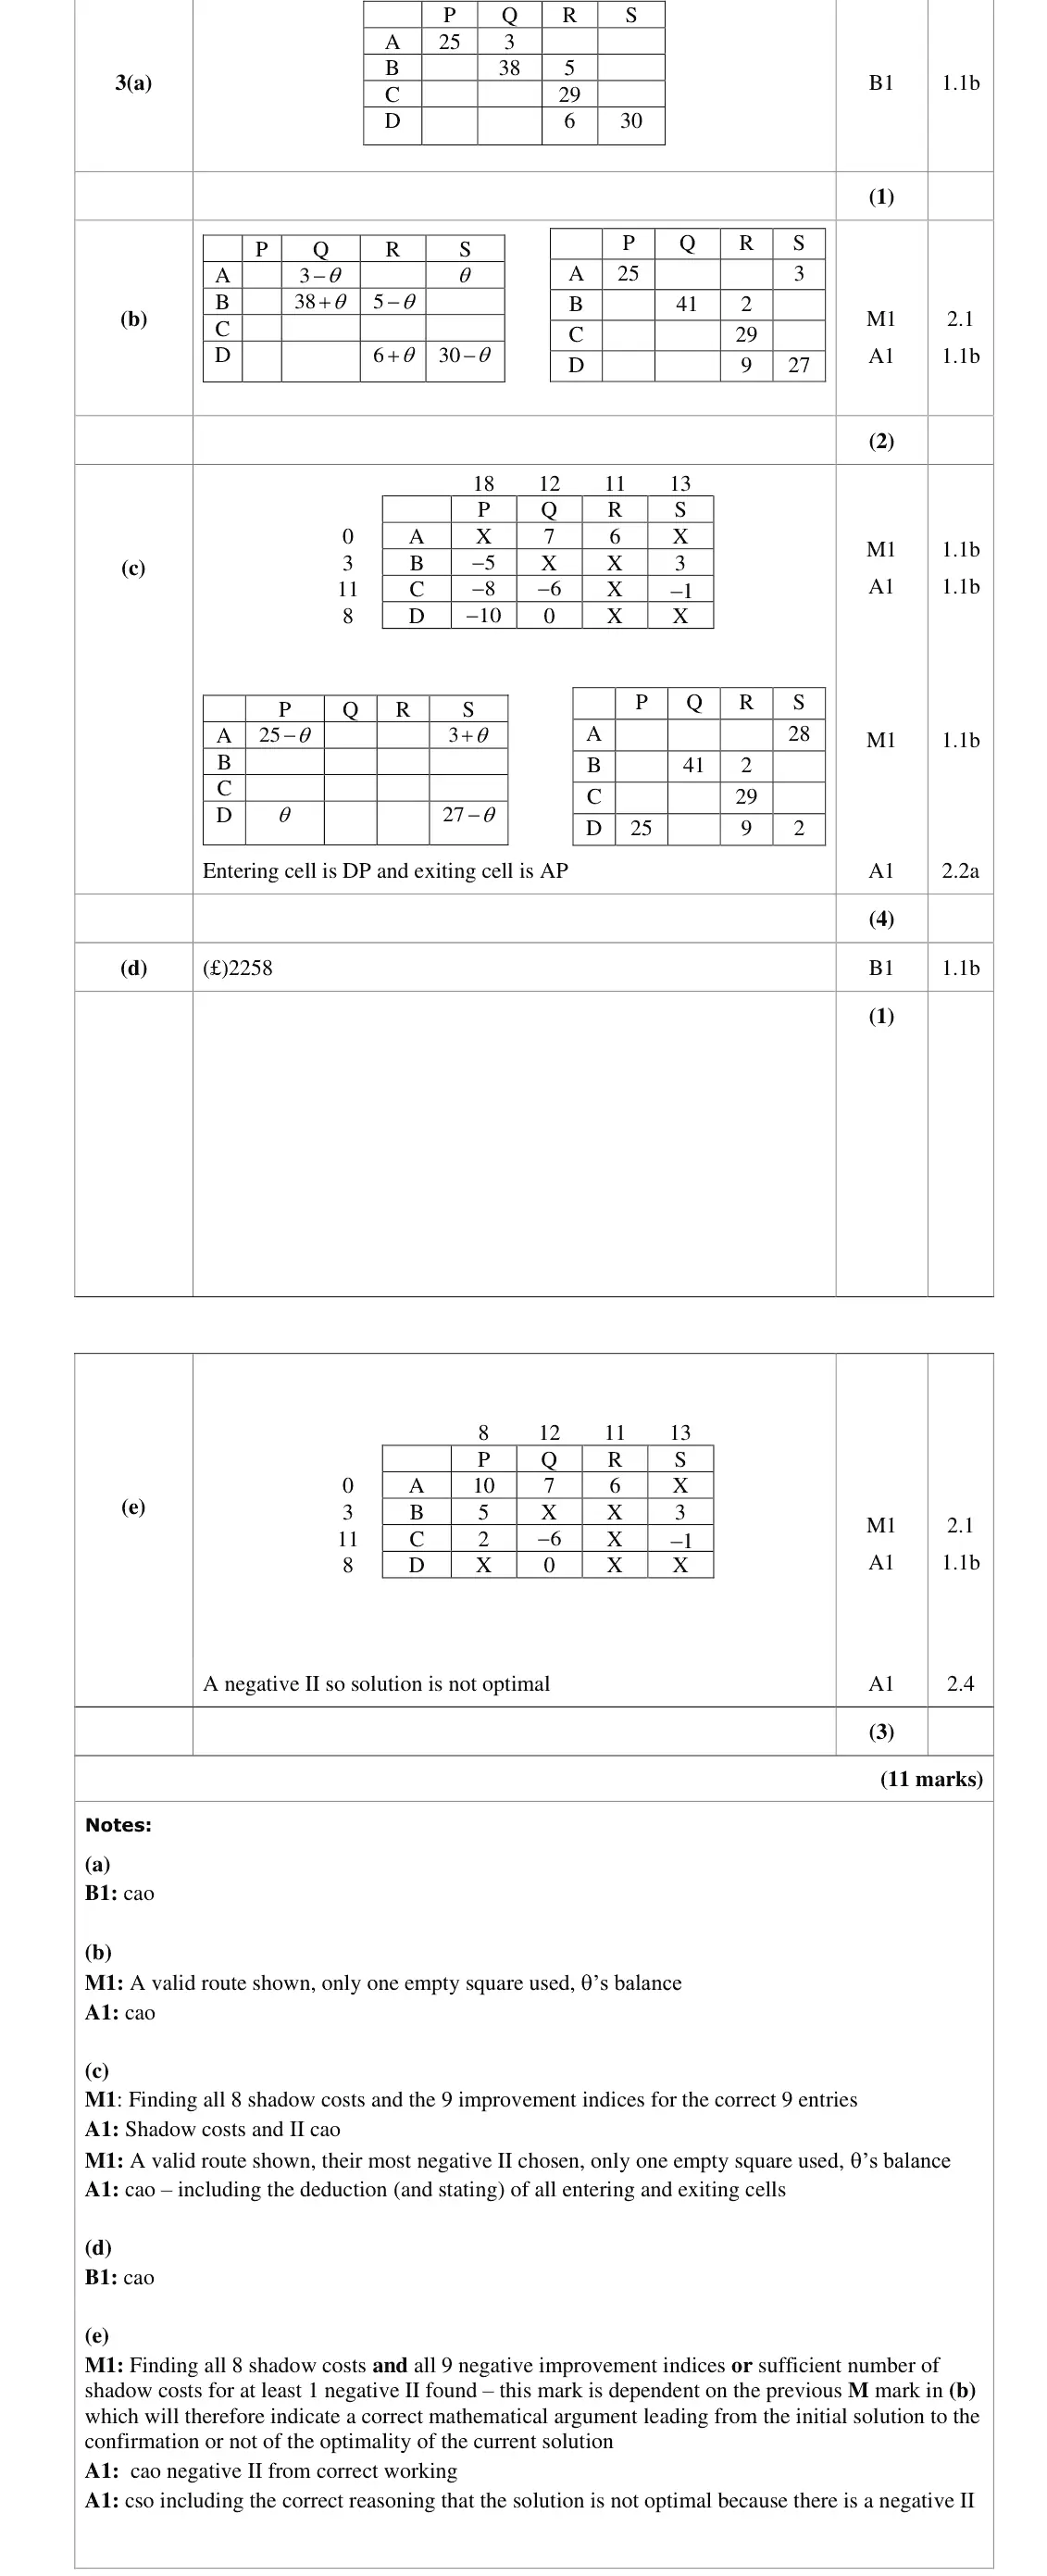
AP 25, AQ 3, BQ 38, BR 5, CR 29, DR 6, DS 30
Nov 2021 · Paper 4D (Decision 2) · Q3(b)2 marks
Mark scheme (whole question; this part is marked with the orange bar)
Key points from the mark scheme and examiner's report
route AS, AQ, BQ, BR, DR, DS with theta = 3
AP 25, AS 3, BQ 41, BR 2, CR 29, DR 9, DS 27
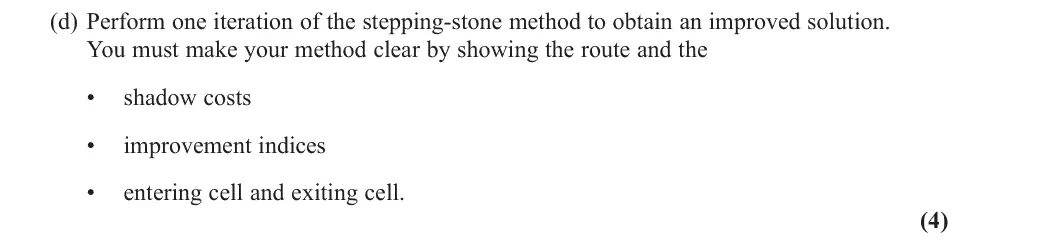
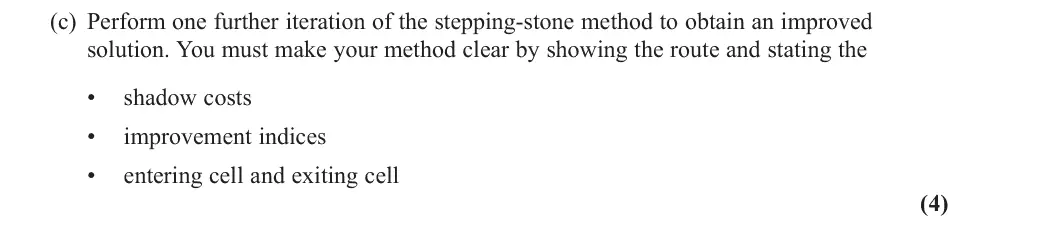
Nov 2021 · Paper 4D (Decision 2) · Q3(c)4 marks
Mark scheme (whole question; this part is marked with the orange bar)
Key points from the mark scheme and examiner's report
8 shadow costs and 9 improvement indices
most negative II is DP (−10)
entering DP, exiting AP
AS 28, BQ 41, BR 2, CR 29, DP 25, DR 9, DS 2
Nov 2021 · Paper 4D (Decision 2) · Q3(d)1 mark
Mark scheme (whole question; this part is marked with the orange bar)
Key points from the mark scheme and examiner's report
cost £2258
Nov 2021 · Paper 4D (Decision 2) · Q3(e)3 marks
Mark scheme (whole question; this part is marked with the orange bar)
Key points from the mark scheme and examiner's report
recalculate shadow costs and IIs
CQ has II −6 (CS −1) so not optimal
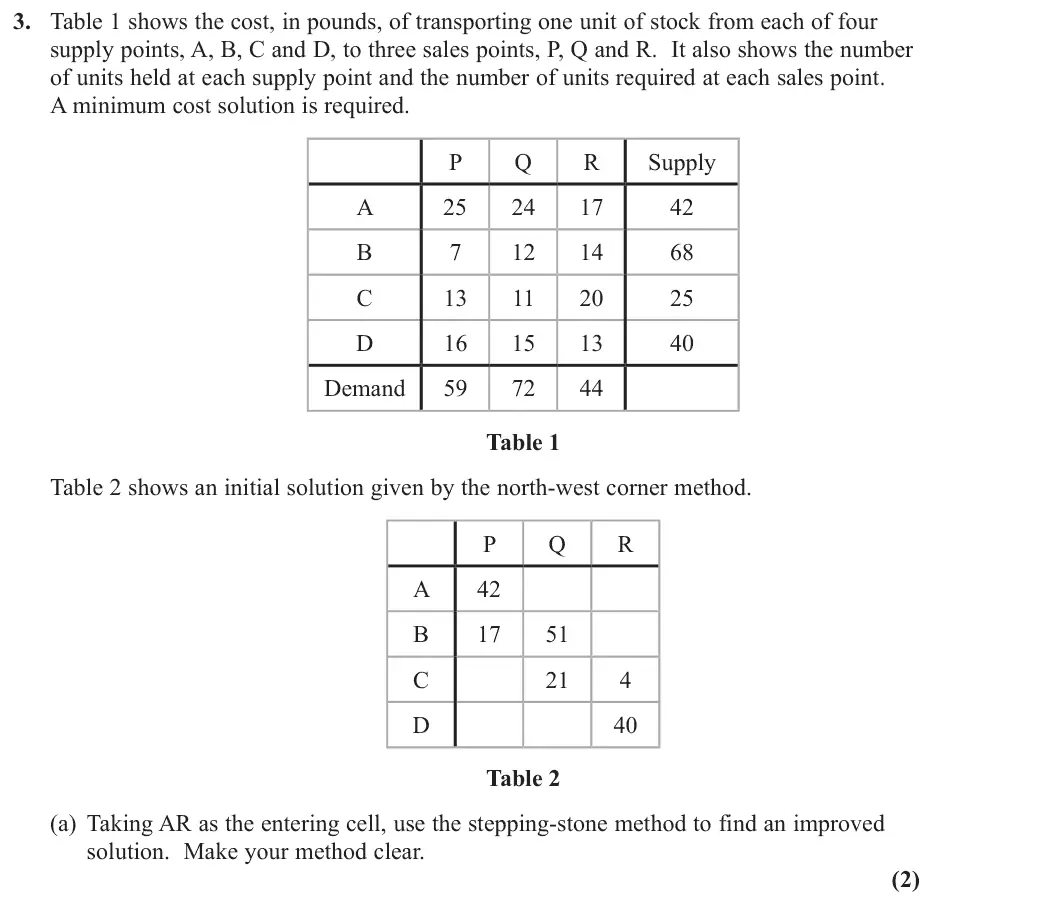
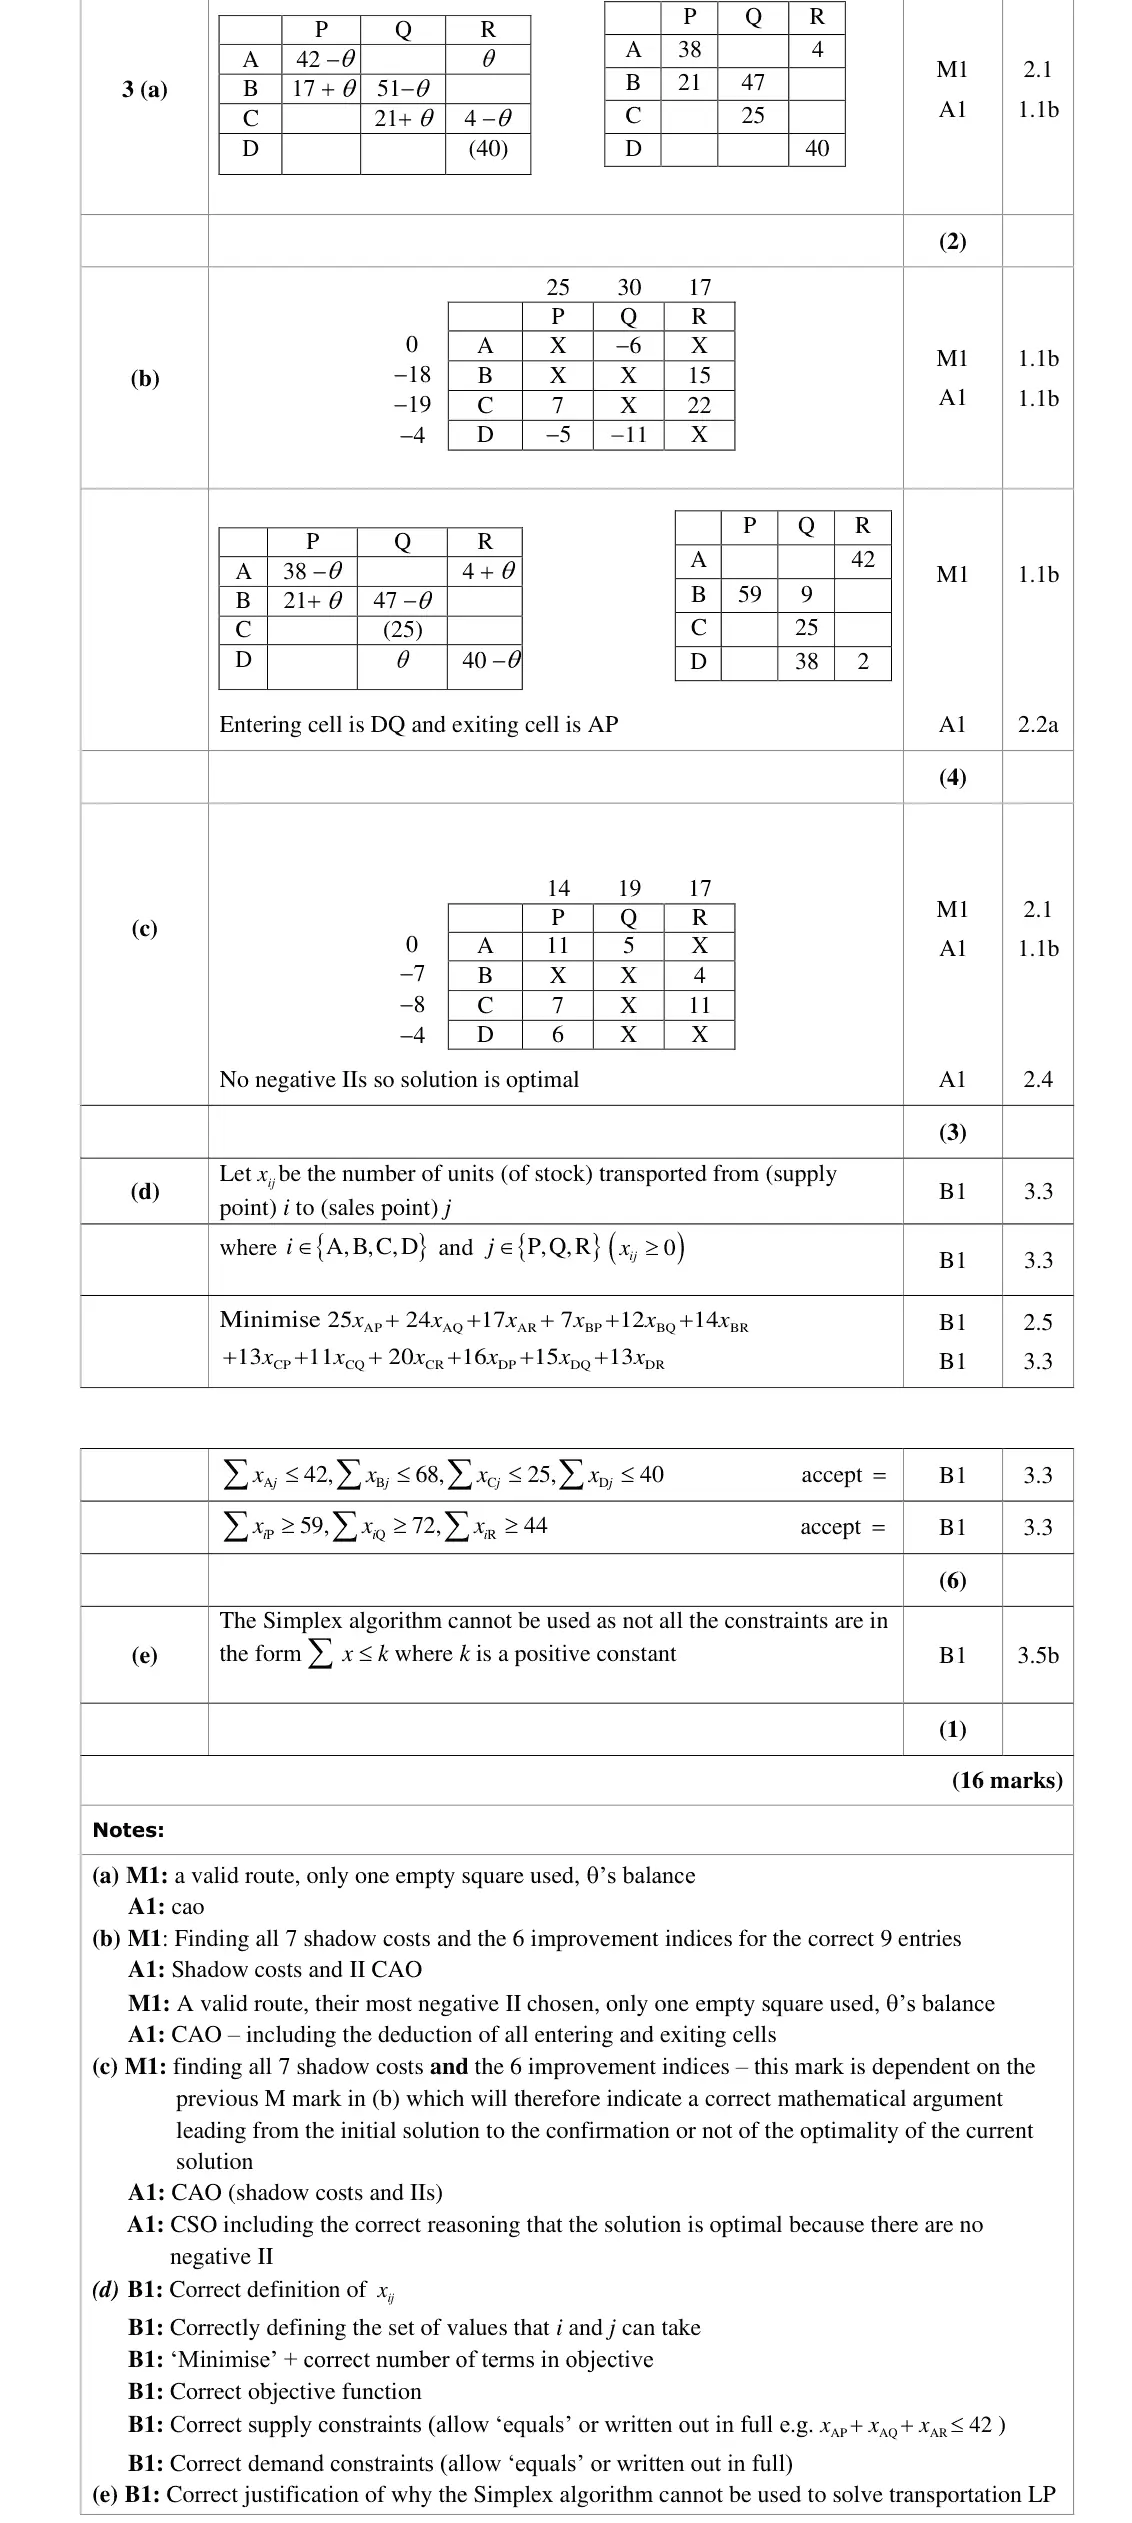
Oct 2020 · Paper 4D (Decision 2) · Q3(a)2 marks
Mark scheme (whole question; this part is marked with the orange bar)
Key points from the mark scheme and examiner's report
route AR, CR, CQ, BQ, BP, AP with theta = 4
AP 38, AR 4, BP 21, BQ 47, CQ 25, DR 40
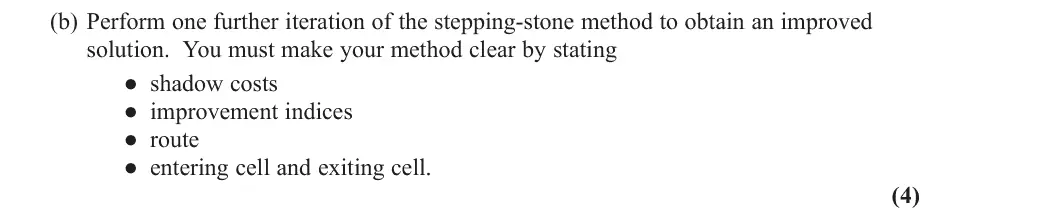
Oct 2020 · Paper 4D (Decision 2) · Q3(b)4 marks
Mark scheme (whole question; this part is marked with the orange bar)
Key points from the mark scheme and examiner's report
7 shadow costs and 6 improvement indices
most negative II is DQ (−11)
entering DQ, exiting AP
AR 42, BP 59, BQ 9, CQ 25, DQ 38, DR 2
Oct 2020 · Paper 4D (Decision 2) · Q3(c)3 marks
Mark scheme (whole question; this part is marked with the orange bar)
Key points from the mark scheme and examiner's report
recalculate all shadow costs and IIs for the new solution
no negative IIs so optimal
Oct 2020 · Paper 4D (Decision 2) · Q3(d)6 marks
Mark scheme (whole question; this part is marked with the orange bar)
Key points from the mark scheme and examiner's report
define x_ij as units from supply point i to sales point j with i in {A, B, C, D}, j in {P, Q, R}, x_ij ≥ 0
minimise the cost-weighted sum of all 12 variables
Mark scheme (whole question; this part is marked with the orange bar)
Key points from the mark scheme and examiner's report
Simplex needs every constraint in the form sum ≤ positive constant
the demand constraints are ≥
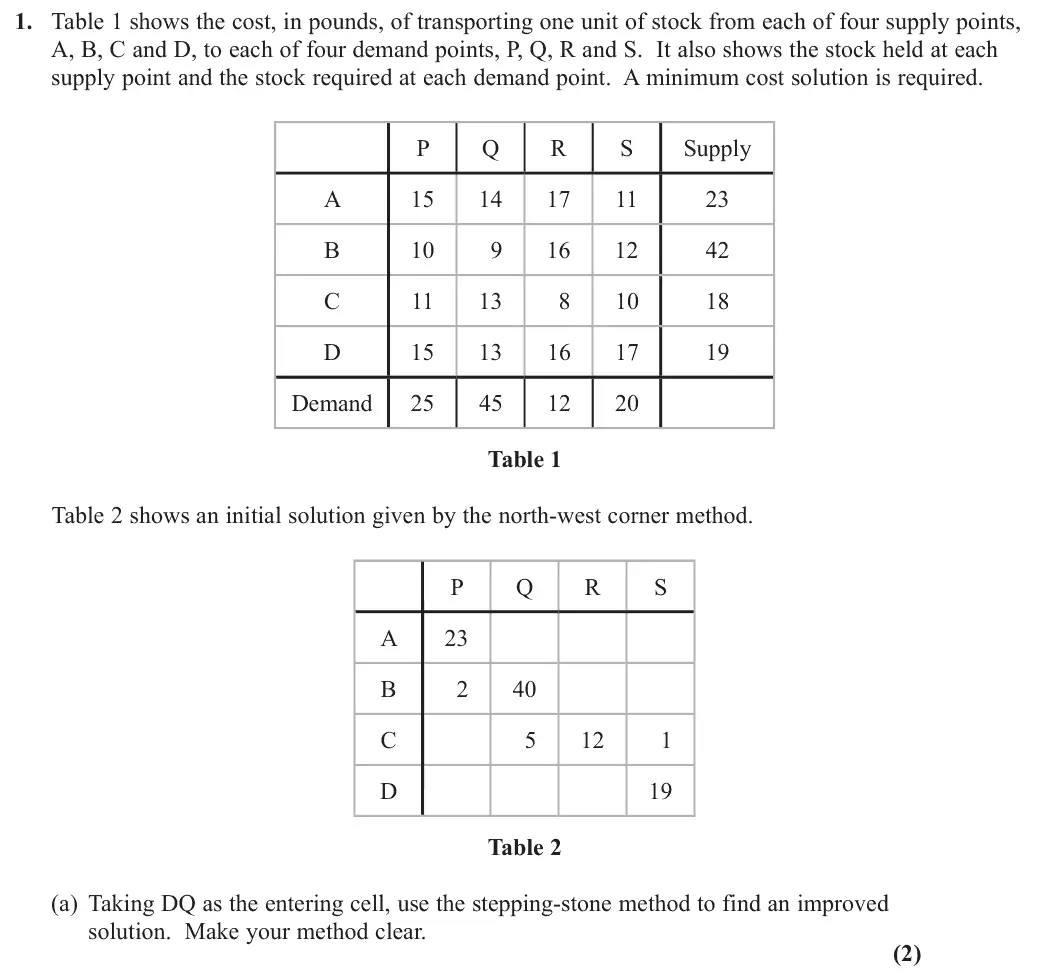
June 2019 · Paper 4D (Decision 2) · Q1(a)2 marks
Mark scheme (whole question; this part is marked with the orange bar)
Examiner's comment
This question, was a generally very accessible start to the paper. The vast majority of candidates were able to gain some marks and most gained several marks here. Sometimes accuracy let candidates down although there were a number of opportunities to re-enter the scheme following errors. Part (a) was well answered. Most candidates were able to find a valid route. Some candidates lost the accuracy mark when they left ‘0’ in CQ in their improved solution. This seemed to occur more frequently than has perhaps been the case in recent years and despite the fact that it is often highlighted in examiners’ reports.
Key points from the mark scheme and examiner's report
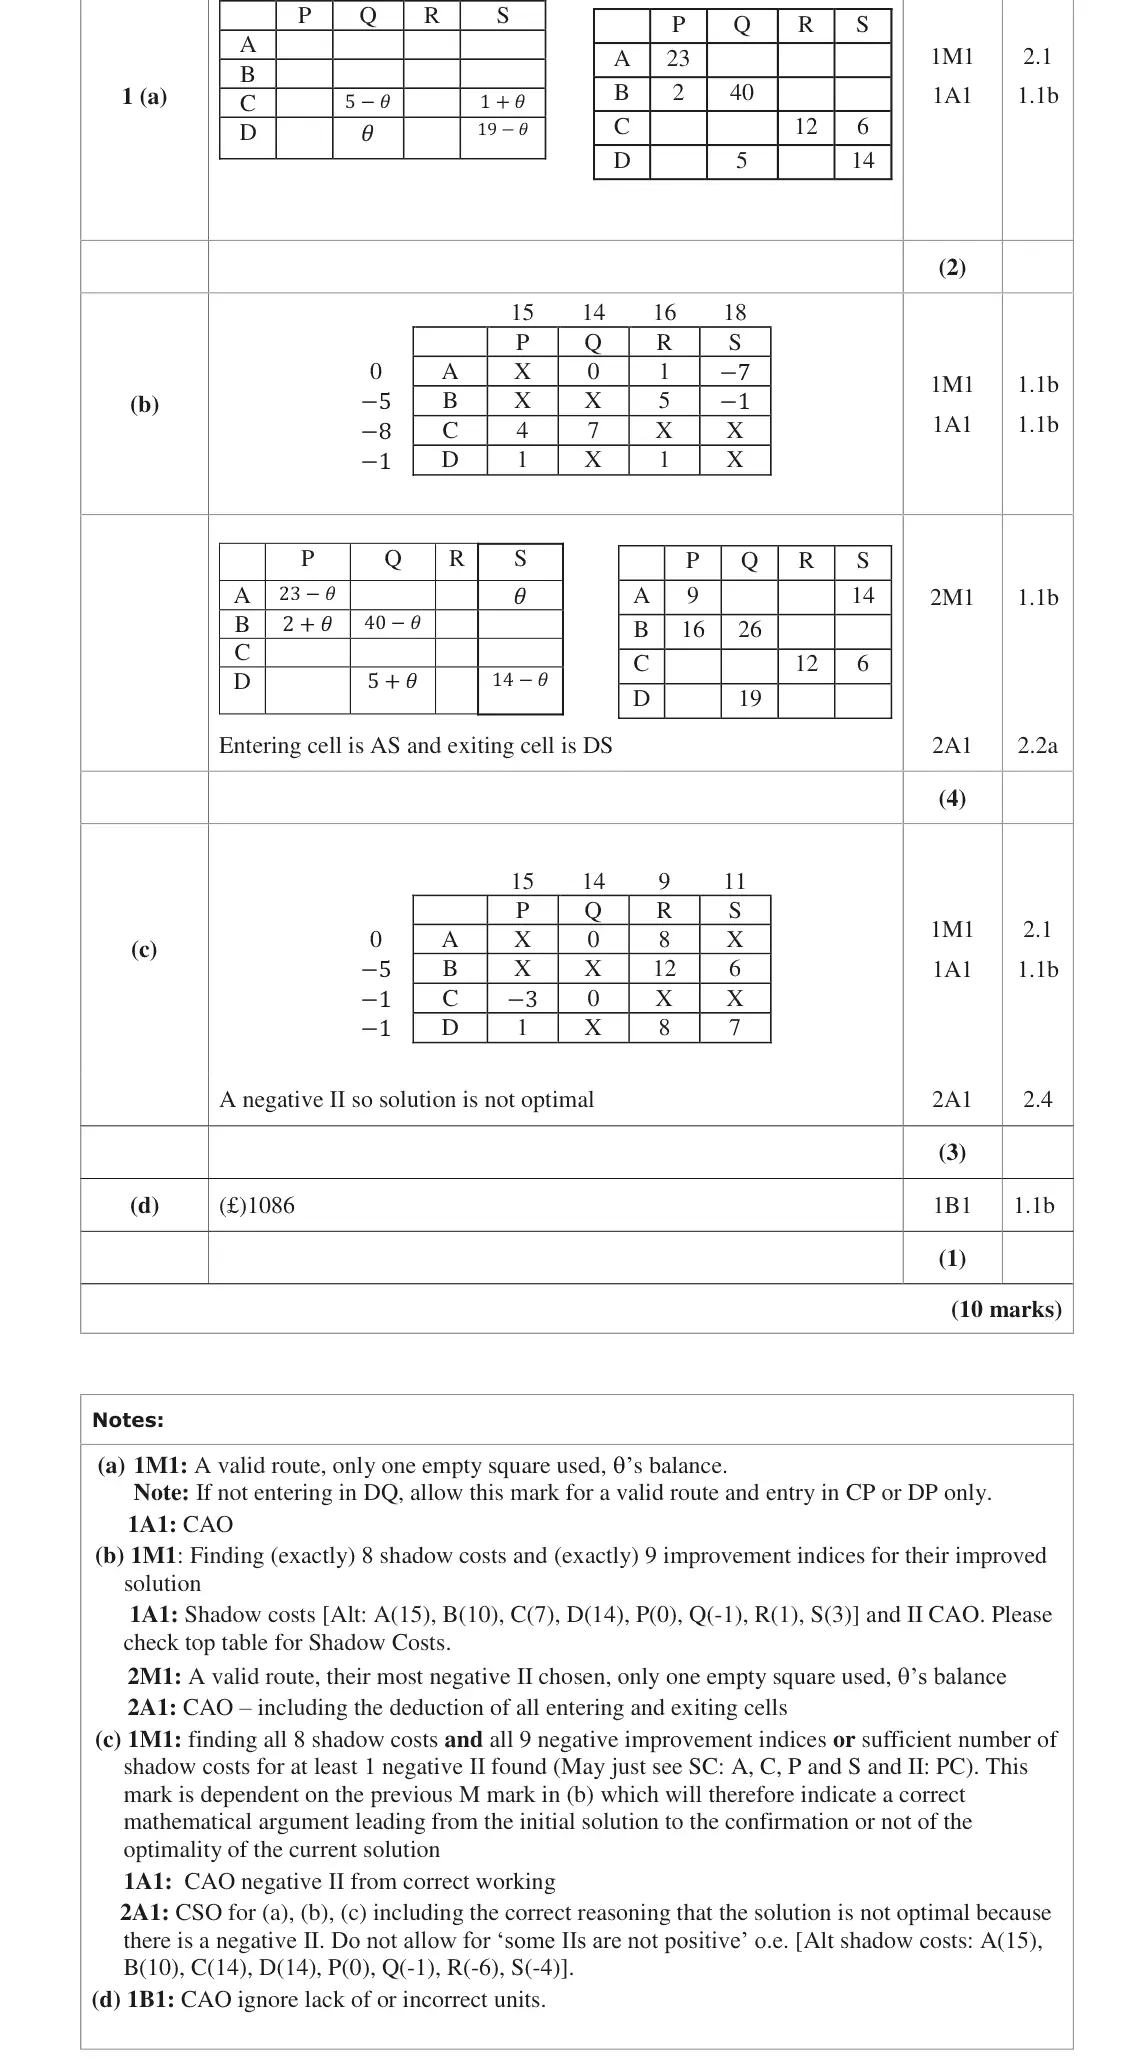
route DQ, DS, CS, CQ with theta = 5
CQ becomes empty and must be left blank, not 0 (a common accuracy loss)
AP 23, BP 2, BQ 40, CR 12, CS 6, DQ 5, DS 14
June 2019 · Paper 4D (Decision 2) · Q1(b)4 marks
Mark scheme (whole question; this part is marked with the orange bar)
Examiner's comment
This question, was a generally very accessible start to the paper. The vast majority of candidates were able to gain some marks and most gained several marks here. Sometimes accuracy let candidates down although there were a number of opportunities to re-enter the scheme following errors. Most candidates found the correct shadow costs and route in (b) for the two method marks; however, a reasonable minority managed to make an error in their improvement indices, thus losing an accuracy mark here. Some candidates found too many or two few improvement indices which was costly. It should be noted that the setting out of the shadow costs and improvement indices as shown in the published mark scheme (in which both sets of values are shown on the same table) is probably the clearest form of presentation; candidates who show many calculations at the side of the table can make it somewhat difficult for the examiner to find, or even to follow, their corresponding method/working. Furthermore, it is more straightforward for candidates to ensure that they have the correct number of both shadow costs and improvement indices if they are presented in this way. A number of candidates failed to state the entry/exit cells although this had been explicitly asked for the question.
Key points from the mark scheme and examiner's report
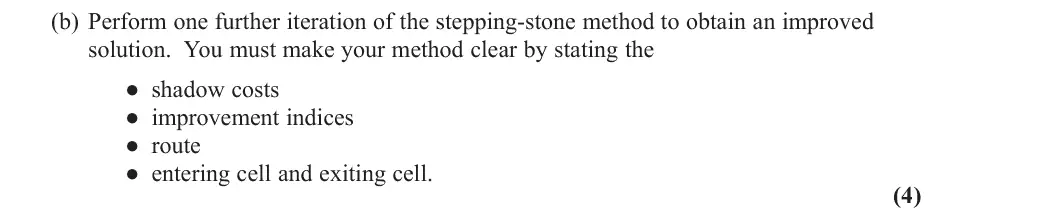
exactly 8 shadow costs and 9 improvement indices
most negative II is AS (−7)
entering AS, exiting DS
slips in the IIs and too many or too few IIs lost marks
June 2019 · Paper 4D (Decision 2) · Q1(c)3 marks
Mark scheme (whole question; this part is marked with the orange bar)
Examiner's comment
This question, was a generally very accessible start to the paper. The vast majority of candidates were able to gain some marks and most gained several marks here. Sometimes accuracy let candidates down although there were a number of opportunities to re-enter the scheme following errors. Part (c) was generally well understood by candidates; again, many made slips in their calculations but understood that a negative improvement index meant a non-optimized solution. A surprising number of candidates did not seem to understand that they would need to recalculate shadow costs and improvement indices in this part and referred instead to shadow costs and improvement indices from the previous iteration. Others calculated more improvement indices than were strictly needed in order to ascertain whether an optimal solution had been reached – as soon as a negative improvement index is reached it is perfectly acceptable to stop calculating more indices.
Key points from the mark scheme and examiner's report
must recalculate shadow costs and IIs for the new solution, not reuse those from (b)
II of CP is −3 so not optimal
'some IIs are not positive' not accepted
June 2019 · Paper 4D (Decision 2) · Q1(d)1 mark
Mark scheme (whole question; this part is marked with the orange bar)
Examiner's comment
This question, was a generally very accessible start to the paper. The vast majority of candidates were able to gain some marks and most gained several marks here. Sometimes accuracy let candidates down although there were a number of opportunities to re-enter the scheme following errors. The correct value in (d) was reached by a majority of candidates who had scored well in the previous three parts. As mentioned in the introduction, the presentation of candidates’ work was sometimes difficult to follow and at times cost marks when it was unclear which values were costs and which values were improvement indices. Candidates would be well advised to set their work out carefully and to clearly identify the different elements of their solution.
Key points from the mark scheme and examiner's report
cost £1086
Find an Edexcel Further Maths tutor
Stuck on this? Book a trial lesson with our Further Maths tutor.