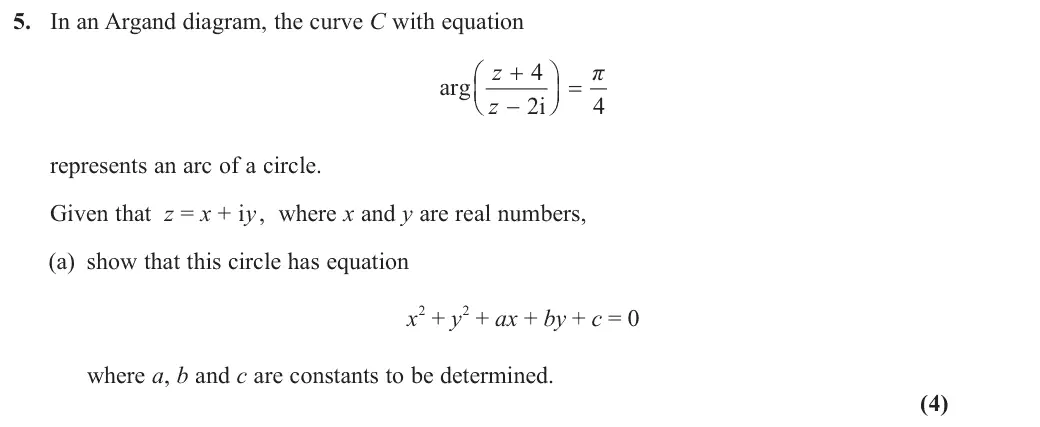
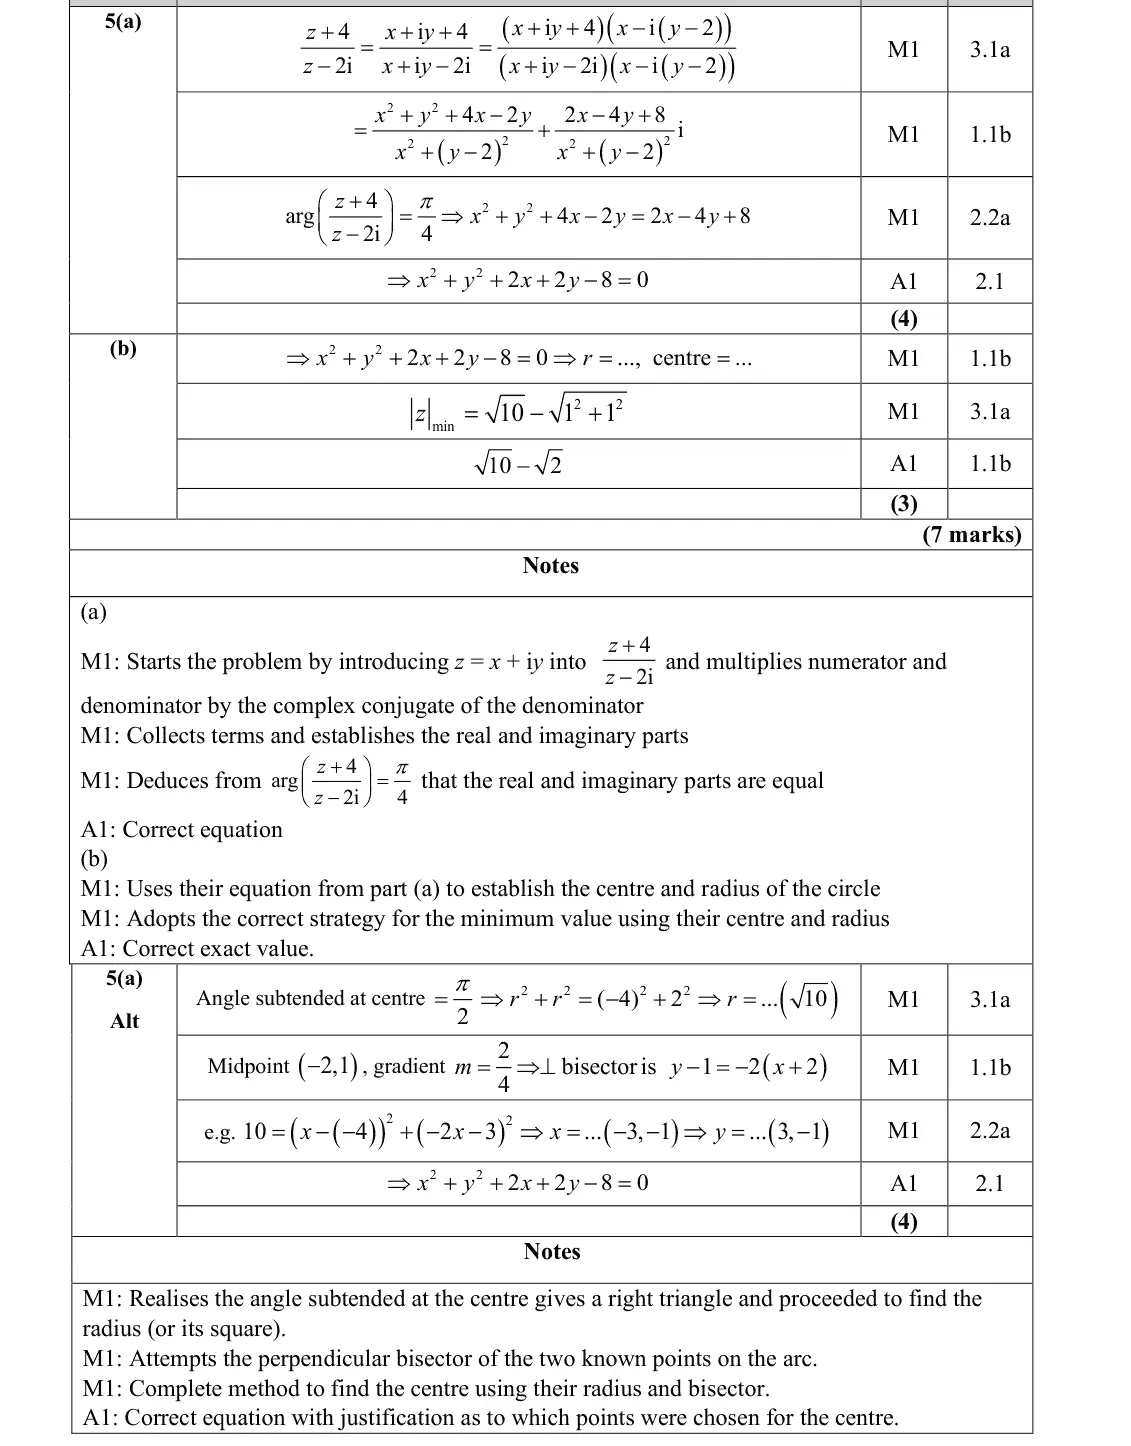
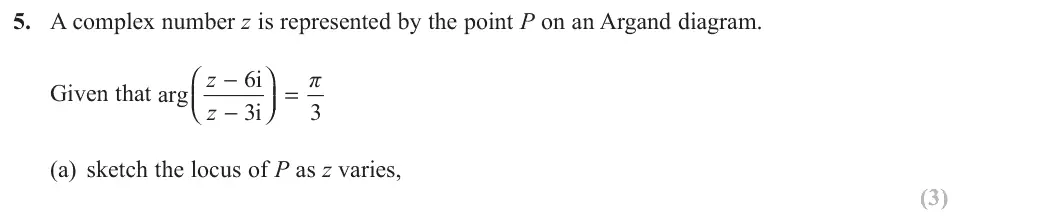
June 2025 · AS Paper 2 (Further Pure 2) · Q5(a)4 marks
Mark scheme (whole question; this part is marked with the orange bar)
Examiner's comment
By far and away the most challenging question on the paper, only one student made significant progress, and none scored full marks for this question. Most were limited to one or two marks at the start of part (a) and/or (b) if they managed to produce a circle equation to work with, though most gave up when they could not obtain the equation from part (a). Even those who did achieve an equation for the circle did not seem clear on how to find the minimum value in (b). Part (b) suffered from many not being able to reach and equation in part (a), and perhaps a full “show that” would have been beneficial here as without many having attempted an answer to this part it is not clear how well understood the method required is. Those who did attempt it (who had achieved a circle equation) could find the centre and radius of the circle but only one student from the small cohort demonstrated a correct method to find the minimum value required.
Key points from the mark scheme and examiner's report
multiply by the conjugate of x + i(y − 2)
arg = π/4 means real part = imaginary part (both positive): x² + y² + 4x − 2y = 2x − 4y + 8, so x² + y² + 2x + 2y − 8 = 0
alternative: radius √10 from the right angle at the centre plus the perpendicular bisector
hardest question, almost no full solutions
June 2025 · AS Paper 2 (Further Pure 2) · Q5(b)3 marks
Mark scheme (whole question; this part is marked with the orange bar)
Examiner's comment
By far and away the most challenging question on the paper, only one student made significant progress, and none scored full marks for this question. Most were limited to one or two marks at the start of part (a) and/or (b) if they managed to produce a circle equation to work with, though most gave up when they could not obtain the equation from part (a). Even minimum value in (b). The most popular method was to try and find the perpendicular bisector of the two points -4 and 2i (the Alt version in the mark scheme), and this is how many accessed a couple of marks. But completing the process after finding the bisector was not well done overall. The most successful attempt at the question took this approach but an error was made during the process. Most ground to a halt after finding the bisector, not knowing what to do next. The main scheme was attempted by a few but again with limited success as students were not clear how to proceed after multiplying through by the conjugate of the denominator. It is clear that the arc equation is the most challenging of the types of loci tested and students are not clear on how to deal with such equations. Part (b) suffered from many not being able to reach and equation in part (a), and perhaps a full “show that” would have been beneficial here as without many having attempted an answer to this part it is not clear how well understood the method required is. Those who did attempt it (who had achieved a circle equation) could find the centre and radius of the circle but only one student from the small cohort demonstrated a correct method to find the minimum value required.
Key points from the mark scheme and examiner's report
centre (−1, −1), radius √10
origin lies inside the circle so minimum modulus = radius − distance to centre = √10 − √2
only one candidate had a correct method
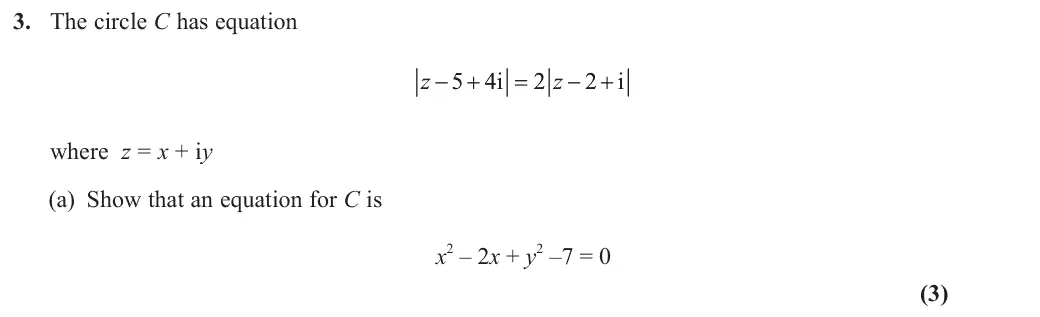
June 2025 · Paper 4A (Further Pure 2) · Q3(a)3 marks
Mark scheme (whole question; this part is marked with the orange bar)
Examiner's comment
This was another question that provided both a good source of marks for the low grade students but provided a good discriminator for the high grade students as well with thought needed for how to tackle part (b). Part (a) was answered very well. A few candidates forgot to square the 2, which was the only significant error noted, algebraically, but these were a minority. The other main reason for loss of a mark here was failure to show sufficient details, missing the “=0” from the final equation being the main such. Occasional slips in the coefficients did happen but most this part led to fully correct responses, and getting the signs wrong between the brackets was seldom seen.
Key points from the mark scheme and examiner's report
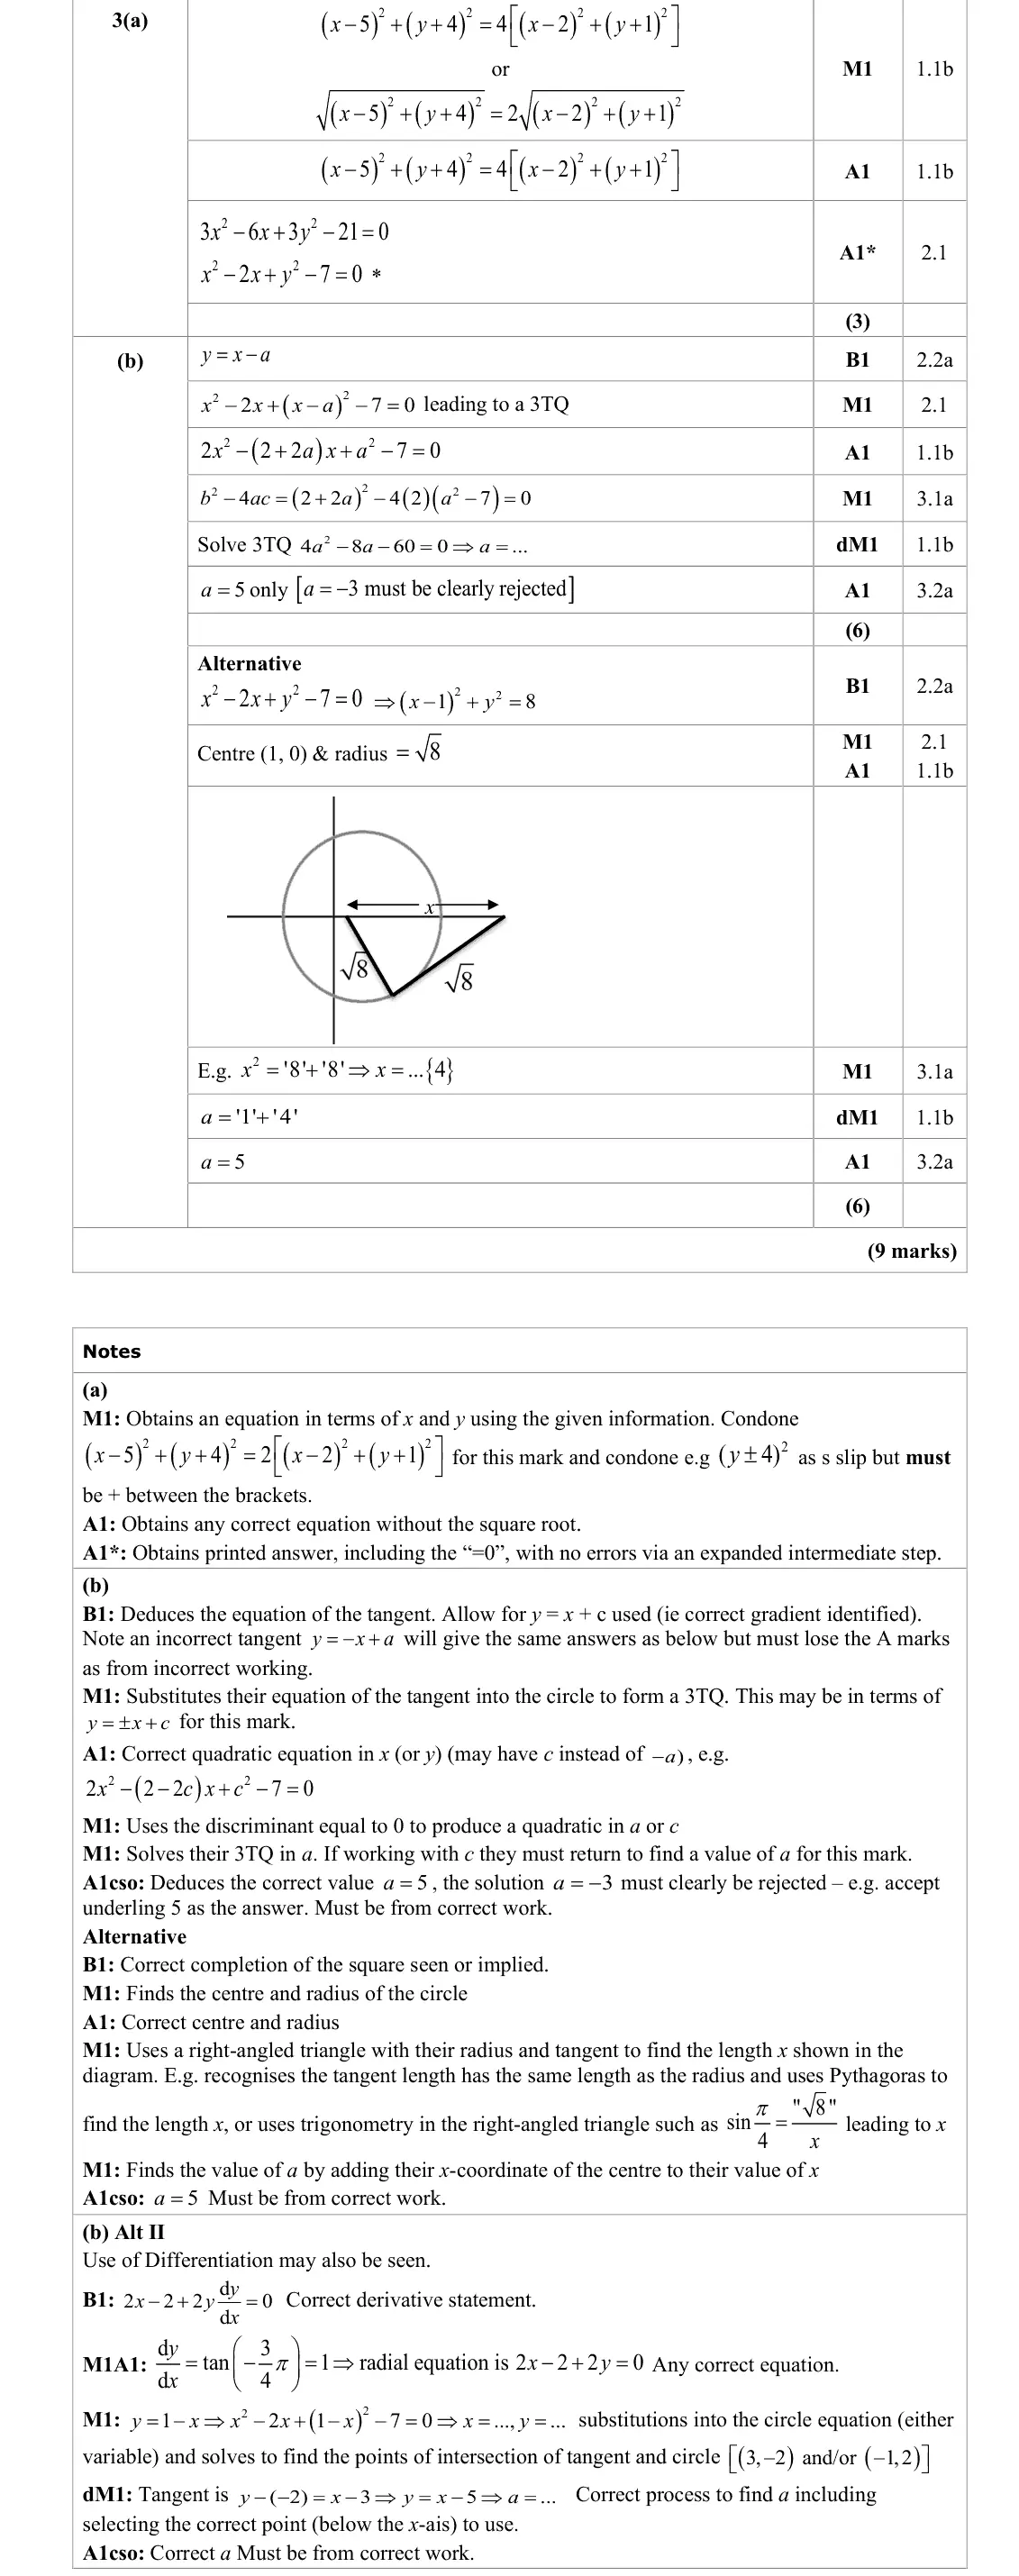
June 2025 · Paper 4A (Further Pure 2) · Q3(b)6 marks
Mark scheme (whole question; this part is marked with the orange bar)
Examiner's comment
This was another question that provided both a good source of marks for the low grade students but provided a good discriminator for the high grade students as well with thought needed for how to tackle part (b). Part (b) was very attainable but did require some thought for how to approach it and there were a number of less able candidates who found this challenging. Drawing a diagram was common, which was good to see, and it was evenly split among the two main methods in the approach, whether they considered the discriminant or considered geometry and right-angled triangles. In the latter more considered a trigonometric than the Pythagorean approach. The alternative with differentiation was seen less often but still a reasonably successful approach when used. However, many responses had a mix of methods before finally settling on one route, which sometimes made marking difficult, having to work backwards to see which route was the most complete. Candidates often worked very inefficiently with little clear aim initially, but many showed good persistence and eventually found the correct answer, so this proved a good exercise in problem solving skills, experimenting finding a solution. Notation was generally good and easy to follow, with quite a few choosing to work with c as the intercept of the tangent rather than -a, but working clearly enough to be able to solve for a in the end. Overall, this was a good question which was accessible for less able candidates to access, and many possible approaches to problem solving.
Key points from the mark scheme and examiner's report
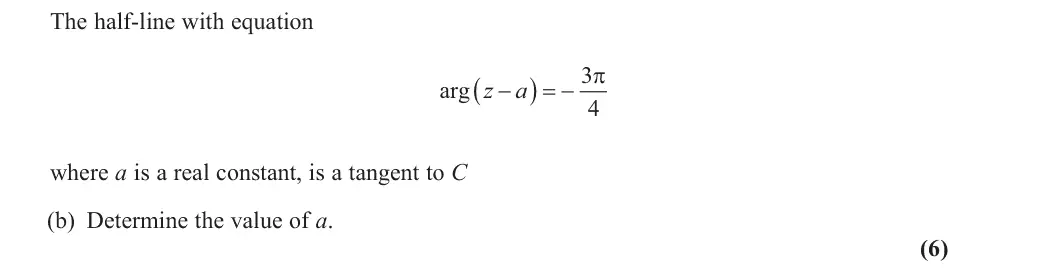
tangent line y = x − a
substitute and set discriminant 0: 4a² − 8a − 60 = 0, a = 5 (reject −3, which touches the wrong side of the half-line)
or geometry with centre (1, 0), radius √8
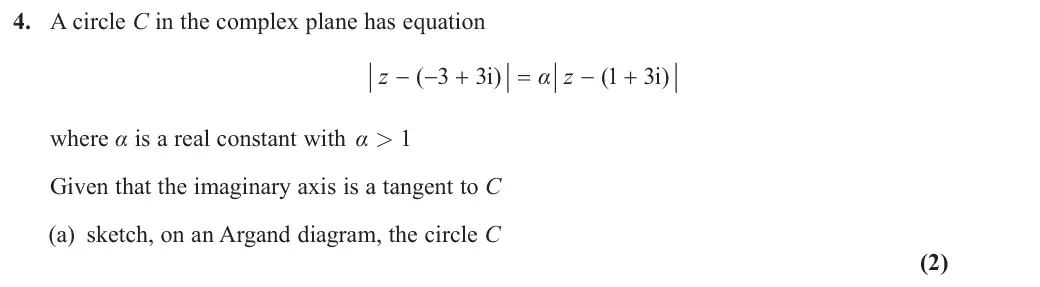
June 2024 · AS Paper 2 (Further Pure 2) · Q4(a)2 marks
Mark scheme (whole question; this part is marked with the orange bar)
Examiner's comment
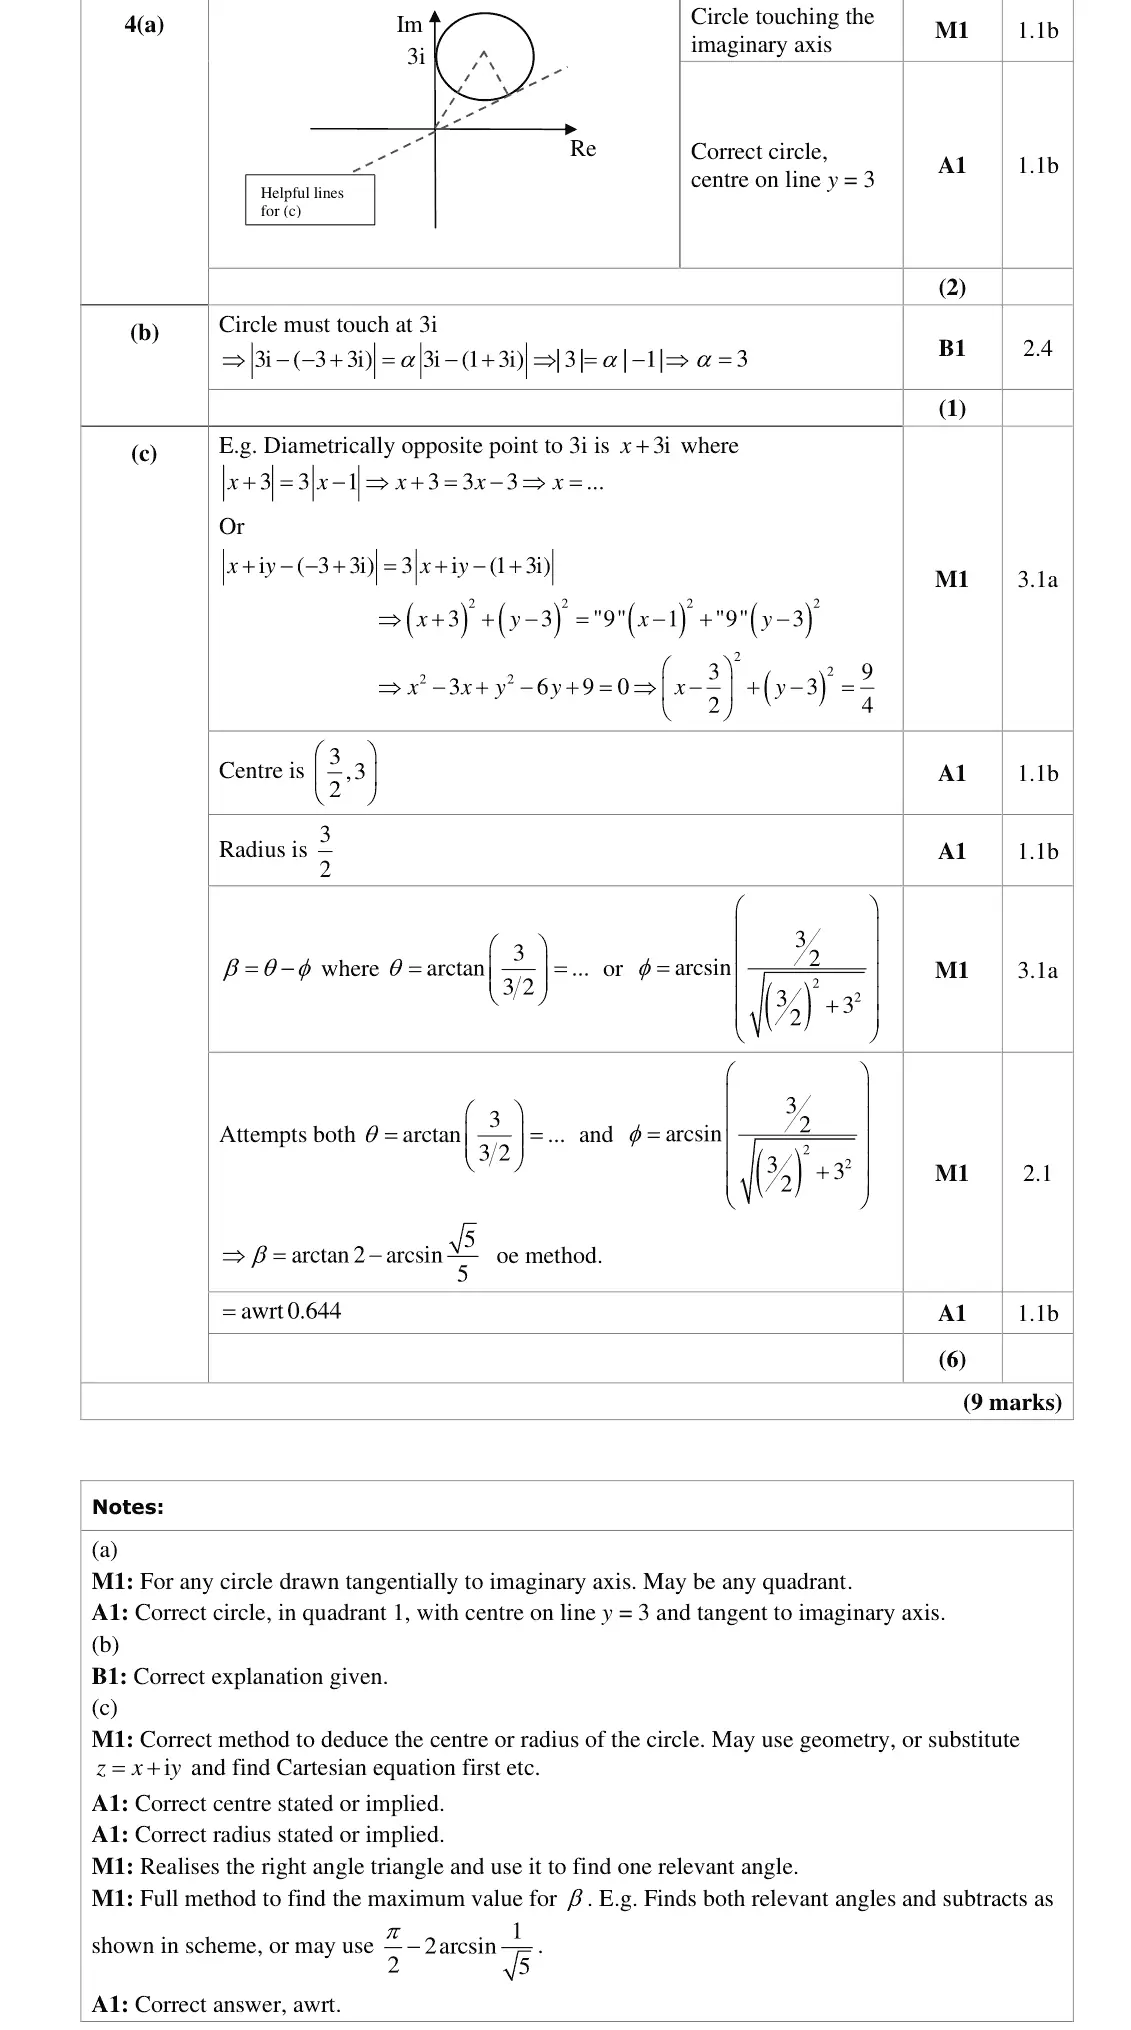
Candidates found this question demanding with unfortunately many scoring no marks. Part (a) it was interesting to see many candidates draw circles which were the imaginary axis was not a tangent, as stated in the question, scoring no mark. Some candidates did manage to draw a circle with the imaginary axis as a tangent but drew with the centre in the second quadrant, scoring one mark. Only a few candidates scored both marks for the centre in the first quadrant.
Key points from the mark scheme and examiner's report
circle in the first quadrant with centre on y = 3, touching the imaginary axis at 3i
many drew circles not tangent to the axis or in the second quadrant
June 2024 · AS Paper 2 (Further Pure 2) · Q4(b)1 mark
Mark scheme (whole question; this part is marked with the orange bar)
Examiner's comment
Candidates found this question demanding with unfortunately many scoring no marks. Part (b) only one candidate was able to explain why the value of a is 3.
Key points from the mark scheme and examiner's report
the circle touches the imaginary axis at 3i so 3i lies on C: modulus of 3i − (−3 + 3i) = 3 = α × 1, so α = 3
only one candidate explained it
June 2024 · AS Paper 2 (Further Pure 2) · Q4(c)6 marks
Mark scheme (whole question; this part is marked with the orange bar)
Examiner's comment
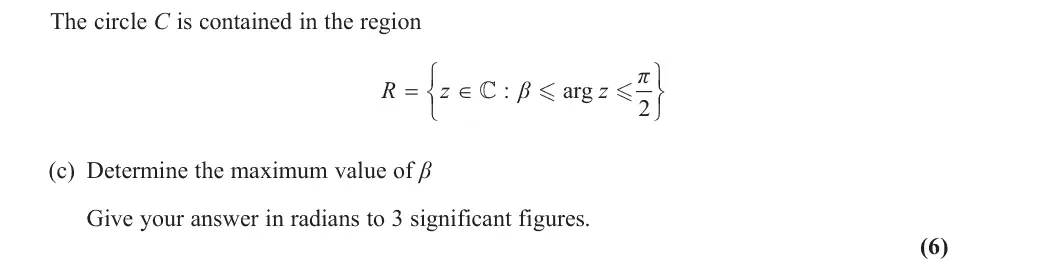
Candidates found this question demanding with unfortunately many scoring no marks. The correct position of the circle was needed to successfully answer part (c) so many candidates found this question demanding. Part (c) candidates needed to have a circle in the correct position so not many candidates were able to score any marks in this part. Finding the centre and radius of the circle was the starting point with a few candidates manging to score some marks. Finding the correct angle then proved more difficult.
Key points from the mark scheme and examiner's report
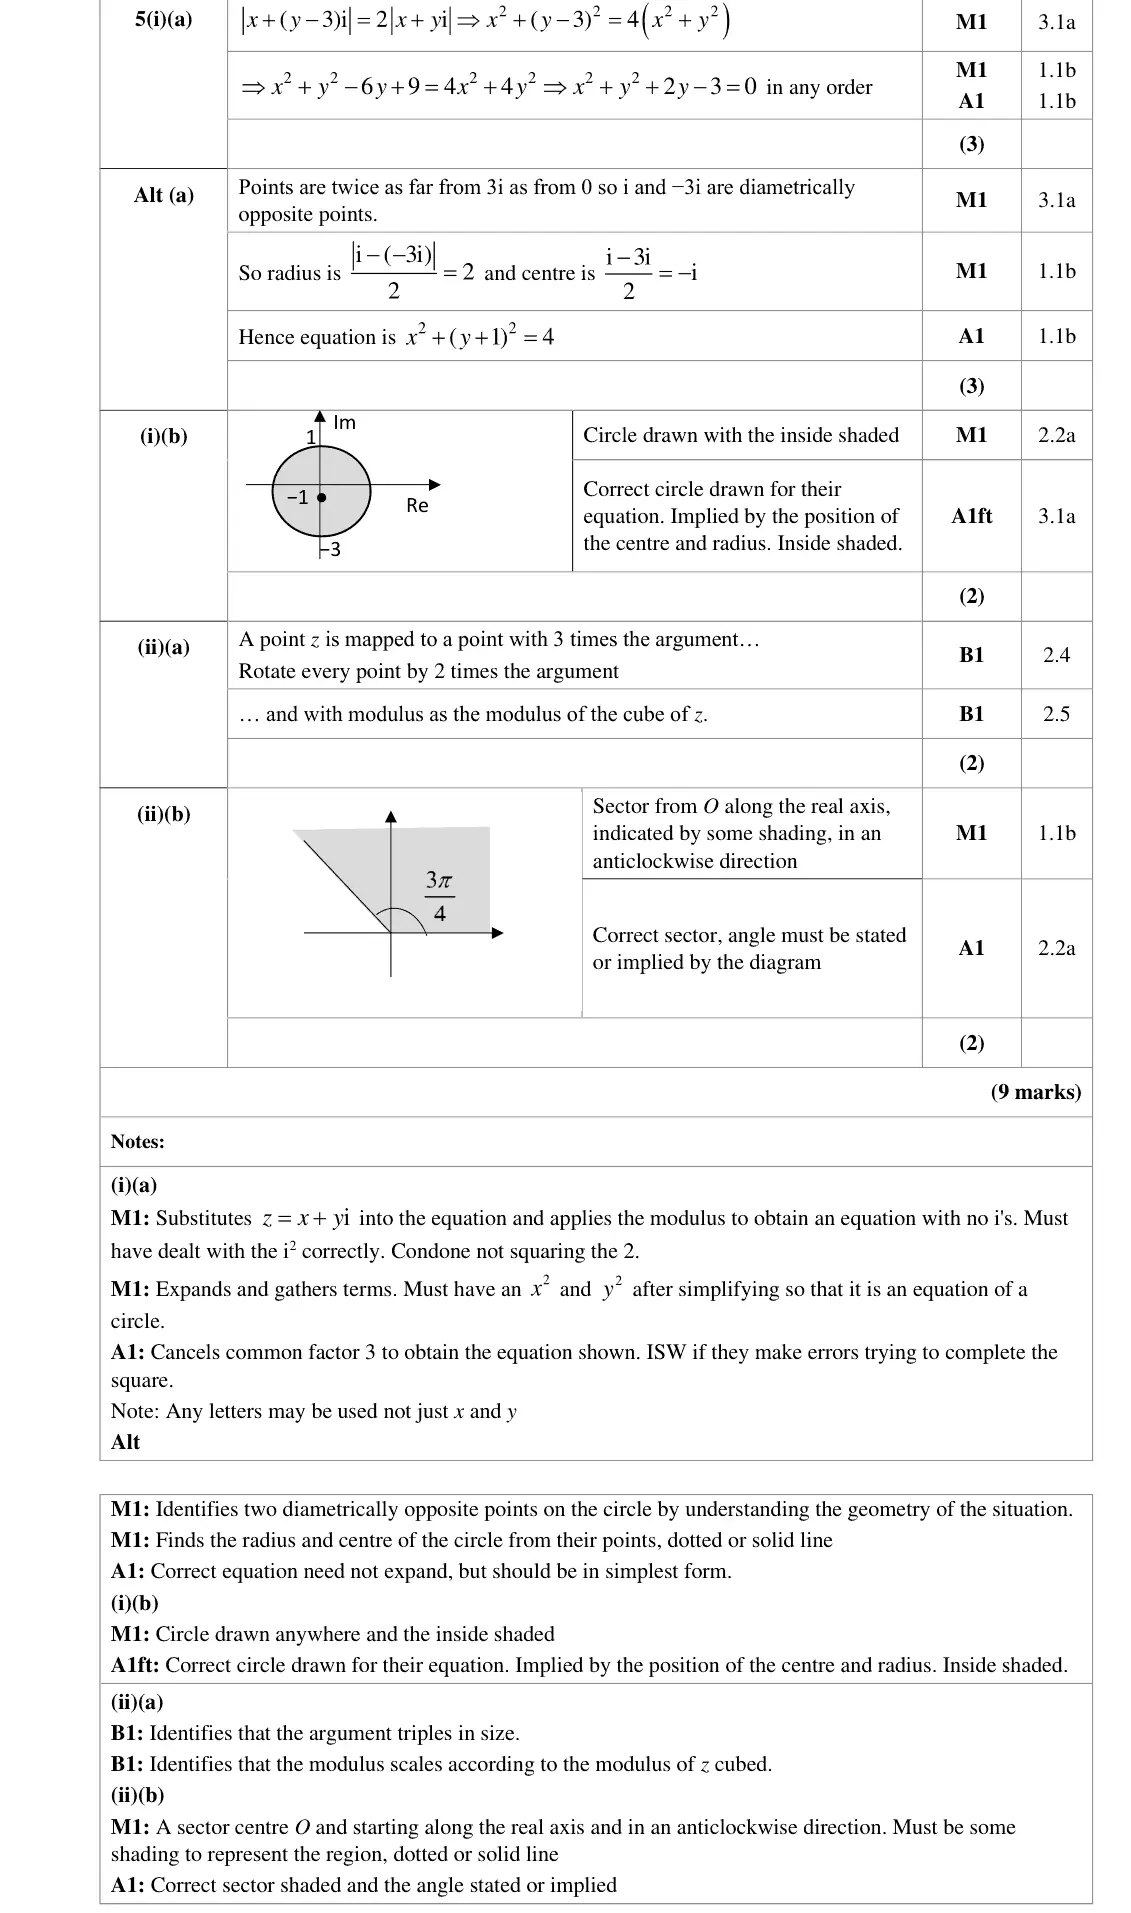
June 2024 · Paper 4A (Further Pure 2) · Q5(i)(a)3 marks
Mark scheme (whole question; this part is marked with the orange bar)
Examiner's comment
In (i) candidates found this accessible. = + z x y i Part (a) the majority of candidates knew to substitute into the equation and applies the modulus to obtain an equation and correctly squared 2. They used algebra correctly to simplify the equation, with some doing extra work in this part to write in the form 2 2 + + = x ( 1) y 4 . Common error was a slip when dividing by 3, forgetting to divide the constant 9. Part (b) the majority of candidates knew that the required region was the inside of a circle and 2 2 + + = ( x 1) y 4 scored a mark for this. Candidates used their equation to deduce the correct centre and radius of the circle. If candidate had made a sip in part (a) there was a follow through on their equation. A few candidate incorrectly had the centre coordinate as ( – 1, 0) instead of (0, – 1) losing the accuracy mark. In (ii) this was more demanding Part (a) some candidates incorrectly said that the transformation was an enlargement scale factor 3. There are two marks of this question and candidates needed to explain what effect = 3 the transformation had on the modulus and argument. Only a few candidates managed w z to correct identify that the argument would be multiplied by 3, rotate every point by 2 times the argument. Fewer candidates were able to identify that the modulus would be cubed, some 3 incorrect answers were that the modulus would be multiplied by scale factor of z . Part (b) was done more successfully that part (a). Even though candidates were not able to describe the transformation correctly they were able to sketch a locus of the correct form and . Some candidates drew a half line but did not shade even with the correct argument of 3 4 the require region so did not score any marks.
Key points from the mark scheme and examiner's report
June 2024 · Paper 4A (Further Pure 2) · Q5(i)(b)2 marks
Mark scheme (whole question; this part is marked with the orange bar)
Examiner's comment
In (i) candidates found this accessible. = + z x y i Part (a) the majority of candidates knew to substitute into the equation and applies the modulus to obtain an equation and correctly squared 2. They used algebra correctly to simplify the equation, with some doing extra work in this part to write in the form 2 2 + + = x ( 1) y 4 . Common error was a slip when dividing by 3, forgetting to divide the constant 9. Part (b) the majority of candidates knew that the required region was the inside of a circle and 2 2 + + = ( x 1) y 4 scored a mark for this. Candidates used their equation to deduce the correct centre and radius of the circle. If candidate had made a sip in part (a) there was a follow through on their equation. A few candidate incorrectly had the centre coordinate as ( – 1, 0) instead of (0, – 1) losing the accuracy mark. In (ii) this was more demanding Part (a) some candidates incorrectly said that the transformation was an enlargement scale factor 3. There are two marks of this question and candidates needed to explain what effect = 3 the transformation had on the modulus and argument. Only a few candidates managed w z to correct identify that the argument would be multiplied by 3, rotate every point by 2 times the argument. Fewer candidates were able to identify that the modulus would be cubed, some 3 incorrect answers were that the modulus would be multiplied by scale factor of z . Part (b) was done more successfully that part (a). Even though candidates were not able to describe the transformation correctly they were able to sketch a locus of the correct form and . Some candidates drew a half line but did not shade even with the correct argument of 3 4 the require region so did not score any marks.
Key points from the mark scheme and examiner's report
circle centre −i (0, −1), radius 2
shade inside
centre (−1, 0) was a common error
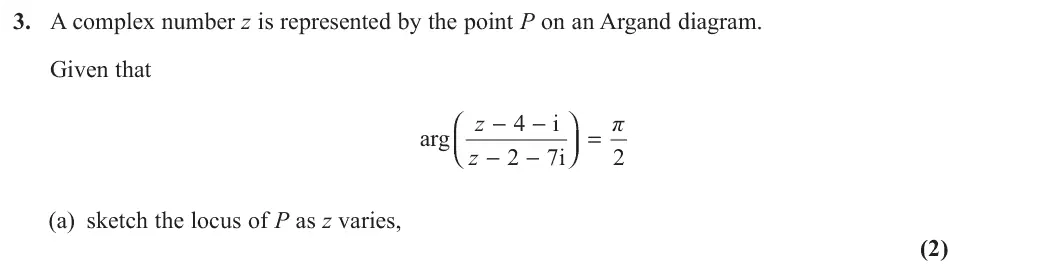
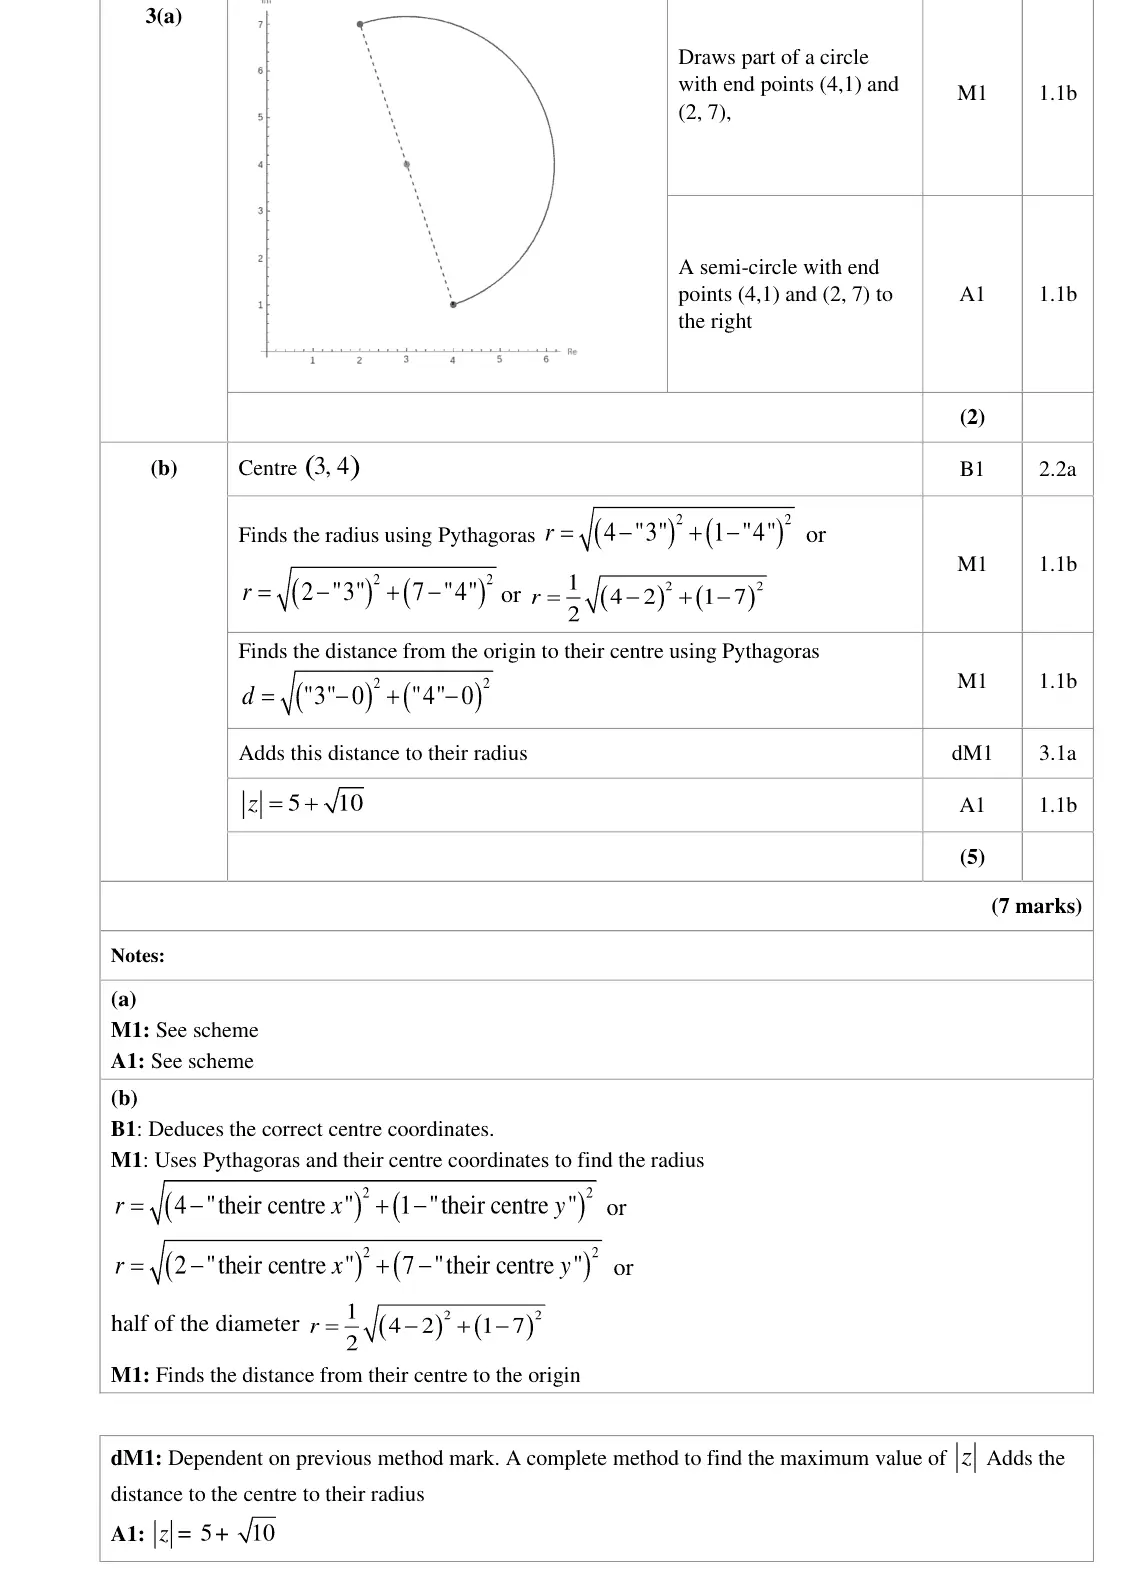
June 2023 · AS Paper 2 (Further Pure 2) · Q3(a)2 marks
Mark scheme (whole question; this part is marked with the orange bar)
Examiner's comment
Part (a) the majority of candidate knew that the loci formed a semi-circle with end point (4, 1) and (2, 7). The majority knew that the semi-circle was above the points, one candidate drew below.
Key points from the mark scheme and examiner's report
angle π/2 so the locus is a semicircle on the diameter from (4, 1) to (2, 7), on the right-hand side, endpoints excluded
one drew it on the wrong side
June 2023 · AS Paper 2 (Further Pure 2) · Q3(b)5 marks
Mark scheme (whole question; this part is marked with the orange bar)
Examiner's comment
Part (b) was more demanding for candidates with quite a few candidates not making any attempt. Candidates are reminded to use a diagram to help them understand what to do. They needed to find the coordinates of the centre of the circle and the distance from the centre to the origin plus the radius.
Key points from the mark scheme and examiner's report
centre (3, 4) is the midpoint of the diameter, radius √10
maximum modulus of z = distance from O to centre + radius = 5 + √10
many did not attempt it
a diagram helps
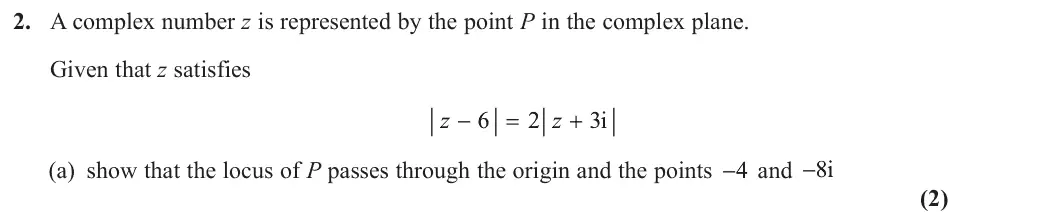
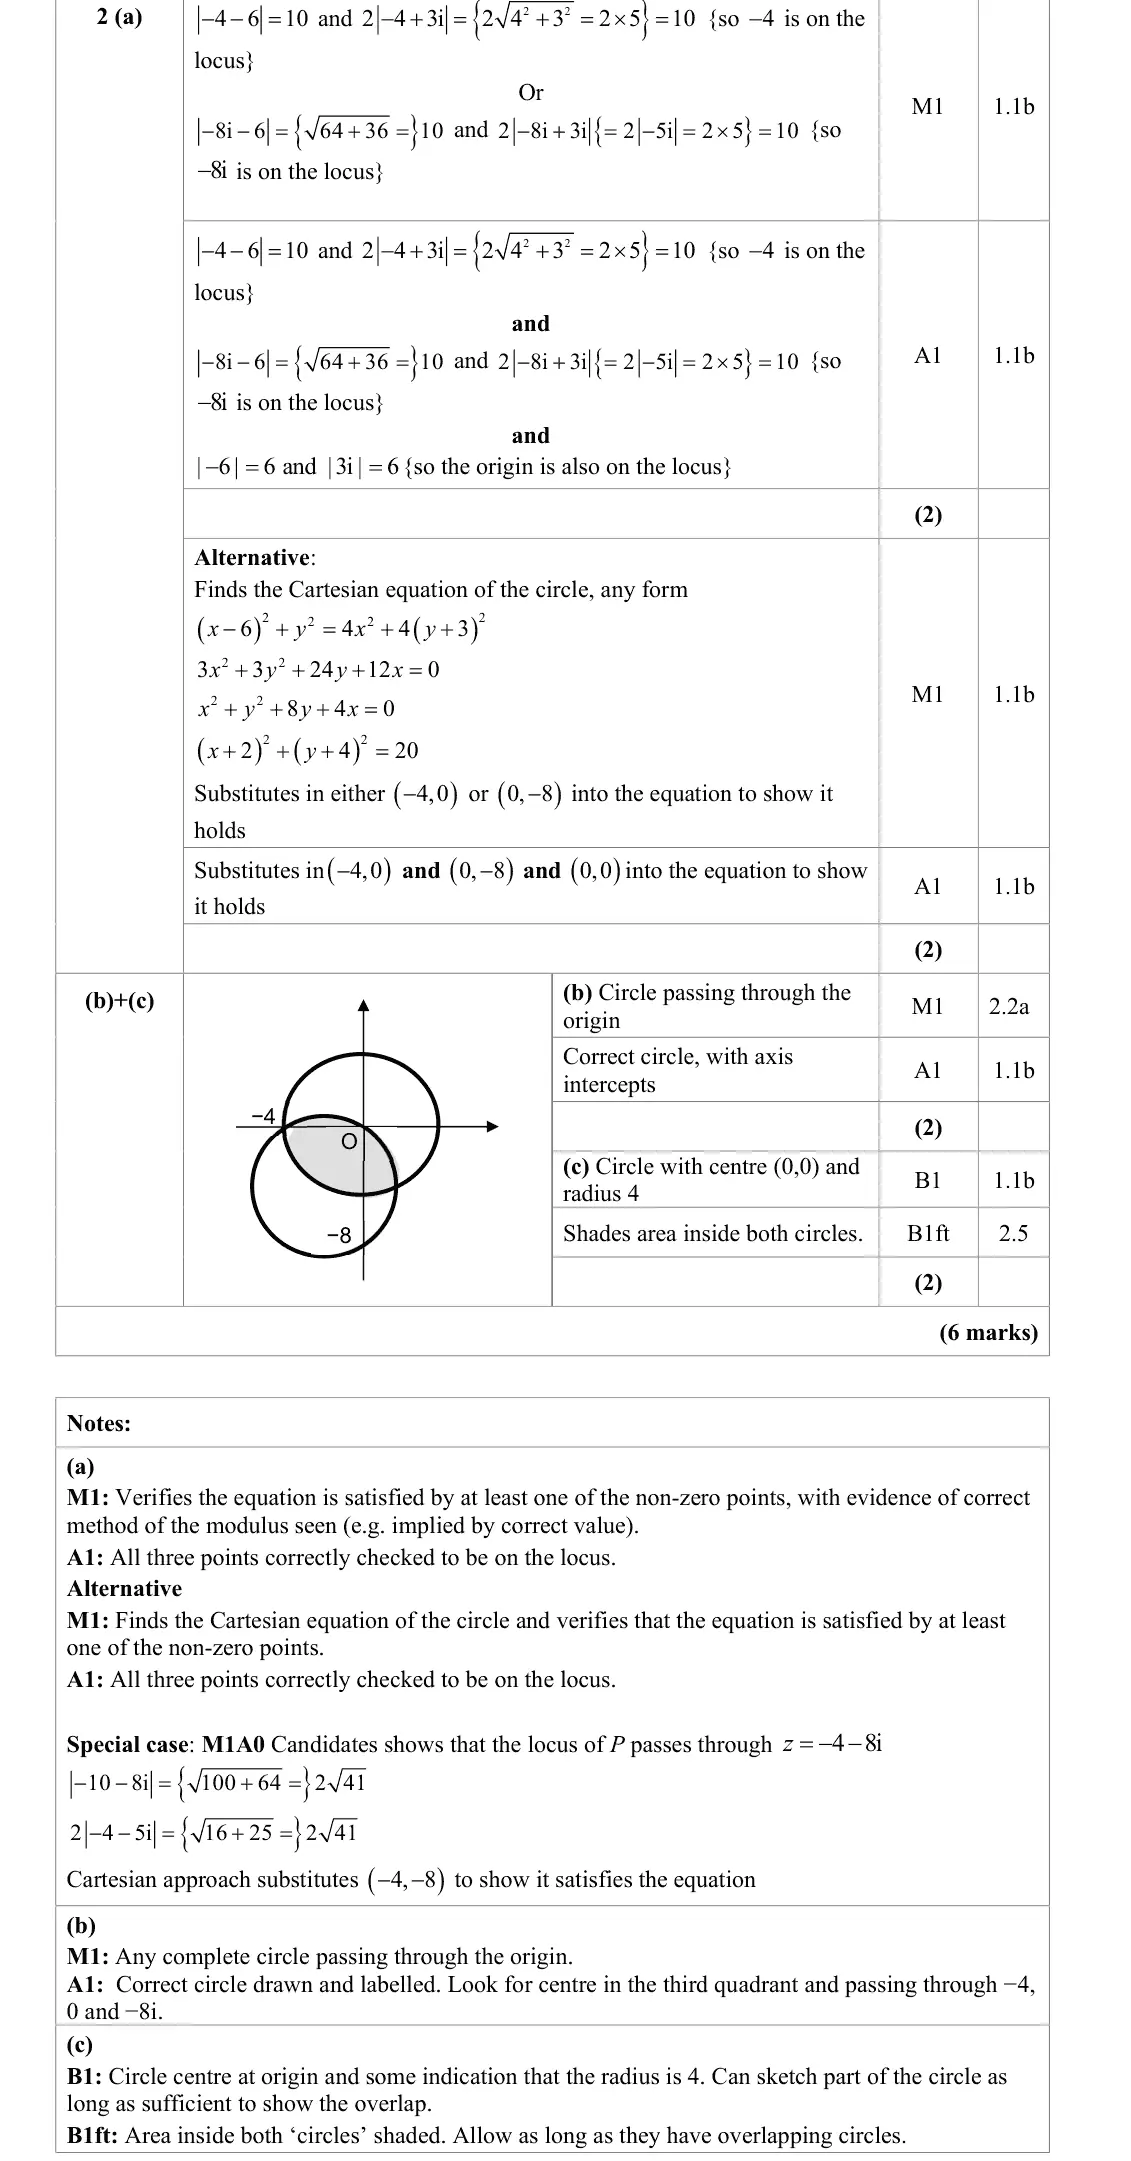
June 2023 · Paper 4A (Further Pure 2) · Q2(a)2 marks
Mark scheme (whole question; this part is marked with the orange bar)
Examiner's comment
(a) The easiest approach was to substitute z = 0, z = – 4 and z = – 8i into both sides of the given locus to show it holds. Quite a few candidates made this more complicated by trying to find the Cartesian equation of the locus first and then substitute in. A few missed showing it holds for the origin and a misread using z = –4 – 8i, scored one mark.
Key points from the mark scheme and examiner's report
substitute 0, −4 and −8i into both sides (each gives equal moduli)
all three points needed
misreading −4 − 8i scored M1 only
June 2023 · Paper 4A (Further Pure 2) · Q2(b)2 marks
Mark scheme (whole question; this part is marked with the orange bar)
Examiner's comment
(b) The majority of candidate scored 1 out of 2 marks. They drew a circle that passed through the origin but did not indicate where it crossed the axis. Candidates are reminded to always indicate intercepts with axes to show location.
Key points from the mark scheme and examiner's report
circle (x + 2)² + (y + 4)² = 20, centre −2 − 4i, through O, −4 and −8i
intercepts must be labelled
June 2023 · Paper 4A (Further Pure 2) · Q2(c)2 marks
Mark scheme (whole question; this part is marked with the orange bar)
Examiner's comment
(c) Candidates appeared to know that 4 z = represented a circle, centre (0, 0) but errors included radius of 2 and again not indicated where it crossed an axis. Candidates were still able to score the final mark if they had two overlapping circles and shaded the overlap. Many candidates were able to score this mark.
Key points from the mark scheme and examiner's report
add circle centre O radius 4 (not 2)
shade the overlap inside both circles
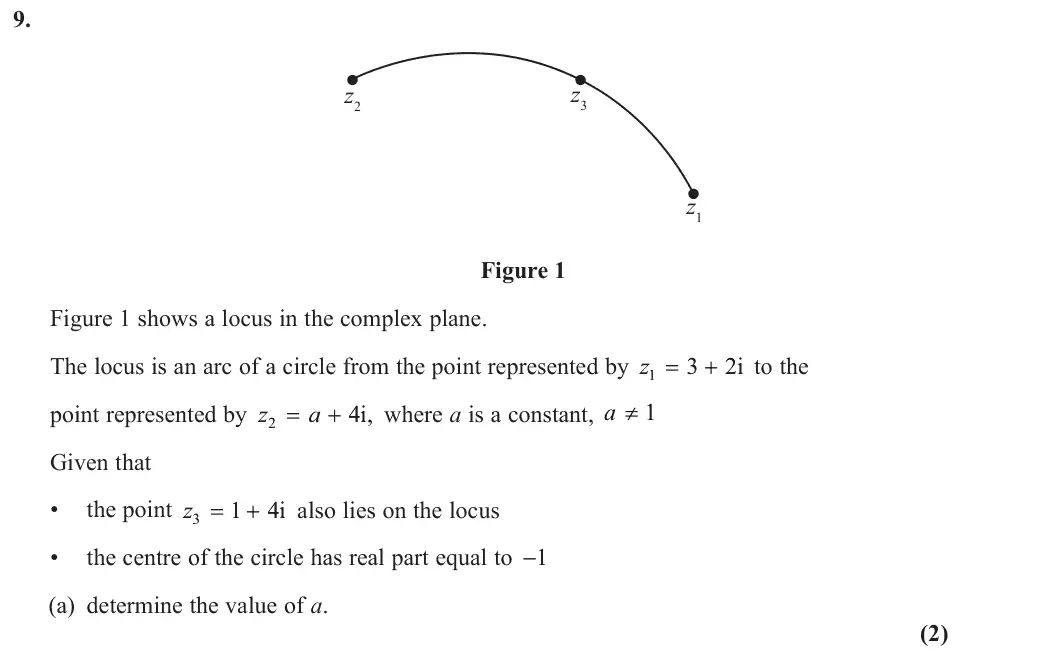
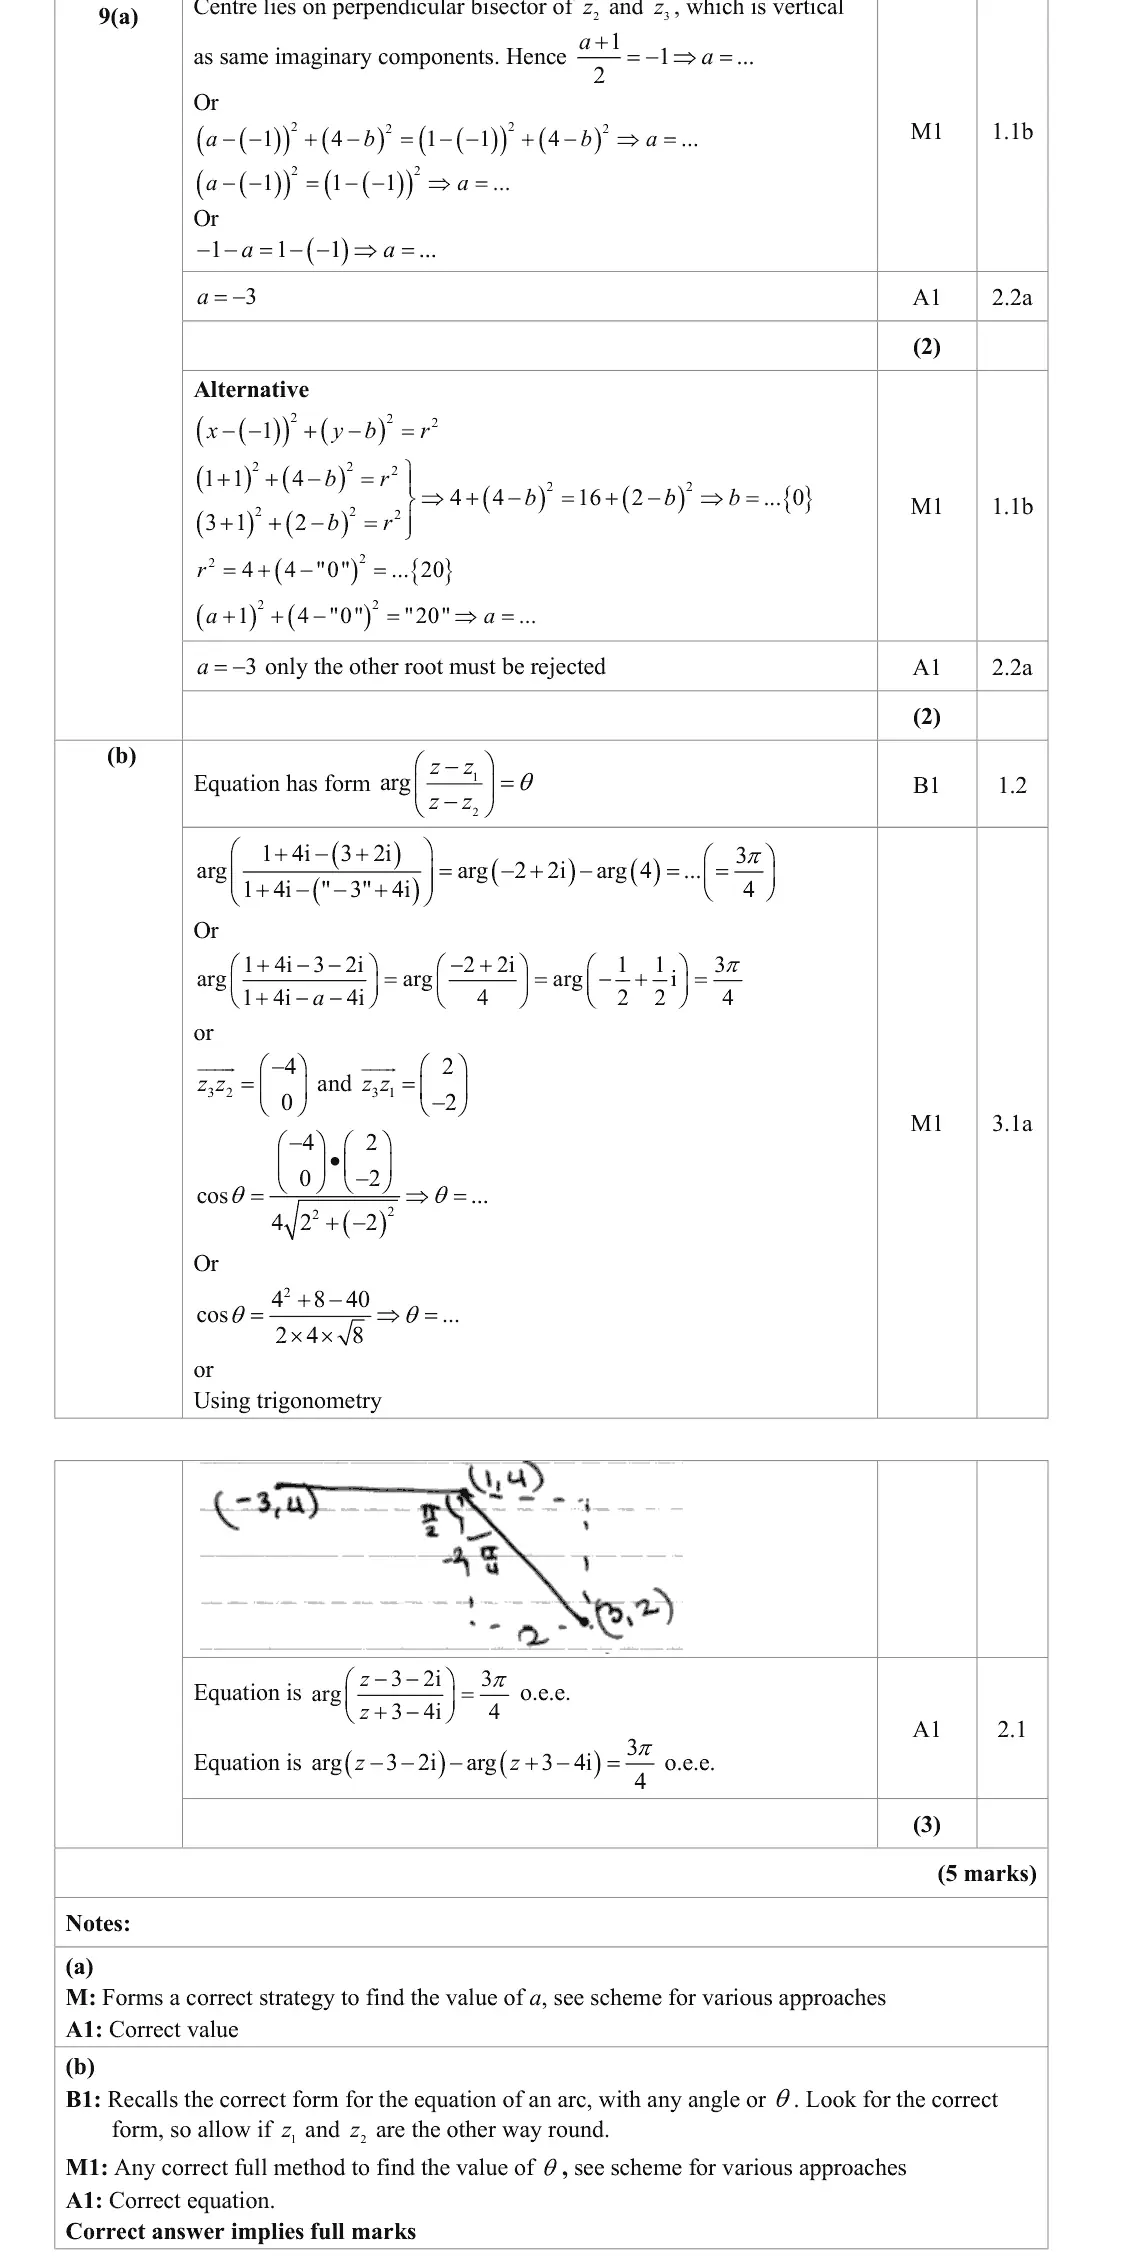
June 2023 · Paper 4A (Further Pure 2) · Q9(a)2 marks
Mark scheme (whole question; this part is marked with the orange bar)
Examiner's comment
(a) There was a variety of methods seen to find the value of a, the easiest was that –1 is the middle of 1 and a. Some candidates used distances or form the equation of the circle and eventually found a = – 3.
Key points from the mark scheme and examiner's report
z₂ and z₃ have the same imaginary part so the centre is on their perpendicular bisector: (a + 1)/2 = −1, a = −3
June 2023 · Paper 4A (Further Pure 2) · Q9(b)3 marks
Mark scheme (whole question; this part is marked with the orange bar)
Examiner's comment
(b) This was not very well done, candidates appeared to know that it involves the locus 3 2i arg 3 4i z z -- = + - but struggled to find the angle. Drawing a diagram would have been helpful to candidates. Again, there were many methods to find the angle, using vectors, cross product or trigonometry.
Key points from the mark scheme and examiner's report
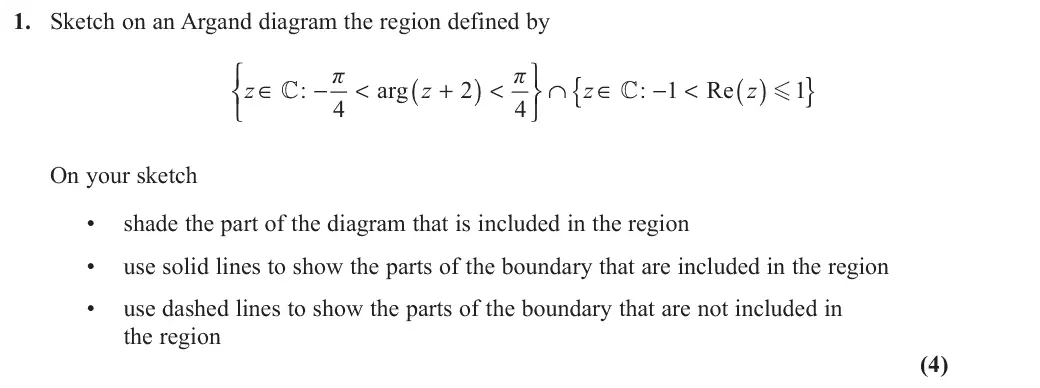
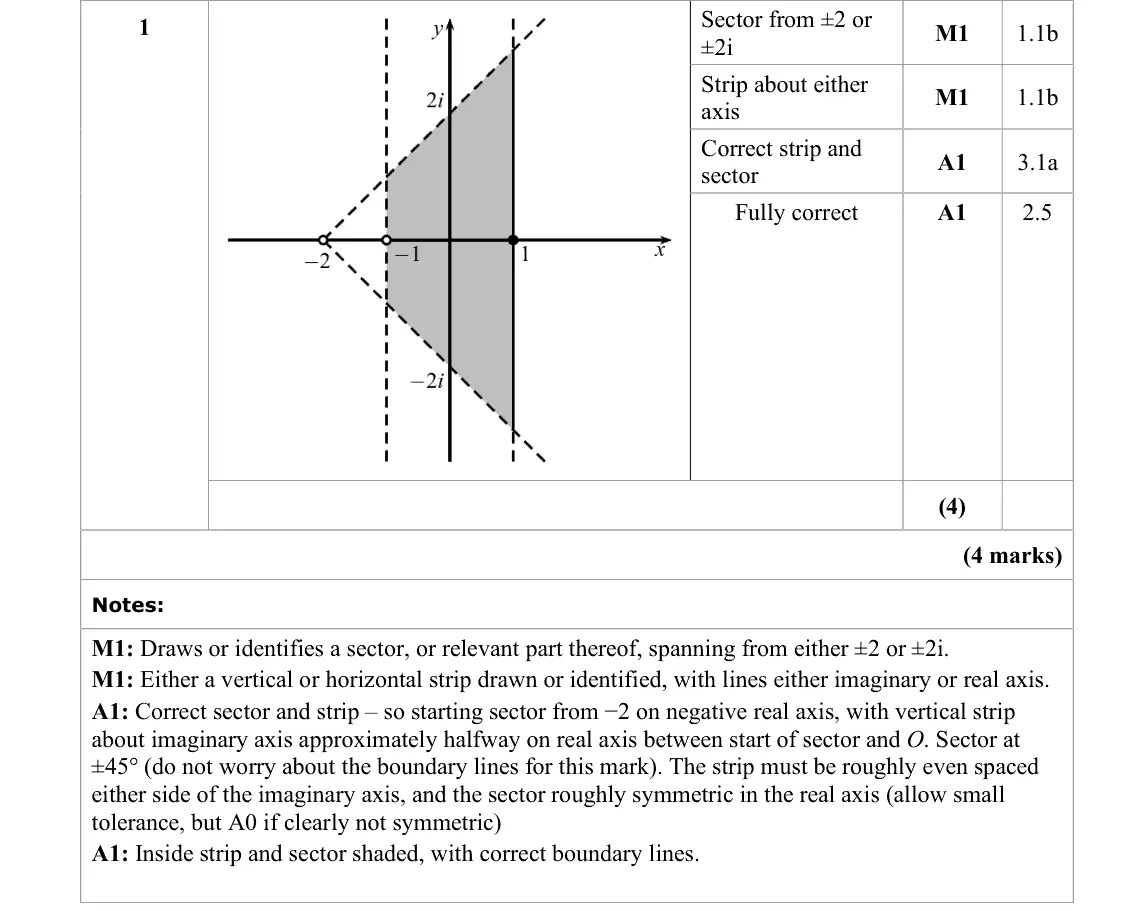
June 2022 · AS Paper 2 (Further Pure 2) · Q14 marks
Mark scheme (whole question; this part is marked with the orange bar)
Examiner's comment
This proved a useful opening question with the majority of candidates scoring at at least two marks, usually the two method marks. The correct sector was not always identified, though the origin of the sector was correct in nearly all cases. Those with the wrong sector generally had a span of angles from 4 pi to 3 4 pi , in the upper half plane. The strip was usually correct, but not always well drawn. However a few did have a horizontal, rather then vertical strip. Specific instructions on the boundaries were given in the question and were followed well by most, though some did have all boundaries as solid lines. Overall, a quarter of students were able to access all four marks, with three quarters accessing at least two.
Key points from the mark scheme and examiner's report
sector from −2 between arguments ±π/4 (dashed, open vertex) intersected with the vertical strip −1 < Re(z) ≤ 1 (dashed at −1, solid at 1)
wrong sector (π/4 to 3π/4) or a horizontal strip were common slips
all-solid boundaries lose the last mark
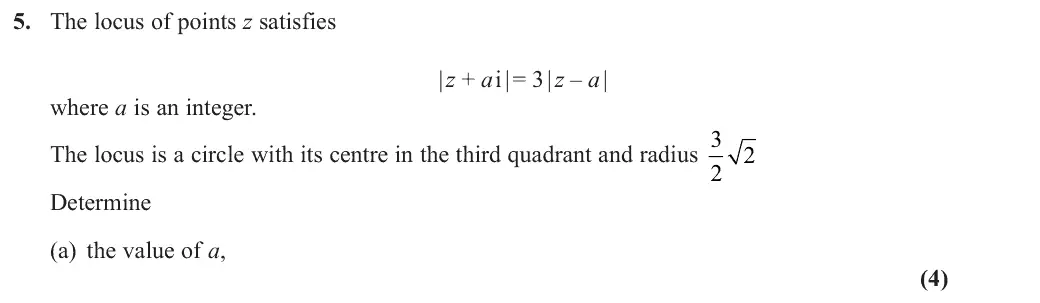
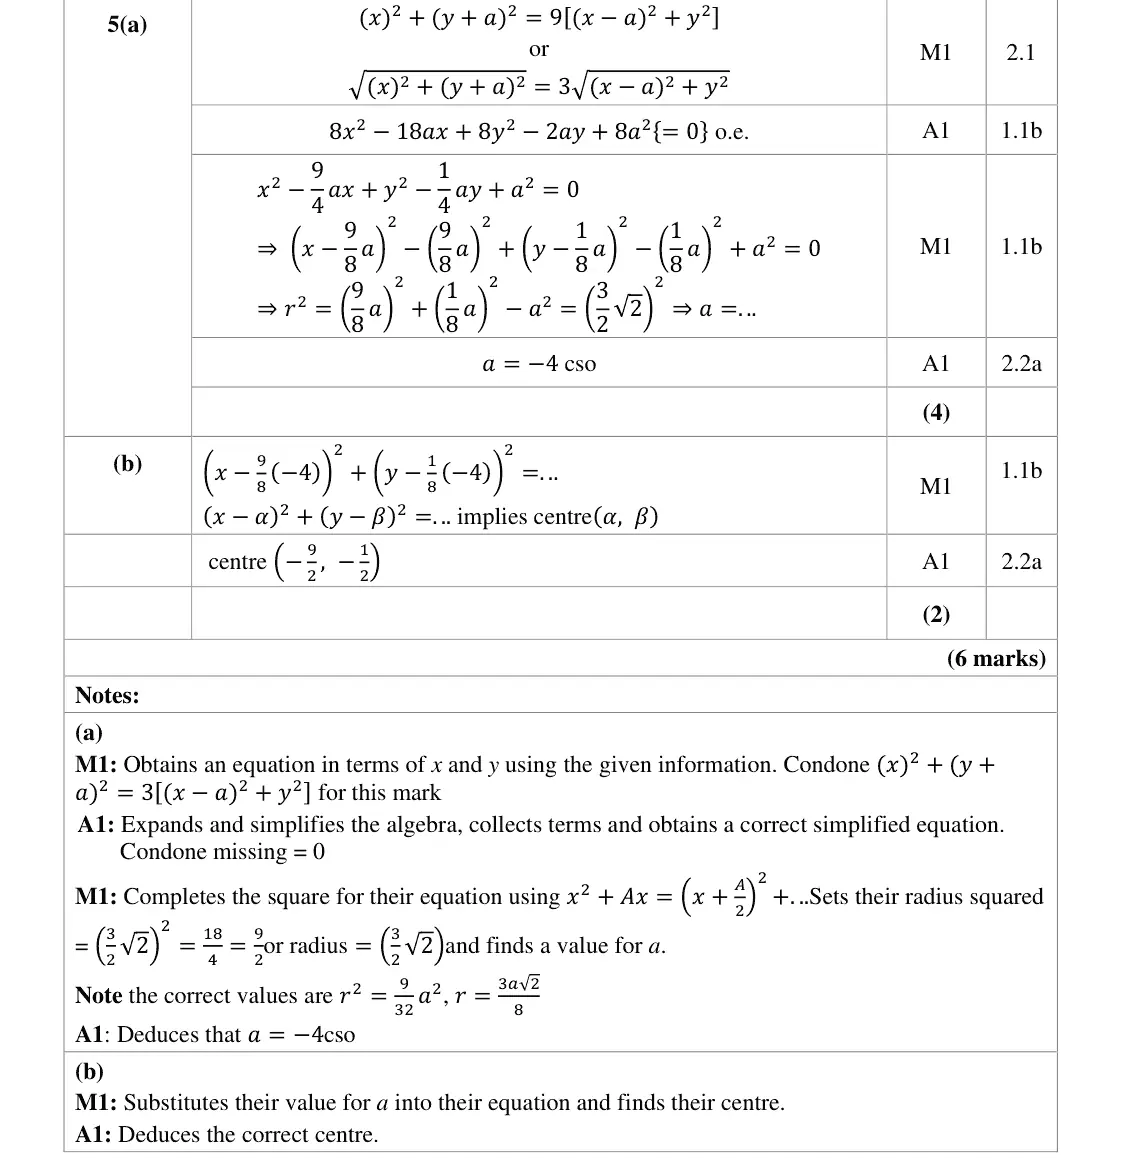
June 2022 · Paper 4A (Further Pure 2) · Q5(a)4 marks
Mark scheme (whole question; this part is marked with the orange bar)
Examiner's comment
Part (a) In general, candidates seemed familiar with this style of question, with almost all of them attempting to solve it by forming the equation of a circle and extracting the centre and radius. There were a number of numeric and algebraic slips in this part of the question, though, with the most common being sign errors, and doubling rather than halving while completing the square. It was quite common for candidates to miss the key information about the solutions being in the ‘third quadrant’, and so get a = 4 rather than a = – 4 Part (b) candidates who had the correct method in part (a) were able to pick out their centre coordinate correctly
Key points from the mark scheme and examiner's report
June 2022 · Paper 4A (Further Pure 2) · Q5(b)2 marks
Mark scheme (whole question; this part is marked with the orange bar)
Examiner's comment
Part (b) candidates who had the correct method in part (a) were able to pick out their centre coordinate correctly
Key points from the mark scheme and examiner's report
centre (9a/8, a/8) = (−9/2, −1/2)
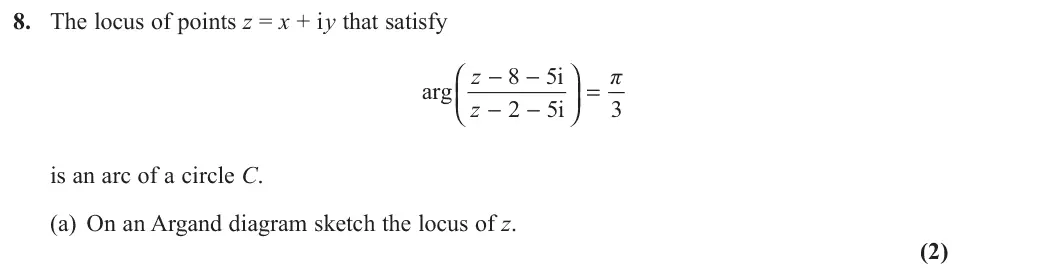
June 2022 · Paper 4A (Further Pure 2) · Q8(a)2 marks
Mark scheme (whole question; this part is marked with the orange bar)
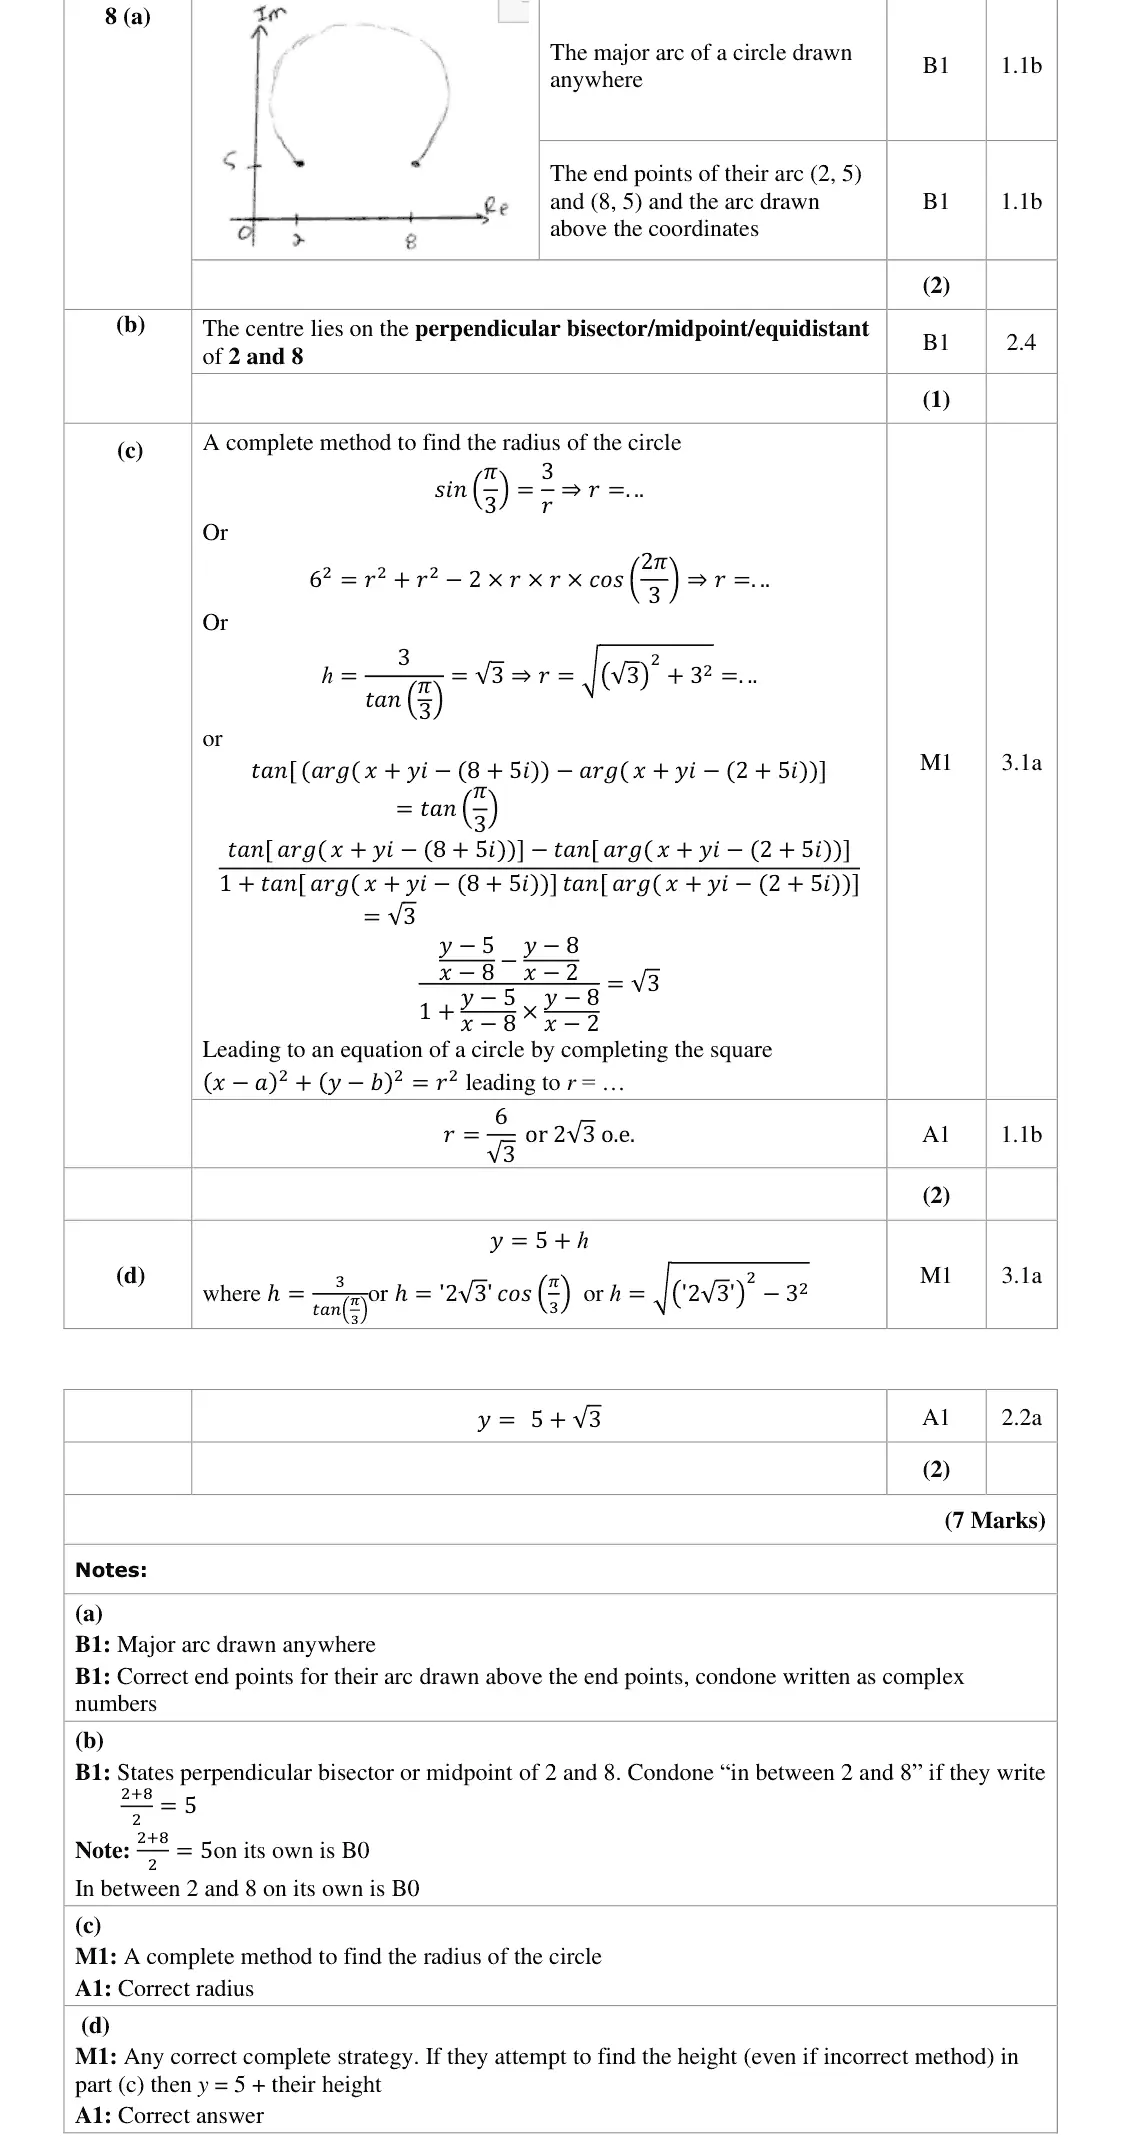
Examiner's comment
Part (a) Almost all candidates had the correct two points marked ut some did not produce a major arc while a few had the arc below the points.
Key points from the mark scheme and examiner's report
major arc of a circle through (2, 5) and (8, 5), drawn above the points
endpoints excluded
June 2022 · Paper 4A (Further Pure 2) · Q8(b)1 mark
Mark scheme (whole question; this part is marked with the orange bar)
Examiner's comment
Part (b) Most candidates explained that the centre lay above the midpoint of (2,5) and (8,5)
Key points from the mark scheme and examiner's report
the centre lies on the perpendicular bisector of the chord from (2, 5) to (8, 5), i.e. x = 5
(2 + 8)/2 alone scores B0
June 2022 · Paper 4A (Further Pure 2) · Q8(c)2 marks
Mark scheme (whole question; this part is marked with the orange bar)
Examiner's comment
Part (c) This part was not well done in the main, with some attempts at complicated methods being abandoned part way through. Those with a suitable sketch from part (a) tended to use trigonometry to reach the result more easily.
Key points from the mark scheme and examiner's report
angle at centre 2π/3 (circle theorem): sin(π/3) = 3/r gives r = 2√3
a sketch made the trig route easy
algebraic routes were often abandoned
June 2022 · Paper 4A (Further Pure 2) · Q8(d)2 marks
Mark scheme (whole question; this part is marked with the orange bar)
Examiner's comment
Part (d) Most candidates recognised that they needed to use their answer from part (c) and picked up at least one mark for this question. Those with incorrect answers to part (c) often could not reconcile their result with the geometry.
Key points from the mark scheme and examiner's report
centre above the chord by h = 3/tan(π/3) = √3: y = 5 + √3
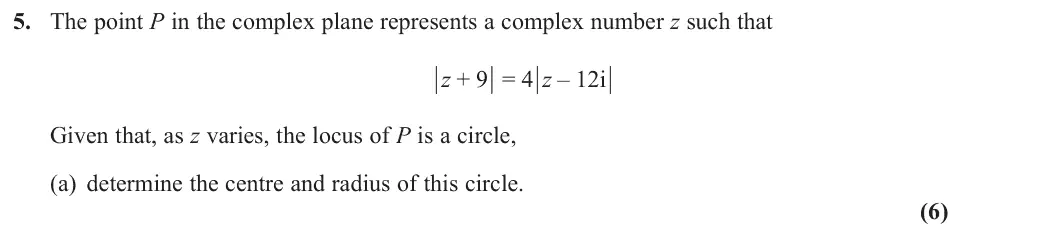
Nov 2021 · Paper 4A (Further Pure 2) · Q5(a)6 marks
Mark scheme (whole question; this part is marked with the orange bar)
Key points from the mark scheme and examiner's report
(x + 9)² + y² = 16(x² + (y − 12)²), complete the square: centre 3/5 + 64i/5, radius 4
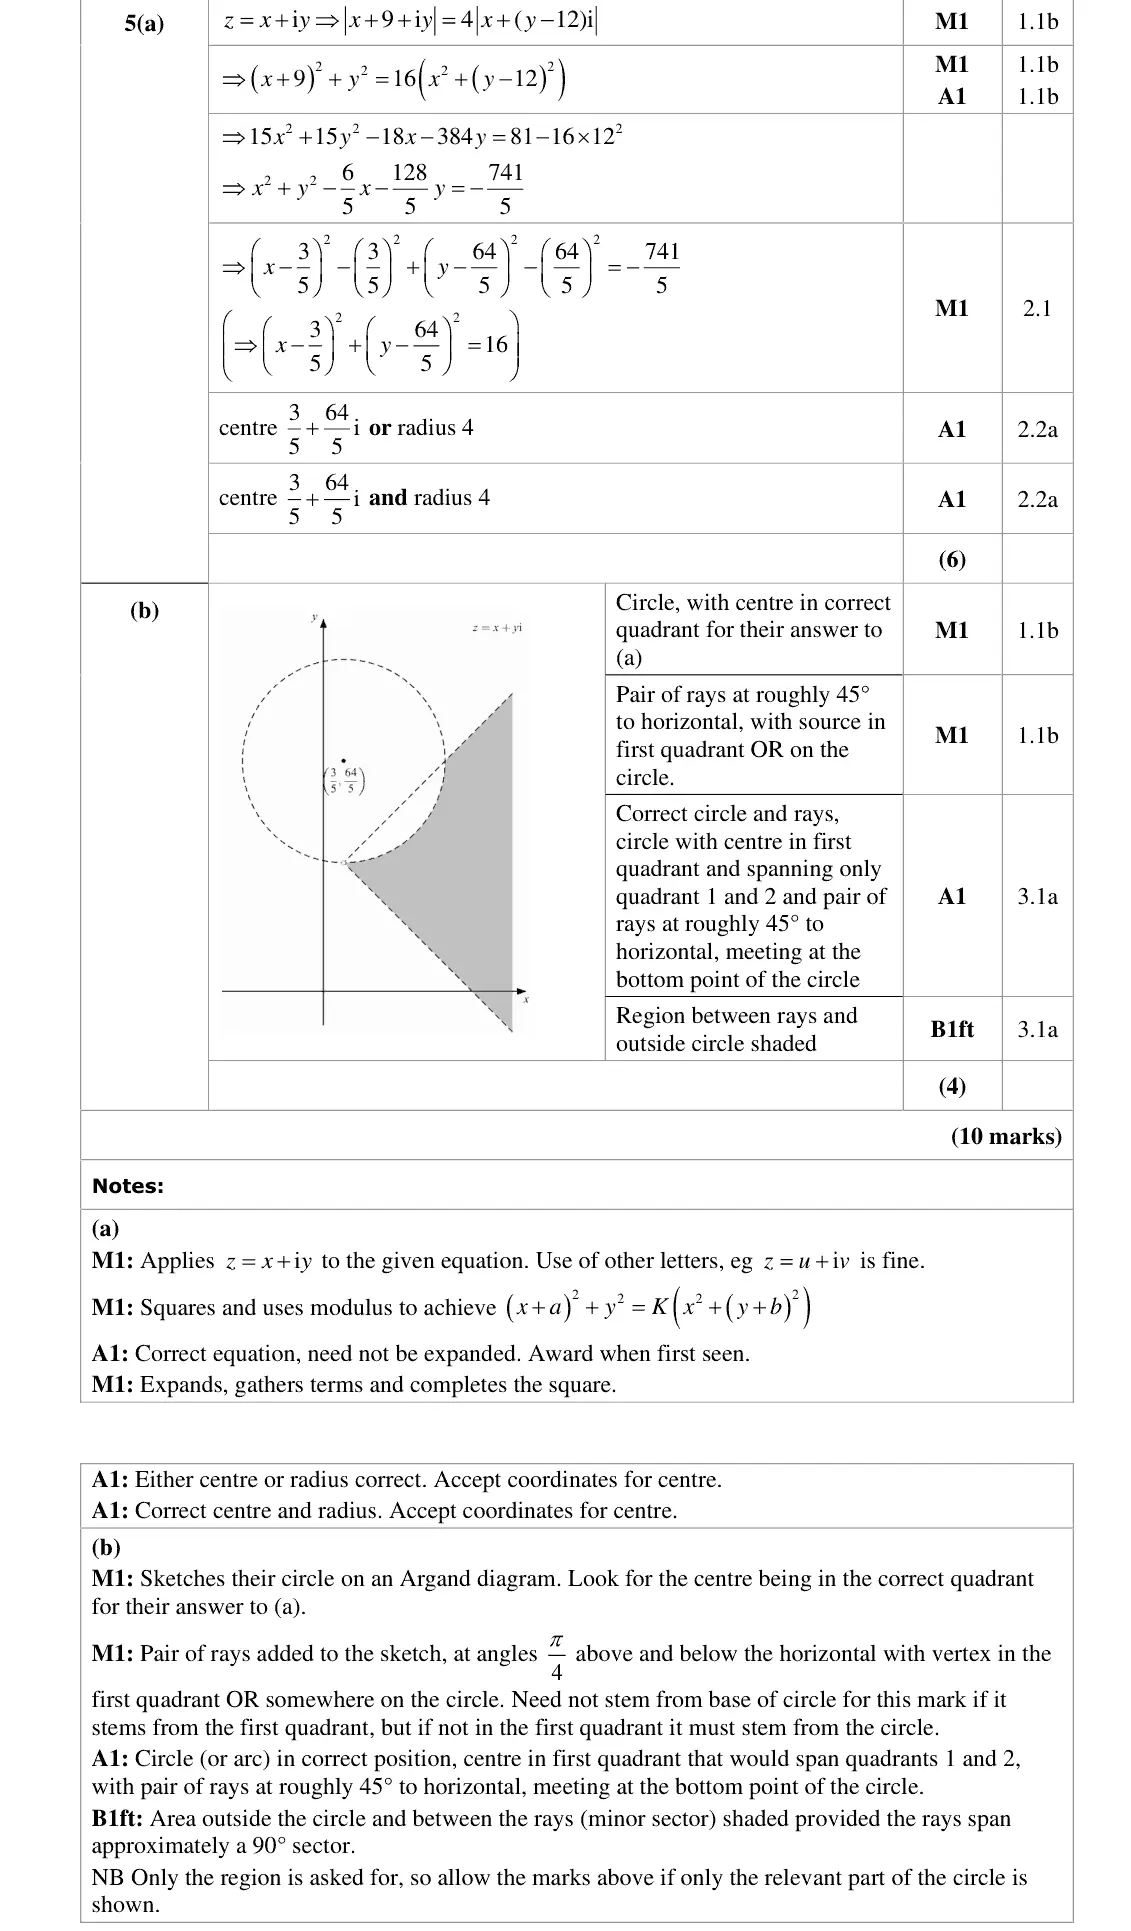
Nov 2021 · Paper 4A (Further Pure 2) · Q5(b)4 marks
Mark scheme (whole question; this part is marked with the orange bar)
Key points from the mark scheme and examiner's report
(3 + 44i)/5 is the lowest point of the circle
rays at ±π/4 from it
shade outside the circle between the rays
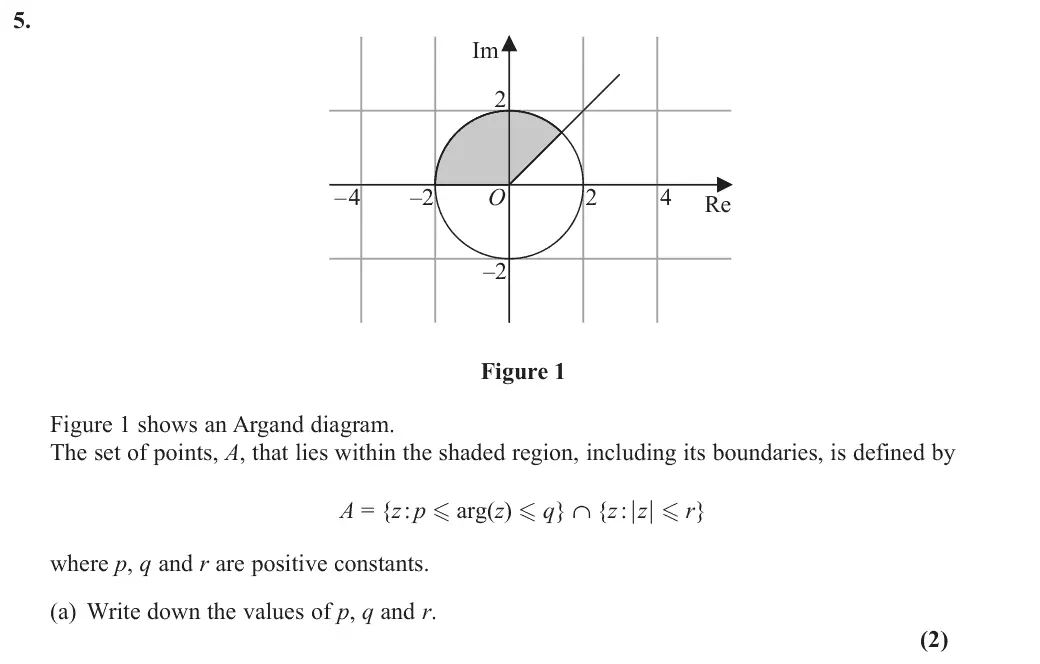
Oct 2020 · AS Paper 2 (Further Pure 2) · Q5(a)2 marks
Mark scheme (whole question; this part is marked with the orange bar)
Key points from the mark scheme and examiner's report
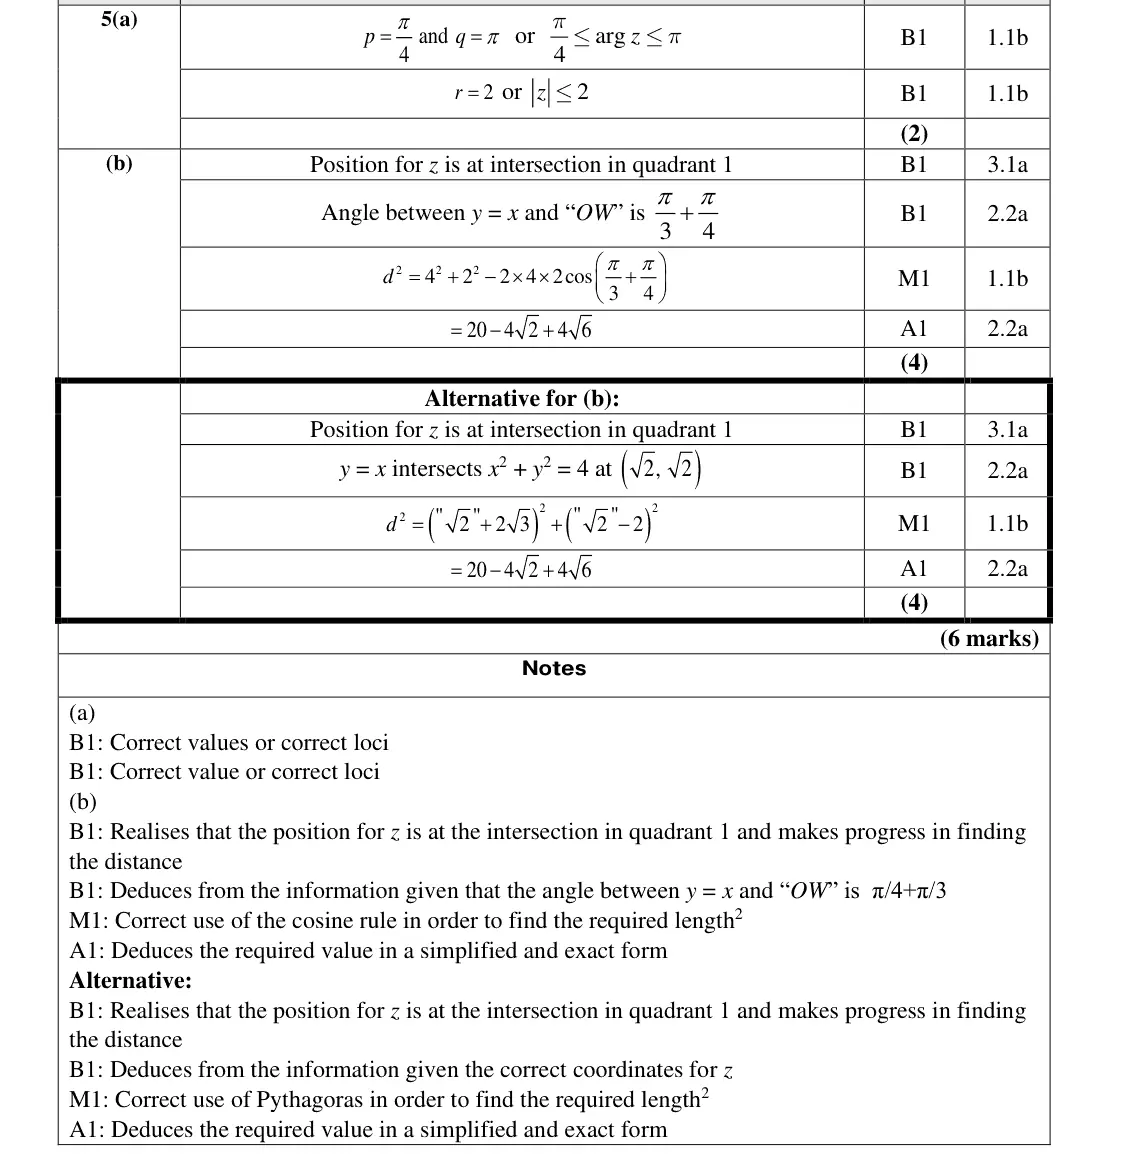
p = π/4, q = π, r = 2
Oct 2020 · AS Paper 2 (Further Pure 2) · Q5(b)4 marks
Mark scheme (whole question; this part is marked with the orange bar)
Key points from the mark scheme and examiner's report
furthest point of the region from w is z = √2 + √2i (on arg z = π/4, modulus 2)
modulus of w = 4 and angle between OW and y = x is π/3 + π/4
cosine rule: maximum = 20 − 4√2 + 4√6
Oct 2020 · Paper 4A (Further Pure 2) · Q5(b)6 marks
Mark scheme (whole question; this part is marked with the orange bar)
Key points from the mark scheme and examiner's report
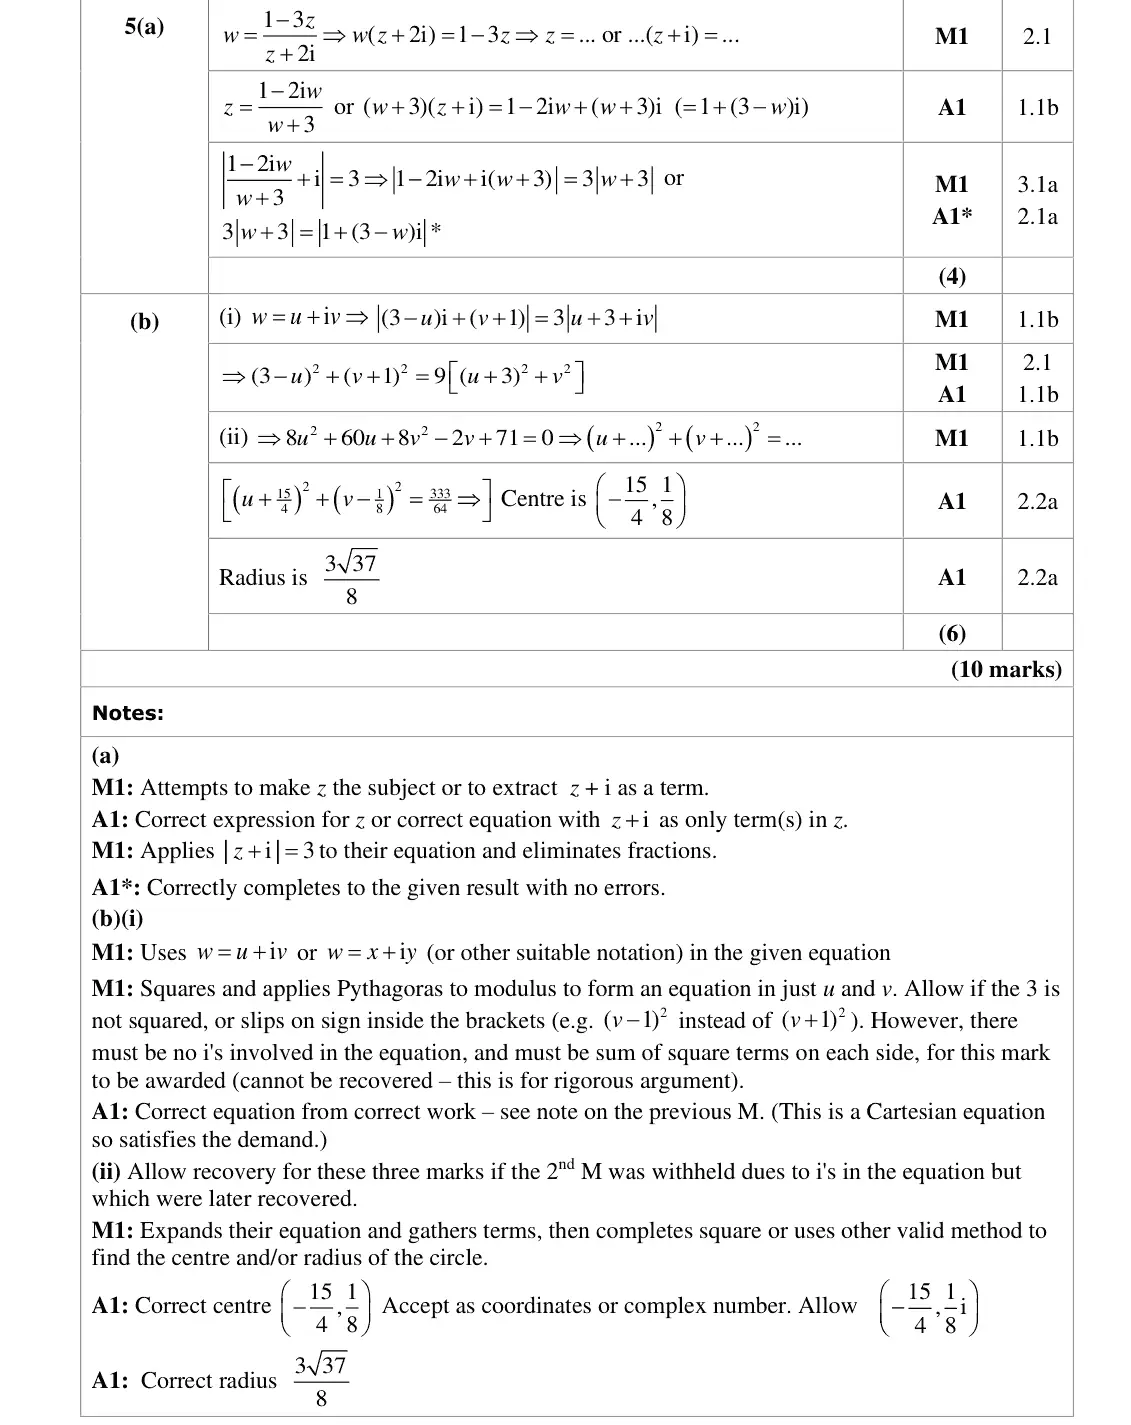
w = u + iv: (3 − u)² + (v + 1)² = 9((u + 3)² + v²) with no i left
8u² + 60u + 8v² − 2v + 71 = 0
centre (−15/4, 1/8), radius 3√37/8
June 2019 · AS Paper 2 (Further Pure 2) · Q3(a)4 marks
Mark scheme (whole question; this part is marked with the orange bar)
Examiner's comment
Part (a) the majority of candidates knew that was required however a few candidates made errors in the algebra. The demand of the questions was that candidates needed to showed that C is a circle, this required the candidate to draw the conclusion that the equation that they produce is that of a circle for the final mark.
Key points from the mark scheme and examiner's report
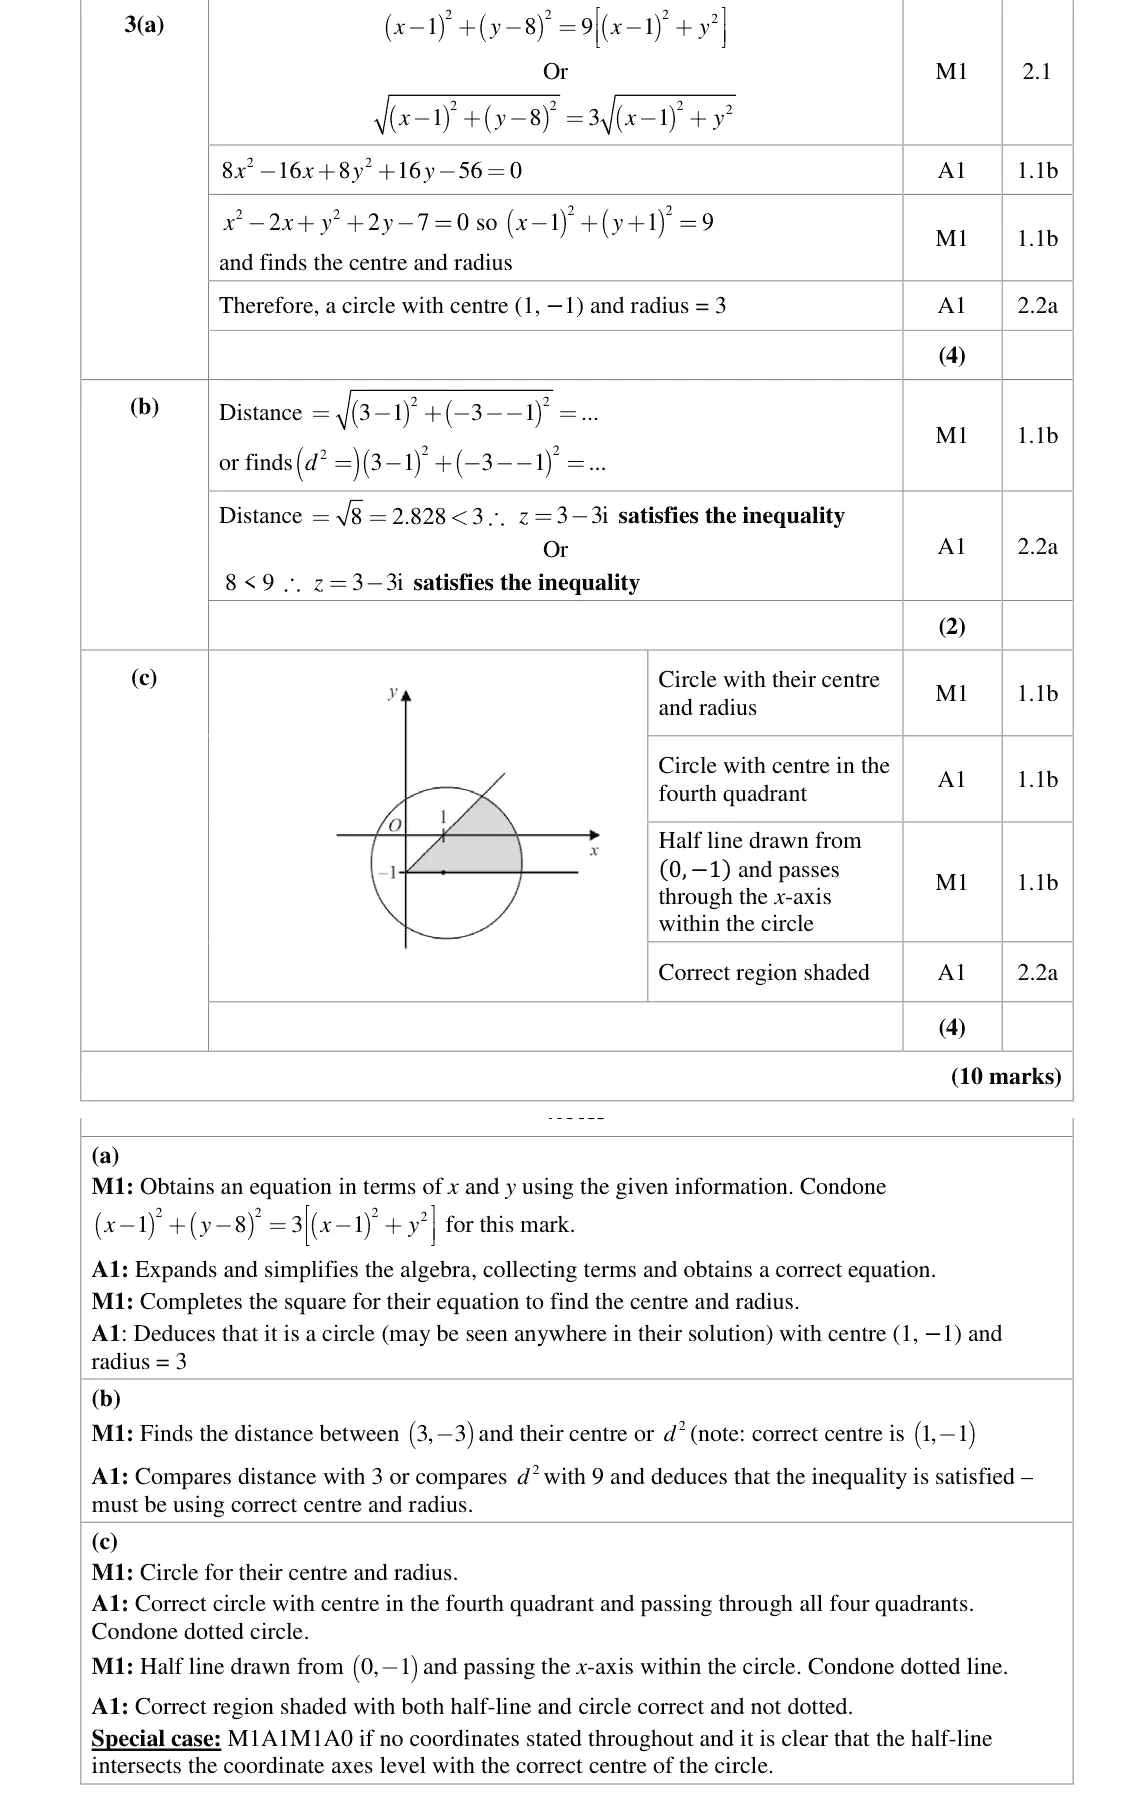
square both sides with z = x + iy: (x − 1)² + (y − 8)² = 9[(x − 1)² + y²]
complete the square: centre (1, −1), radius 3
must state it is a circle
algebra slips
June 2019 · AS Paper 2 (Further Pure 2) · Q3(b)2 marks
Mark scheme (whole question; this part is marked with the orange bar)
Examiner's comment
Part (b) demanded that the candidates used the answer to part (a), finding the distance of z to the centre of the circle and comparing it with the radius. Candidates who substituted z into the inequality gained no marks. The question tested whether candidates can make connections between the parts of the question. A few candidates who made the connection incorrectly thought that the inequality was not satisfied.
Key points from the mark scheme and examiner's report
distance from 3 − 3i to the centre (1, −1) is √8 < 3, so inside the circle and the inequality holds
substituting into the inequality directly scores 0
June 2019 · AS Paper 2 (Further Pure 2) · Q3(c)4 marks
Mark scheme (whole question; this part is marked with the orange bar)
Examiner's comment
Part (c) Candidates are advised to indicate key coordinates on any diagrams, such as the centre of the circle and the starting coordinate of the half-line. The majority of candidates drew a circle, some put the centre of their circle in the first quadrant instead of the fourth. Again, many candidates knew to draw a half-life but lost marks as they did not indicate the coordinate where it started. Those candidates who in part (b) who thought the inequality was not satisfied shade the incorrect area outside the circle instead on inside.
Key points from the mark scheme and examiner's report
circle centre (1, −1) radius 3
half-line from (0, −1) at π/4
shade inside the circle between the half-line and the horizontal through −i
label the start of the half-line
some shaded outside the circle
June 2019 · Paper 4A (Further Pure 2) · Q1(a)2 marks
Mark scheme (whole question; this part is marked with the orange bar)
Examiner's comment
This question was generally answered well, and provided a suitable opening to the paper, though there was a discriminating mark in part (b). In part (a) the majority of candidates knew the procedure for this part and proceeded to apply the magnitude formula correctly to both sides. However some errors expanding and manipulating to the required form were seen leading to the loss of the accuracy mark. Only a small number of candidates forgot to square the 4, or ended up with negative y2 terms.
Key points from the mark scheme and examiner's report
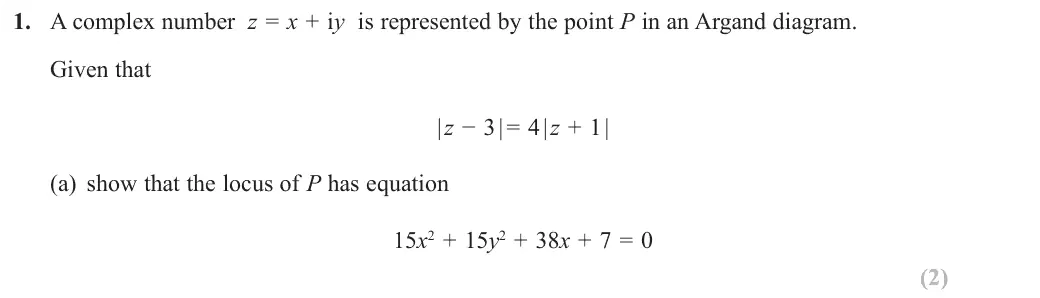
forgetting to square the 4 or bracket slips lose the A1*
June 2019 · Paper 4A (Further Pure 2) · Q1(b)3 marks
Mark scheme (whole question; this part is marked with the orange bar)
Examiner's comment
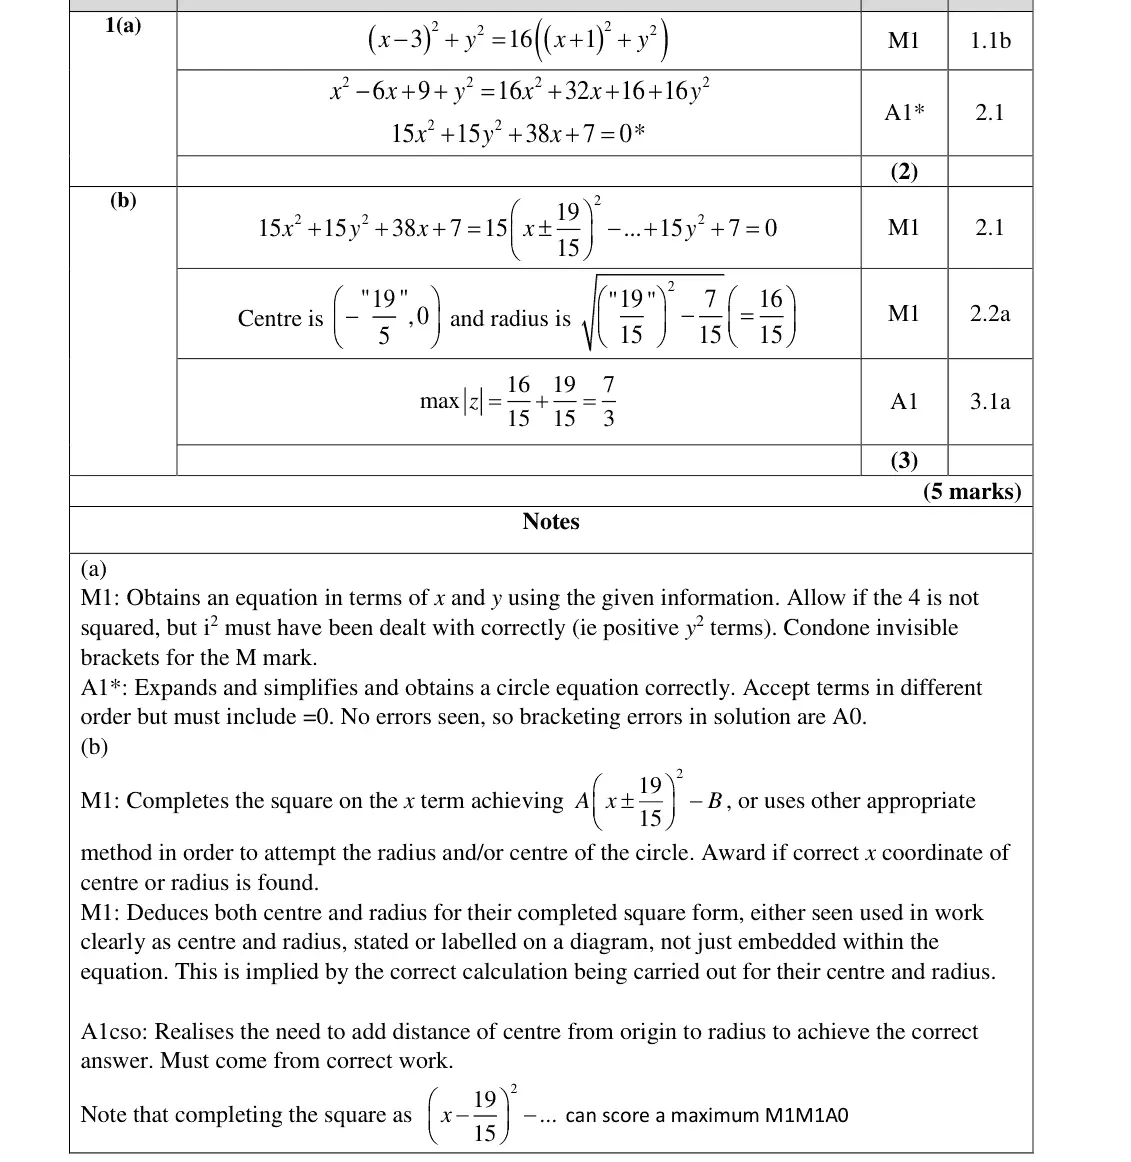
This question was generally answered well, and provided a suitable opening to the paper, though there was a discriminating mark in part (b). The first mark of part (b) was scored by the majority of candidates via completing the square, usually correctly. Knowing what to do with this form proved more challenging, with many giving 16/15 as the answer at this stage. Some did state the centre and radius to gain the second mark, but went no further. Those who drew a sketch were more successful in spotting the correct method required. Only a minority went on to score the A by using their centre and radius appropriately. A few candidates tried to differentiate as a “maximum” was required, and such cases usually only scored the first mark.
Key points from the mark scheme and examiner's report
complete the square: centre (−19/15, 0), radius 16/15
max modulus of z = distance of centre from O + radius = 7/3
many stopped at 16/15 or differentiated
a sketch helps
June 2018 · AS Paper 2 (Further Pure 2) · Q5(a)3 marks
Mark scheme (whole question; this part is marked with the orange bar)
Examiner's comment
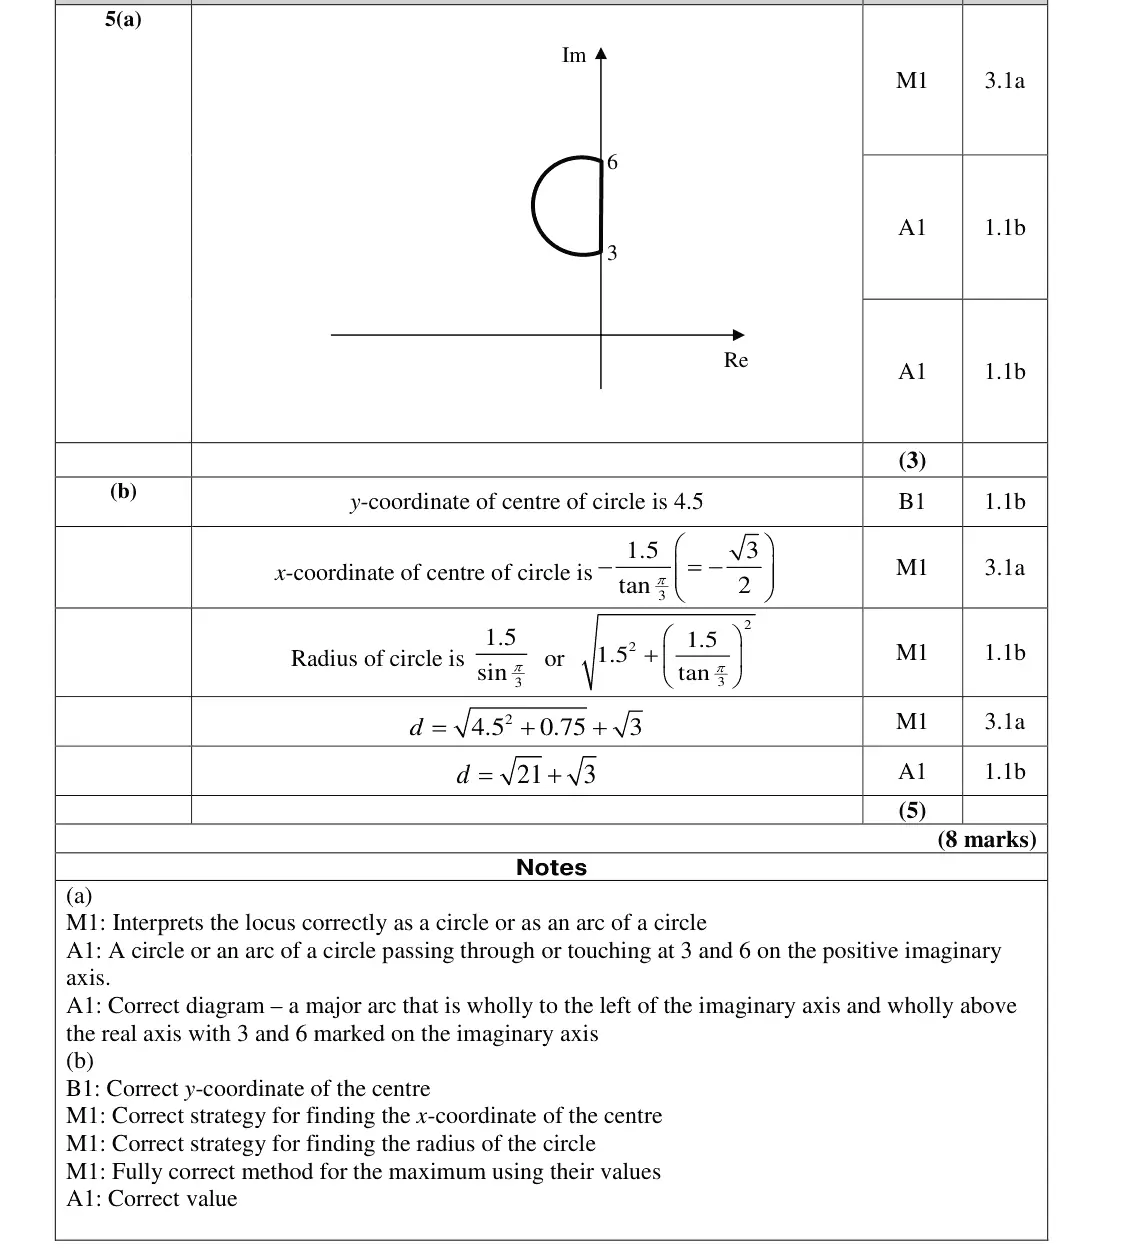
(a) Fully correct diagrams were rare although a significant number of students knew that a circle or arc of a circle was required.
Key points from the mark scheme and examiner's report
locus is a major arc of a circle through 3i and 6i, to the LEFT of the imaginary axis
endpoints marked
fully correct sketches rare
June 2018 · AS Paper 2 (Further Pure 2) · Q5(b)5 marks
Mark scheme (whole question; this part is marked with the orange bar)
Examiner's comment
(b) This was one of the more demanding questions on the paper. Some students tried to establish the Cartesian equation from part (a) and made little progress. Those who were more successful used a geometrical approach, using basic trigonometry with right angled triangles.
Key points from the mark scheme and examiner's report
geometric approach: centre (−√3/2, 4.5), radius 1.5/sin(π/3) = √3
maximum modulus of z = distance from O to centre + radius = √21 + √3
converting to Cartesian rarely succeeded
Find an Edexcel Further Maths tutor
Stuck on this? Book a trial lesson with our Further Maths tutor.