FM2.3.1 Centre of mass of uniform and non-uniform rigid bodies and…
Section
FM2.3 Further centres of mass
Level
A level only
Statement
Centre of mass of uniform and non-uniform rigid bodies and composite bodies.
Guidance
Problems which involve the use of integration and/or symmetry to determine the centre of mass of a uniform or non-uniform body may be set. The level of calculus will be consistent with that required in A level Mathematics and Further Mathematics. Unless otherwise stated in the question, results given in the formulae book may be quoted without proof.
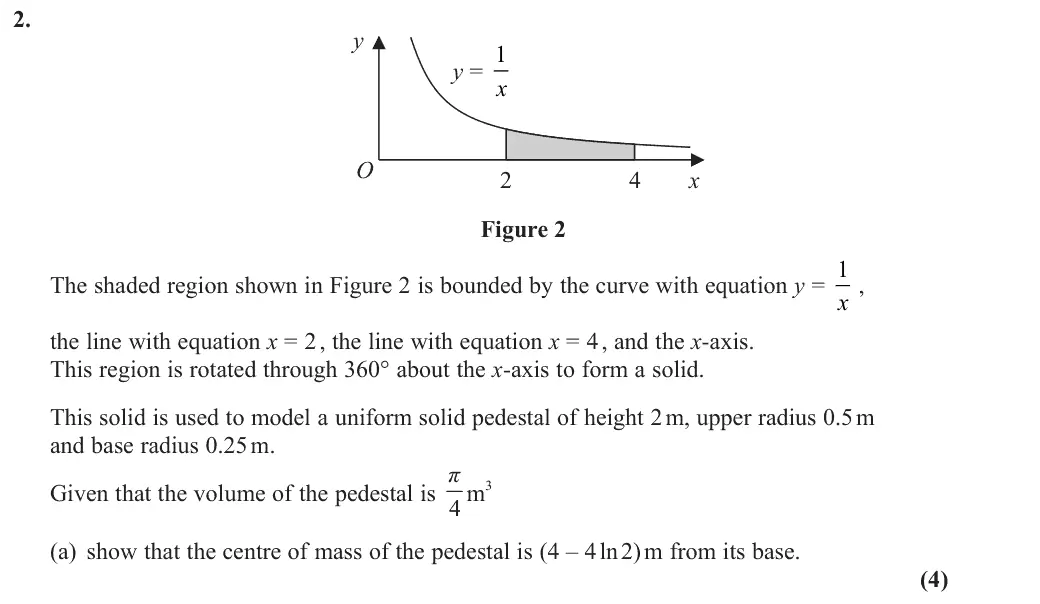
June 2025 · Paper 4C (Further Mechanics 2) · Q2(a)4 marks
Mark scheme (whole question; this part is marked with the orange bar)
Examiner's comment
(a) While most responses had a clear method, a number did not fully explain their division by pi and some tried to derive the final expression by simplifying their d rather than subtracting from 4. Some weaker responses just integrated y with respect to x which was not given any credit.
Key points from the mark scheme and examiner's report
moment π∫y²x dx = π∫(1/x) dx from 2 to 4 = πln 2
divide by volume π/4: 4ln 2 from O, so 4 − 4ln 2 from the base (x = 4)
integrating y alone scores nothing
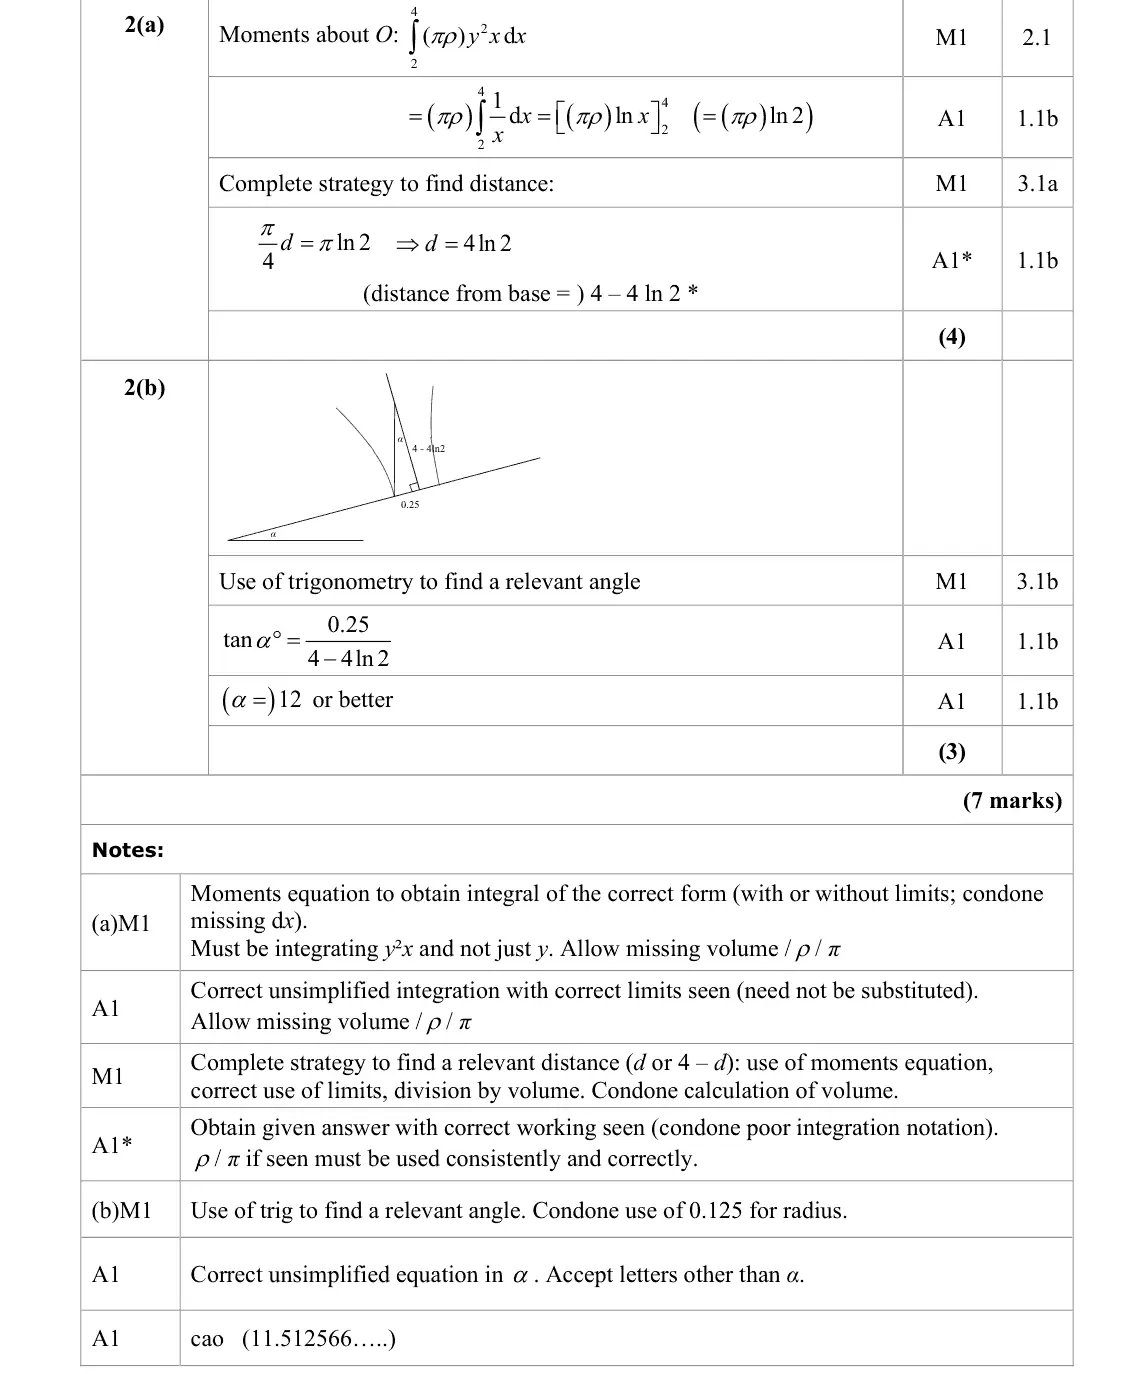
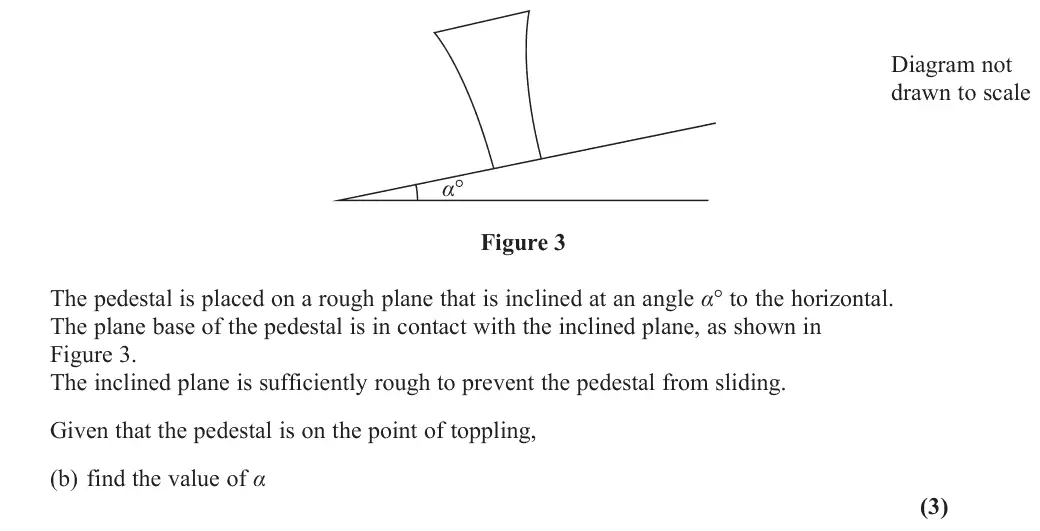
June 2025 · Paper 4C (Further Mechanics 2) · Q2(b)3 marks
Mark scheme (whole question; this part is marked with the orange bar)
Examiner's comment
(b) Responses to this suggested that candidates are familiar with this style of demand; nevertheless, a significant proportion of responses used a radius of 0.125 rather than 0.25 for the base.
Key points from the mark scheme and examiner's report
on the point of toppling the centre of mass is above the lowest base edge: tan α = 0.25/(4 − 4ln 2), α = 11.5
base radius is 0.25 (not 0.125)
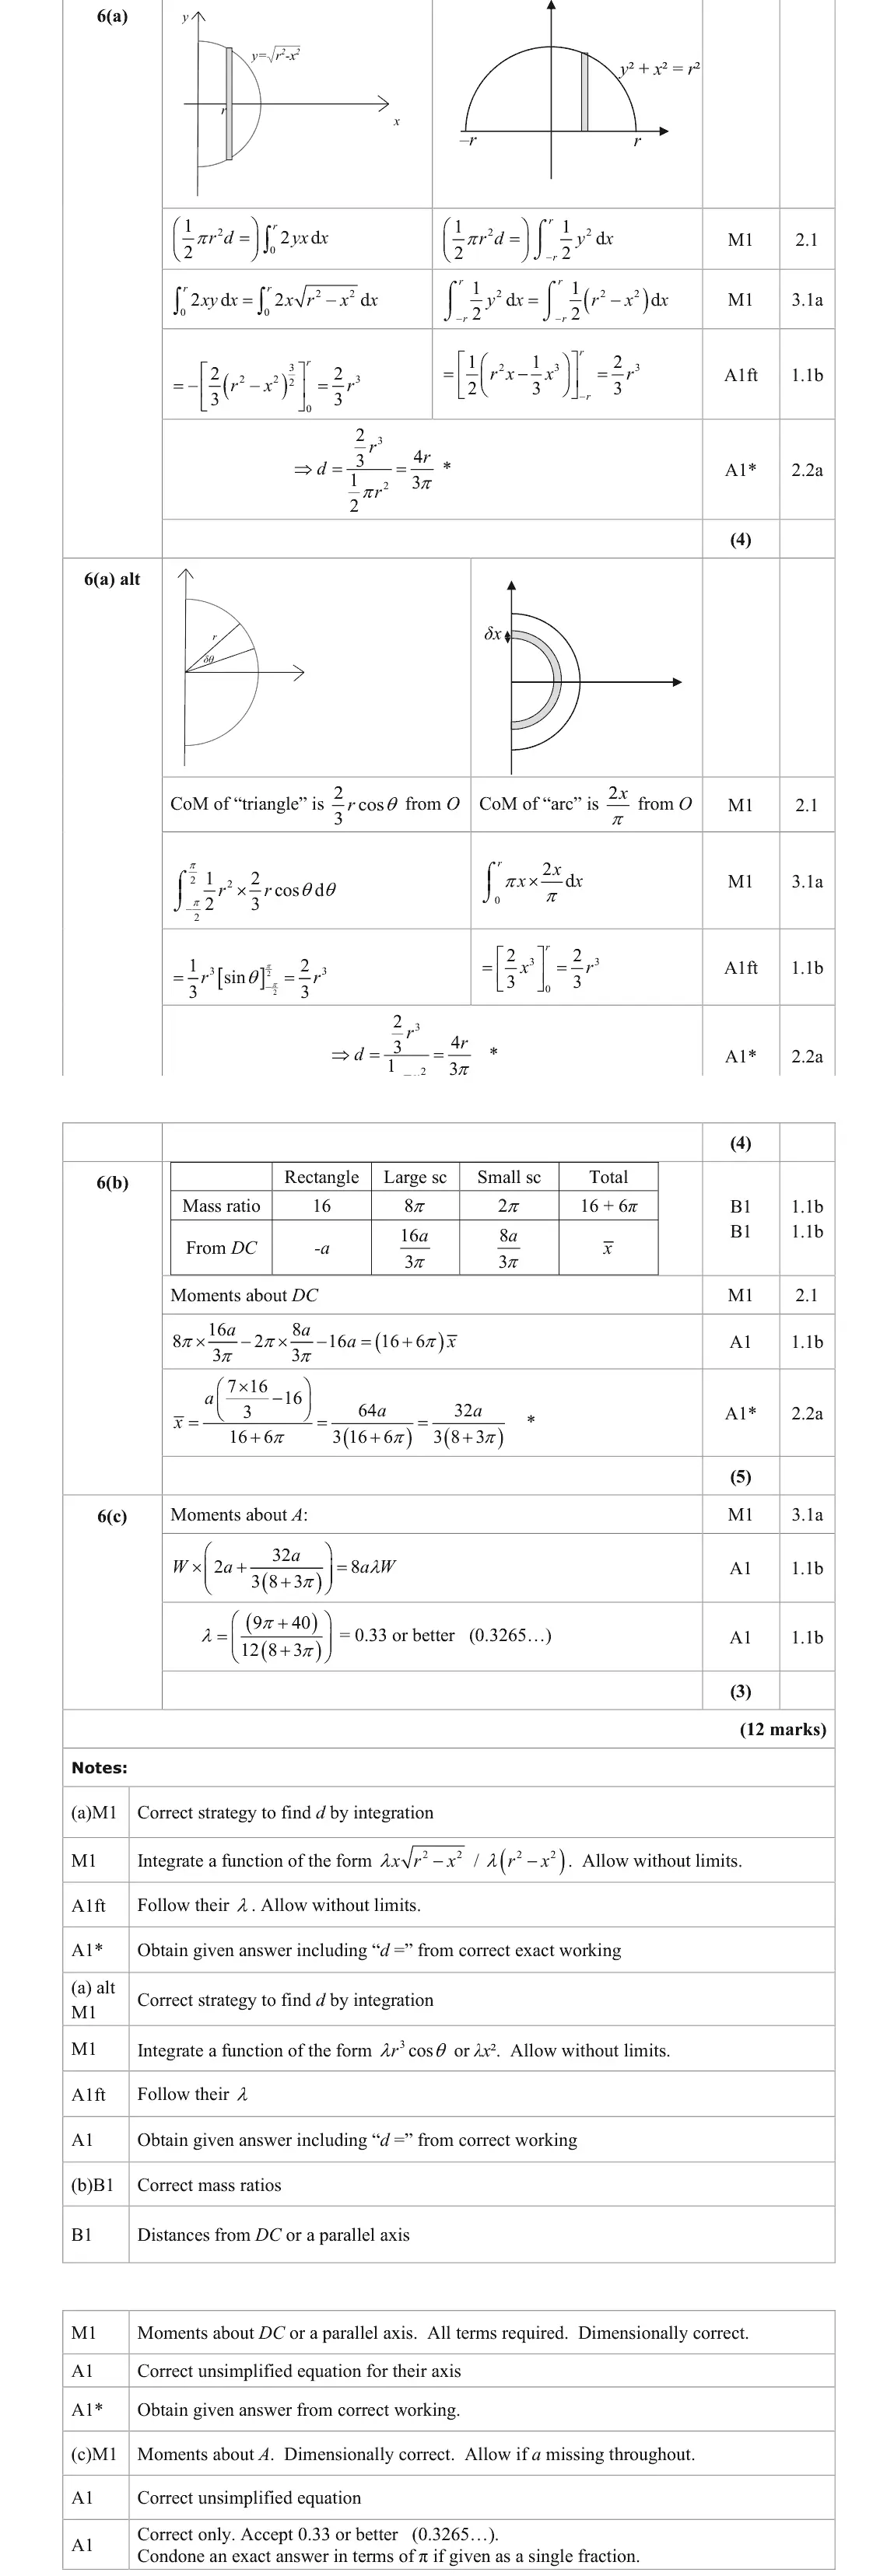
June 2025 · Paper 4C (Further Mechanics 2) · Q6(a)4 marks
Mark scheme (whole question; this part is marked with the orange bar)
Examiner's comment
(a) This question attracted the greatest variety of responses in the paper which suggests that it is a familiar result. Methods were usually one of those listed in the mark scheme, with the fourth particularly popular among those looking for an “efficient” method. Weaker responses made claims about areas of sectors using 2 1 sin 2 r theta but could not justify why their integral might be with respect to theta , particularly when they had a constant centre of mass for each sector of 2 3 r . Several responses used the positive quadrant only and found the centre of mass of the quarter-circle but did not make any attempt to justify why this was also the centre of mass of a semicircle. Several otherwise strong responses omitted to reference d which was penalised via the final mark. The weaker responses simply quoted the formula for the centre of mass of a sector and did not make use of integration at all.
Key points from the mark scheme and examiner's report
strips: ½πr²d = ∫ from −r to r of ½y² dx (or ∫2xy dx) = 2r³/3
d = 4r/(3π)
sector or arc-element methods also fine
must refer to d
a quarter-circle alone needs justification
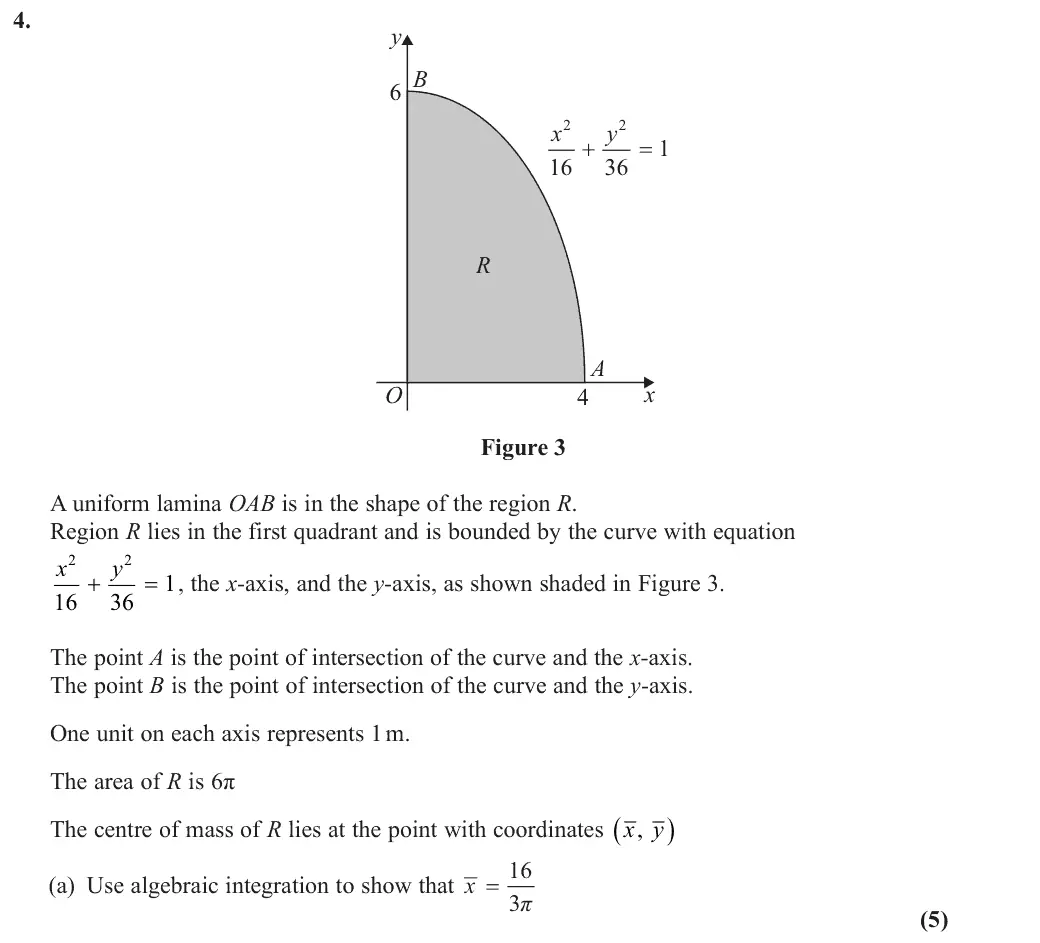
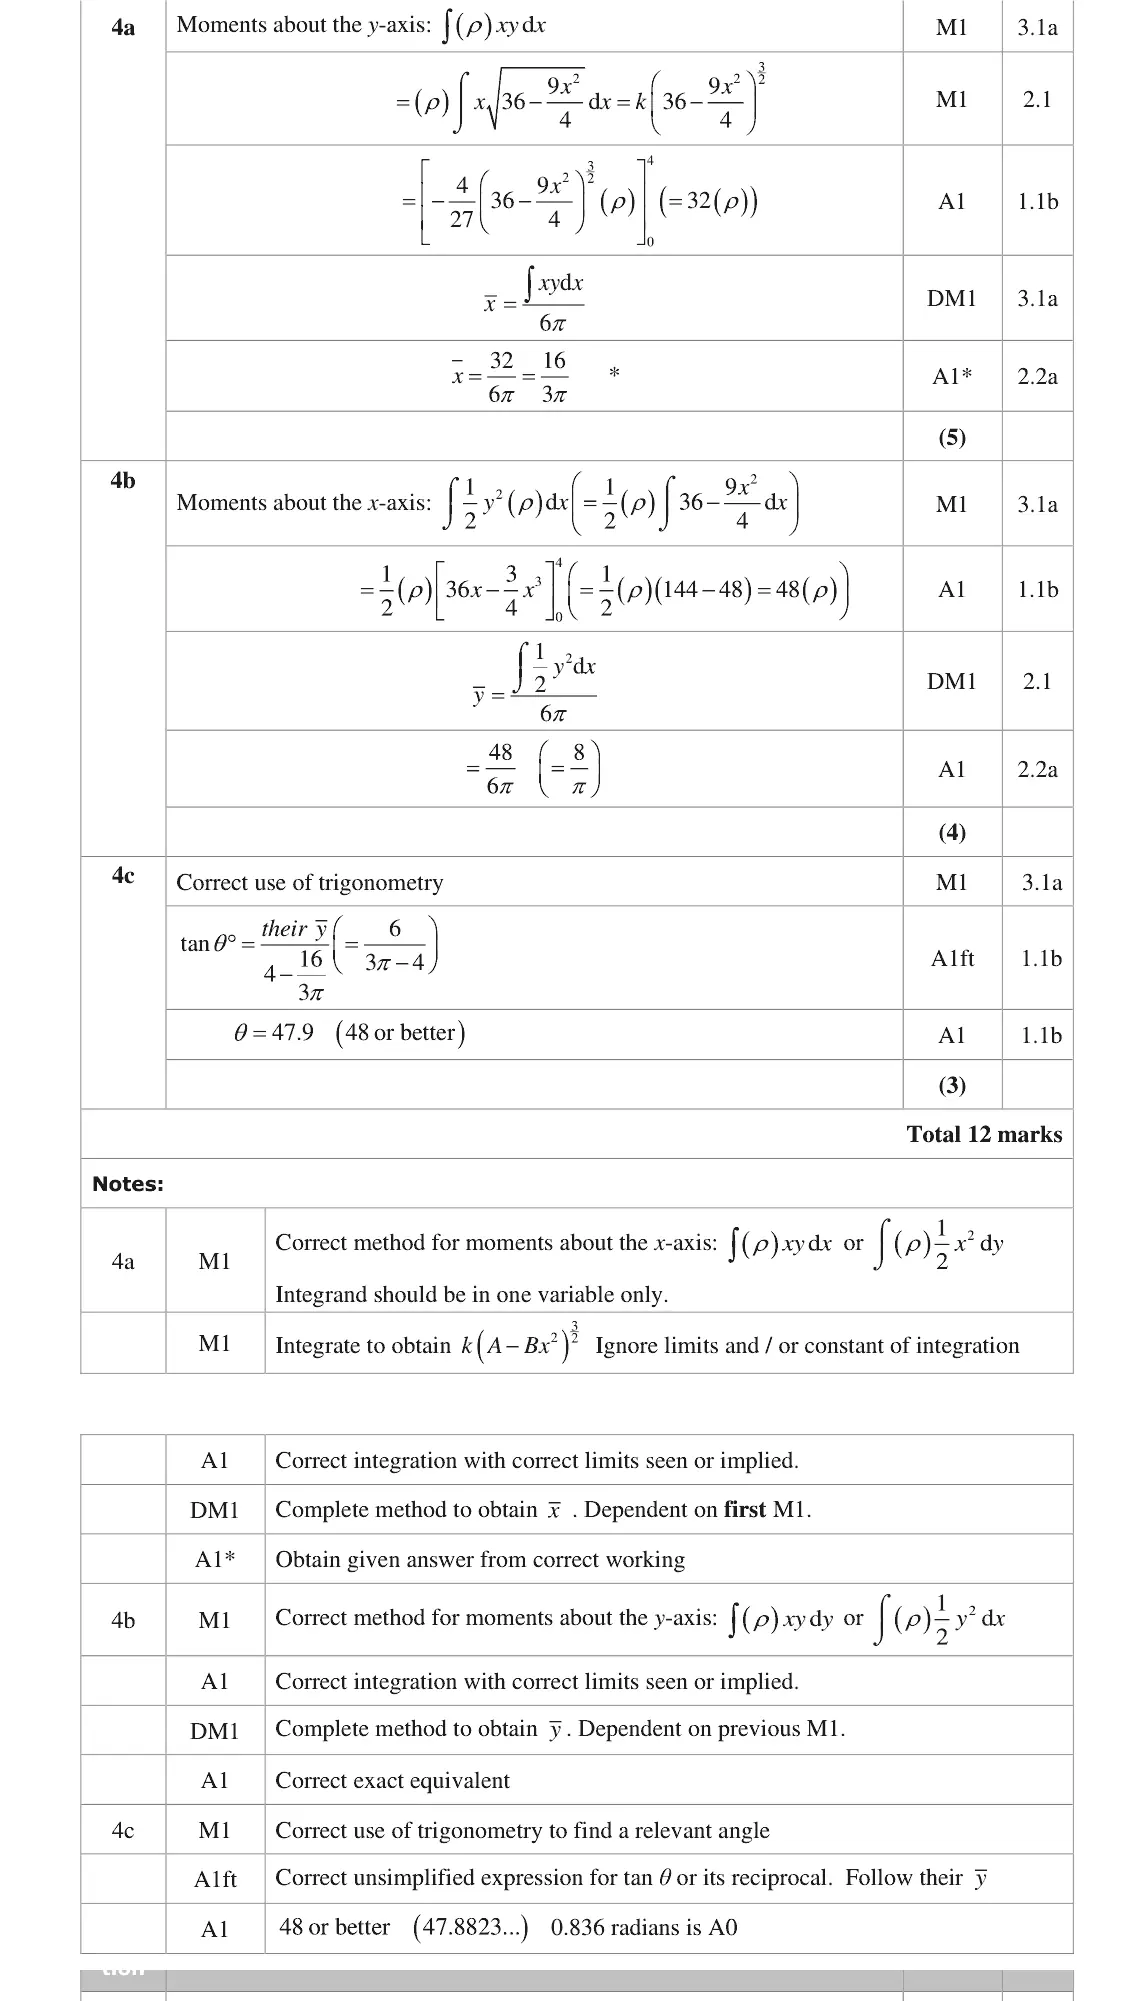
June 2024 · Paper 4C (Further Mechanics 2) · Q4(a)5 marks
Mark scheme (whole question; this part is marked with the orange bar)
Examiner's comment
(a) This question caused problems for many candidates. Most did know which integral was required and scored the first mark but the integration itself was poorly attempted by a large number, with integration by parts attempted by most of these. A few tried a trigonometric substitution, with a small number doing so successfully. Very strong candidates managed the integration “in their heads” or by recognizing the correct form of the integral and differentiating to find the required constant. A number successfully did a substitution 2 1 16 x u = - . Some abandoned their algebraic integration and used their calculator function, losing at least three of the five marks. The majority of those who achieved a value for the integral went on to find the correct value for x , helped by the printed result, but a number of these did not gain full marks. A small number used the wrong limits; a few tried to integrate 2 xy . A small number made the integration much easier by using 2 1 2 x dy and candidates should be encouraged to look at both possible ways to integrate.
Key points from the mark scheme and examiner's report
∫xy dx with y = √(36 − 9x²/4) from 0 to 4 = 32 by reverse chain rule or substitution (by parts usually failed)
divide by area 6π: x̄ = 16/(3π)
calculator integration loses marks
June 2024 · Paper 4C (Further Mechanics 2) · Q4(b)4 marks
Mark scheme (whole question; this part is marked with the orange bar)
Examiner's comment
(b) This part was much better attempted because candidates knew that they had to integrate 2 1 2 y . A few omitted the 1 2 and scored M0. A few had the limits incorrect. The majority of candidates achieved the correct result.
Key points from the mark scheme and examiner's report
½∫y² dx from 0 to 4 = 48 (½ often omitted)
ȳ = 48/(6π) = 8/π
June 2024 · Paper 4C (Further Mechanics 2) · Q4(c)3 marks
Mark scheme (whole question; this part is marked with the orange bar)
Examiner's comment
(c) Most who reached this part achieved the correct answer; some candidates did not get this far. The main errors from those who attempted it were in equating tan theta to y x or to 4 4 y x - -
Key points from the mark scheme and examiner's report
suspended from A: tan θ = ȳ/(4 − x̄) = 6/(3π − 4)
θ = 47.9
errors using ȳ/x̄
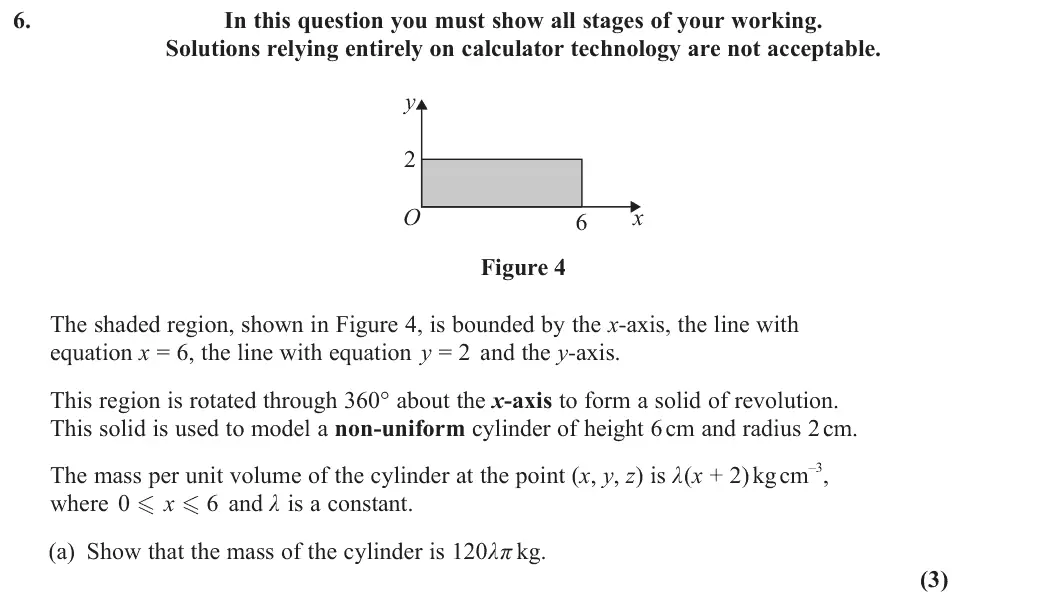
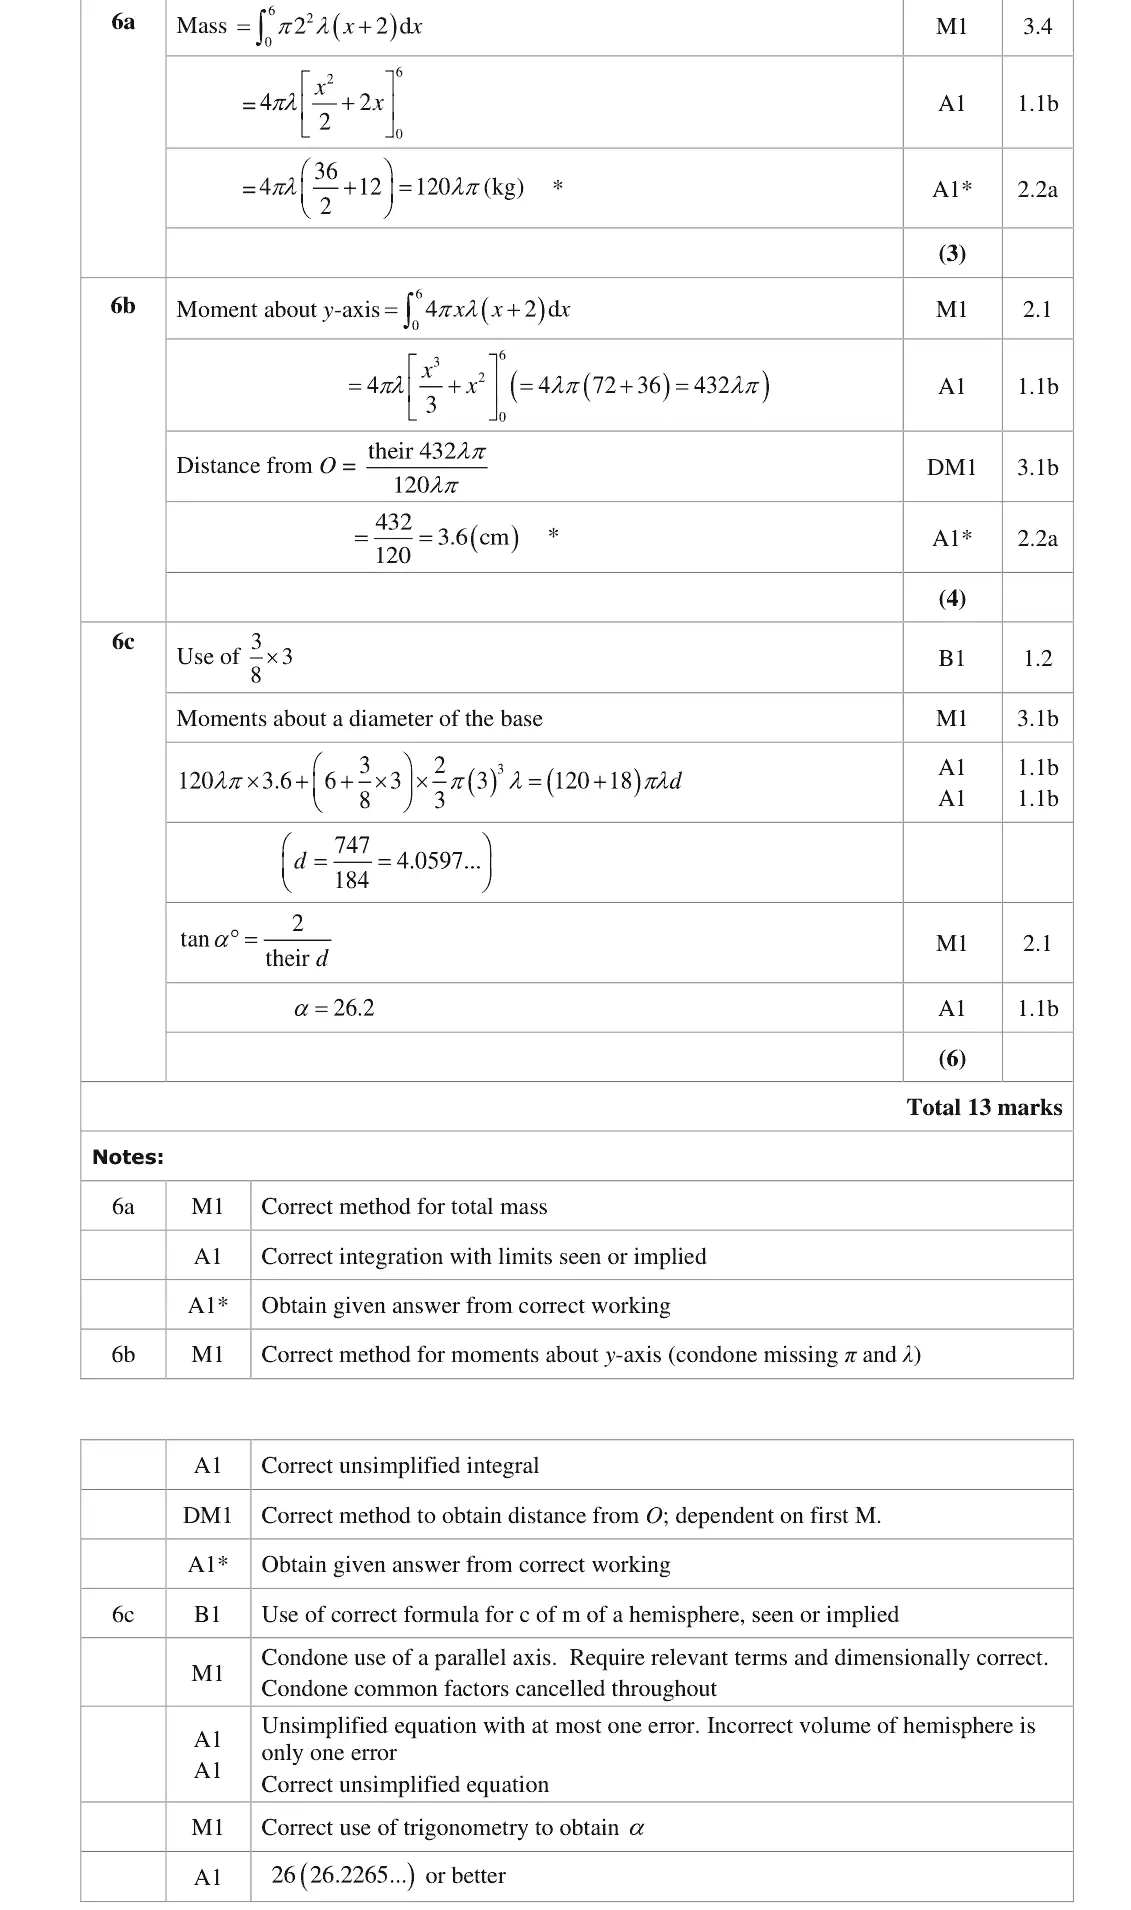
June 2024 · Paper 4C (Further Mechanics 2) · Q6(a)3 marks
Mark scheme (whole question; this part is marked with the orange bar)
Examiner's comment
(a) The majority of candidates knew the required integral and went on to score all three marks. A few neglected the y^2 (=2^2) and scored no marks. A small number of candidates attempted to do the problem without any understanding of the question, usually without any integration.
Key points from the mark scheme and examiner's report
mass ∫π(2²)λ(x + 2) dx from 0 to 6 = 120λπ
y² = 4 often omitted
June 2024 · Paper 4C (Further Mechanics 2) · Q6(b)4 marks
Mark scheme (whole question; this part is marked with the orange bar)
Examiner's comment
(b) Most attempts scored all marks here. The integration was much better understood as was the formula for the distance. A very small number took the distance from the base of the hemisphere and then did a subtraction, but not always correctly.
Key points from the mark scheme and examiner's report
moment ∫4πλx(x + 2) dx = 432λπ
divide by mass: 3.6 cm from O
June 2024 · Paper 4C (Further Mechanics 2) · Q6(c)6 marks
Mark scheme (whole question; this part is marked with the orange bar)
Examiner's comment
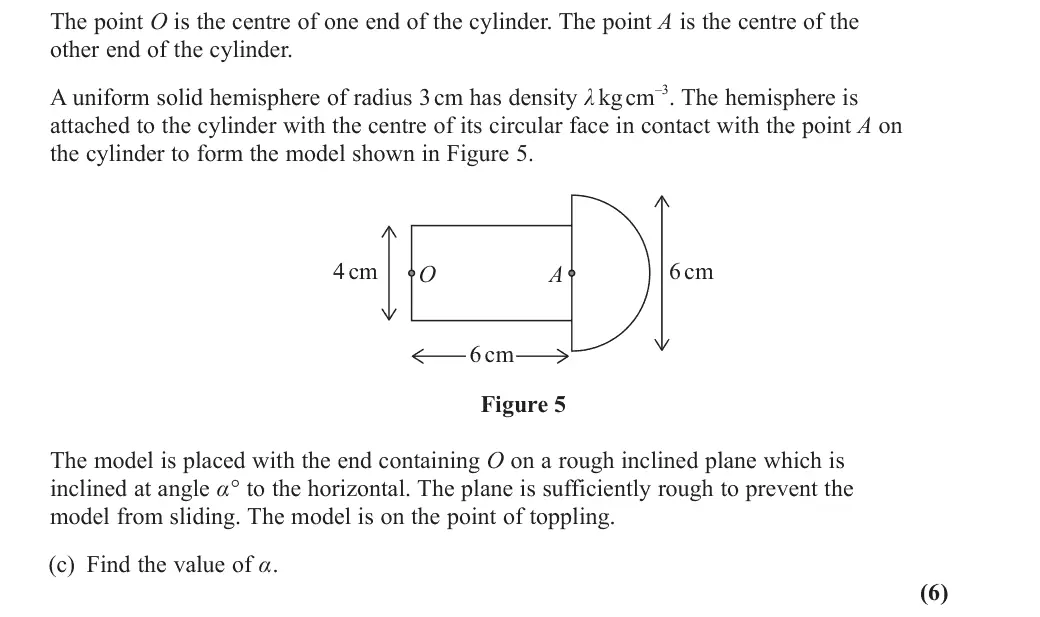
(c) Weak candidates did not know how to proceed here, although the majority knew that a moments approach was called for. Most of these correctly looked up the centre of mass for a hemisphere. The main errors were incorrectly using the volume of a sphere instead of a hemisphere and not adding the “6” to the distance of the hemisphere from the base. There were a lot of fully correct answers; many of those who lost the last two marks had 3 instead of 2 in the numerator for their tan alpha expression.
Key points from the mark scheme and examiner's report
hemisphere mass 18λπ (volume ⅔π3³), centre 6 + 9/8 from O
d = 747/184 ≈ 4.06
toppling about the base edge: tan α = 2/d (radius 2, not 3), α = 26.2
June 2023 · Paper 4C (Further Mechanics 2) · Q5(a)4 marks
Mark scheme (whole question; this part is marked with the orange bar)
Examiner's comment
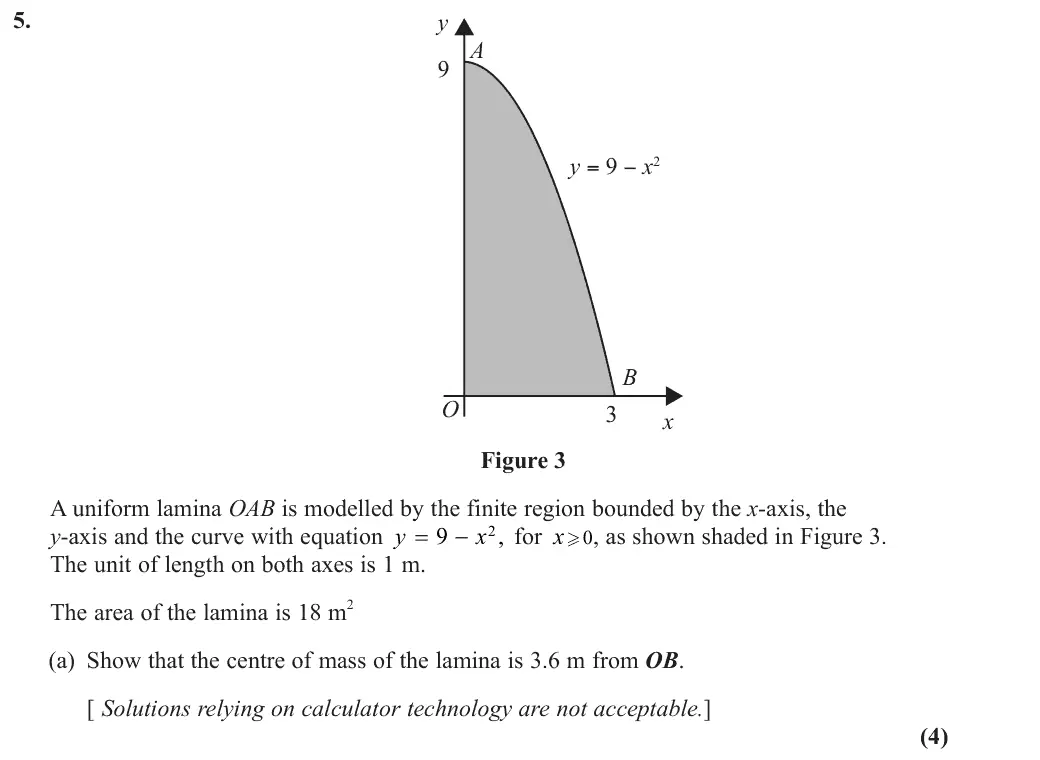
(a) The majority of candidates identified an appropriate integral and obtained the given result correctly. Most used 2 1 d 2y x , but a few preferred d . xy y Only a minority of candidates found the distance from OA rather than from OB. Despite the warning in the question, there were candidates who went directly from stating the integral to writing down the given answer: this scored only one mark. Several candidates spent time checking that the given area of the lamina was correct.
Key points from the mark scheme and examiner's report
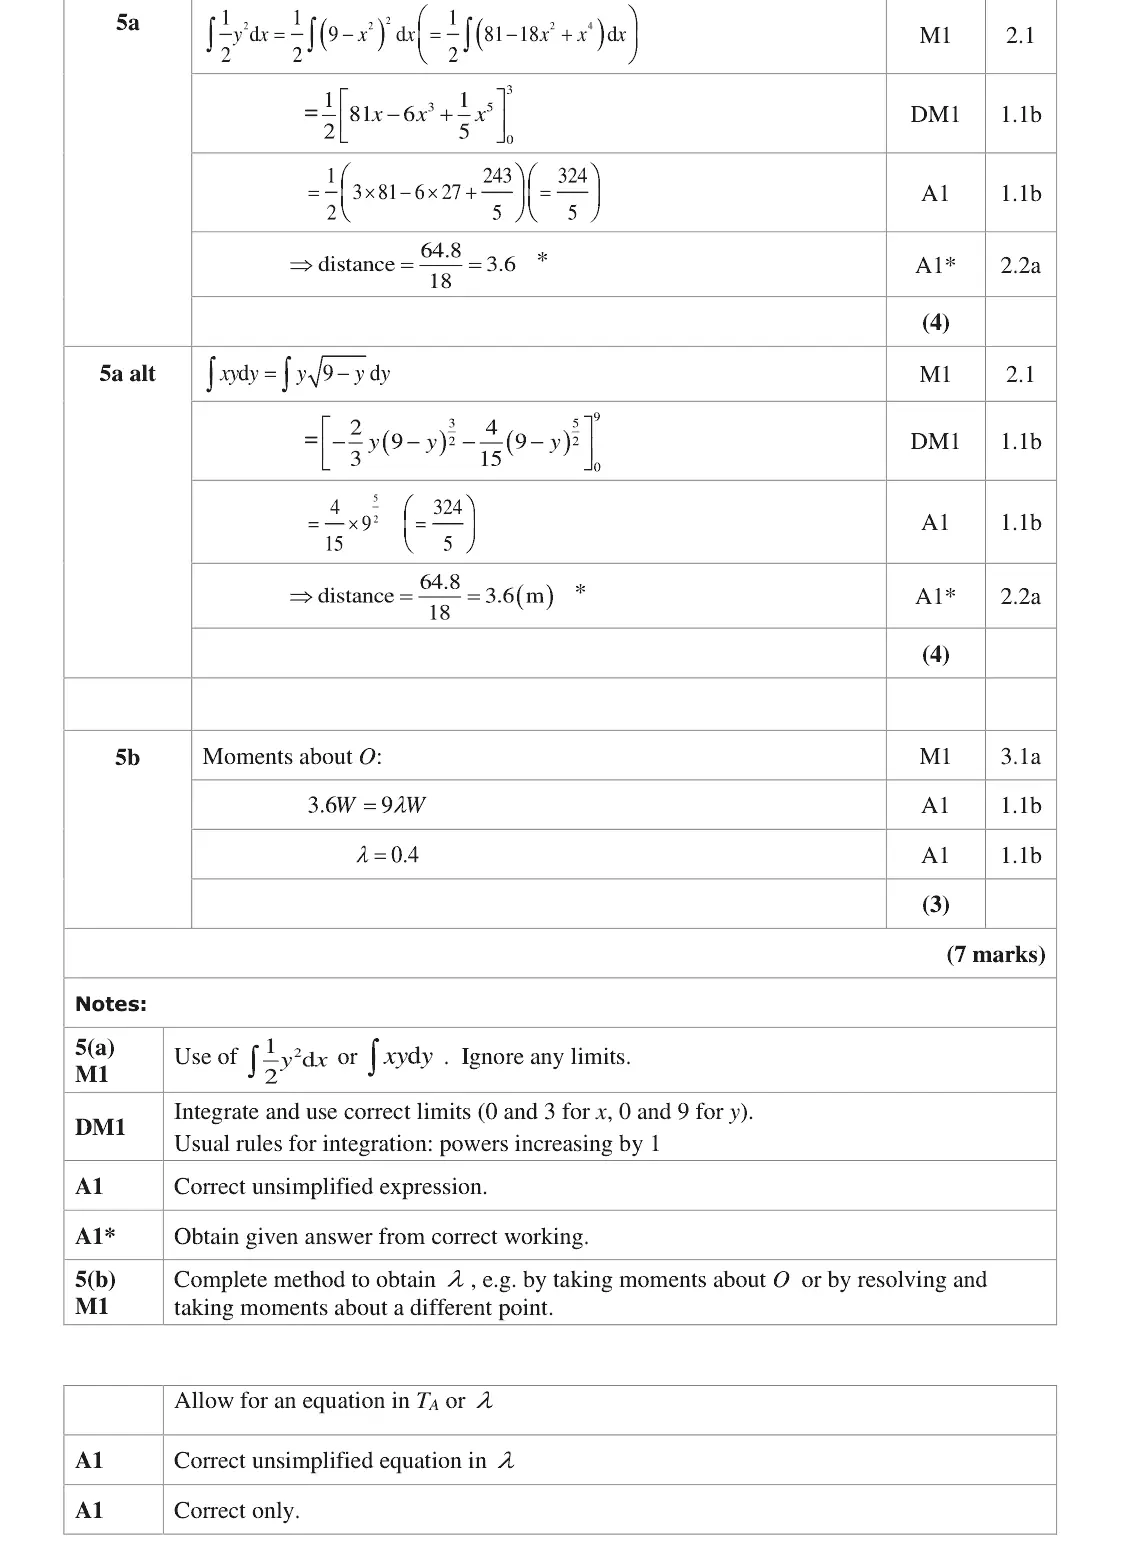
moments ½∫y² dx from 0 to 3 (or ∫xy dy) = 324/5
divide by area 18: 3.6 m from OB
integral then answer scores only one mark
June 2023 · Paper 4C (Further Mechanics 2) · Q5(b)3 marks
Mark scheme (whole question; this part is marked with the orange bar)
Examiner's comment
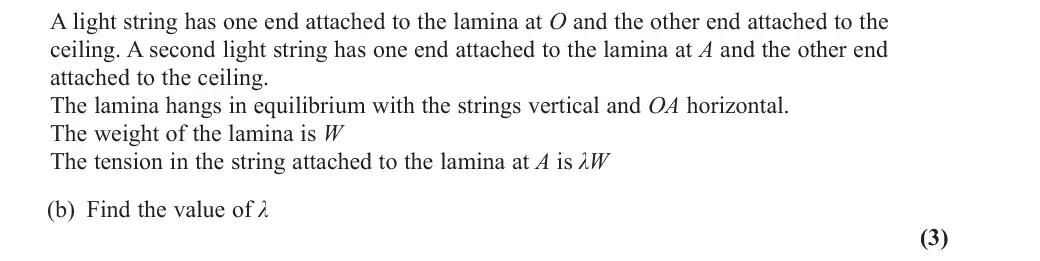
(b) This part of the question used the given result from part (a), so several candidates answered this correctly without completing part (a). Most candidates took moments about O, but some resolved vertically and took moments about a different point. Most errors involved the use of incorrect distances.
Key points from the mark scheme and examiner's report
OA horizontal so the weight acts 3.6 m from O along OA
moments about O: 3.6W = 9λW, λ = 0.4
errors from wrong distances
June 2023 · Paper 4C (Further Mechanics 2) · Q7(a)6 marks
Mark scheme (whole question; this part is marked with the orange bar)
Examiner's comment
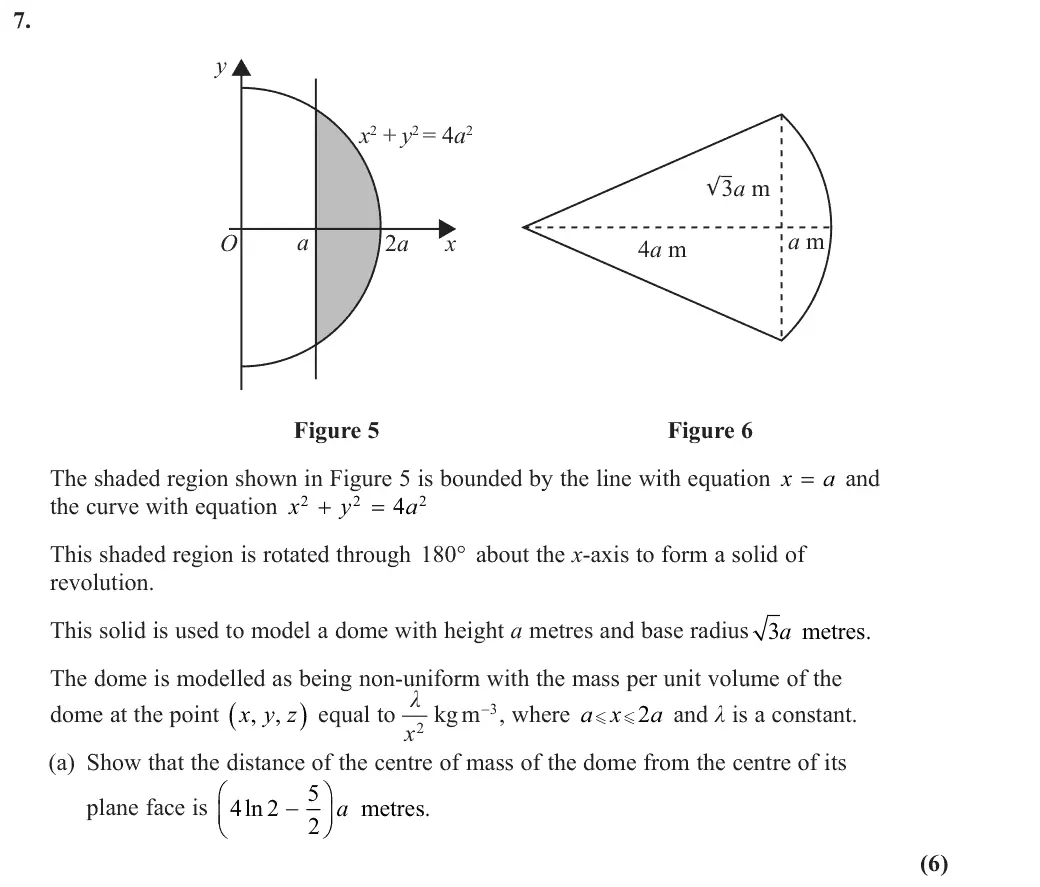
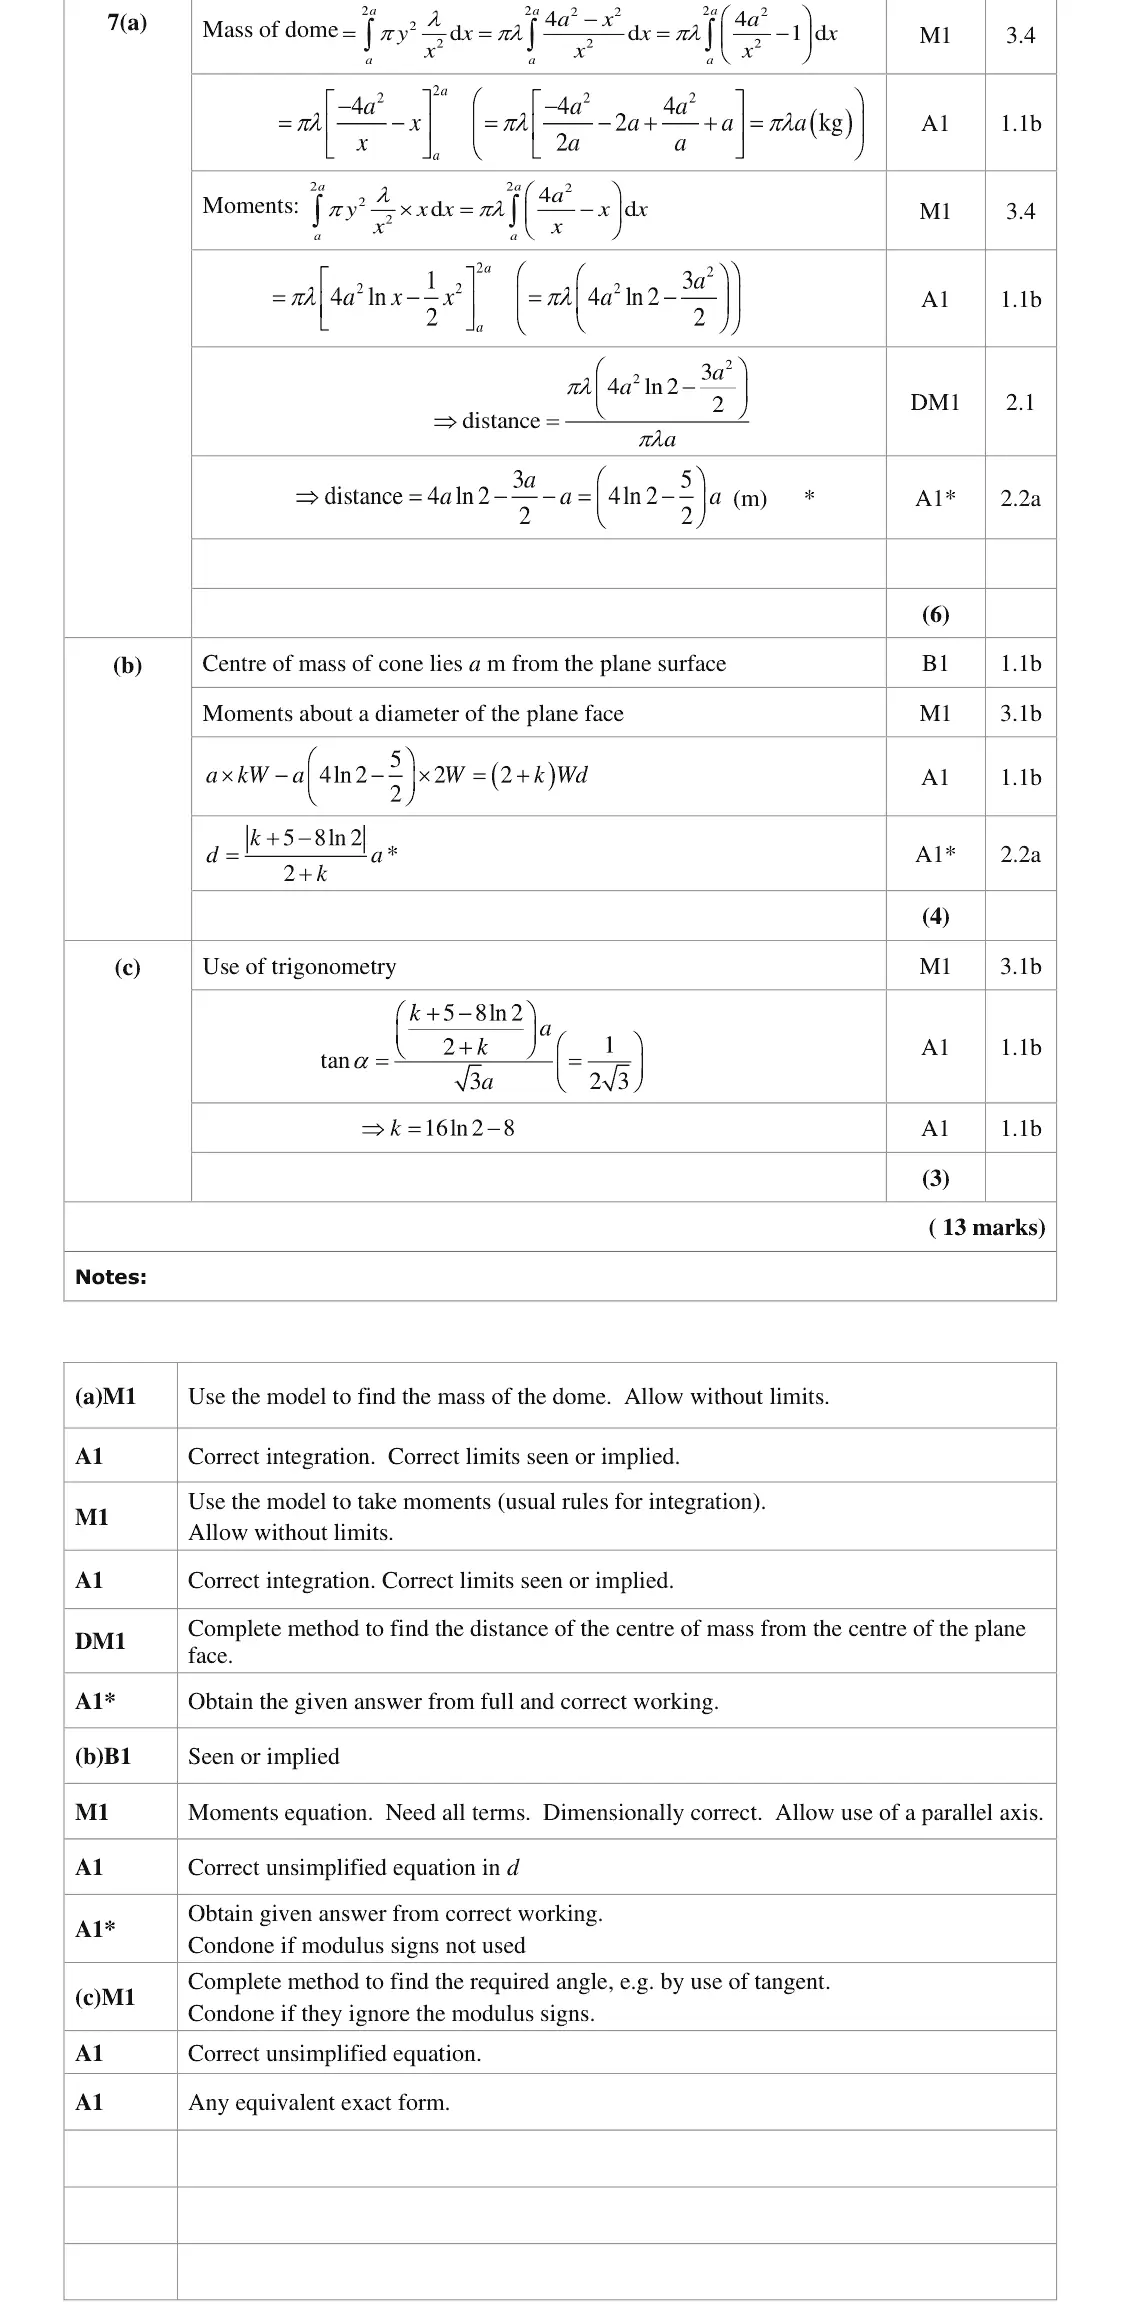
(a) A minority of candidates did not appear to know how to use the information about the variable density of the dome. However, the majority processed this correctly. Several candidates who had correct integrals for the mass and for the moments then tried to manipulate their working to reach the given answer because they did not realise that the distance that they had found was the distance from O and not the required distance - they needed to subtract a to obtain the given answer.
Key points from the mark scheme and examiner's report
mass ∫πy²(λ/x²) dx from a to 2a = πλa
moment πλ(4a²ln 2 − 3a²/2)
this distance is from O, so subtract a for the given answer
June 2023 · Paper 4C (Further Mechanics 2) · Q7(b)4 marks
Mark scheme (whole question; this part is marked with the orange bar)
Examiner's comment
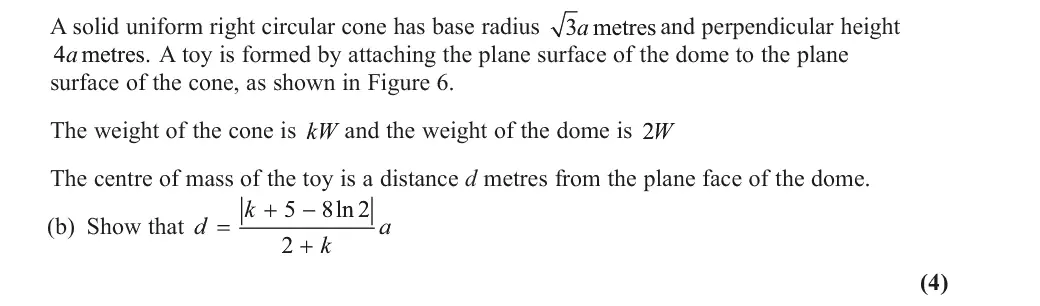
(b) Some candidates did not attempt this part of the question, and others attempted to integrate again unnecessarily. Most used the result from (a) and the correct distance for the centre of mass of the solid cone in a moments equation about the diameter of the common plane surfaces, and obtained the result required. Very few candidates explained the significance of the modulus in their working.
Key points from the mark scheme and examiner's report
cone centre of mass a from its plane face (quarter of height)
moments about the common diameter: akW − a(4ln 2 − 5/2)2W = (2 + k)Wd
the modulus allows either side
no need to integrate again
June 2023 · Paper 4C (Further Mechanics 2) · Q7(c)3 marks
Mark scheme (whole question; this part is marked with the orange bar)
Examiner's comment
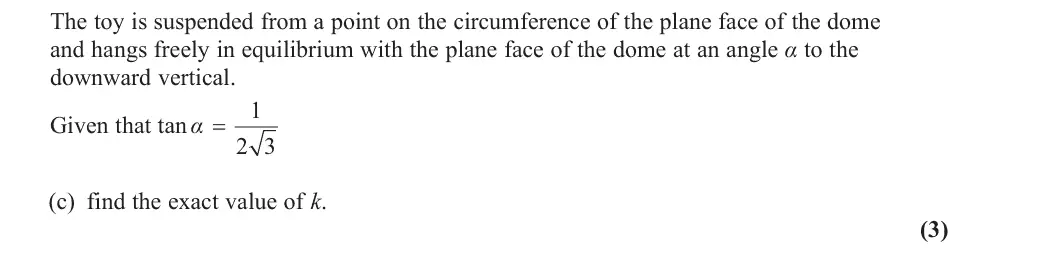
(c) The majority of the candidates identified the correct angle and formed a correct equation in k. A minority considered the two options for the modulus term and went on to verify that only one solution was valid.
Key points from the mark scheme and examiner's report
suspended from the rim: tan α = d/(√3a) = 1/(2√3)
k = 16ln 2 − 8 exact
check which sign of the modulus gives a valid k
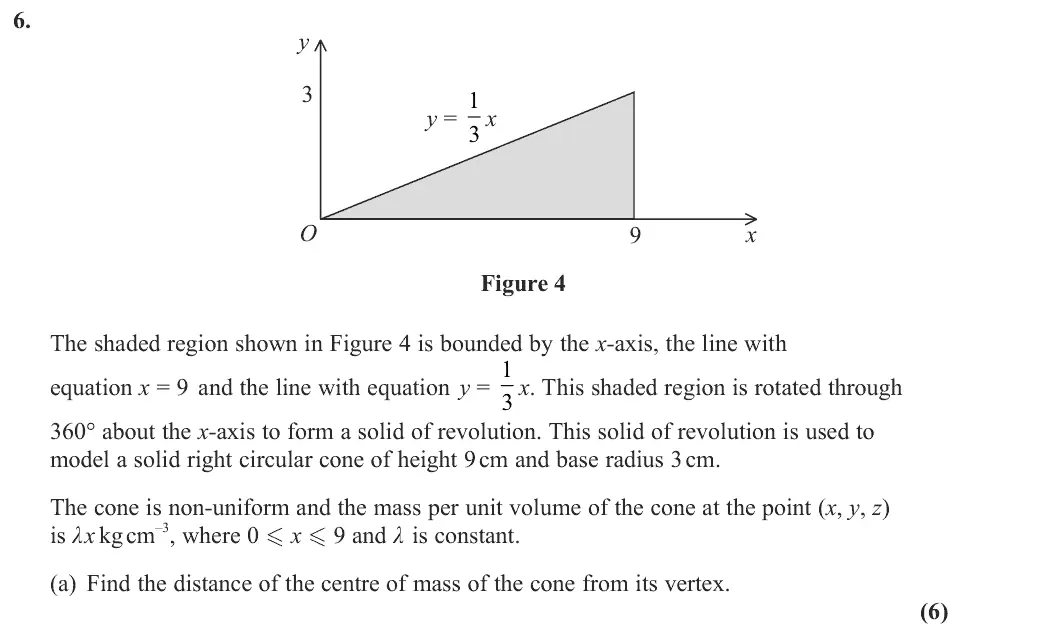
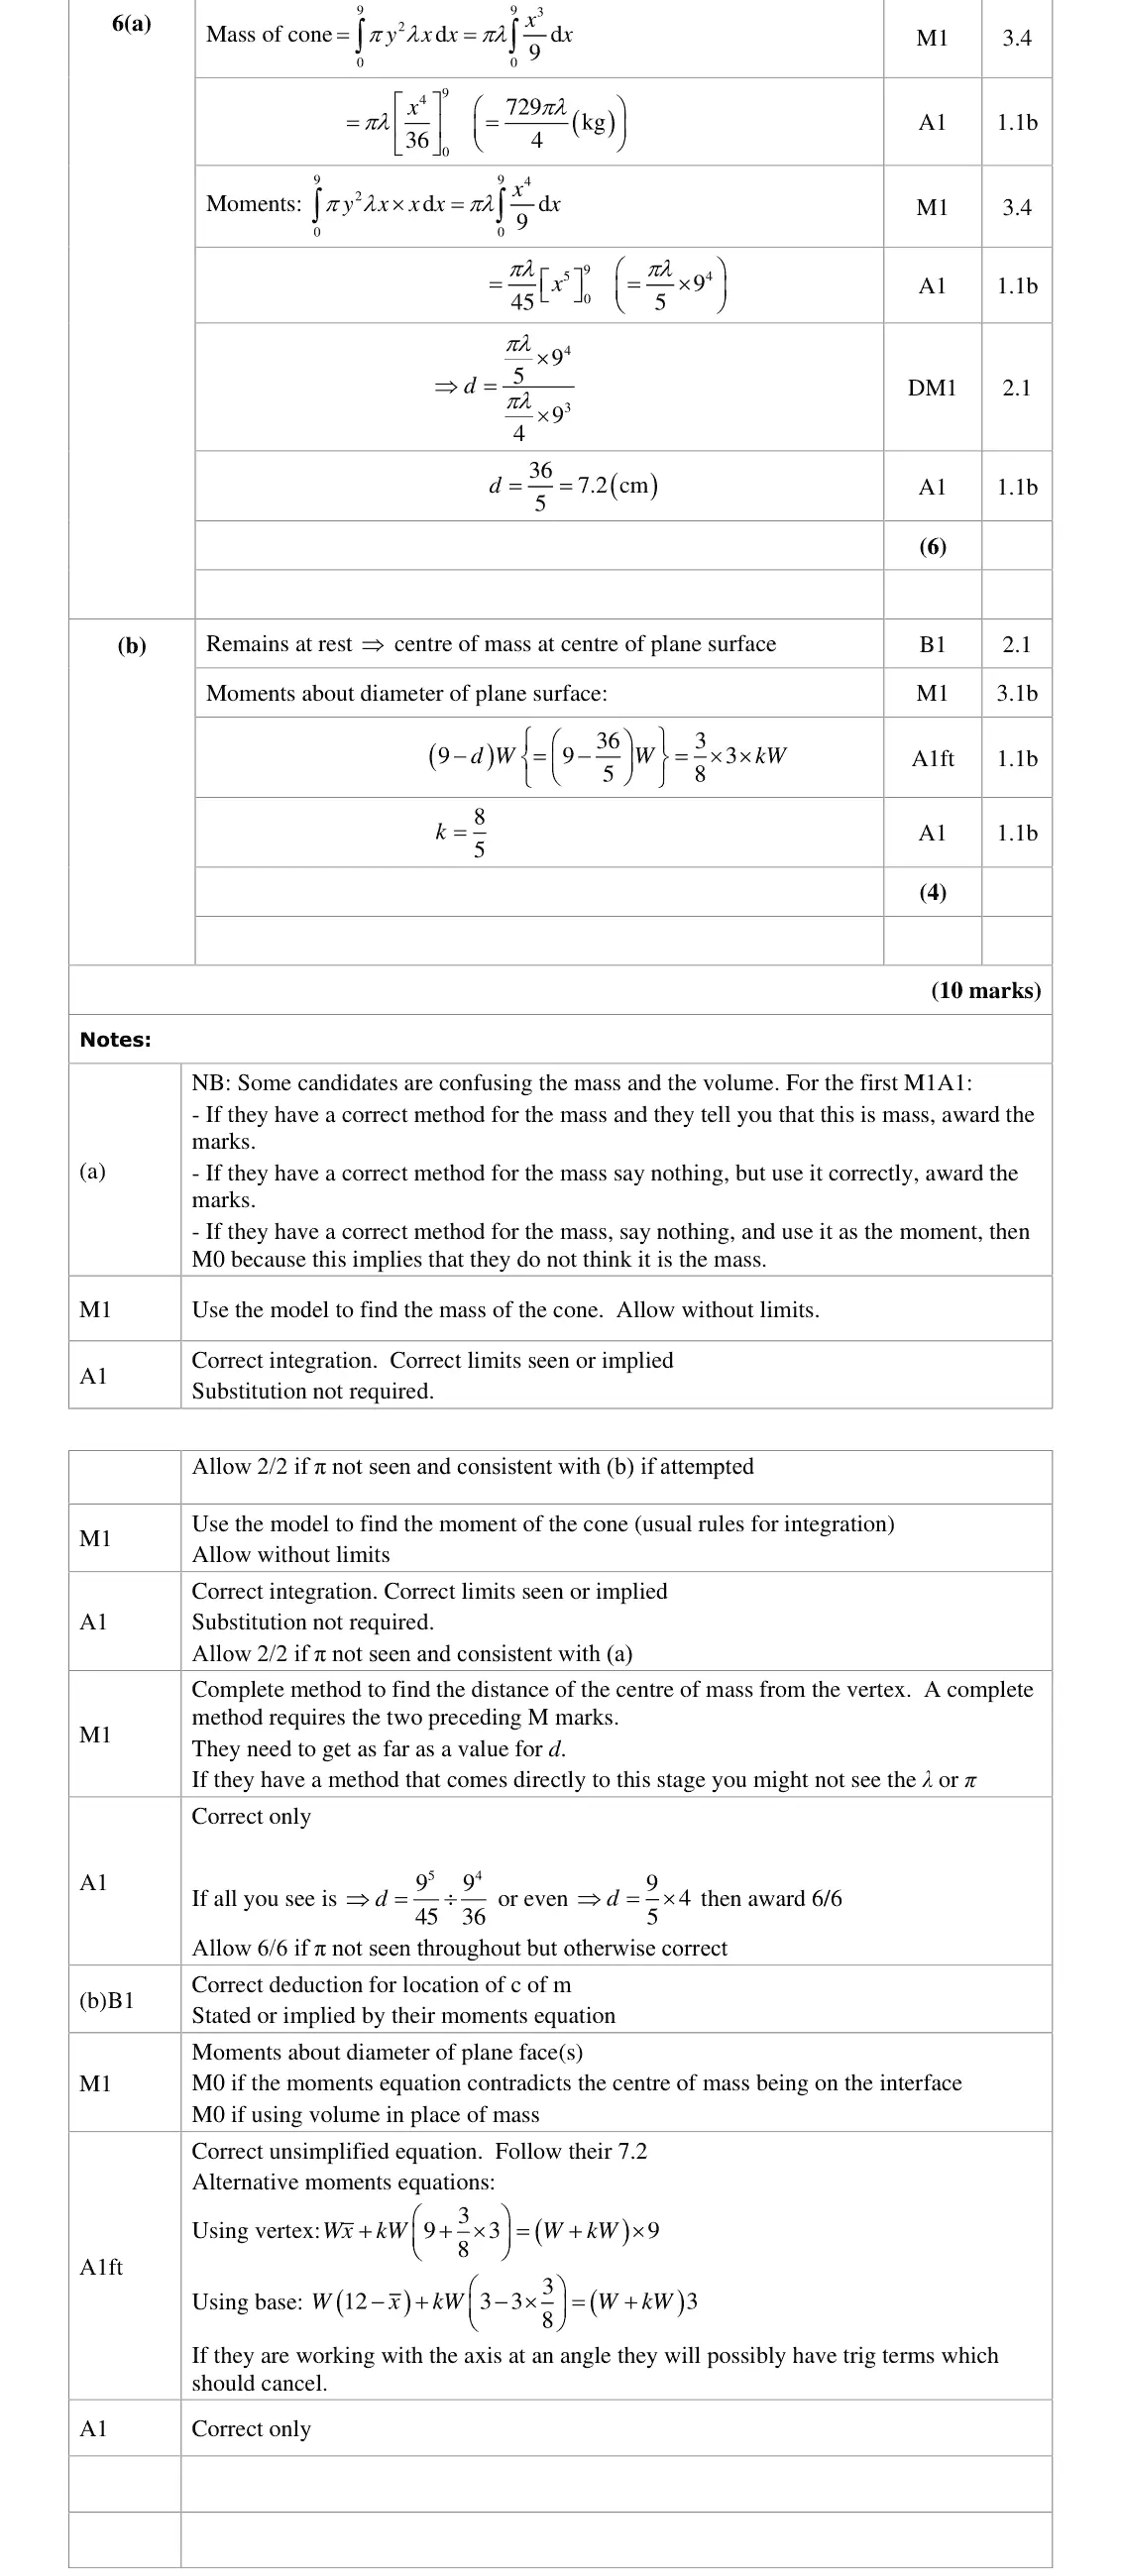
June 2022 · Paper 4C (Further Mechanics 2) · Q6(a)6 marks
Mark scheme (whole question; this part is marked with the orange bar)
Examiner's comment
(a) Those candidates who made correct use of the information about the density of the cone and waited until the final step to simplify their answers usually produced concise and accurate solutions. A large number of candidates did not deal with the density correctly. Many of them simply ignored it and set about finding the position of the centre of mass of a uniform cone. In contrast, there were a significant number of candidates deducing the expressions for the relevant integrals from first principles, which was nice to see though it was not a requirement of the question.
Key points from the mark scheme and examiner's report
non-uniform: mass = ∫πy²λx dx = 729πλ/4, moment ∫πy²λx² dx
d = 7.2 cm from vertex
many ignored the variable density and used the uniform-cone result
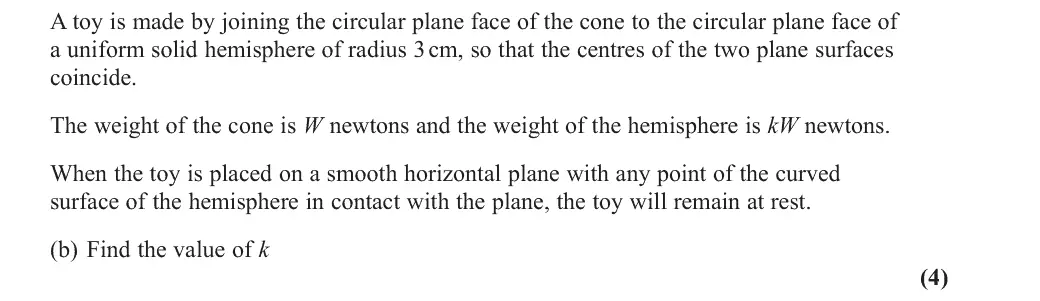
June 2022 · Paper 4C (Further Mechanics 2) · Q6(b)4 marks
Mark scheme (whole question; this part is marked with the orange bar)
Examiner's comment
(b) Many candidates deduced the correct location of the centre of mass of the toy and were able to form a correct moments equation. The most common error was to confuse distances, with a significant number of candidates continuing to use the distance of the centre of mass of the cone from its vertex when they needed to be using the distance from the centre of the plane face. Some candidates used the volumes of the cone and hemisphere rather than the weight ratio given in the question.
Key points from the mark scheme and examiner's report
rests at any point on the hemisphere so the centre of mass is at the centre of the common plane face
(9 − 7.2)W = (3/8)(3)kW, k = 8/5
errors using the distance from the vertex or volumes instead of the given weights
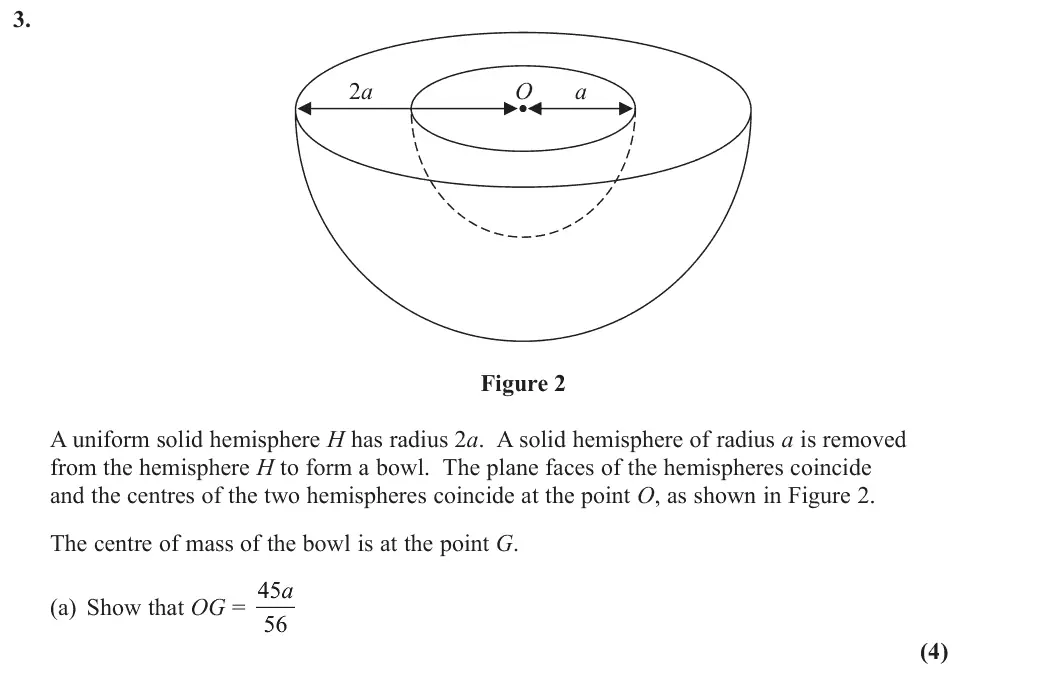
Nov 2021 · Paper 4C (Further Mechanics 2) · Q3(a)4 marks
Mark scheme (whole question; this part is marked with the orange bar)
Key points from the mark scheme and examiner's report
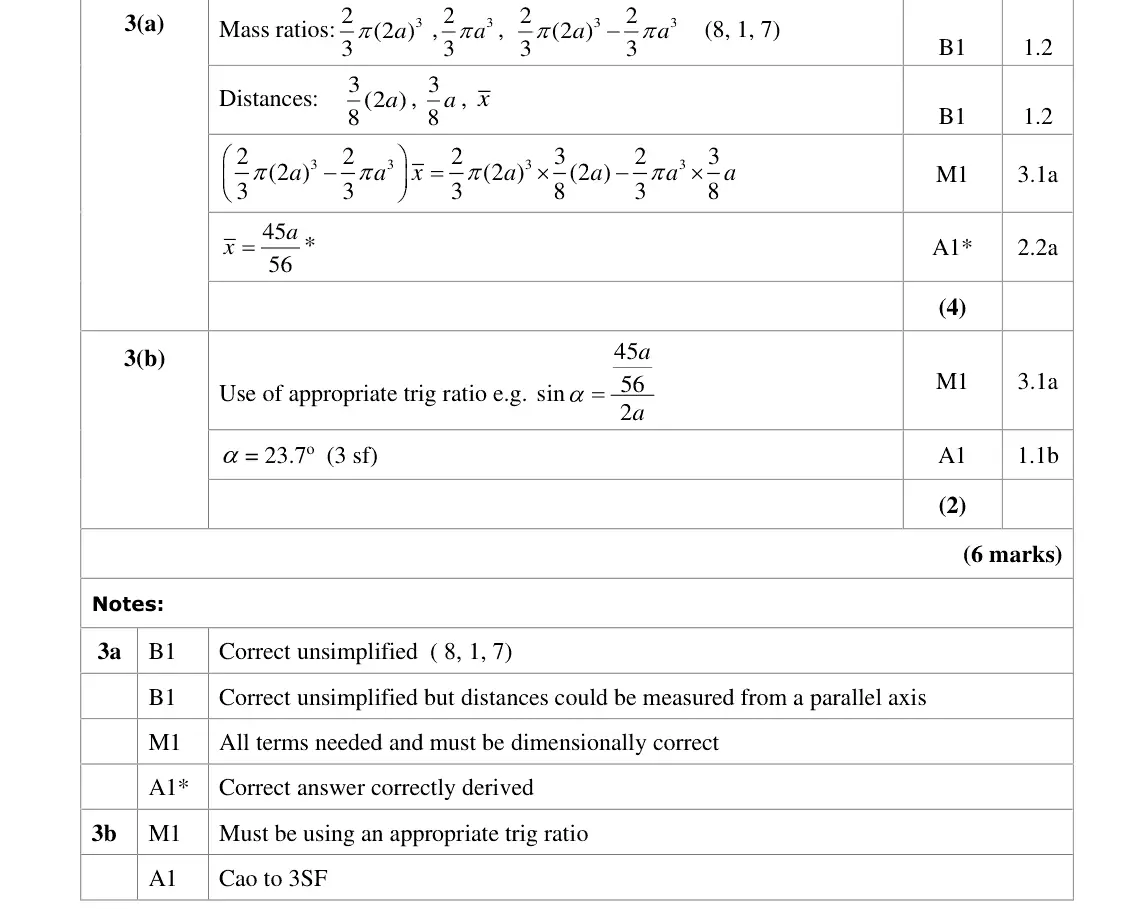
mass ratios 8 : 1 : 7
hemisphere centres 3(2a)/8 and 3a/8 from O
subtract: OG = 45a/56
Nov 2021 · Paper 4C (Further Mechanics 2) · Q3(b)2 marks
Mark scheme (whole question; this part is marked with the orange bar)
Key points from the mark scheme and examiner's report
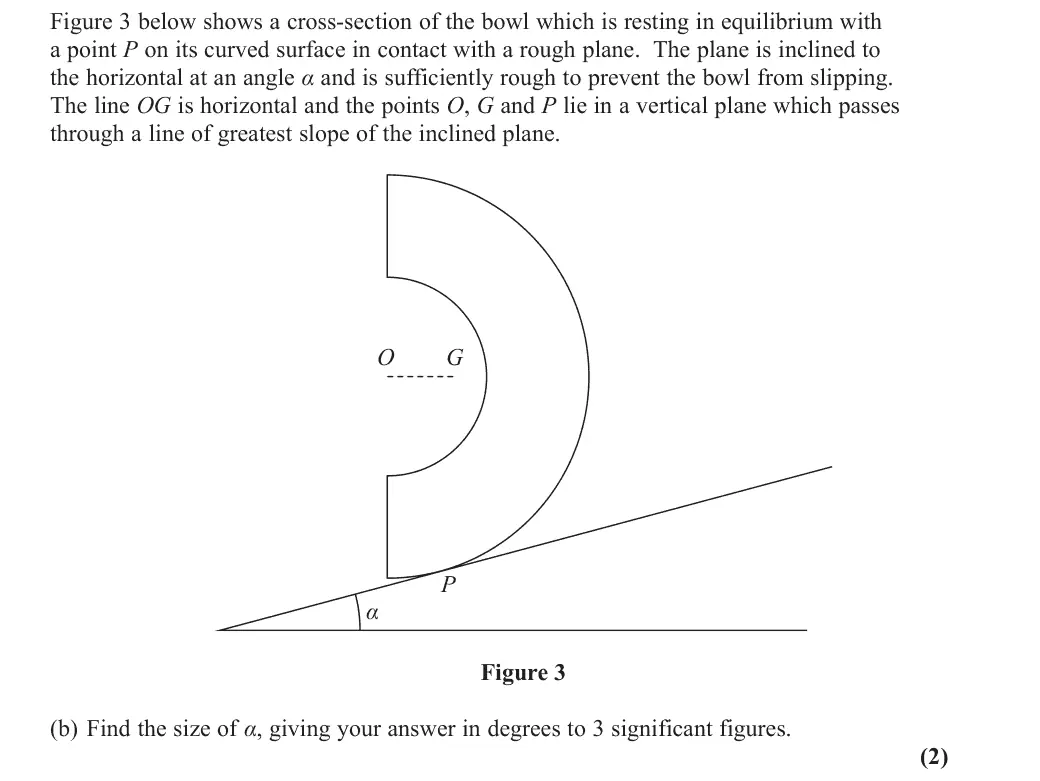
G lies vertically above P, and OP is a radius normal to the plane, so sin α = OG/2a = 45/112
α = 23.7°
Nov 2021 · Paper 4C (Further Mechanics 2) · Q7(a)5 marks
Mark scheme (whole question; this part is marked with the orange bar)
Key points from the mark scheme and examiner's report
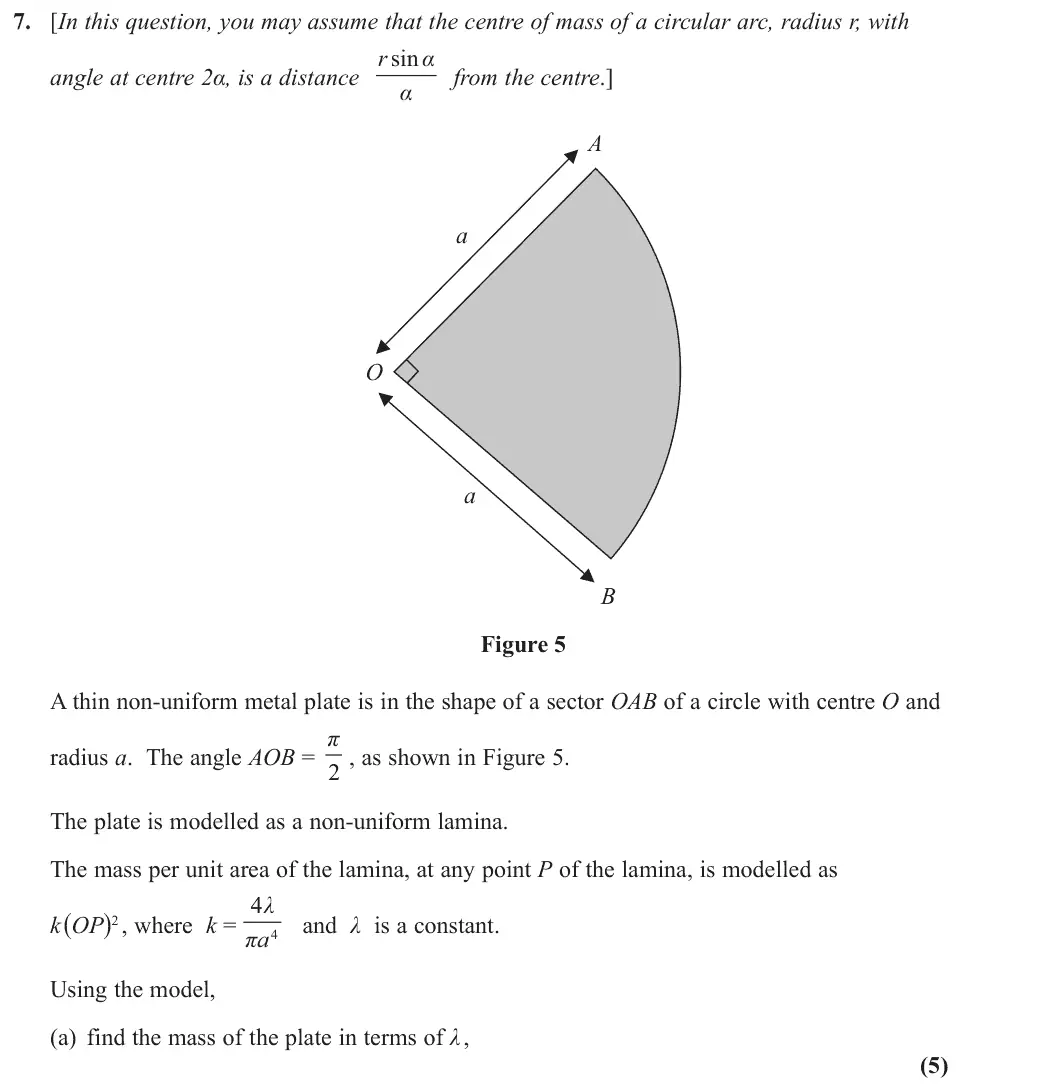
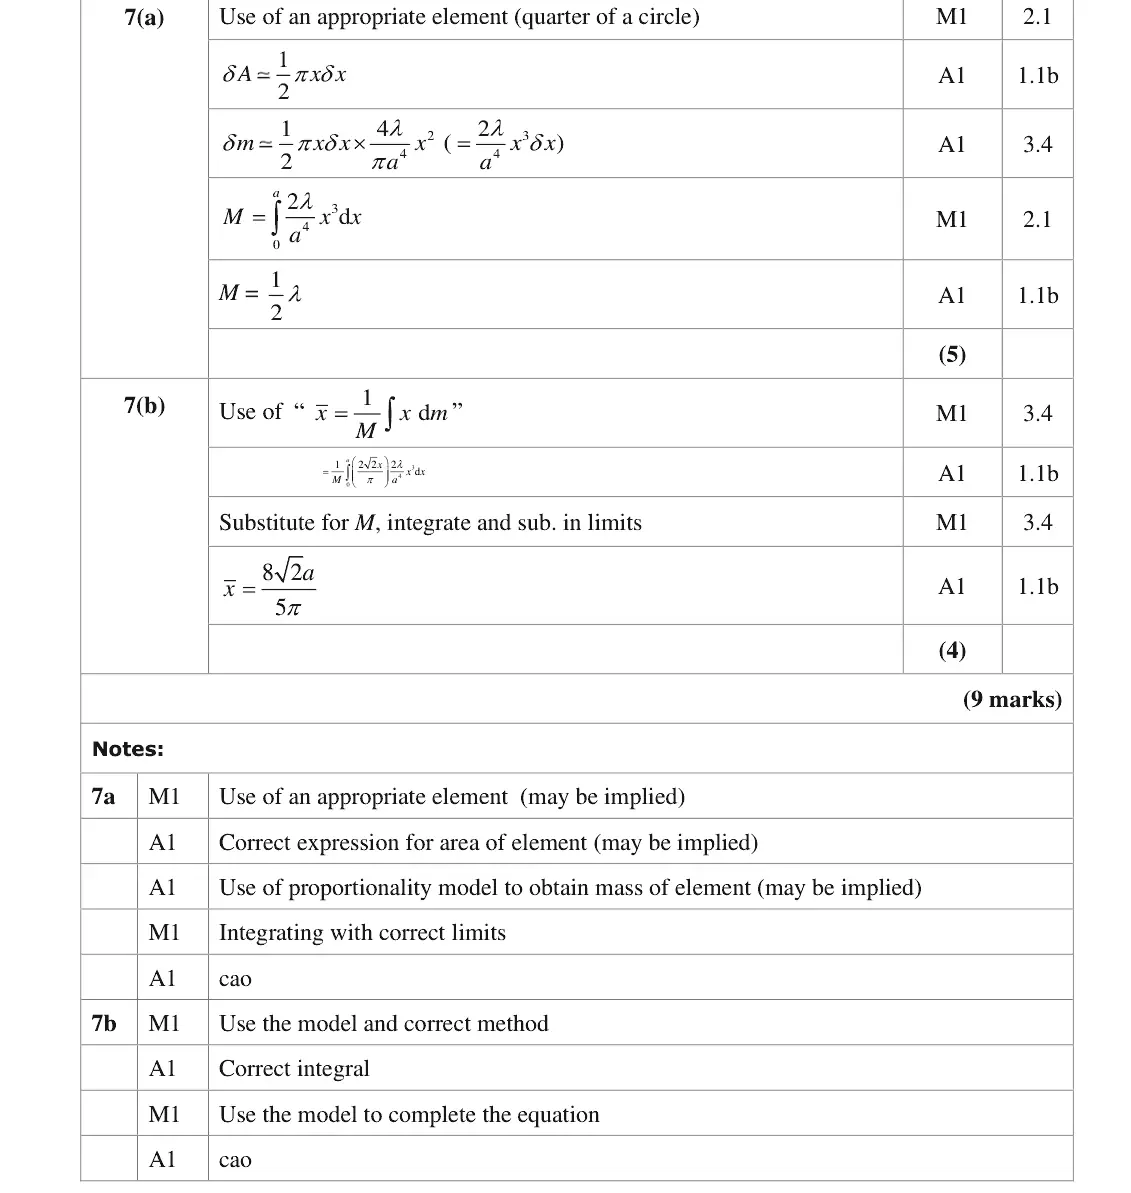
element is a quarter-circle arc of width δx: δA = ½πx δx, δm = (2λ/a⁴)x³ δx
M = ∫ from 0 to a = λ/2
Nov 2021 · Paper 4C (Further Mechanics 2) · Q7(b)4 marks
Mark scheme (whole question; this part is marked with the orange bar)
Key points from the mark scheme and examiner's report
each arc element has centre of mass (x sin(π/4))/(π/4) = 2√2x/π from O
x̄ = (1/M)∫(2√2x/π)(2λ/a⁴)x³ dx = 8√2a/(5π)
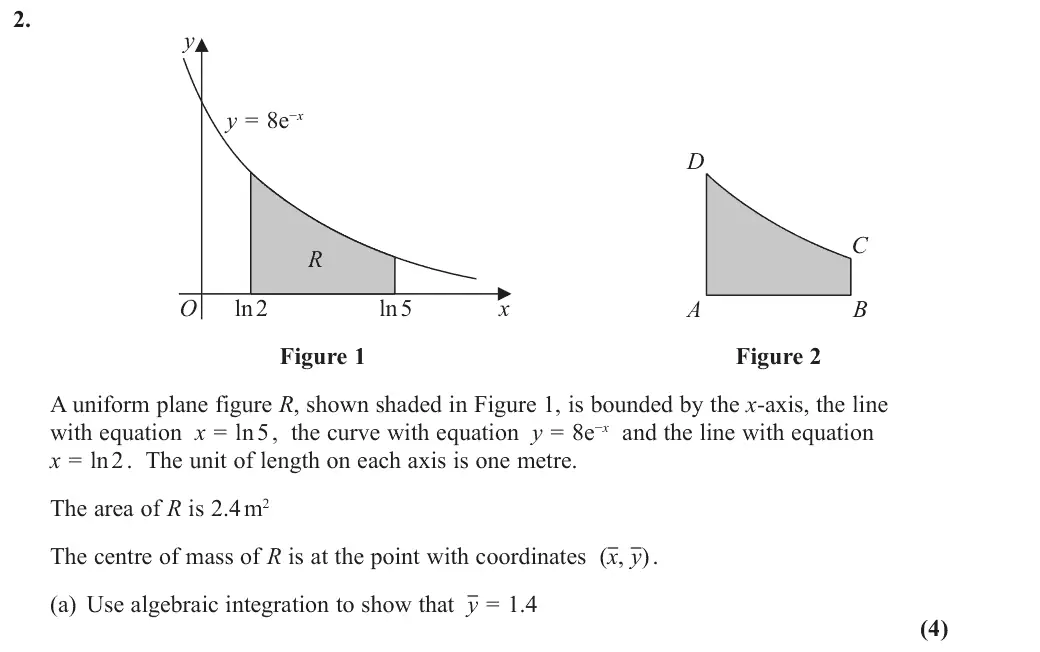
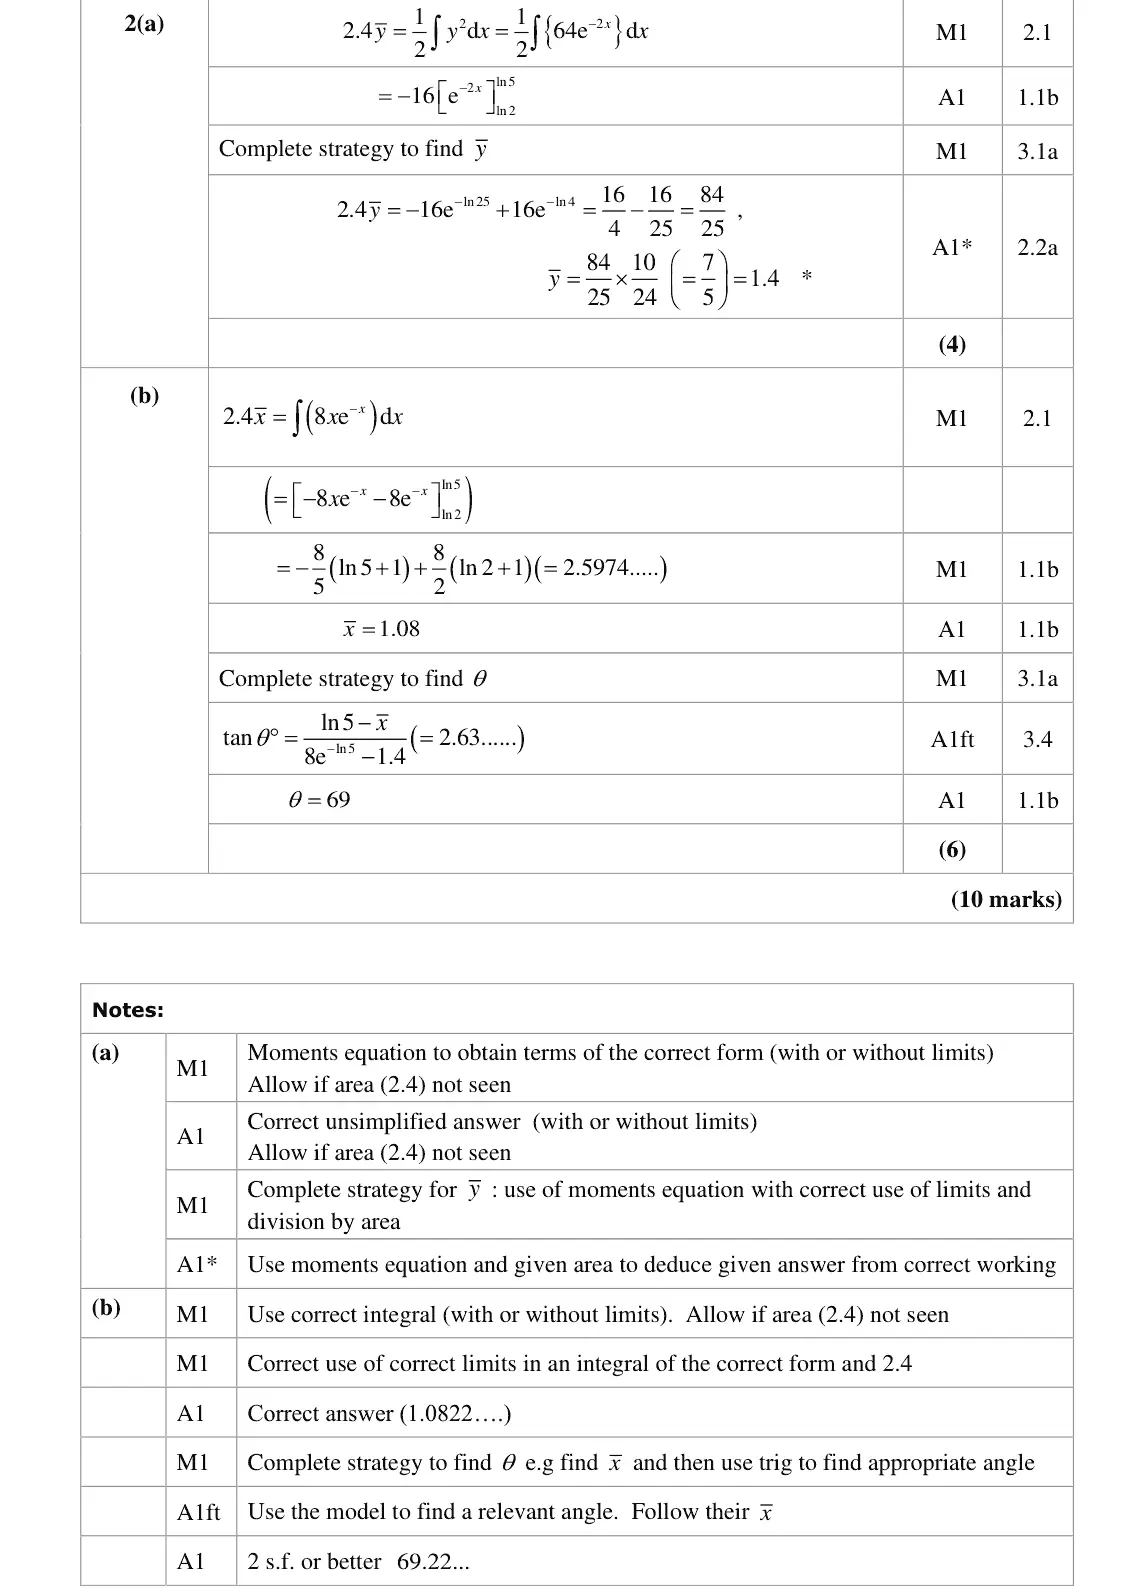
Oct 2020 · Paper 4C (Further Mechanics 2) · Q2(a)4 marks
Mark scheme (whole question; this part is marked with the orange bar)
Key points from the mark scheme and examiner's report
2.4ȳ = ½∫64e^(−2x) dx from ln 2 to ln 5 = 84/25
exact use of e^(−ln 25) = 1/25 needed for the given answer 1.4
Oct 2020 · Paper 4C (Further Mechanics 2) · Q2(b)6 marks
Mark scheme (whole question; this part is marked with the orange bar)
Key points from the mark scheme and examiner's report
2.4x̄ = ∫8xe^(−x) dx by parts, x̄ = 1.08
tan θ = (ln 5 − x̄)/(8e^(−ln 5) − 1.4) measured from C, θ = 69
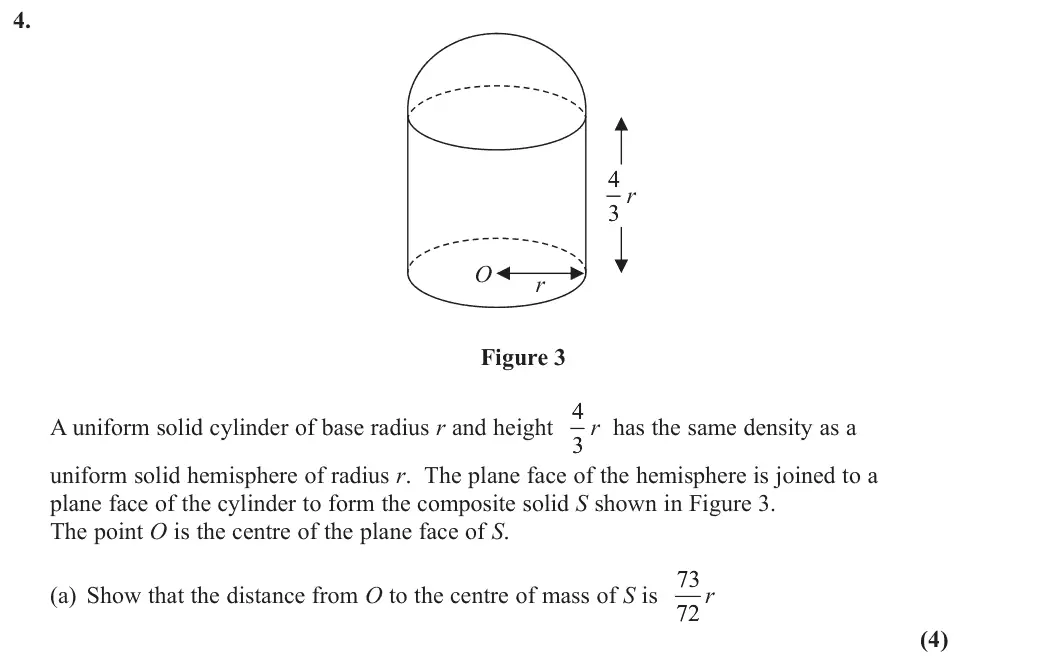
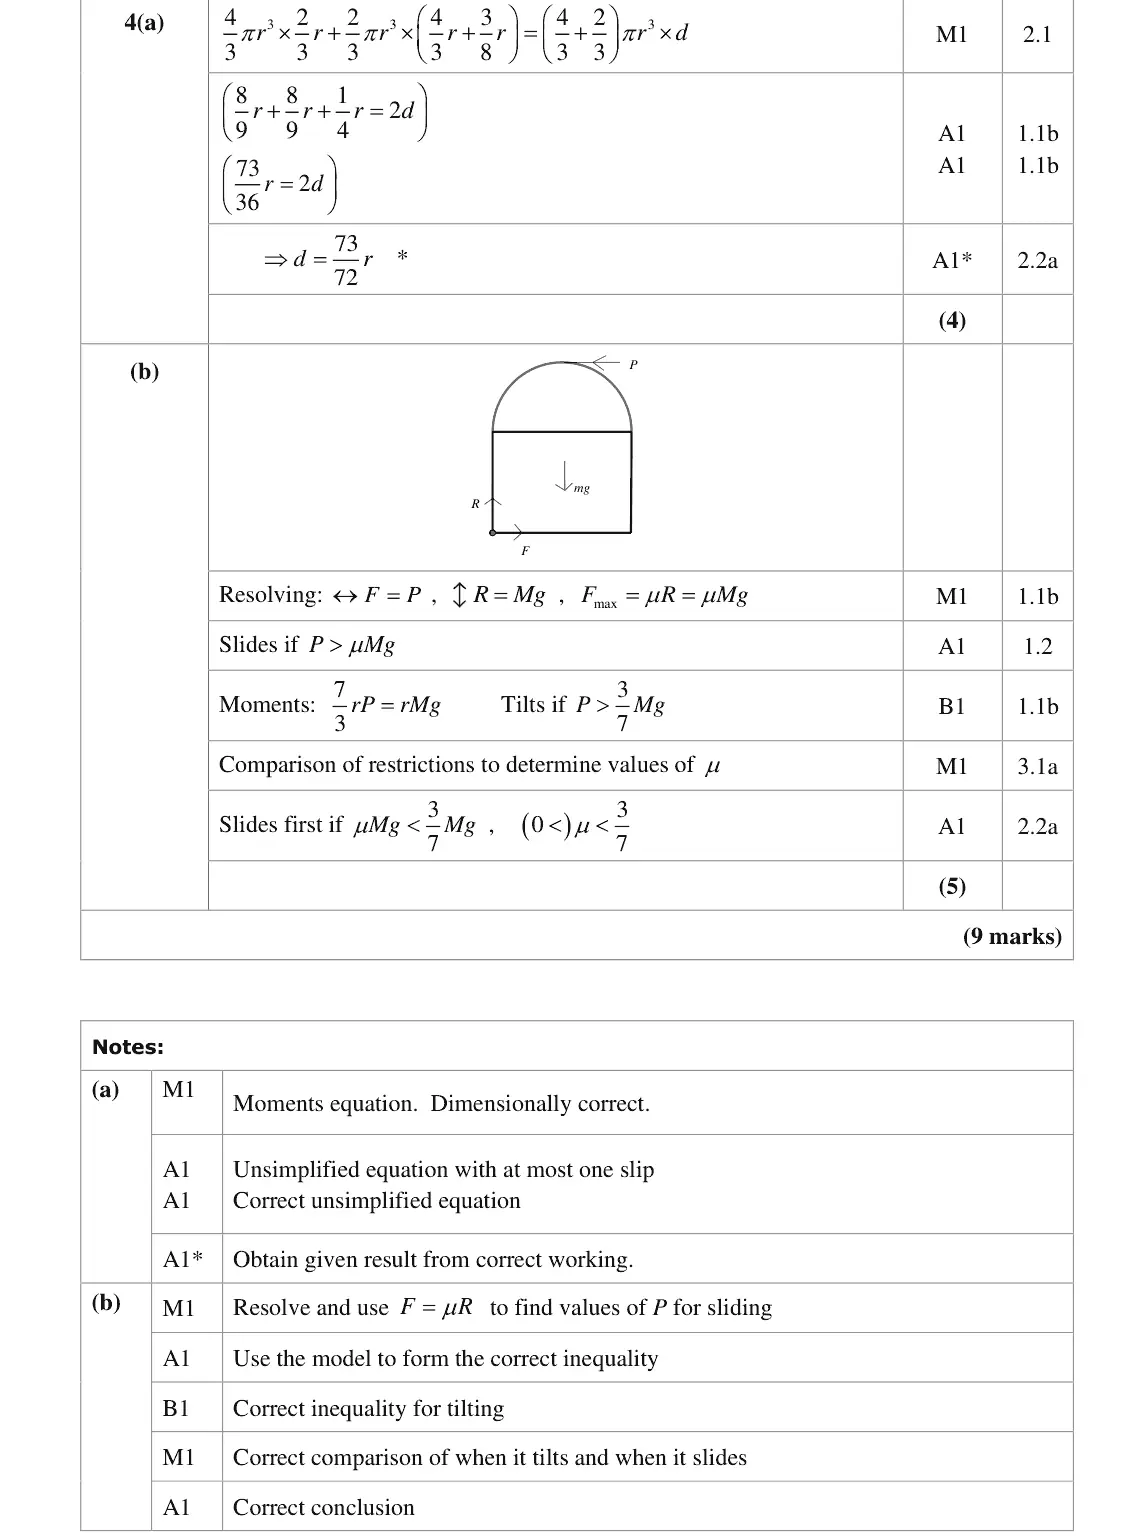
Oct 2020 · Paper 4C (Further Mechanics 2) · Q4(a)4 marks
Mark scheme (whole question; this part is marked with the orange bar)
Key points from the mark scheme and examiner's report
moments about O: cylinder mass ratio 4/3 at 2r/3, hemisphere 2/3 at 4r/3 + 3r/8
d = 73r/72
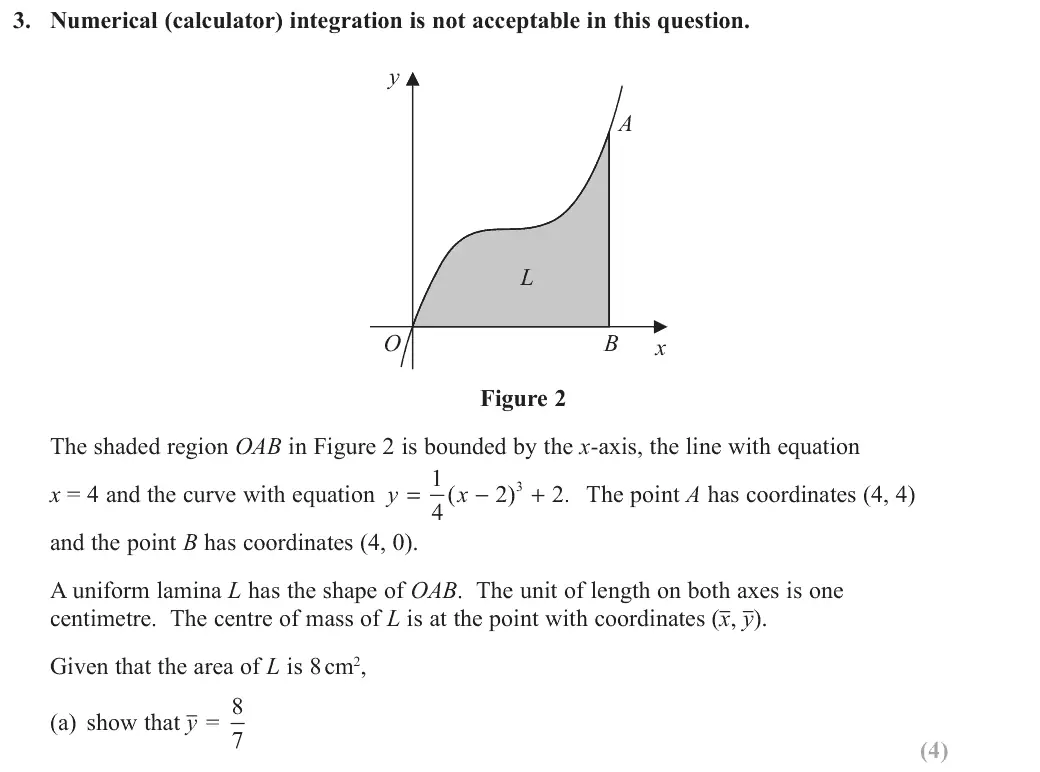
June 2019 · Paper 4C (Further Mechanics 2) · Q3(a)4 marks
Mark scheme (whole question; this part is marked with the orange bar)
Examiner's comment
(a) Most candidates formed a correct moments equation, but they were not all comfortable with the integration. At this level it was surprising to see many candidates avoiding the integration of n and preferring to attempt the expansion before integrating or to use integration by x a substitution. Those candidates who took the direct route usually complete the task correctly. Some candidates attempted , but did not realise that this did not give them y for the d xy y shaded region. Several candidates did unnecessary work in checking that the value given for the area of L was correct.
Key points from the mark scheme and examiner's report
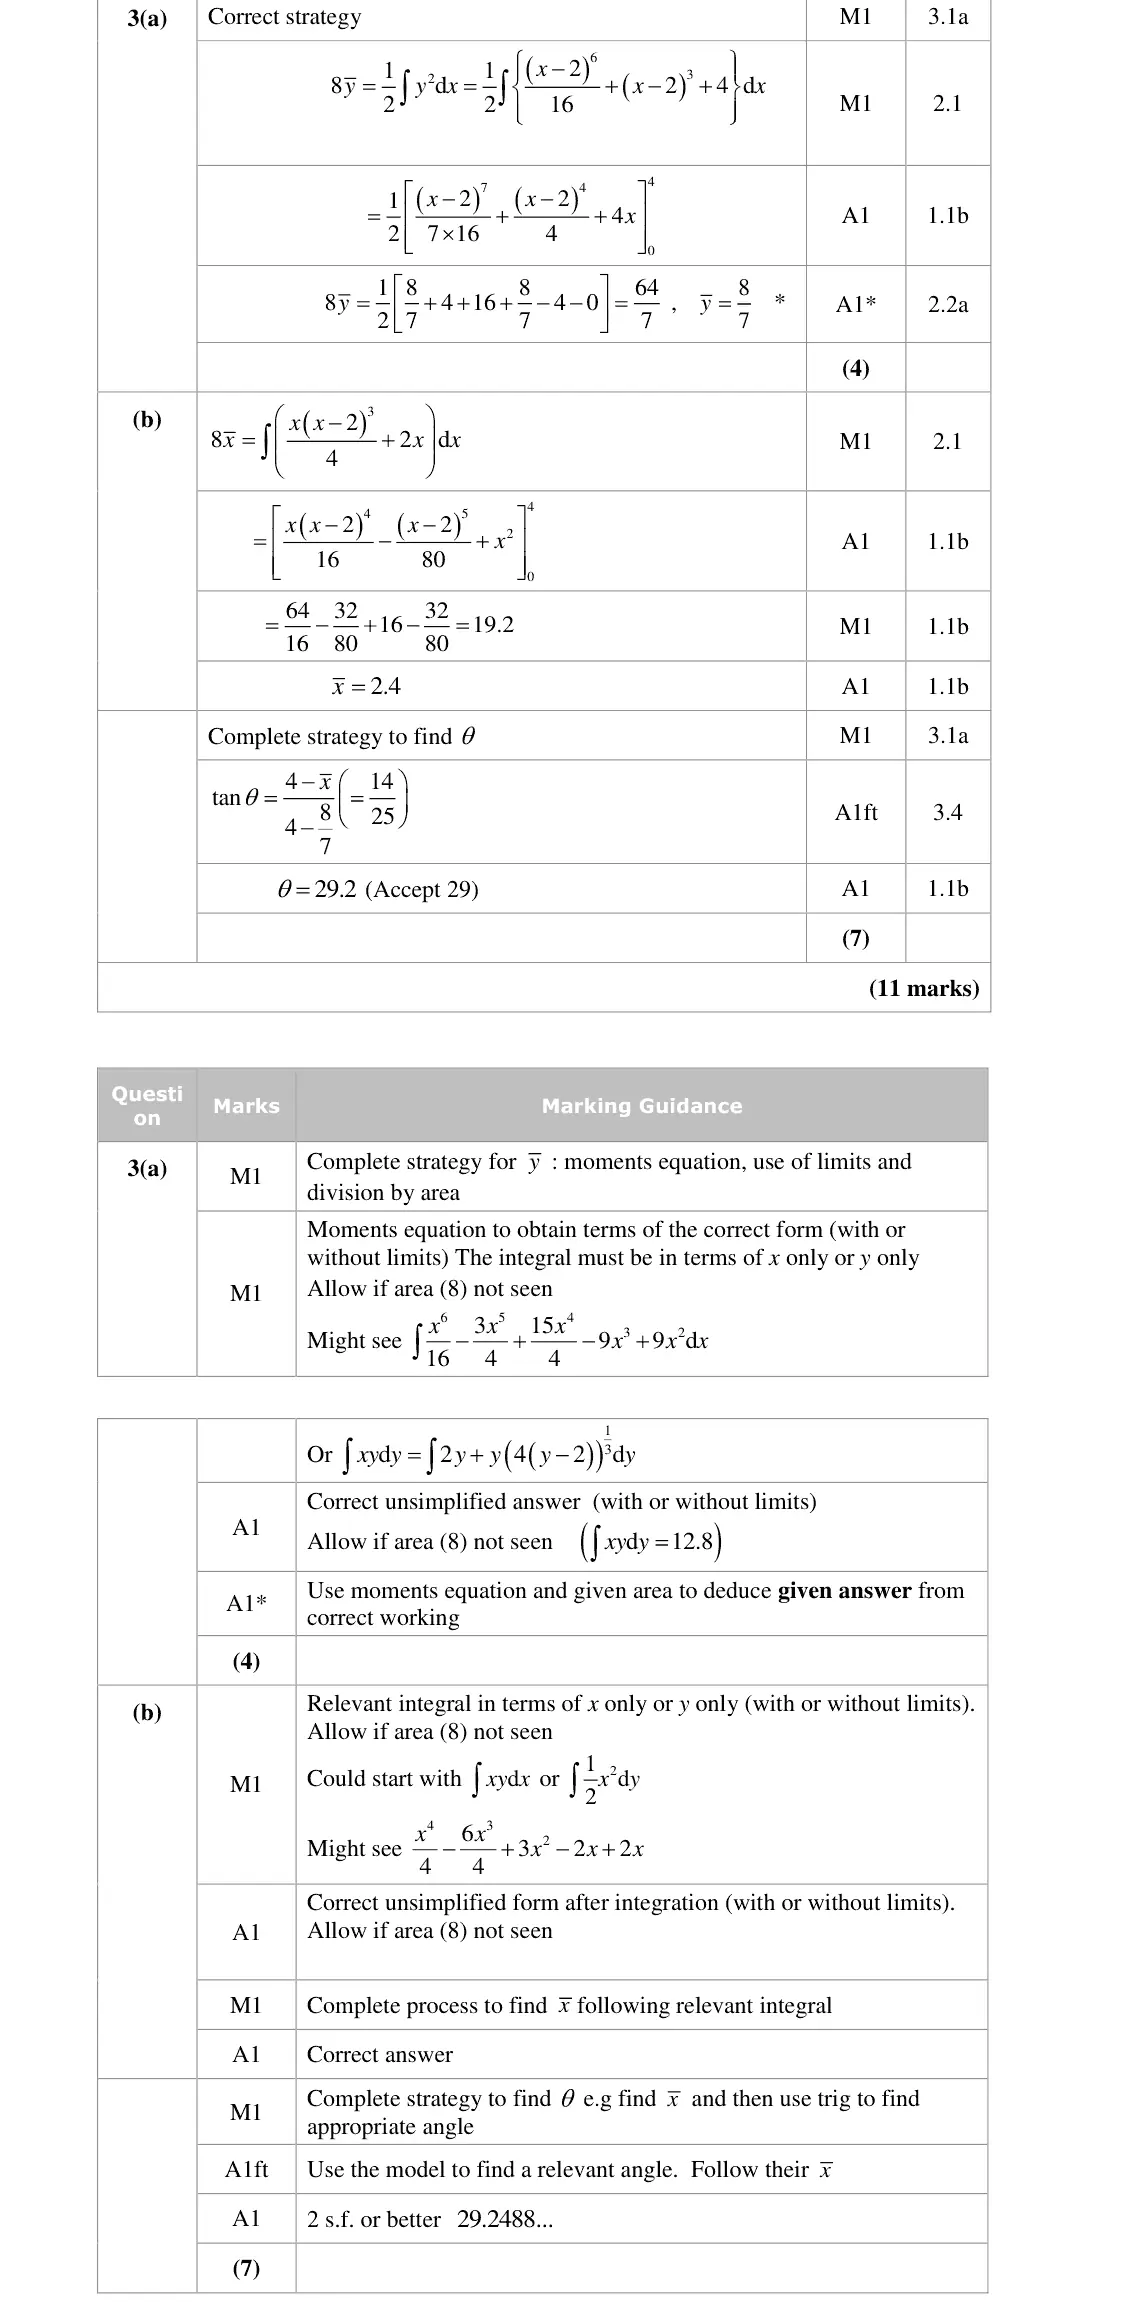
8ȳ = ½∫y² dx from 0 to 4
integrate (x − 2)ⁿ directly rather than expanding or substituting
∫xy dy wrongly used for ȳ
June 2019 · Paper 4C (Further Mechanics 2) · Q3(b)7 marks
Mark scheme (whole question; this part is marked with the orange bar)
Examiner's comment
(b) The majority of candidates realised that they needed to find x before they could find the required angle. Most attempted , but several of them did not complete the multiplication d xy x or lost the x from 2x. Here again, the integration proved to be challenging, with many candidates choosing to use substitution or to expand the function rather than use integration by parts. Candidates who drew a diagram and identified the required angle usually adopted a correct method to find the angle. Candidates who did not have a correct value for x were still able to x 1 score two of the marks available. The most common errors were to look for , tan y 1 4 x x 1 or tan tan . y 4 y
Key points from the mark scheme and examiner's report
8x̄ = ∫xy dx gives x̄ = 2.4
tan θ = (4 − x̄)/(4 − ȳ) = 14/25, θ = 29.2
x lost from 2x or integration by parts avoided
draw a diagram to identify the angle
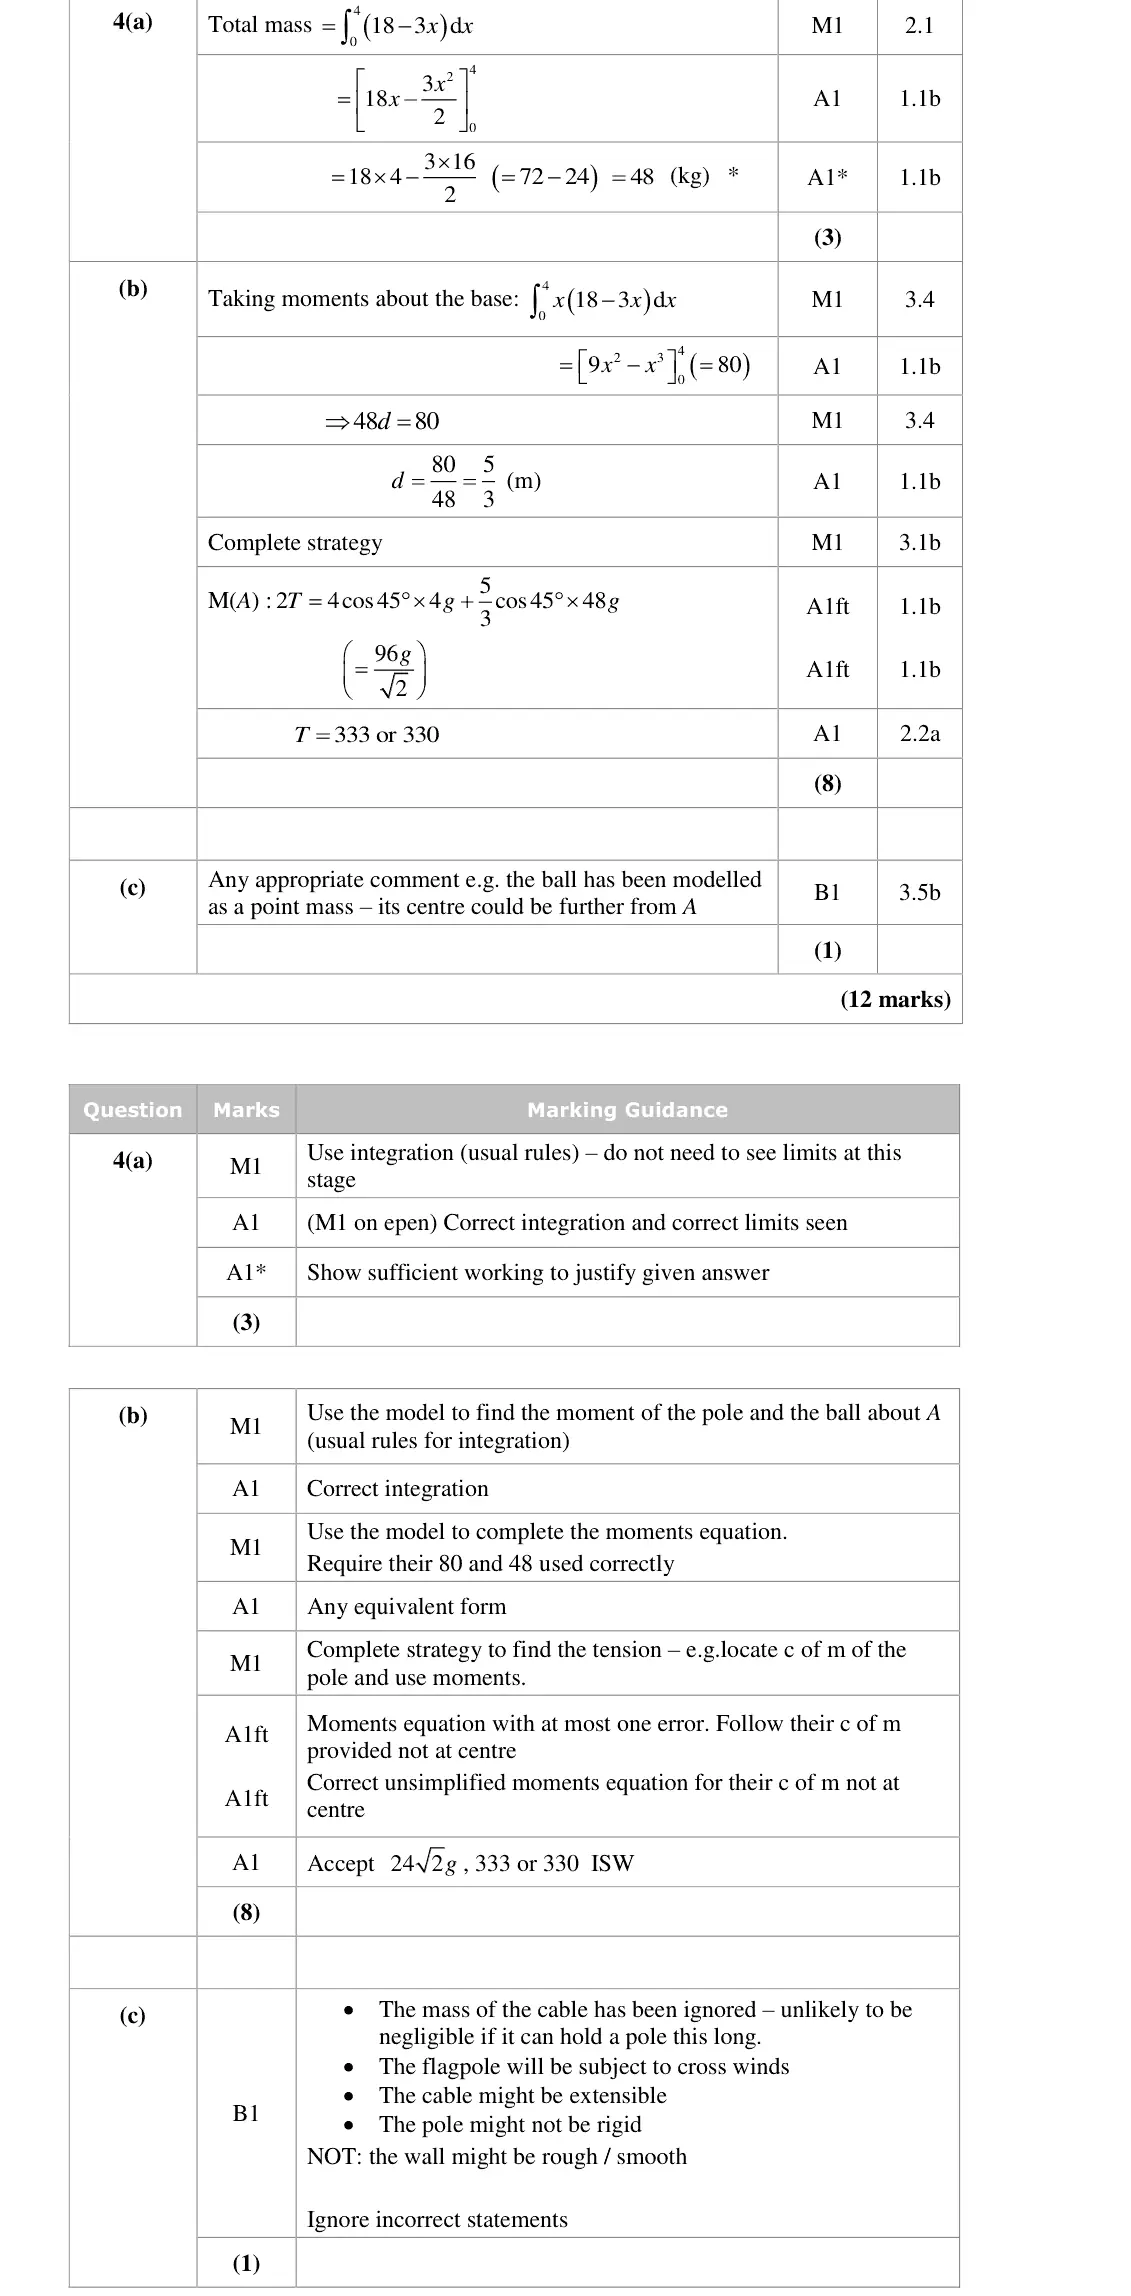
June 2019 · Paper 4C (Further Mechanics 2) · Q4(a)3 marks
Mark scheme (whole question; this part is marked with the orange bar)
Examiner's comment
(a) This was a “show that ..” questions, so candidates needed to do a little more than write down the integral followed by the answer. We expected to see the integration and evidence of use of the limits. There were many correct solutions, but also several that did not show sufficient working to earn all the marks.
Key points from the mark scheme and examiner's report
∫(18 − 3x)dx from 0 to 4 = 48
integration and use of limits must be seen for the given answer
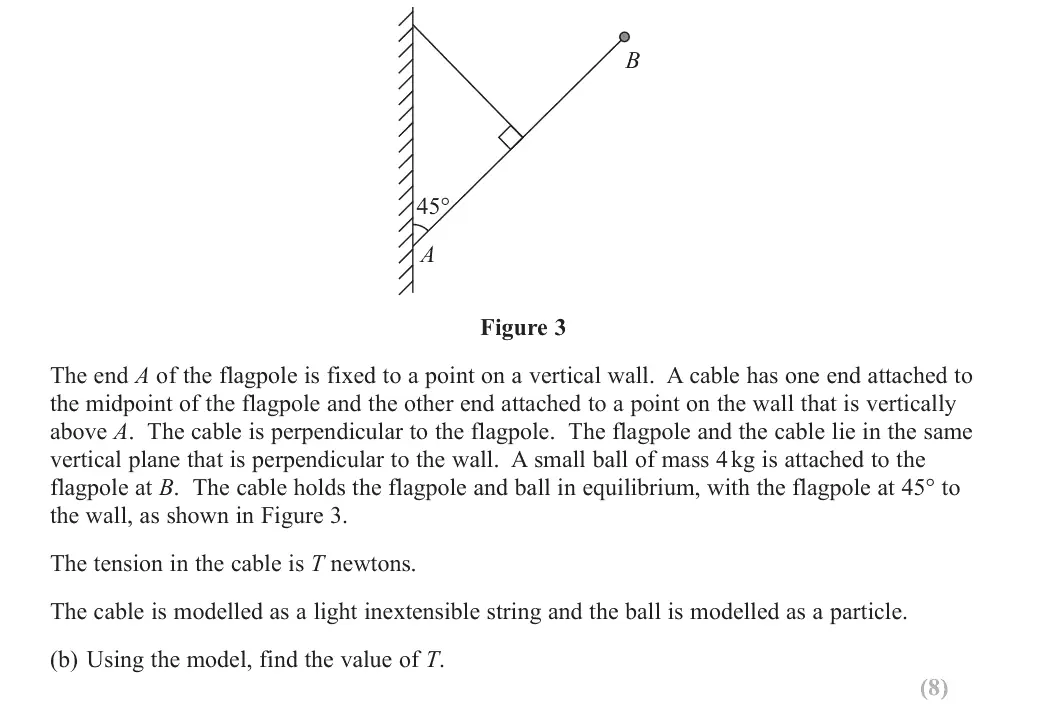
June 2019 · Paper 4C (Further Mechanics 2) · Q4(b)8 marks
Mark scheme (whole question; this part is marked with the orange bar)
Examiner's comment
(b) The two steps that were needed here were to find the position of the centre of mass of the pole, and then to find the tension in the cable. The majority of candidates formed a correct equation to find the position of the centre of mass of the pole. As there is no need to know anything about the forces acting at A, the next step should be to takes moments about A to find the tension. There were many errors in this process; candidates resolved the tension, although it acts perpendicular to the pole, and they did not always resolve the weights. Candidates who tried alternatives to taking moments about A usually forgot an element of the force acting at A. The final answer involved the use of g, so it should either be given as an exact answer in terms of g, or to 2 or 3 significant figures.
Key points from the mark scheme and examiner's report
centre of mass of pole 5/3 m from A via ∫x(18 − 3x)dx = 80
moments about A: 2T = 4cos45°×4g + (5/3)cos45°×48g, T = 24√2g ≈ 333 N
T is perpendicular to the pole so do not resolve it
weights must be resolved
June 2019 · Paper 4C (Further Mechanics 2) · Q5(a)4 marks
Mark scheme (whole question; this part is marked with the orange bar)
Examiner's comment
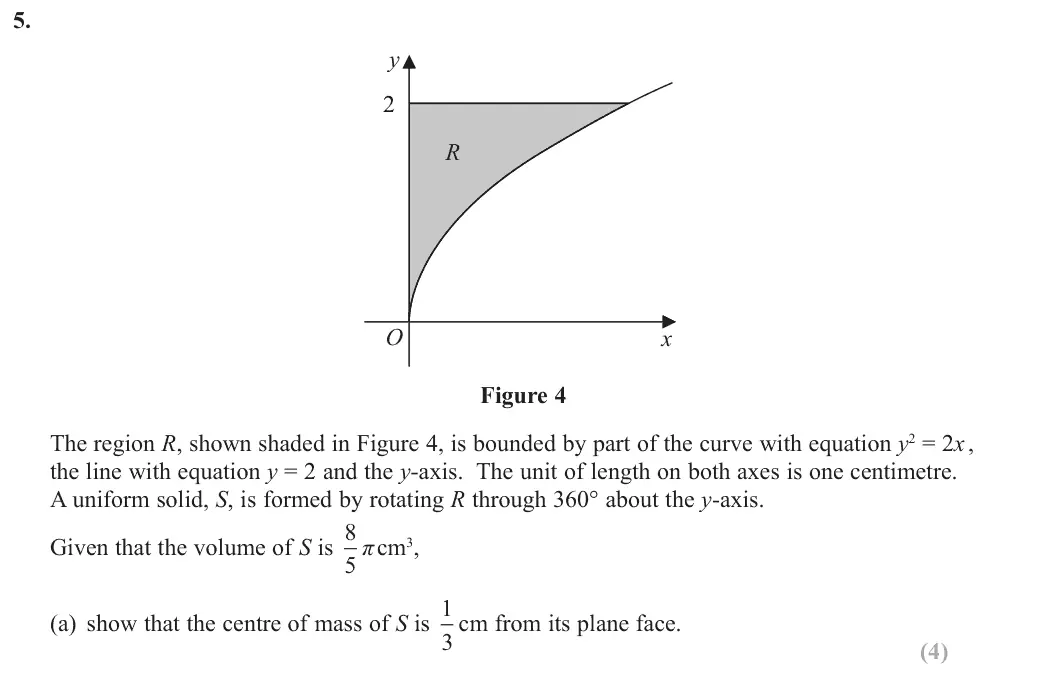
(a) Many candidates set up the correct integral for a moments equation to find the distance of the centre of mass of S from O. The integral was straightforward, and they had no difficulty in reaching the given answer. A few candidates set up the integral by working from first principles, but most used a remembered formula. Several candidates did unnecessary work checking that the value given for the volume of S was correct. Some candidates offered no attempt to find the distance and simply used the given answer in part (b).
Key points from the mark scheme and examiner's report
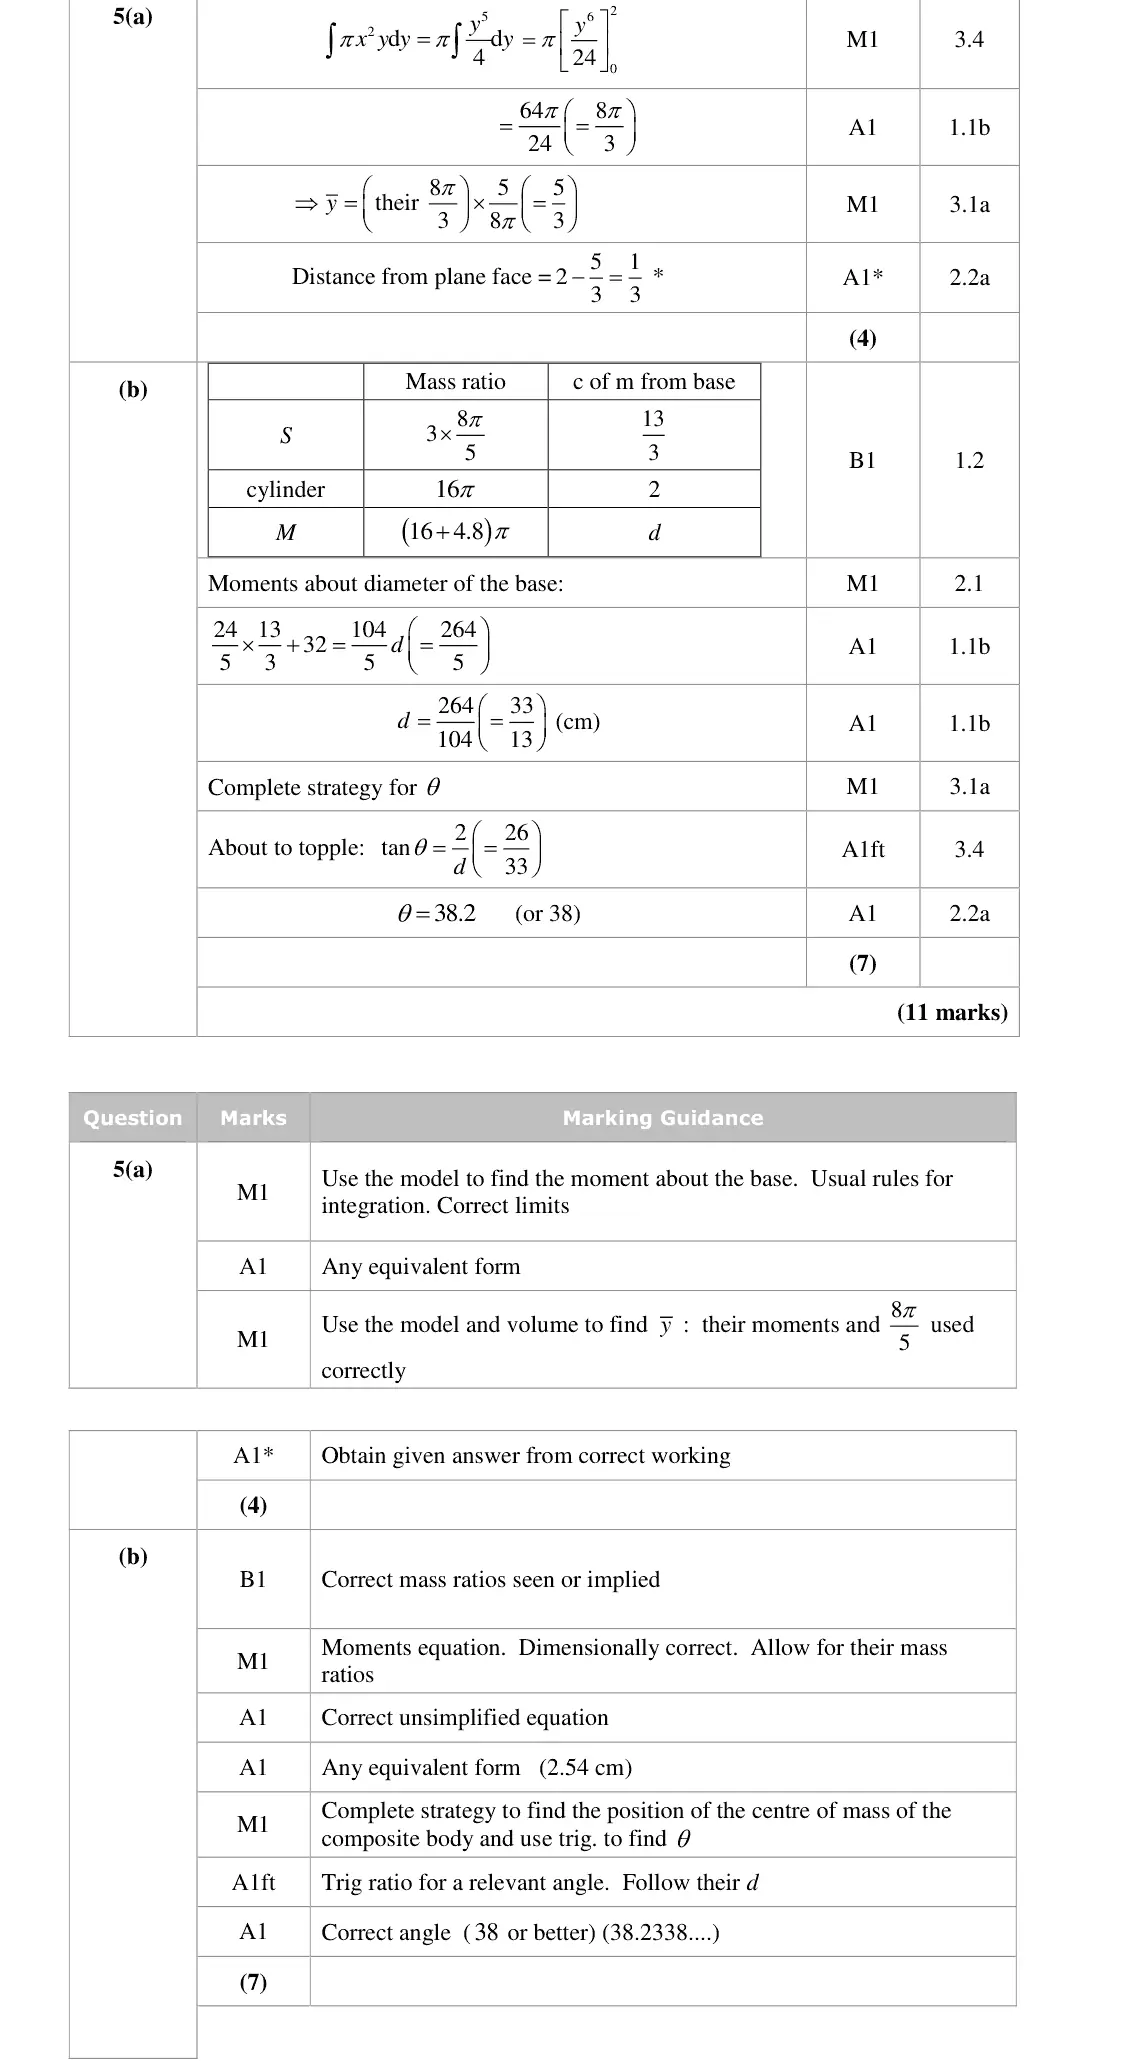
π∫x²y dy from 0 to 2 = 8π/3, ȳ = 5/3 from O, so 1/3 cm from the plane face
some just quoted the given answer in (b)
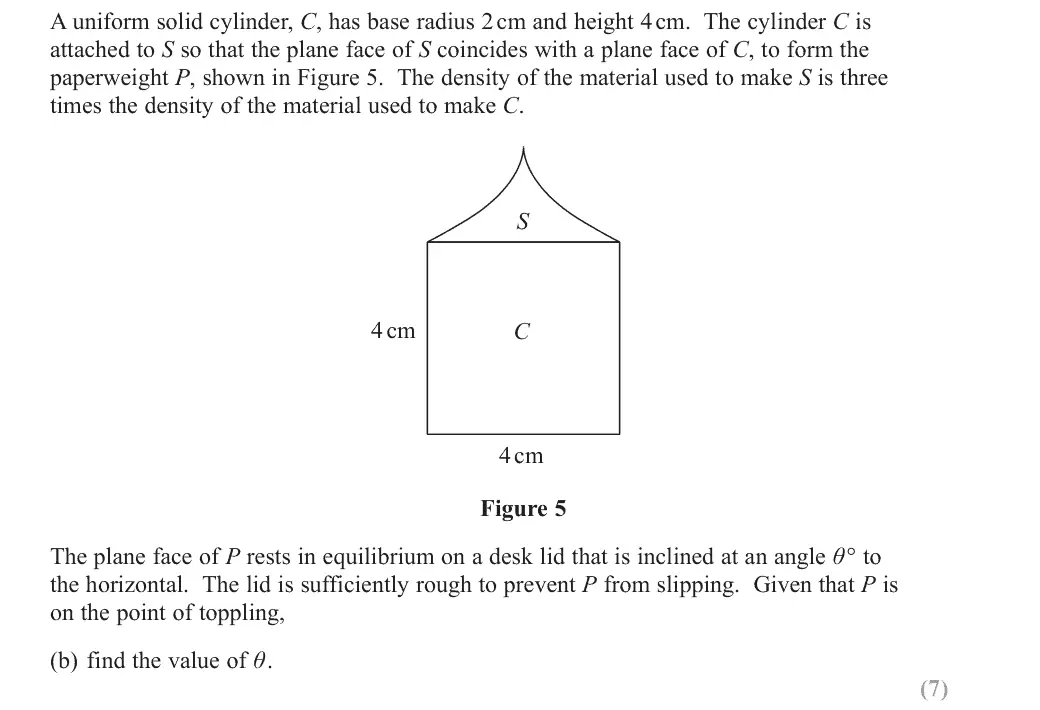
June 2019 · Paper 4C (Further Mechanics 2) · Q5(b)7 marks
Mark scheme (whole question; this part is marked with the orange bar)
Examiner's comment
attempt to find the distance and simply used the given answer in part (b). (b) The majority of candidates understood the basic process for finding the position of the centre of mass of P. The common errors were to make the density of C three times the density of S, not to use the different density at all, and to make an error in finding the volume of C. Having found their value for the distance of the centre of mass from the base, most candidates used this correctly to find the required angle.
Key points from the mark scheme and examiner's report
mass ratio S : C = 24π/5 : 16π (S is three times as dense)
d = 33/13 cm from base
on point of toppling tan θ = 2/d, θ = 38.2
common errors density the wrong way round or ignored, wrong cylinder volume
Find an Edexcel Further Maths tutor
Stuck on this? Book a trial lesson with our Further Maths tutor.