Centres of mass of a triangular lamina, a circular arc and a sector are given.
Since 2018
61 question parts, 221 marks
Notes, worked examples and practice for this topic are being written by our tutors. The past-paper questions below are ready now: work each one on paper, then open the mark scheme and the examiner's comment.
Tap a question to zoom it. Mark scheme and examiner's comment open under each question.
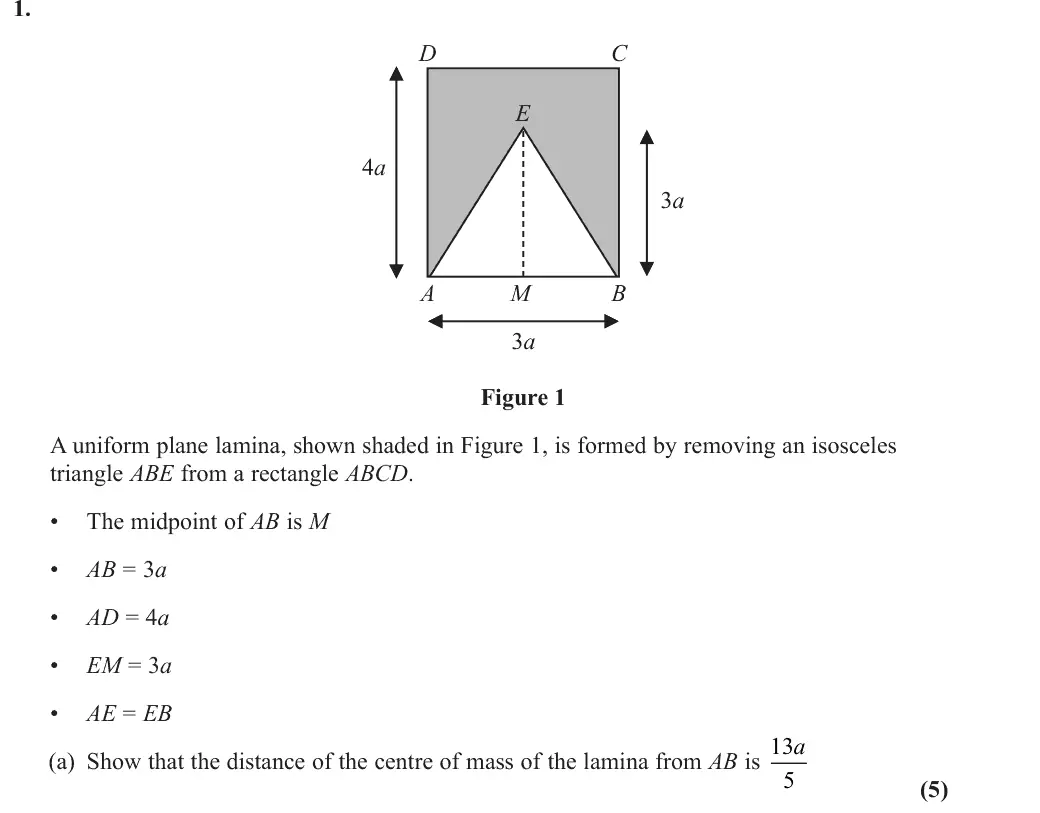
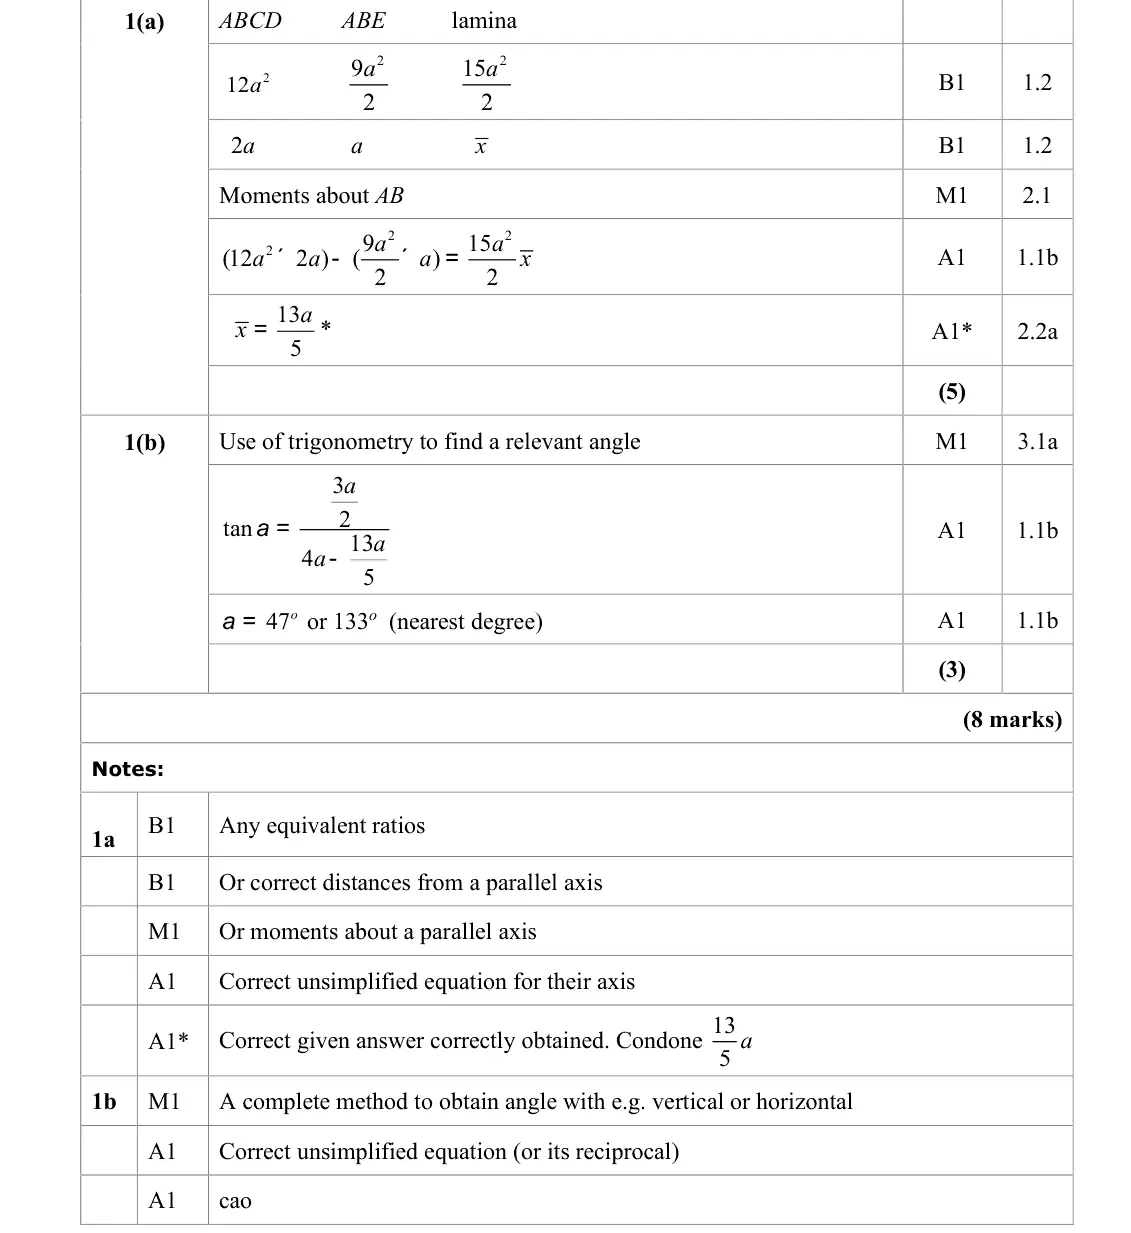
June 2025 · AS Paper 2 (Further Mechanics 2) · Q1(a)5 marks
Mark scheme (whole question; this part is marked with the orange bar)
Examiner's comment
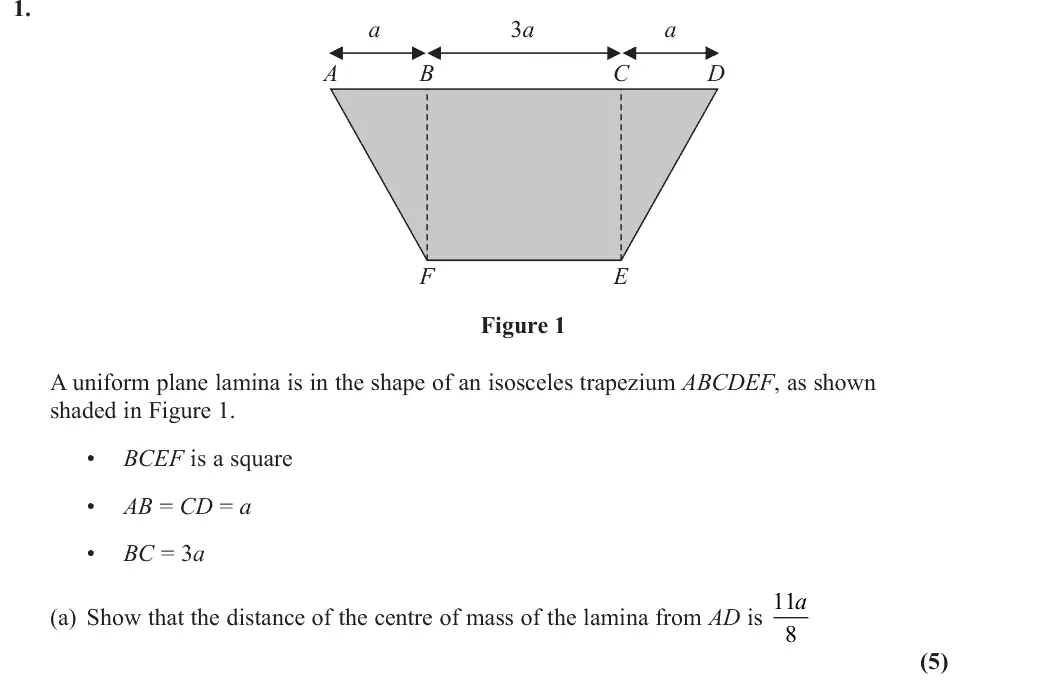
(a) Responses to this question were often good and successful methods included the subtraction of the triangle from the rectangle, as in the mark scheme, and the addition of two triangles to a rectangle. Some weaker responses divided the shape up into further parts and often made errors with lengths or duplicated parts; other weak responses mistakenly thought the shape was a framework.
Key points from the mark scheme and examiner's report
rectangle 12a² (2a from AB) minus triangle 9a²/2 (a from AB): (15a²/2)x̄ = 24a³ − 9a³/2, x̄ = 13a/5
it is a lamina, not a framework
extra dissections led to errors
June 2025 · AS Paper 2 (Further Mechanics 2) · Q1(b)3 marks
Mark scheme (whole question; this part is marked with the orange bar)
Examiner's comment
(b) Stronger responses dealt with this efficiently and among the weaker responses it was common to see an incorrect assumption that the angle DXA, where X is the centre of mass, was right-angled.
Key points from the mark scheme and examiner's report
G is 3a/2 from AD and 4a − 13a/5 below D: tan α = (3a/2)/(7a/5) gives 47°
angle DXA is not a right angle
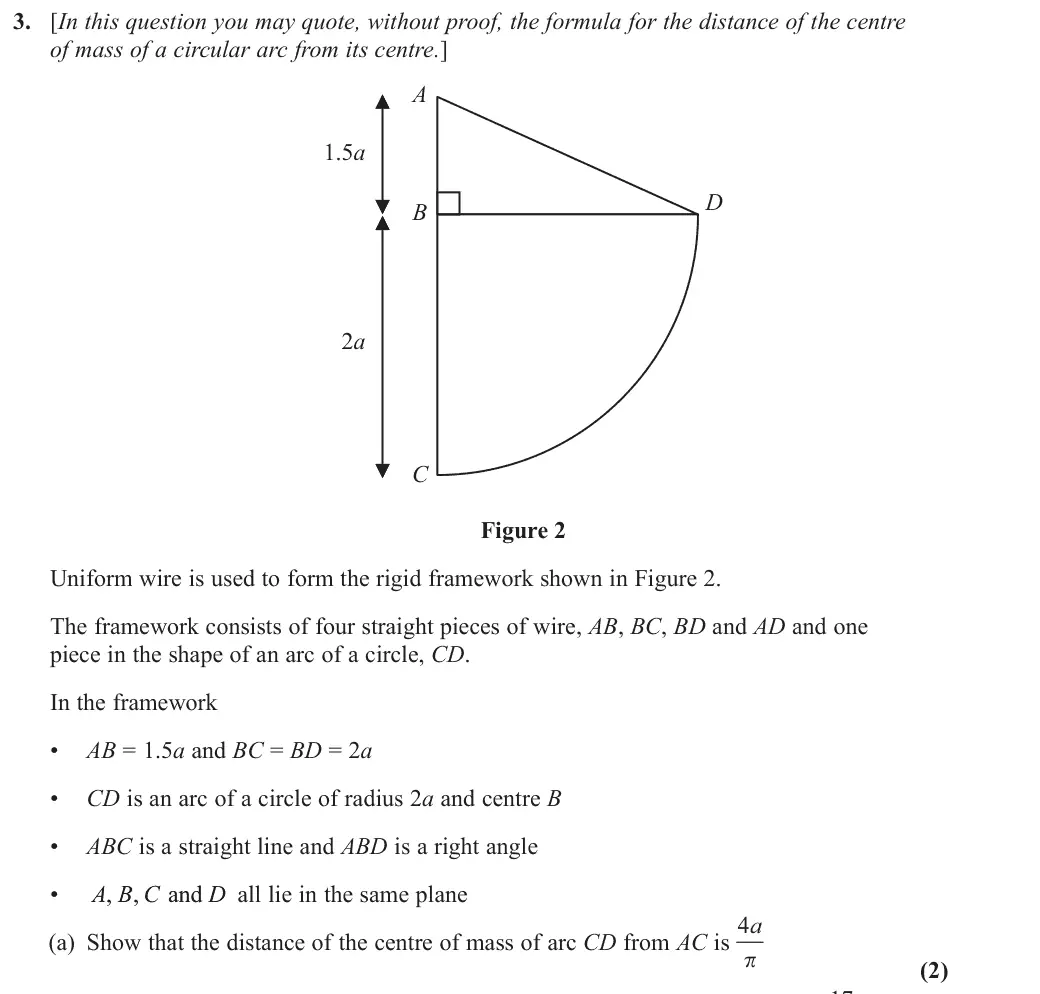
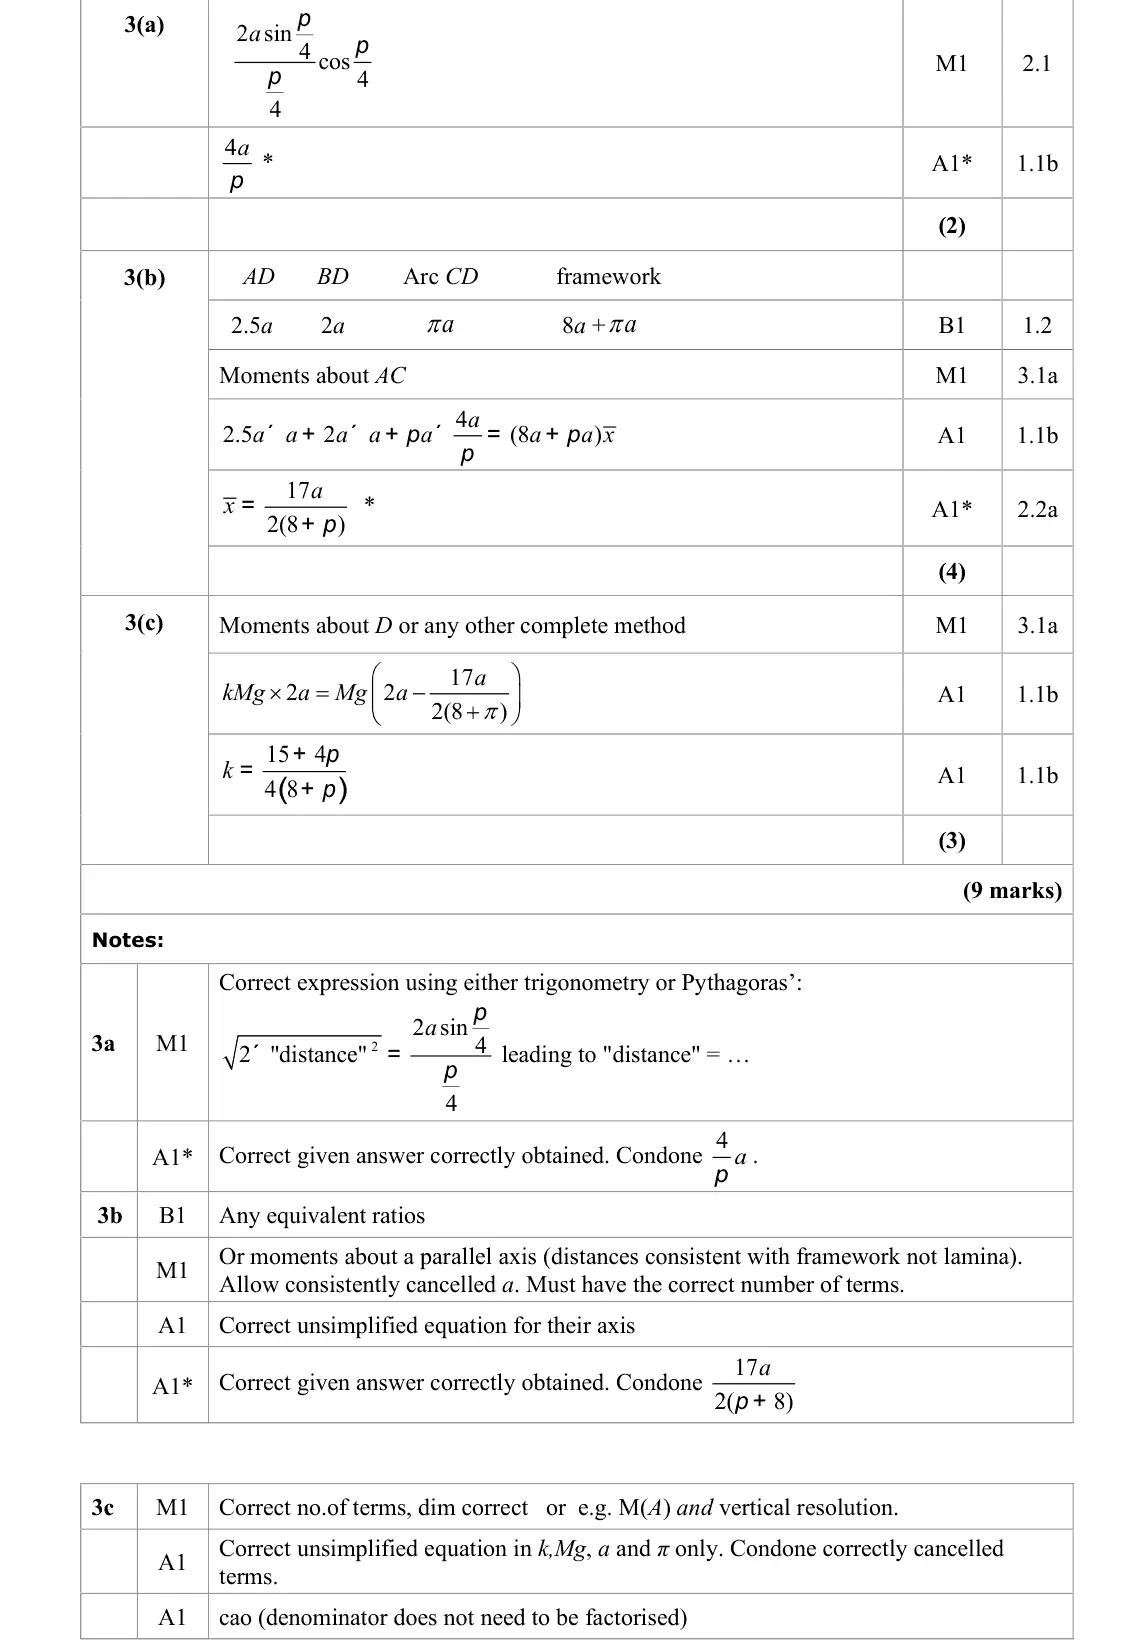
June 2025 · AS Paper 2 (Further Mechanics 2) · Q3(a)2 marks
Mark scheme (whole question; this part is marked with the orange bar)
Examiner's comment
(a) While this was a given answer and the text of the question encouraged learners to use the standard result for the centre of mass of a circular arc, a great many responses chose not to do anything other than use this formula. As a result, a common weak response was to use an pi . Many successful responses opted for Pythagoras’ rather than pi instead of 4 angle of 2 trigonometry.
Key points from the mark scheme and examiner's report
arc subtends π/2 at B so use angle π/4 (not π/2) in the formula: distance from B is 2a sin(π/4)/(π/4) = 4√2a/π, then × cos(π/4) gives 4a/π
June 2025 · AS Paper 2 (Further Mechanics 2) · Q3(b)4 marks
Mark scheme (whole question; this part is marked with the orange bar)
Examiner's comment
(b) It was common to see good responses to this question, but weaker responses chose not to use completely correct mathematical working and often had brackets or factors of a missing from their solutions. Other weaker responses double-counted some of the lengths of the framework and a small number mistakenly assumed the shape was a lamina.
Key points from the mark scheme and examiner's report
lengths AD 2.5a, BD 2a, arc πa (AB and BC lie on AC)
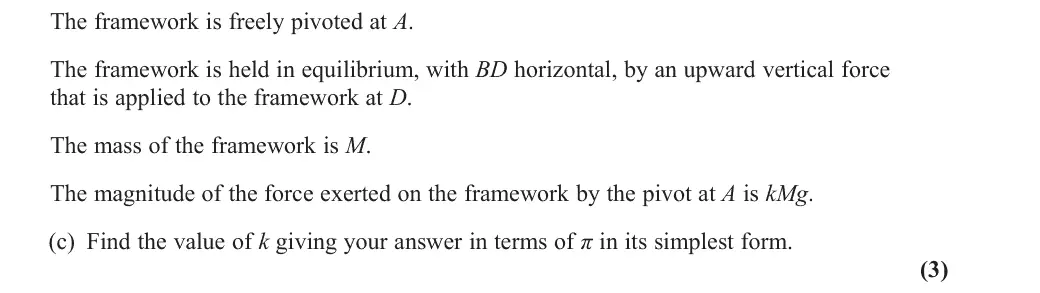
June 2025 · AS Paper 2 (Further Mechanics 2) · Q3(c)3 marks
Mark scheme (whole question; this part is marked with the orange bar)
Examiner's comment
(c) A great number of responses struggled to maintain consistency with distances in their moments equations and a significant proportion of weaker responses thought that the force at D was kMg. A small number of otherwise good responses gave an approximate final answer without stating an exact one as part of their solution.
Key points from the mark scheme and examiner's report
moments about D: kMg × 2a = Mg(2a − 17a/(2(8 + π))) gives k = (15 + 4π)/(4(8 + π))
the force at D is not kMg
exact form required
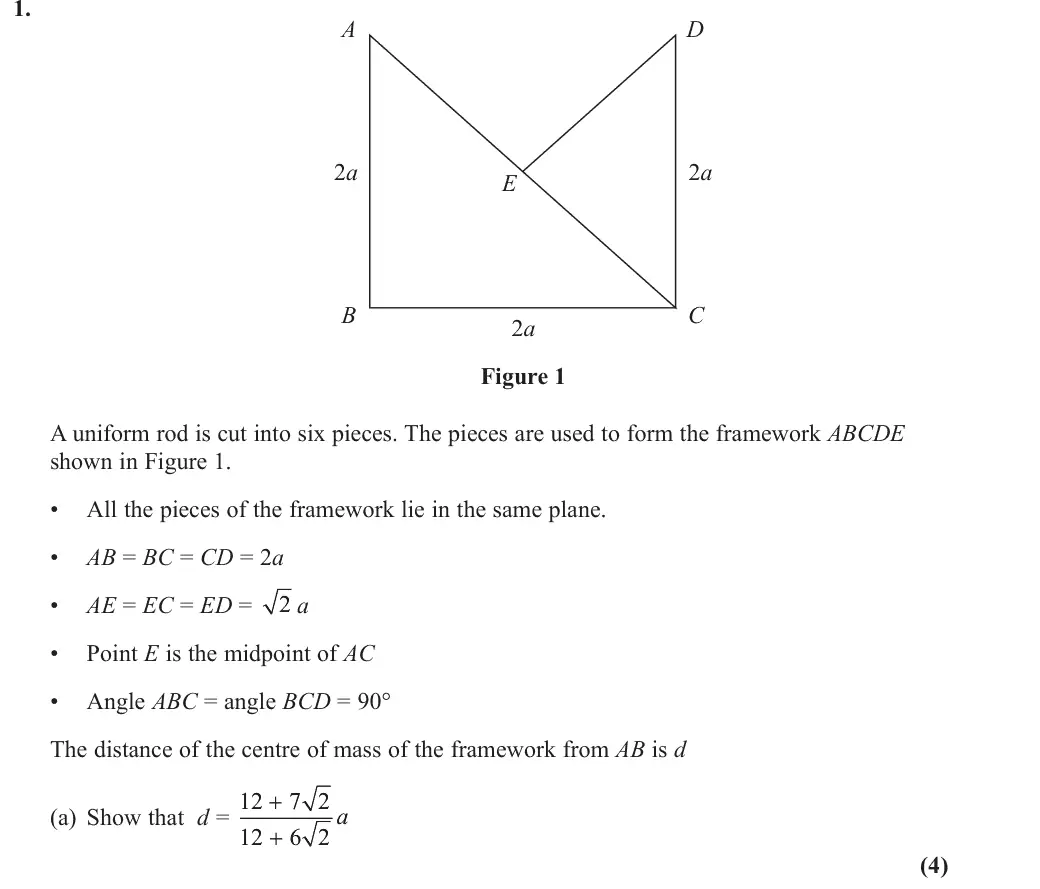
June 2025 · Paper 4C (Further Mechanics 2) · Q1(a)4 marks
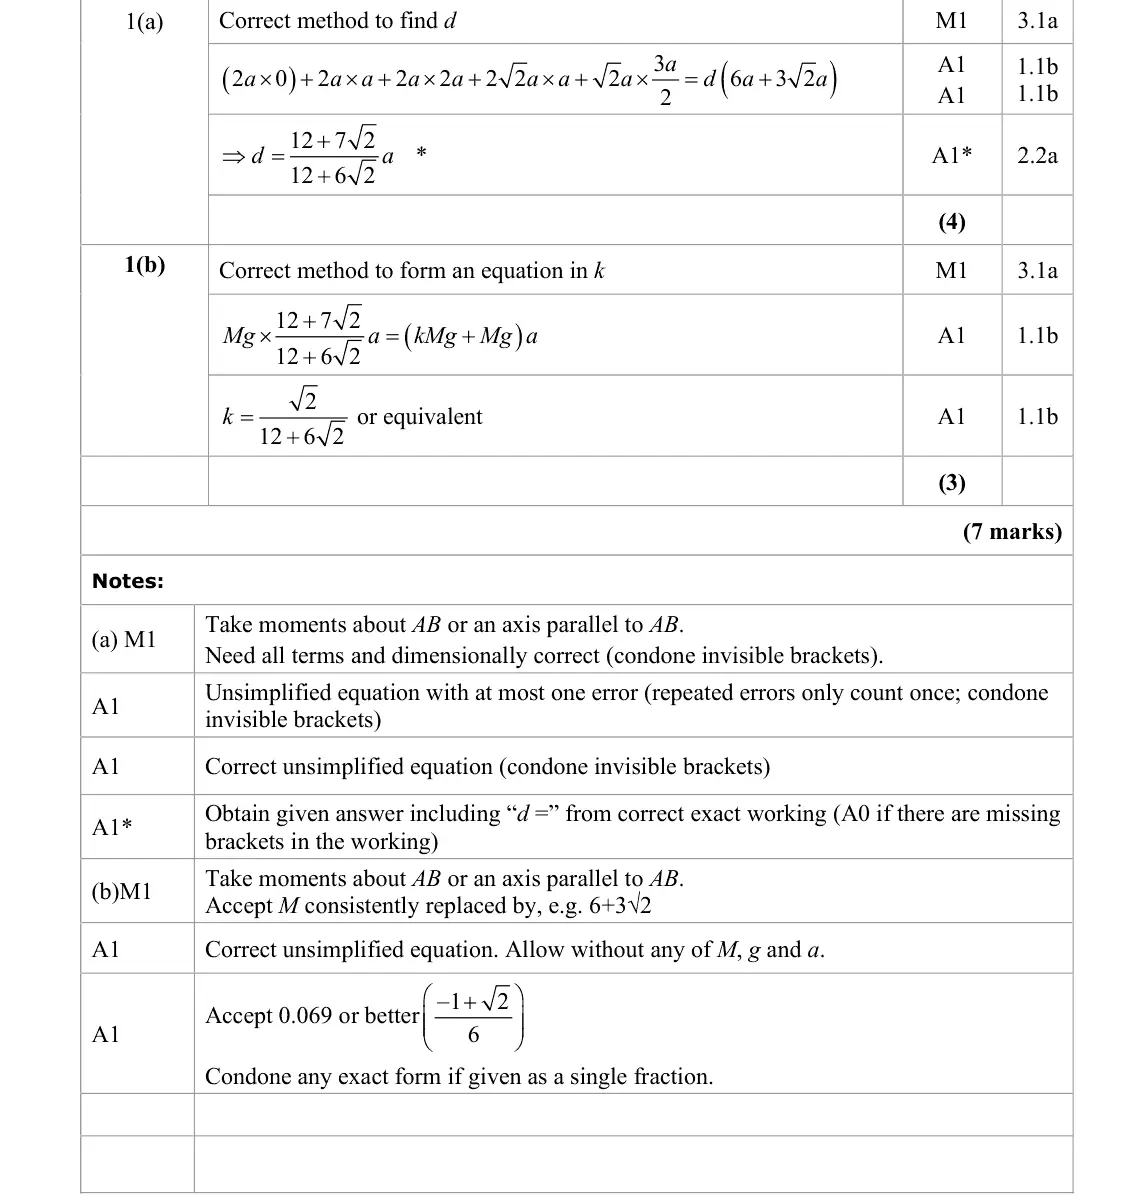
Mark scheme (whole question; this part is marked with the orange bar)
Examiner's comment
(a) Responses to this question took a variety of routes to dividing up the shape. A significant proportion of otherwise correct solutions chose to omit to reference d anywhere, which was penalised. Weaker responses confused the horizontal distances of AC and DE or double-counted parts.
Key points from the mark scheme and examiner's report
masses proportional to lengths (2a, 2a, 2a, 2√2a for AC, √2a for ED)
errors mixing horizontal distances of AC and DE or double counting
June 2025 · Paper 4C (Further Mechanics 2) · Q1(b)3 marks
Mark scheme (whole question; this part is marked with the orange bar)
Examiner's comment
(b) Several strong responses were seen which simply wrote k + 1 = d then used a calculator to get the answer. Weaker responses often introduced a surd-form for M or did not simply their moments equation to get a value for k.
Key points from the mark scheme and examiner's report
particle at B is on AB so adds no moment: Md = (M + kM)a, so k + 1 = d/a
k = √2/(12 + 6√2) = (√2 − 1)/6 ≈ 0.069
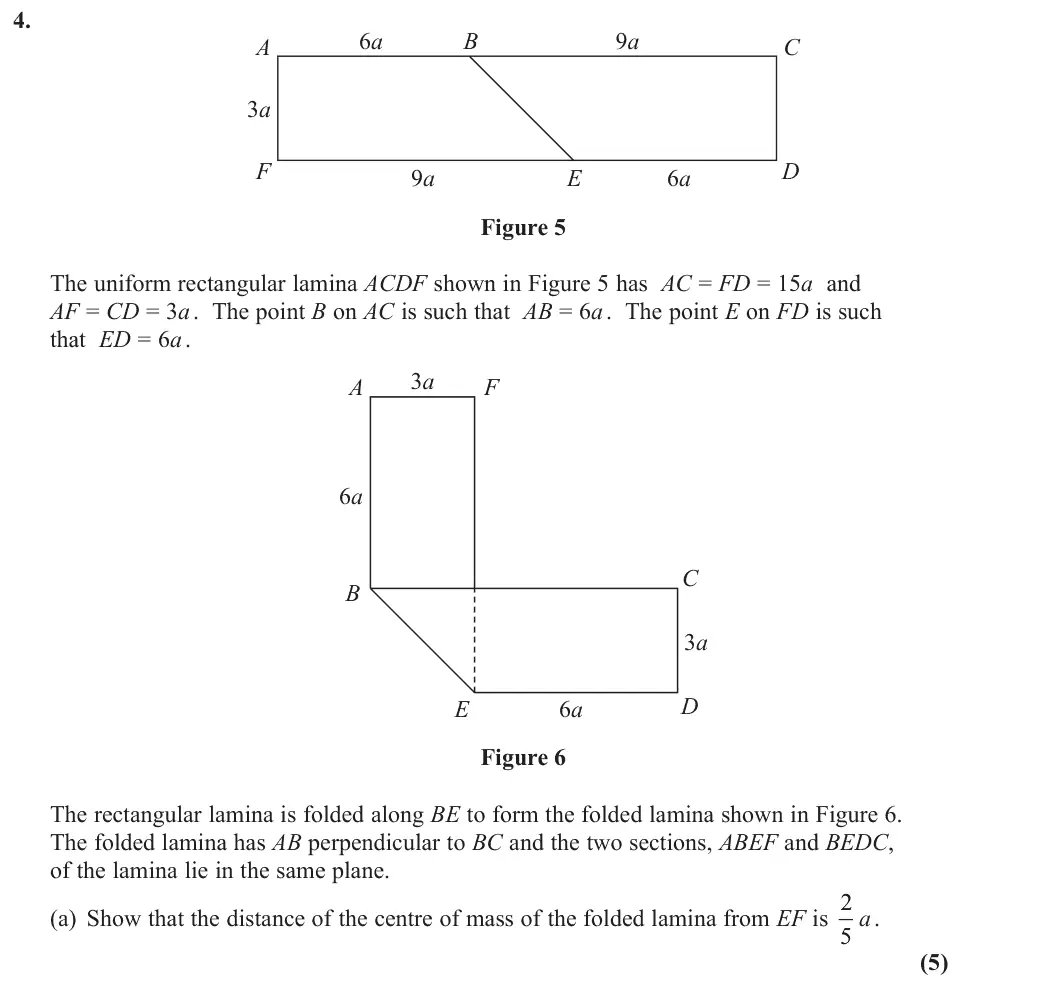
June 2025 · Paper 4C (Further Mechanics 2) · Q4(a)5 marks
Mark scheme (whole question; this part is marked with the orange bar)
Examiner's comment
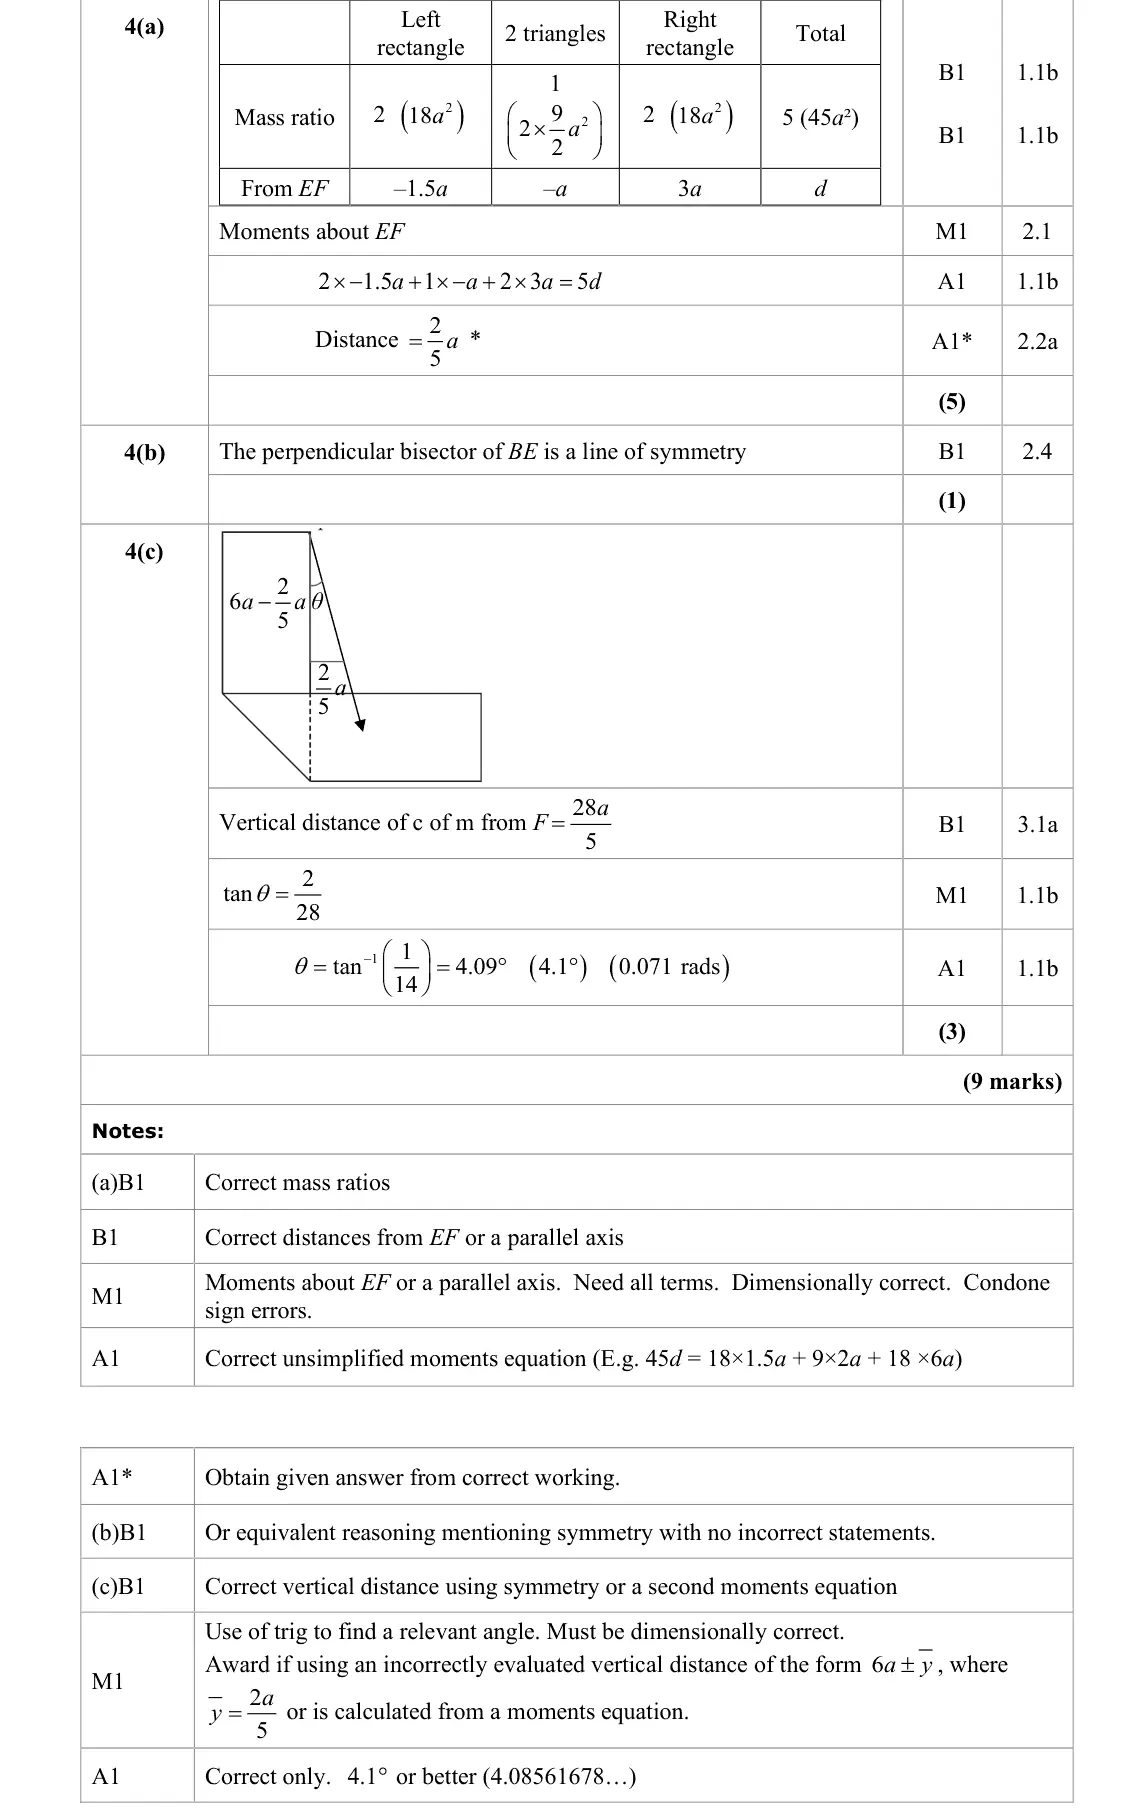
(a) Solutions for this question mainly followed the method described in the main mark scheme, but several candidates also chose to divide the shape in various fashions including overlapping rectangles subtracting a triangle. Many responses chose to measure from AB rather than EF but were still able to successfully reach the correct conclusion. Among weaker responses the most common errors involved the triangular folded part – either not doubling its mass or getting its centre of mass wrong.
Key points from the mark scheme and examiner's report
folded part: two triangles overlap so the triangle region has double mass
mass ratios 2 : 1 : 2 at distances −1.5a, −a, 3a from EF
5d = 2a so 2a/5
June 2025 · Paper 4C (Further Mechanics 2) · Q4(b)1 mark
Mark scheme (whole question; this part is marked with the orange bar)
Examiner's comment
(b) While most responses mentioned the symmetry a significant proportion also gave too much information, including additional incorrect statements such as claiming that the lamina was uniform.
Key points from the mark scheme and examiner's report
the perpendicular bisector of BE is a line of symmetry of the folded lamina
do not add incorrect statements
June 2025 · Paper 4C (Further Mechanics 2) · Q4(c)3 marks
Mark scheme (whole question; this part is marked with the orange bar)
Examiner's comment
(c) While most responses opted for a solution similar to the mark scheme, a large proportion assumed the centre of mass was “within” the triangle and so used a denominator of 32 in their tan theta expression. Weaker responses often tried to work out a new y-bar or similar by taking moments again.
Key points from the mark scheme and examiner's report
by symmetry the centre of mass is 6a − 2a/5 = 28a/5 below F vertically and 2a/5 across: tan θ = 2/28, θ = 4.1°
avoid recalculating ȳ by moments
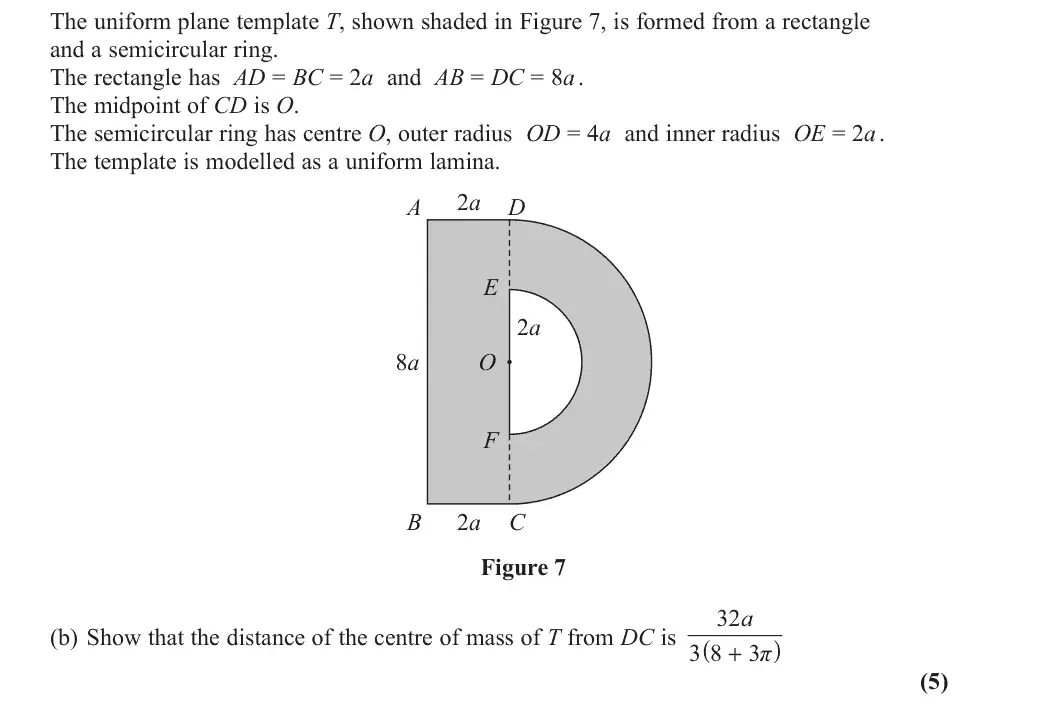
June 2025 · Paper 4C (Further Mechanics 2) · Q6(b)5 marks
Mark scheme (whole question; this part is marked with the orange bar)
Examiner's comment
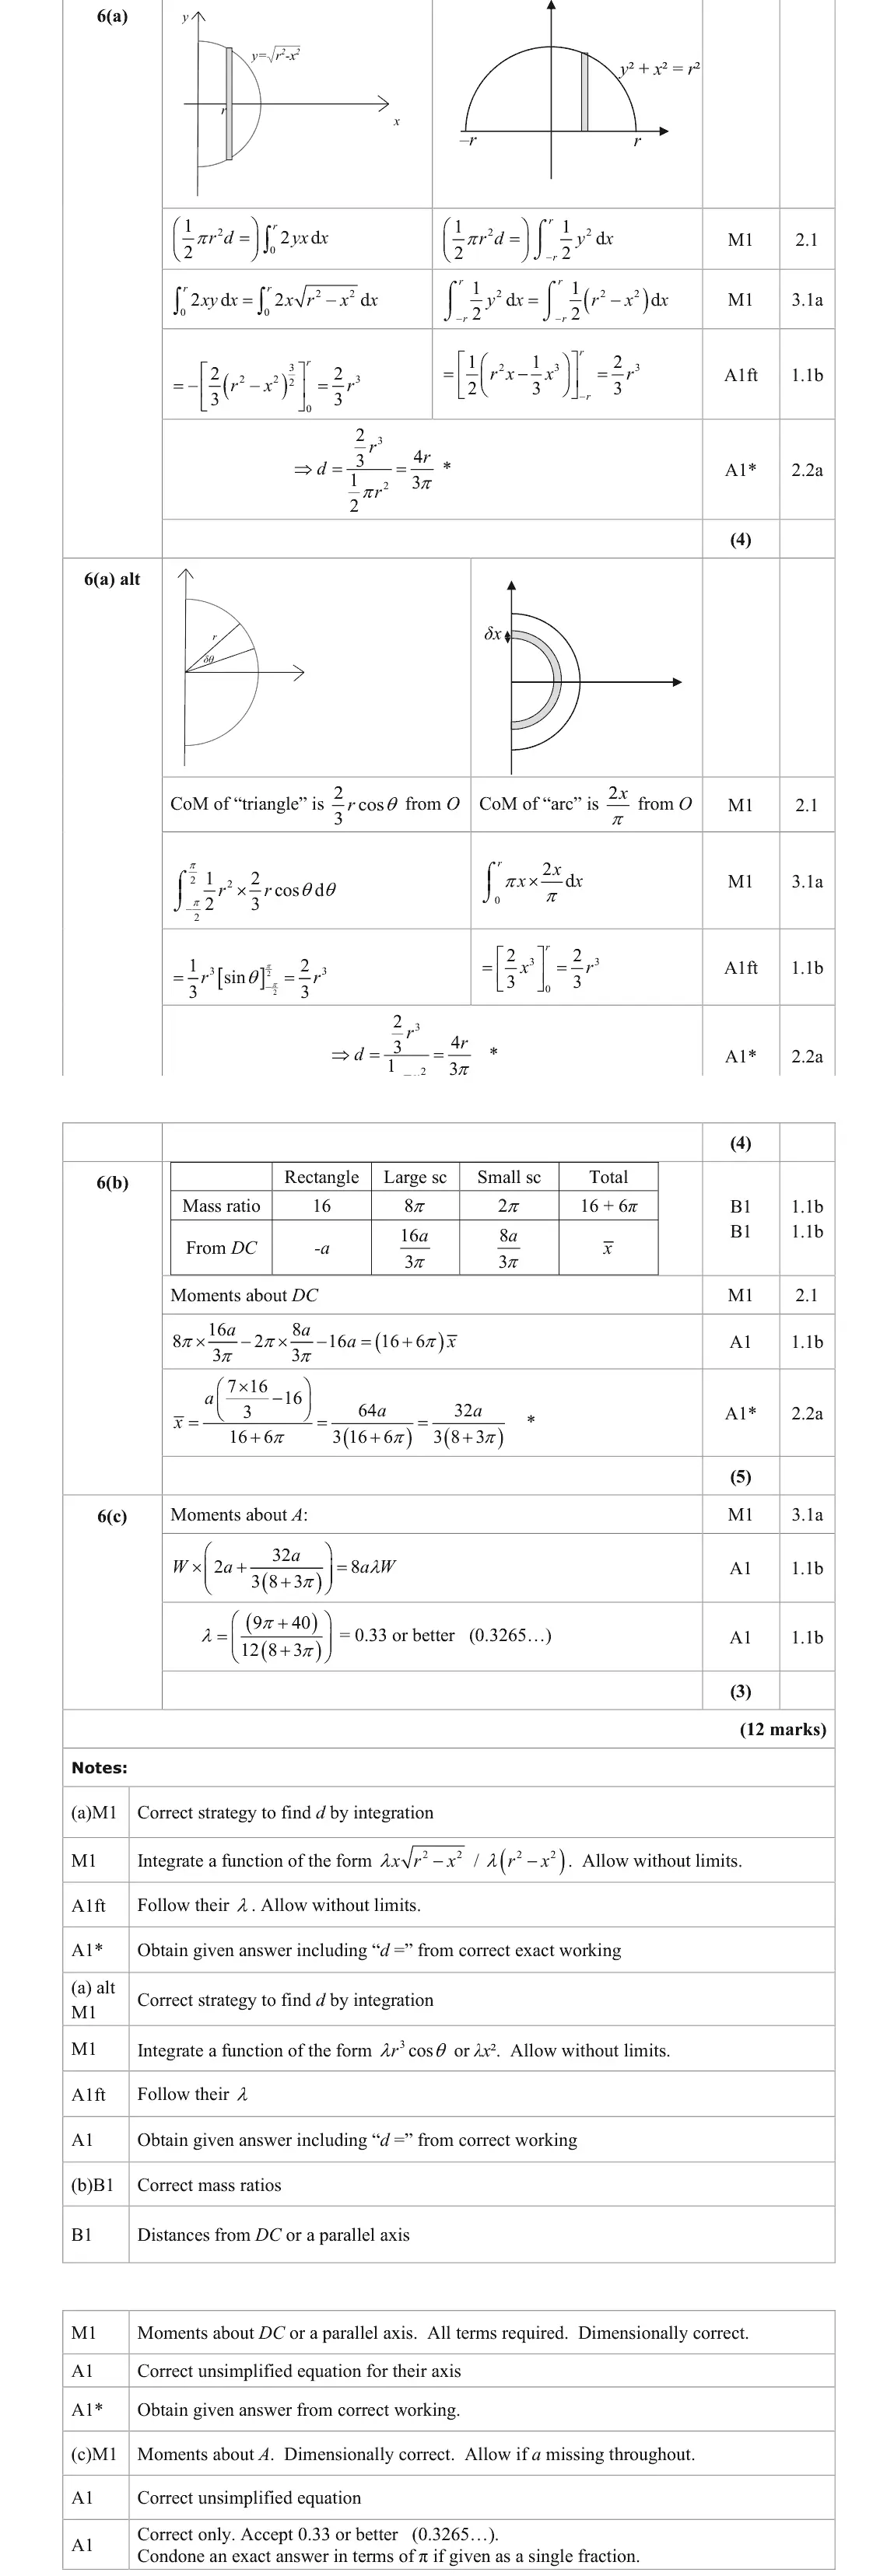
(b) Most responses proceeded as per the main mark scheme although a fair number used incorrect or inconsistent distances for the centres of mass, with sign errors frequently seen. A significant number of responses chose to find the centre of mass of the compound shape CDEF then combine it with ABCD and while this was less efficient than a single equation it was often successful. Weaker responses double-counted or omitted parts of the shape.
Key points from the mark scheme and examiner's report
mass ratios 16 : 8π : 2π (outer semicircle minus inner)
distances −a, 16a/(3π), 8a/(3π) from DC
x̄ = 32a/(3(8 + 3π))
sign errors and double counting common
June 2025 · Paper 4C (Further Mechanics 2) · Q6(c)3 marks
Mark scheme (whole question; this part is marked with the orange bar)
Examiner's comment
(c) This part attracted several good responses, including from candidates who had not correctly answered previous parts of the question. A number of responses formed a correct equation but did not simplify their answer to a value. Weaker responses had inconsistent distances, often omitting the “2a” or made dimensional errors with factors of a on one side of an equation but not the other.
Key points from the mark scheme and examiner's report
moments about A: W(2a + 32a/(3(8 + 3π))) = 8a λW
λ = 0.33
include the 2a and keep a on both sides
June 2024 · AS Paper 2 (Further Mechanics 2) · Q1(a)4 marks
Mark scheme (whole question; this part is marked with the orange bar)
Examiner's comment
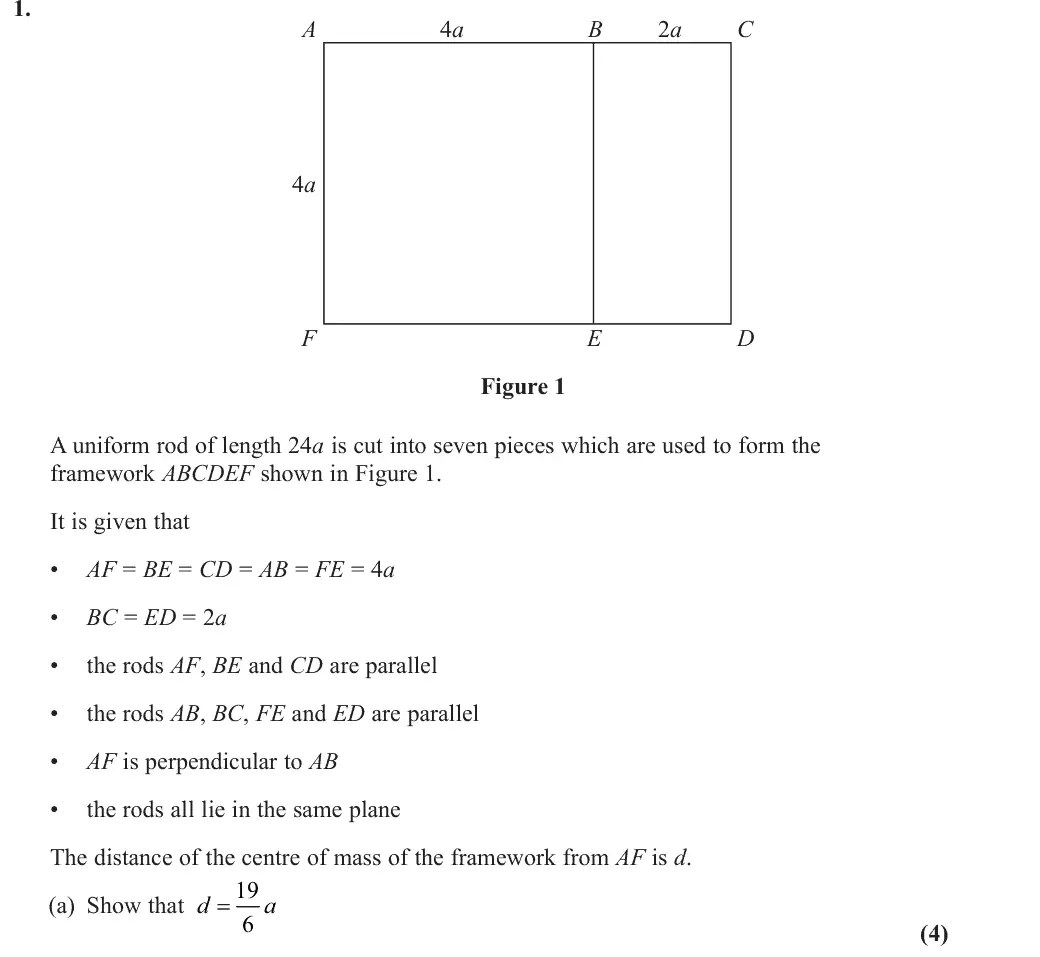
(a) The overwhelming majority of candidates understood how to approach this part but many lost marks through inaccurate working: often this was through dimensionally incorrect equations (for example, missing a throughout) which they attempted to recover at the end. Candidates must also realise that where an answer is given their conclusion must be the same: a significant number of otherwise strong candidates lost the final mark for never referencing d in their solution.
Key points from the mark scheme and examiner's report
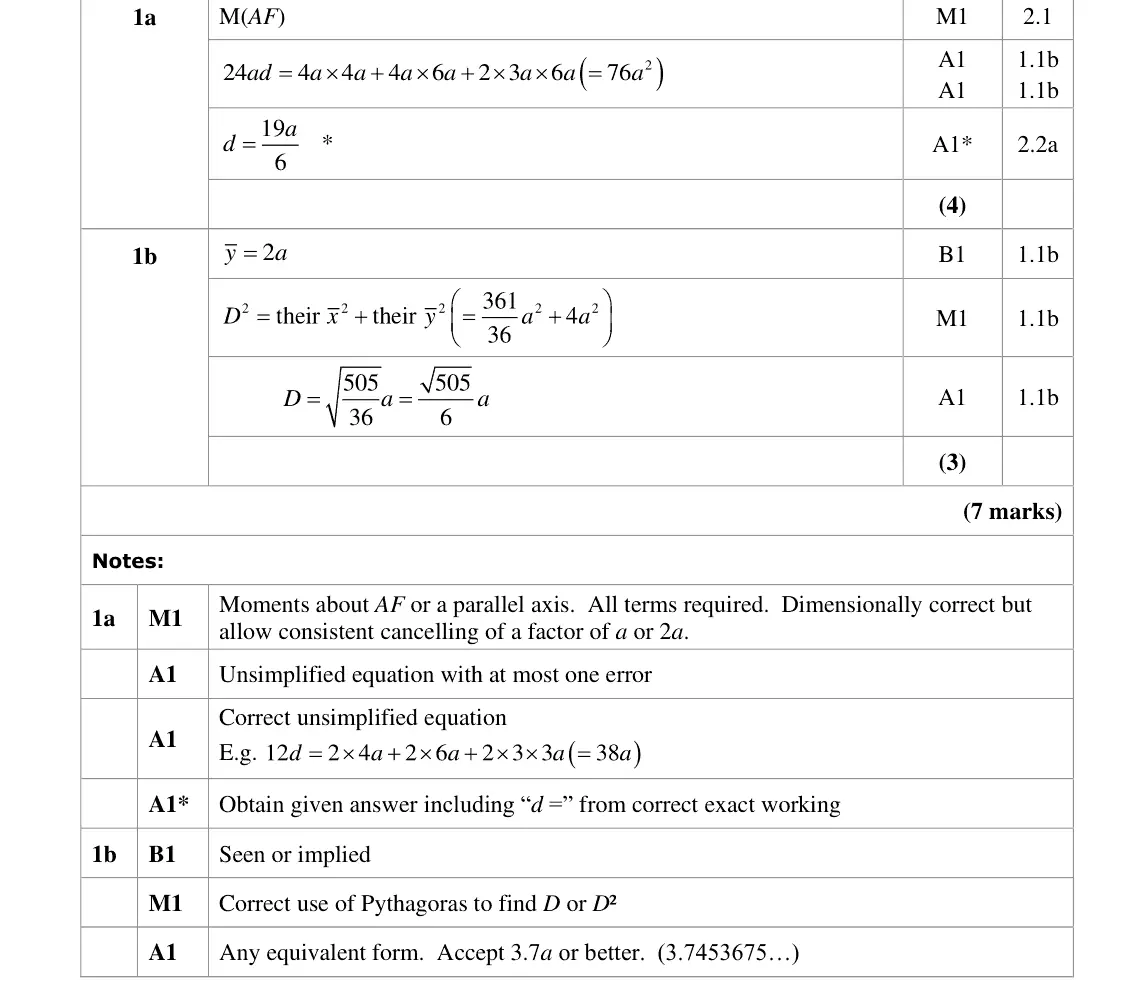
rod lengths as masses (total 24a): moments about AF give 24ad = 76a², d = 19a/6
keep a dimensionally correct throughout
conclusion must state d =
June 2024 · AS Paper 2 (Further Mechanics 2) · Q1(b)3 marks
Mark scheme (whole question; this part is marked with the orange bar)
Examiner's comment
(b) Almost all candidates successfully found y although a small number proceeded no further. Incorrect responses usually involved either unsuccessful use of trigonometry or losing the a from the final answer.
Key points from the mark scheme and examiner's report
ȳ = 2a by symmetry
Pythagoras: √505 a/6 ≈ 3.75a
some lost the a or tried trigonometry
June 2024 · AS Paper 2 (Further Mechanics 2) · Q4(a)3 marks
Mark scheme (whole question; this part is marked with the orange bar)
Examiner's comment
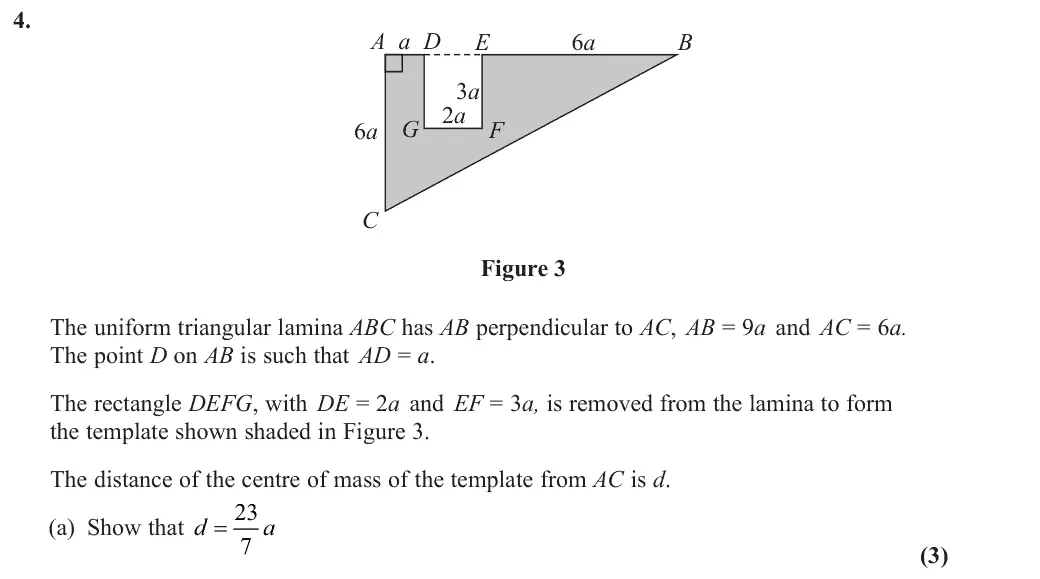
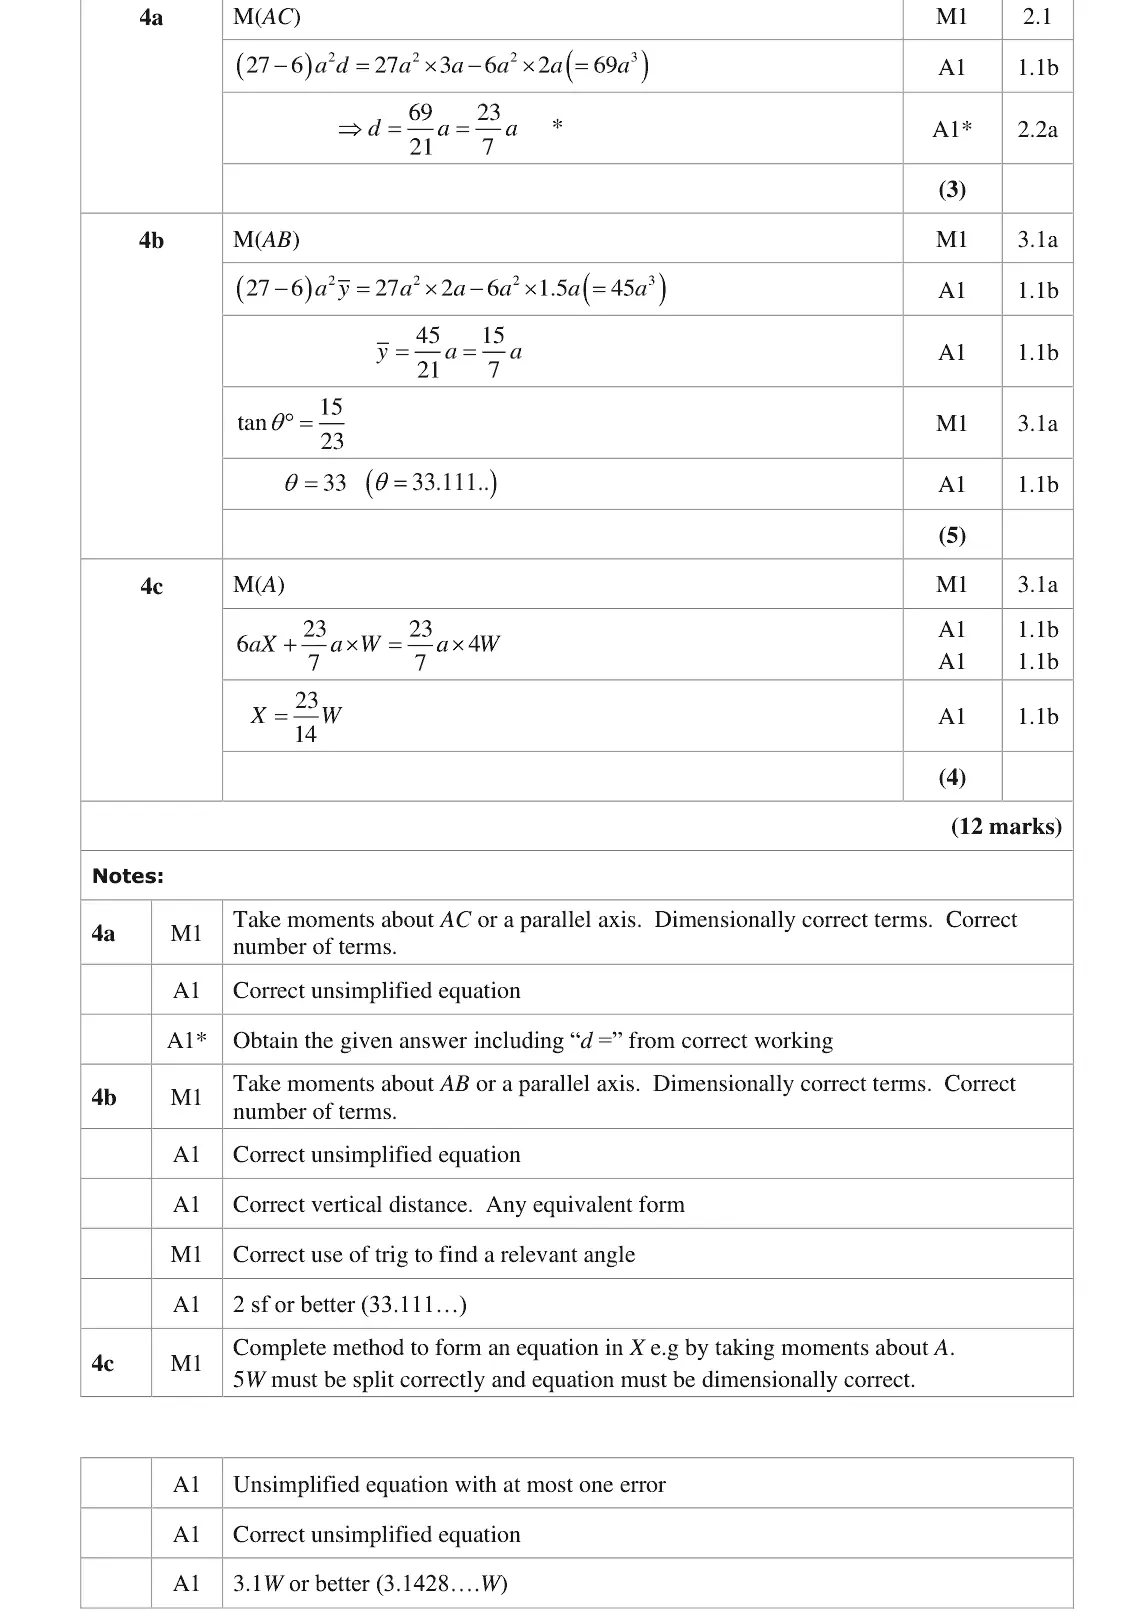
(a) As with question 1, a large number of otherwise strong candidates lost marks in this part because they had dimensionally incorrect equations (too much cancelling of a) or did not reference the d in the question. The majority of problems for those who struggled were incorrect distances of the centres of mass, with triangles in particular a problem.
Key points from the mark scheme and examiner's report
triangle area 27a² (centroid 3a from AC) minus rectangle 6a² (2a from AC): 21a²d = 69a³, d = 23a/7
triangle centroid distances were the usual error
June 2024 · AS Paper 2 (Further Mechanics 2) · Q4(b)5 marks
Mark scheme (whole question; this part is marked with the orange bar)
Examiner's comment
(b) The vast majority of candidates made good progress by finding a vertical distance and the majority proceeded correctly but a number found the angle with the horizontal instead. The weakest attempts were often those who tried to find a distance of the centre of mass from A and then use cosine or sine trigonometric ratios.
Key points from the mark scheme and examiner's report
moments about AB: ȳ = 15a/7
tan θ = (15/7)/(23/7) = 15/23 so θ = 33
some found the angle with the horizontal
June 2024 · AS Paper 2 (Further Mechanics 2) · Q4(c)4 marks
Mark scheme (whole question; this part is marked with the orange bar)
Examiner's comment
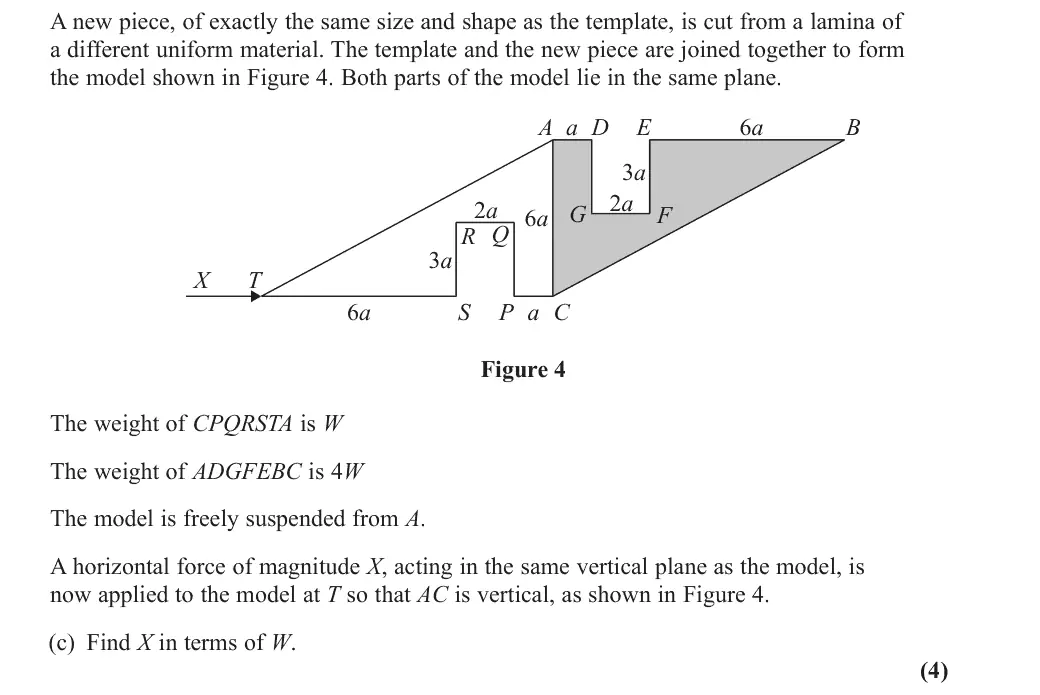
(c) This part was found by most candidates the hardest with many of them scoring no marks. A number of candidates successfully found the centre of mass of the combined shape then took moments. The most common incorrect responses included a moments equation with either no distance term with X or an incorrect distance of 9a, or moments about somewhere other than A which forgot to include a tension or equivalent force.
Key points from the mark scheme and examiner's report
moments about A with AC vertical: 6aX + (23a/7)W = (23a/7)(4W), X = 23W/14 ≈ 3.14W
the new piece's centre of mass is 23a/7 the other side of AC
X acts 6a from A, not 9a
hardest part
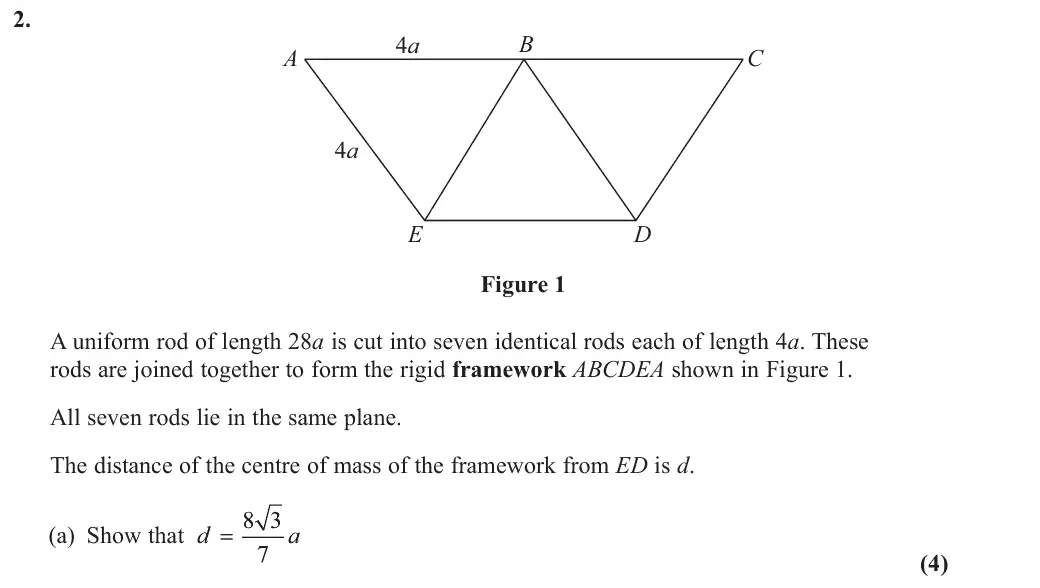
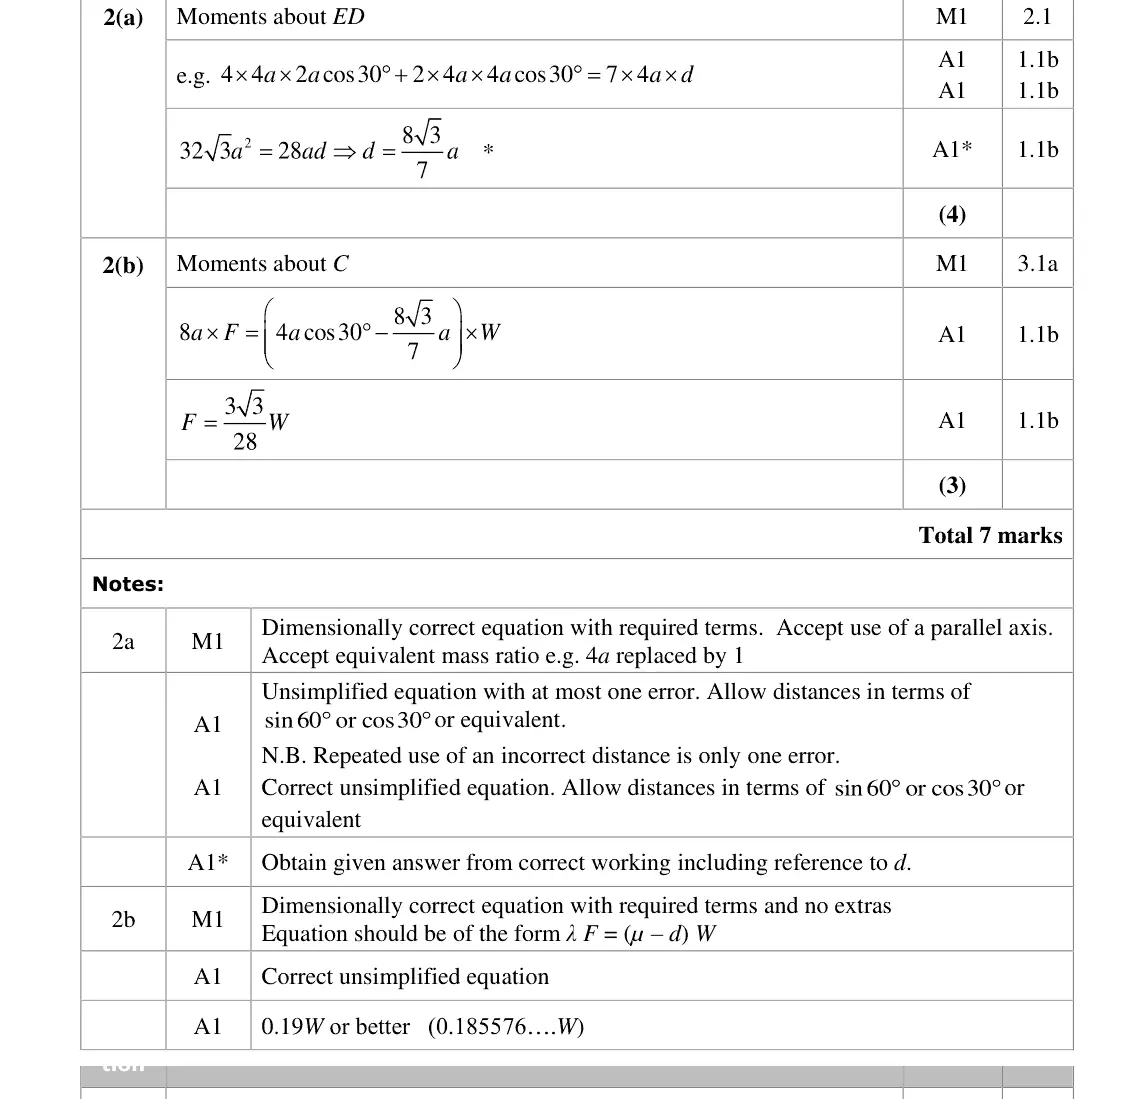
June 2024 · Paper 4C (Further Mechanics 2) · Q2(a)4 marks
Mark scheme (whole question; this part is marked with the orange bar)
Examiner's comment
(a) The vast majority of candidates recognized that they had to take moments and most successfully formed the original equation. A few worked with a dimensionally incorrect equation, missing a factor of “a” from one side and other errors included use of sin30° instead of cos30° in finding lengths. Only a small number of candidates thought the question was about triangular laminas rather than rods. A significant number of candidates who were otherwise correct did not reference the d from the question anywhere in their solution; some others omitted a from the answer. Candidates who failed to form an equation scored no marks in this part.
Key points from the mark scheme and examiner's report
seven equal rods so equal masses
heights of rod midpoints 2a cos 30° and 4a cos 30°: 32√3a² = 28ad
use cos 30° (not sin 30°), it is rods not laminas, and refer to d
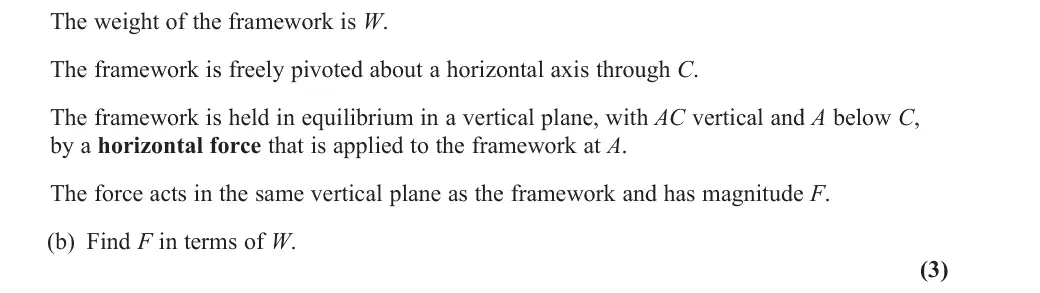
June 2024 · Paper 4C (Further Mechanics 2) · Q2(b)3 marks
Mark scheme (whole question; this part is marked with the orange bar)
Examiner's comment
(b) The majority of candidates knew what to do here and successfully found F in terms of W. From the incorrect responses, a significant number used 4a instead of 8a and many did not subtract from 4a cos30°. A small number had complicated, incorrect expressions involving trigonometry on both sides, usually because they were unnecessarily trying to find an angle between a side and the line through the CoM.
Key points from the mark scheme and examiner's report
moments about C with AC = 8a vertical: 8aF = (4a cos 30° − d)W
F = 3√3W/28 ≈ 0.19W
errors using 4a for AC or not subtracting d
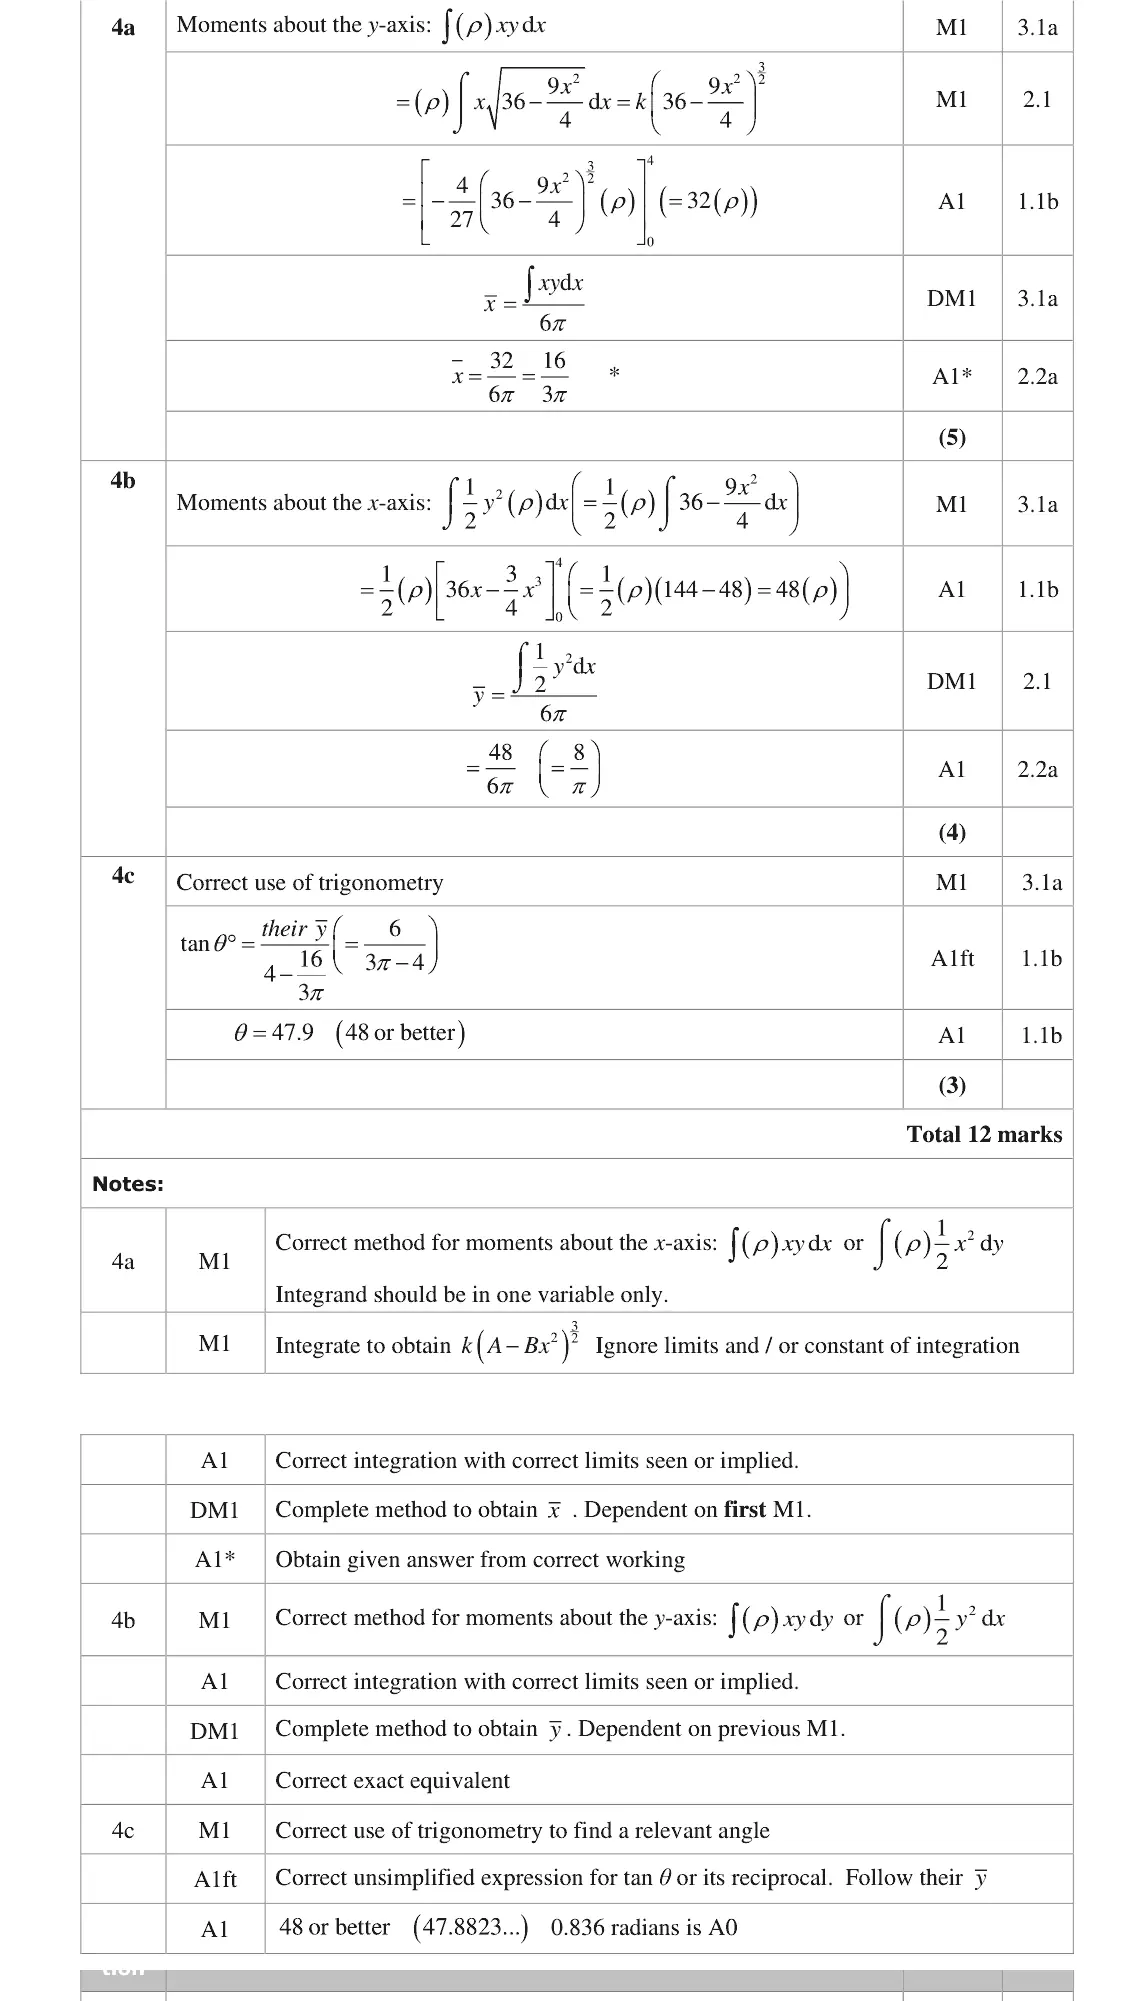
June 2024 · Paper 4C (Further Mechanics 2) · Q4(c)3 marks
Mark scheme (whole question; this part is marked with the orange bar)
Examiner's comment
(c) Most who reached this part achieved the correct answer; some candidates did not get this far. The main errors from those who attempted it were in equating tan theta to y x or to 4 4 y x - -
Key points from the mark scheme and examiner's report
suspended from A: tan θ = ȳ/(4 − x̄) = 6/(3π − 4)
θ = 47.9
errors using ȳ/x̄
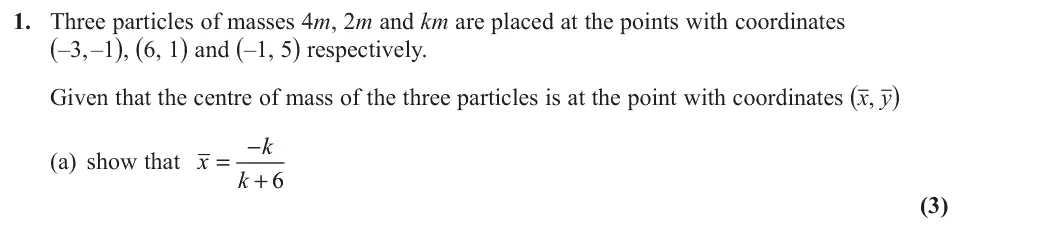
June 2023 · AS Paper 2 (Further Mechanics 2) · Q1(a)3 marks
Mark scheme (whole question; this part is marked with the orange bar)
Examiner's comment
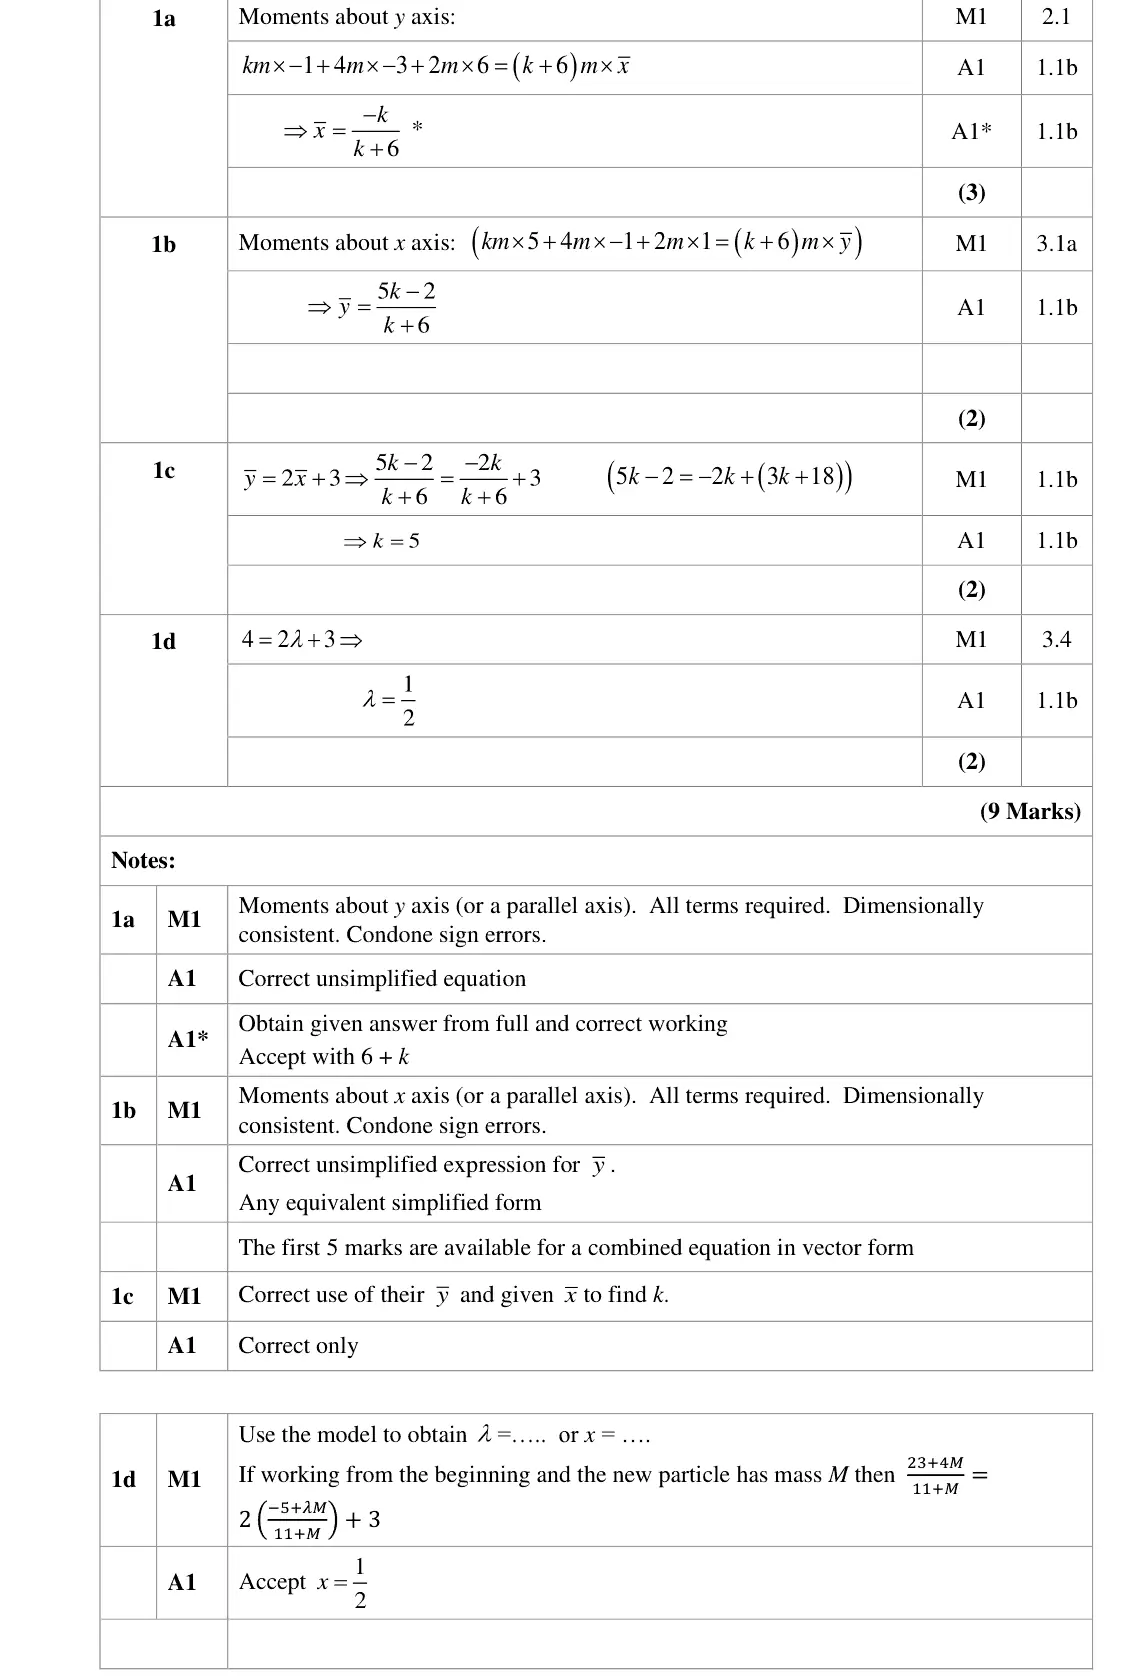
(a) This question has a given answer, so the working needs to be clear and correct. The majority of candidates achieved this. The most common problem was the inconsistent use of m, which needs to be in all terms or in none for the equation to be dimensionally consistent.
Key points from the mark scheme and examiner's report
moments about the y-axis: −km − 12m + 12m = (k + 6)m x̄ gives −k/(k + 6)
m must be in all terms or none (dimensional consistency)
June 2023 · AS Paper 2 (Further Mechanics 2) · Q1(b)2 marks
Mark scheme (whole question; this part is marked with the orange bar)
Examiner's comment
(b) Many candidates did the working for part (b) alongside the working for (a) in a vector equation. The answer was usually correct.
Key points from the mark scheme and examiner's report
moments about the x-axis: ȳ = (5k − 2)/(k + 6)
often done with (a) as one vector equation
June 2023 · AS Paper 2 (Further Mechanics 2) · Q1(c)2 marks
Mark scheme (whole question; this part is marked with the orange bar)
Examiner's comment
(c) The majority of candidates understood that they needed to substitute their coordinates for the centre of mass into the equation of the line. There were a few slips in the algebra and in the arithmetic, but several correct solutions.
Key points from the mark scheme and examiner's report
substitute x̄ and ȳ into y = 2x + 3: 5k − 2 = −2k + 3k + 18 so k = 5
June 2023 · AS Paper 2 (Further Mechanics 2) · Q1(d)2 marks
Mark scheme (whole question; this part is marked with the orange bar)
Examiner's comment
(d) Those candidates who realised that the fourth particle must lie on the line scored these marks very easily. Those who did not spot this needed to assign a mass to the new particle and work through from the beginning. Some of these candidates were successful, but the arithmetic and algebra were a problem.
Key points from the mark scheme and examiner's report
the fourth particle must itself lie on the line: 4 = 2λ + 3 so λ = 1/2
those who missed this had to assign a mass and work from the start
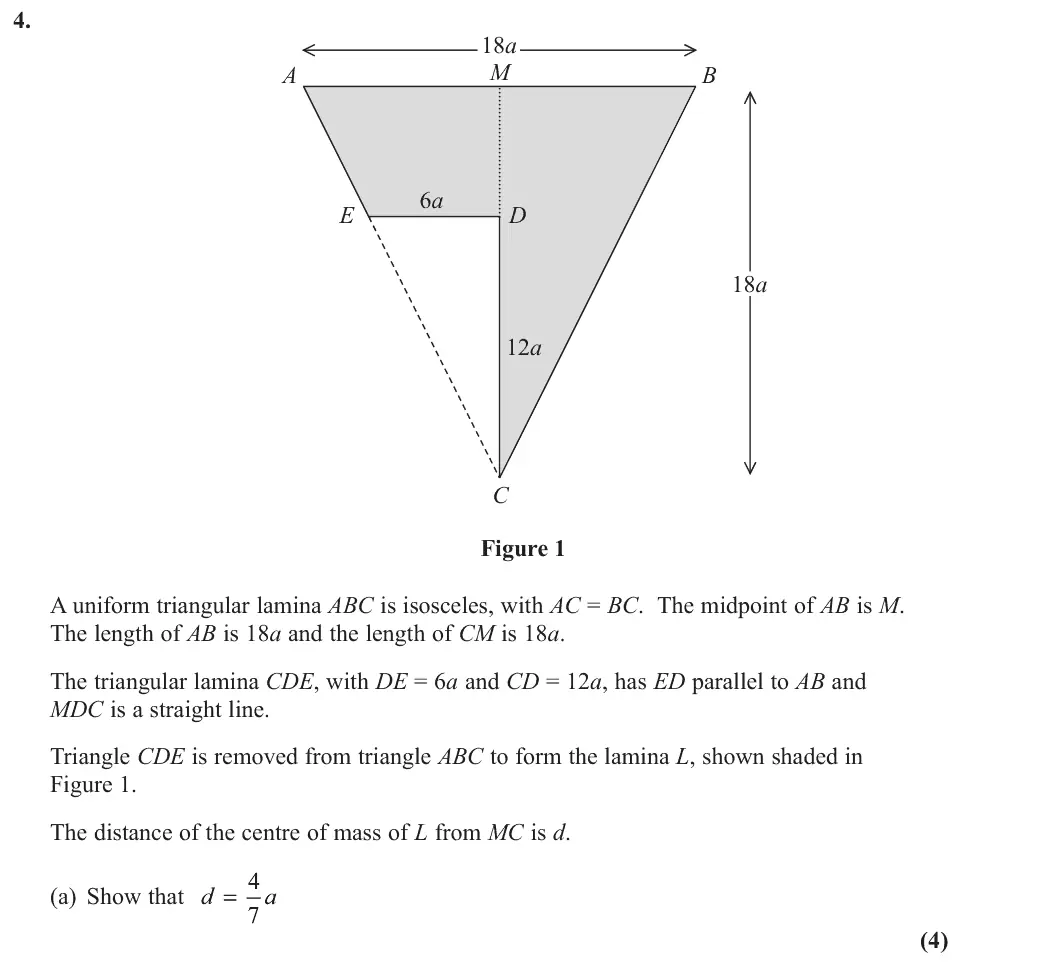
June 2023 · AS Paper 2 (Further Mechanics 2) · Q4(a)4 marks
Mark scheme (whole question; this part is marked with the orange bar)
Examiner's comment
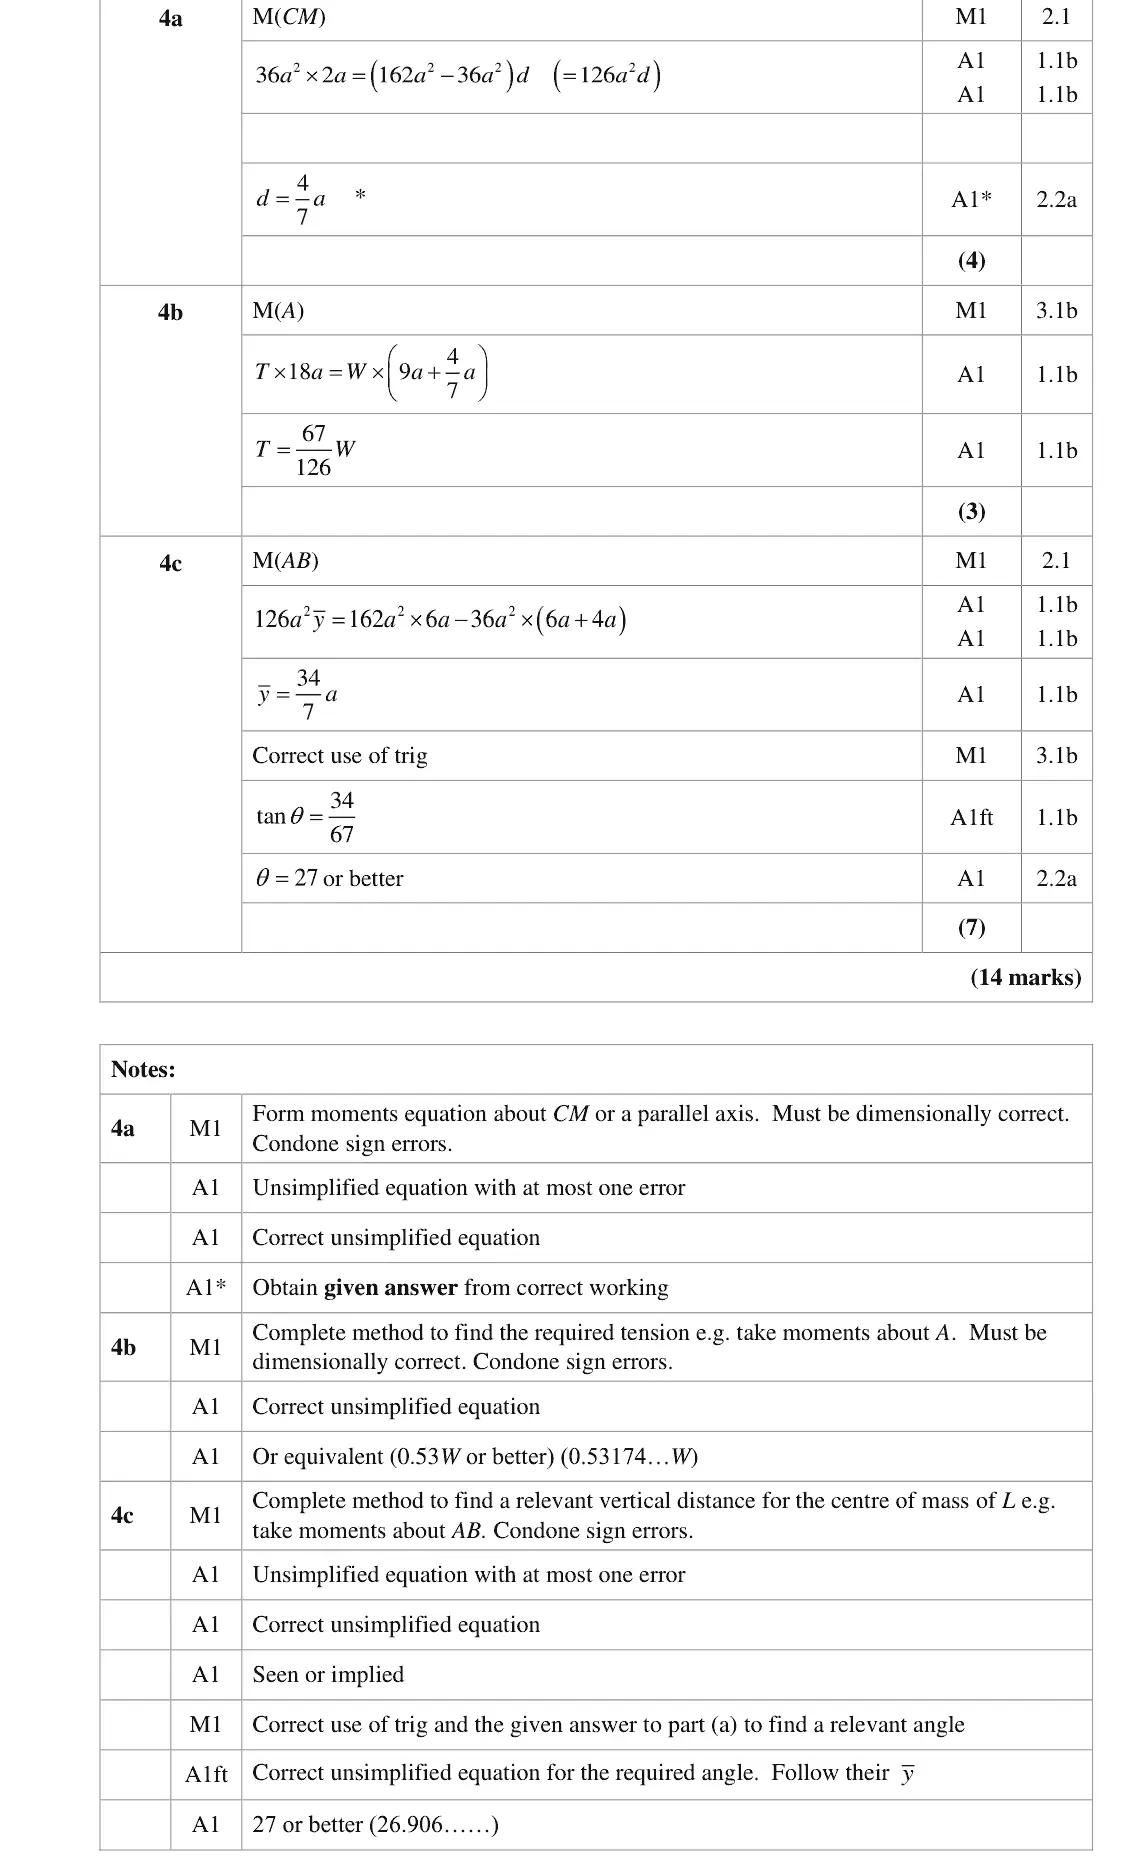
(a) Many candidates made this more complicated than necessary, either by dividing the figure into more than two parts, or by using a vertical axis other than CM. Using CM as the vertical axis makes the working much simpler because the centre of mass of ABC lies on CM. Many candidates did eventually reach the given answer.
Key points from the mark scheme and examiner's report
moments about CM using two parts: 36a² × 2a = (162a² − 36a²)d gives 4a/7
extra dissections or other axes made it harder
June 2023 · AS Paper 2 (Further Mechanics 2) · Q4(b)3 marks
Mark scheme (whole question; this part is marked with the orange bar)
Examiner's comment
(b) Several candidates were successful in using the answer to part (a) to solve this task. However, many did not appreciate that if they needed to know the tension in the string attached at B then the most efficient approach was to take moments about A.
Key points from the mark scheme and examiner's report
moments about A: 18aT = W(9a + 4a/7) gives T = 67W/126 (0.53W)
moments about A is the efficient route
June 2023 · AS Paper 2 (Further Mechanics 2) · Q4(c)7 marks
Mark scheme (whole question; this part is marked with the orange bar)
Examiner's comment
(c) To solve this problem, it was necessary to find the vertical distance of the centre of mass of the lamina from AB. To this end, a sensible approach was to take moments about AB, although with the centre of mass of ABC lying on DE using this as the axis was also a good tactic. Some candidates who were working on the correct triangle were confused about which angle they needed to use.
Key points from the mark scheme and examiner's report
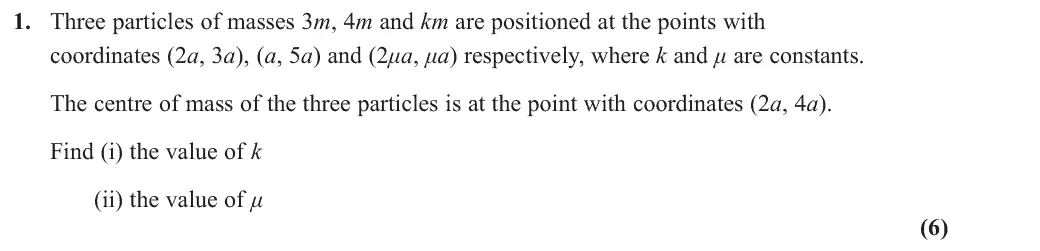
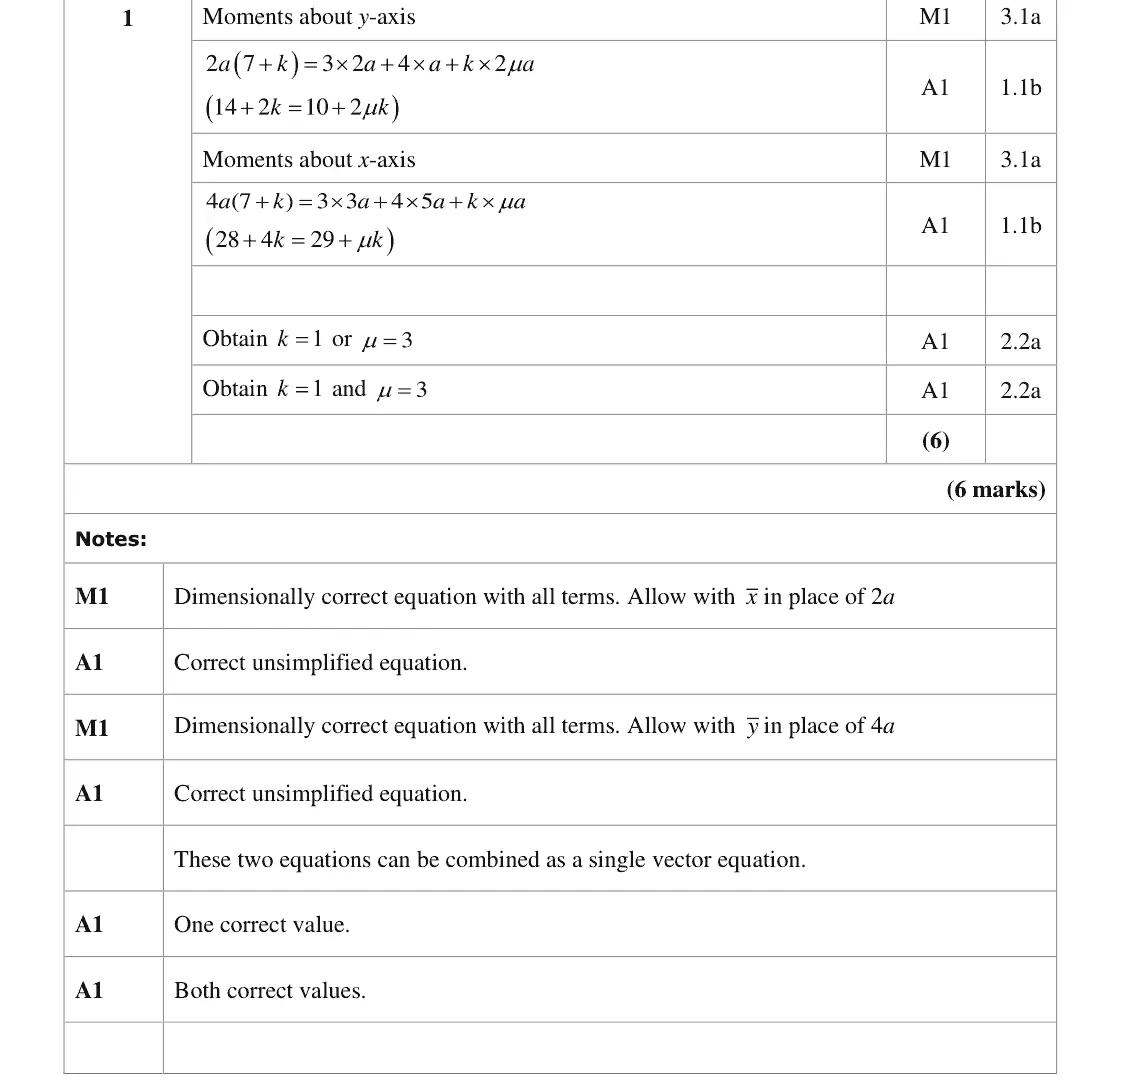
June 2023 · Paper 4C (Further Mechanics 2) · Q1(ii)6 marks
Mark scheme (whole question; this part is marked with the orange bar)
Examiner's comment
Almost all of the candidates identified the need to take moments around the coordinate axes and correctly obtained a pair of simultaneous equations, usually expressed in vector form. The vast majority of the errors occurred in trying to solve these equations.
Key points from the mark scheme and examiner's report
moments about both axes (or one vector equation): 14 + 2k = 10 + 2μk and 28 + 4k = 29 + μk
solve simultaneously for k = 1, μ = 3
most errors came in solving the equations
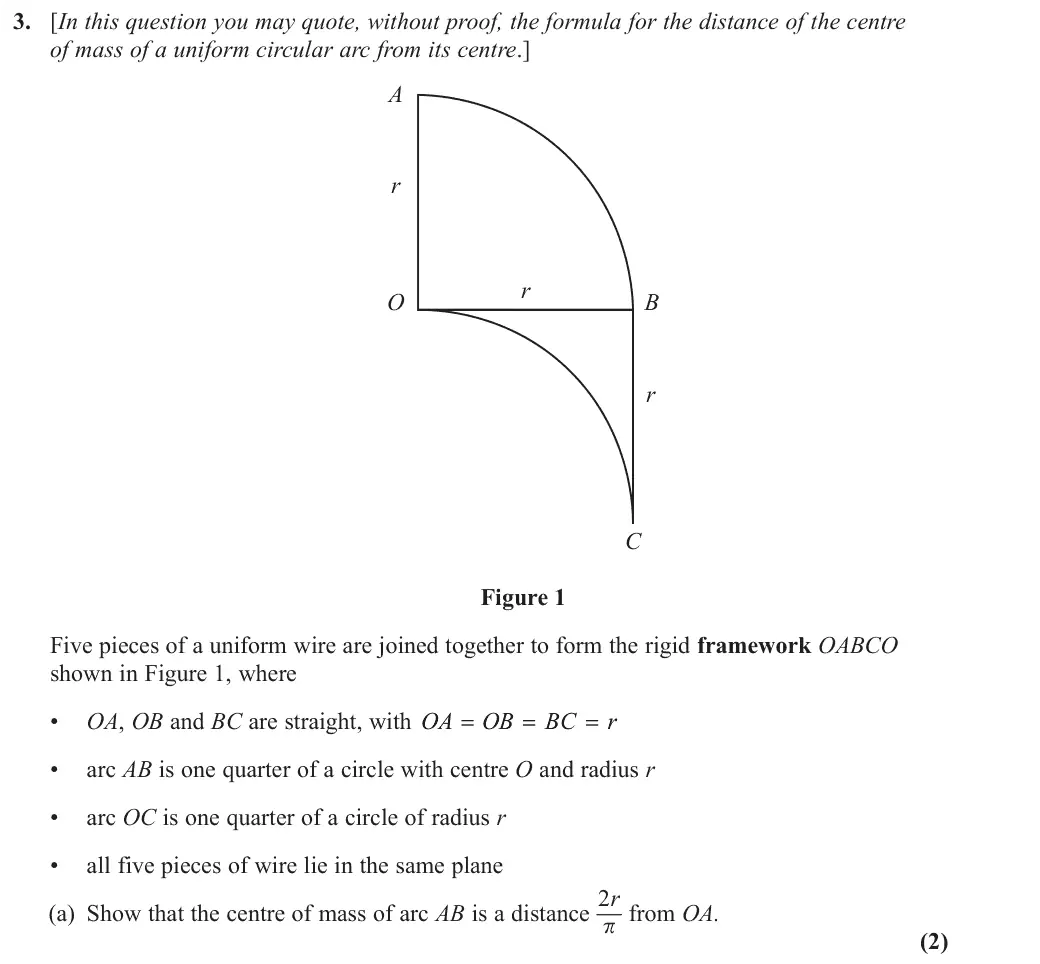
June 2023 · Paper 4C (Further Mechanics 2) · Q3(a)2 marks
Mark scheme (whole question; this part is marked with the orange bar)
Examiner's comment
(a) Most candidates used the correct formula with 4 = and obtained the given result correctly. Some offered no attempt to demonstrate the result, and some used 2 = .
Key points from the mark scheme and examiner's report
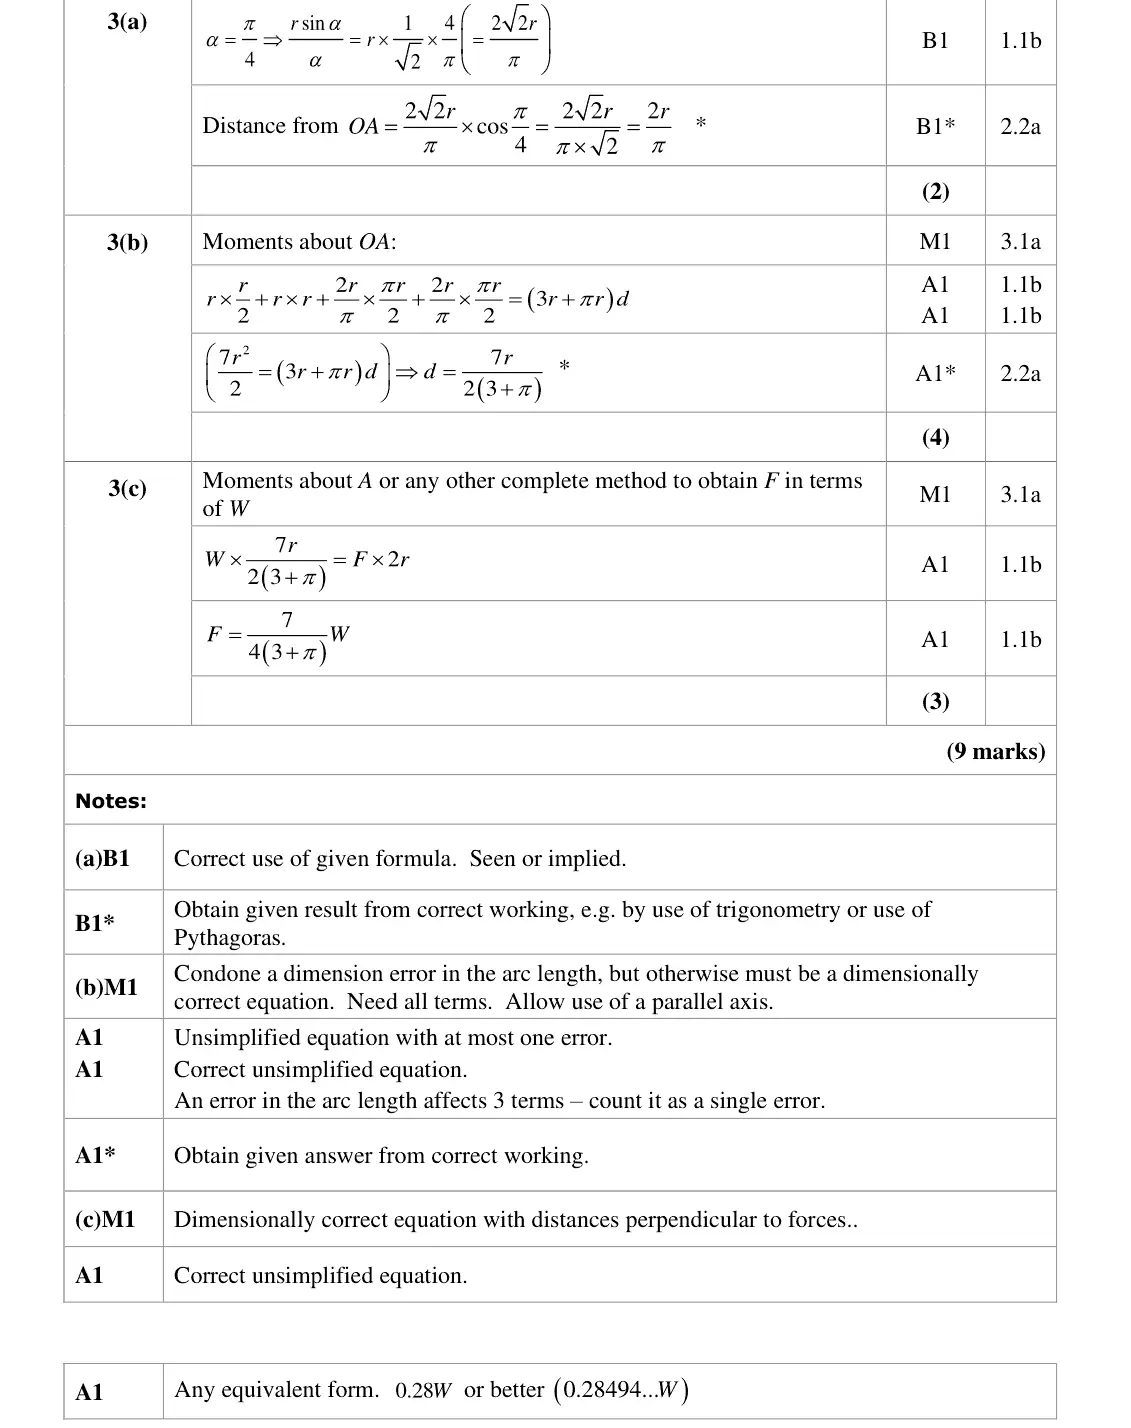
arc formula with α = π/4 (not π/2): 2√2r/π from O, times cos 45° gives 2r/π from OA
June 2023 · Paper 4C (Further Mechanics 2) · Q3(b)4 marks
Mark scheme (whole question; this part is marked with the orange bar)
Examiner's comment
(b) The majority of candidates took moments about OA, often as part of a vector equation, and obtained the given answer. The most common errors were in finding the lengths of the arcs AB and OC, with candidates often using an area formula. Although the question talks about pieces of wire and a framework, some candidates worked the question as if it concerned a lamina.
Key points from the mark scheme and examiner's report
masses proportional to lengths: arcs πr/2 each (not area formulae)
moments about OA: 7r²/2 = (3 + π)r d
it is a wire framework, not a lamina
June 2023 · Paper 4C (Further Mechanics 2) · Q3(c)3 marks
Mark scheme (whole question; this part is marked with the orange bar)
Examiner's comment
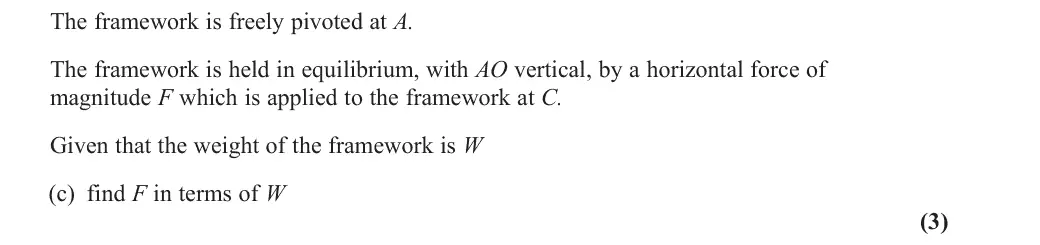
(c) The majority of the candidates recognised the need to take moments about the point A and thus correctly obtained F in terms of W. The most common error in this approach was to assume that the vertical distance of C from A was r, not 2r. A surprising error from some candidates was to cancel the 1 2 on one side of the equation and the 2 on the other side. A significant minority of the candidates took moments about the point O but then forgot to include the moment of the force acting at A and thus scored no marks in this part.
Key points from the mark scheme and examiner's report
moments about A: W d = F × 2r (C is 2r below A, not r)
F = 7W/(4(3 + π)) ≈ 0.285W
moments about O need the force at A too
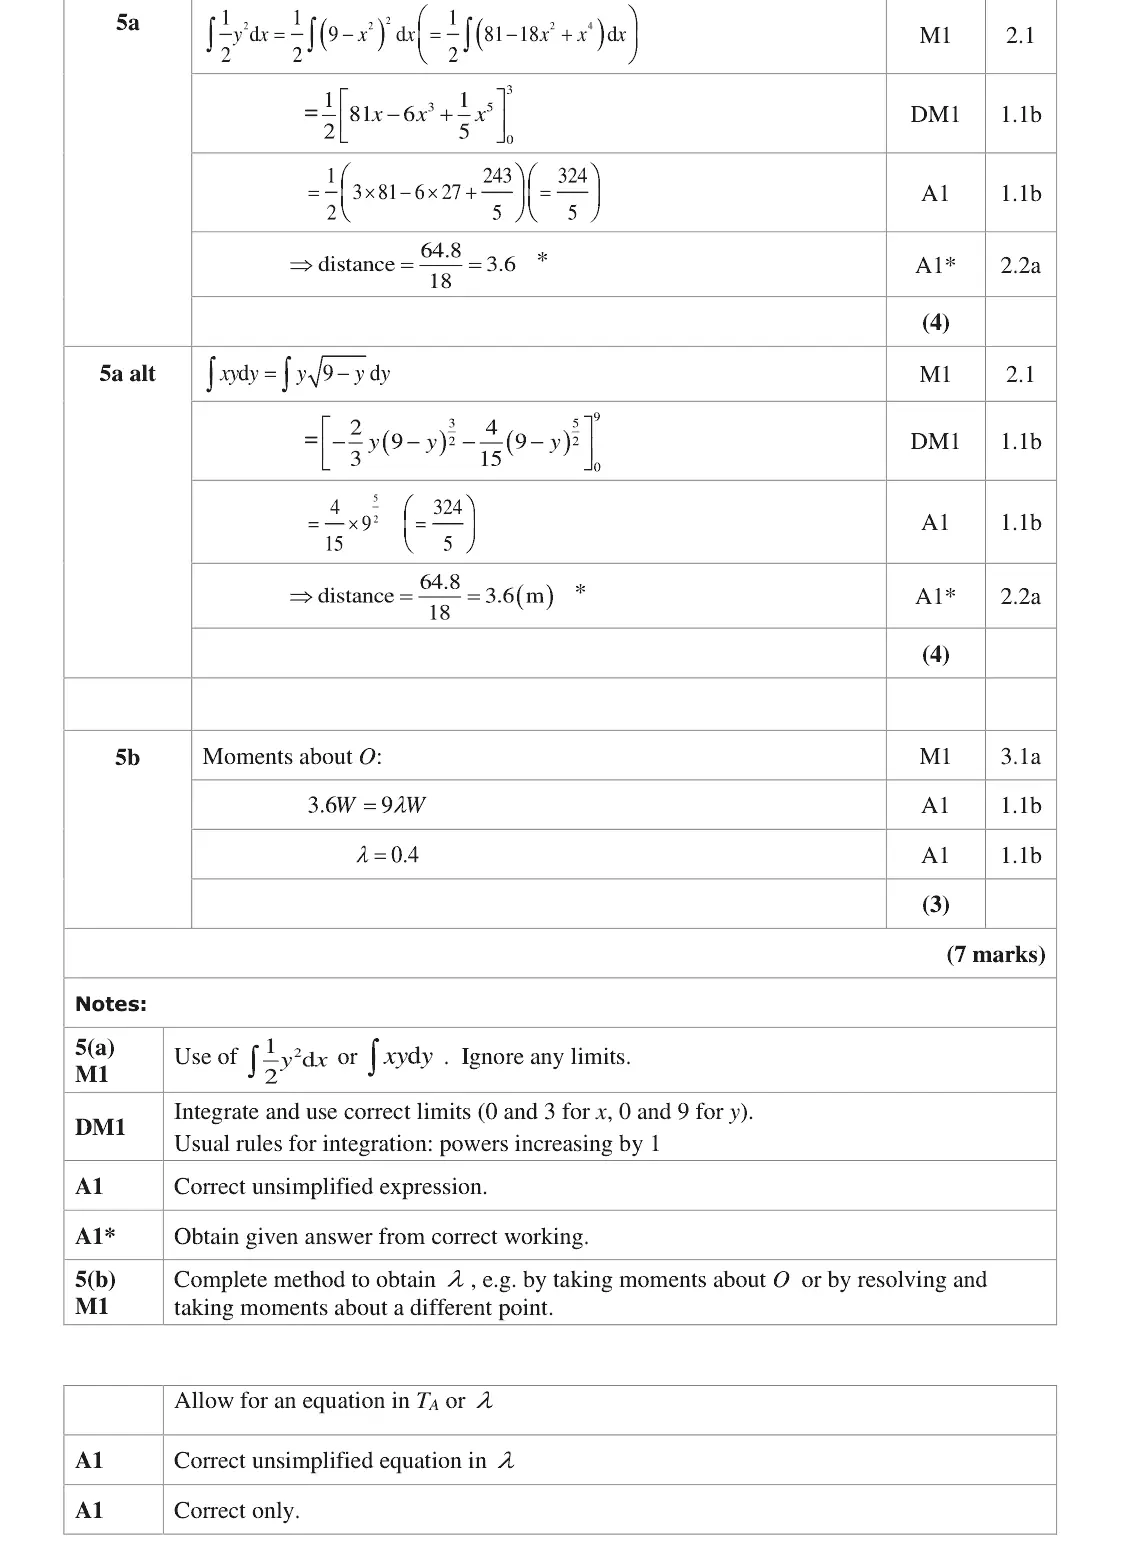
June 2023 · Paper 4C (Further Mechanics 2) · Q5(b)3 marks
Mark scheme (whole question; this part is marked with the orange bar)
Examiner's comment
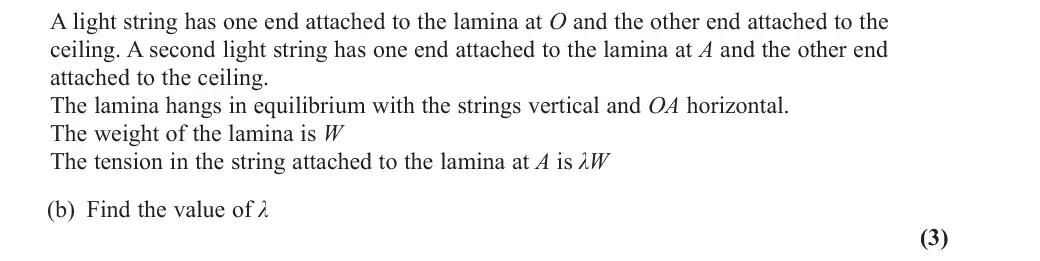
(b) This part of the question used the given result from part (a), so several candidates answered this correctly without completing part (a). Most candidates took moments about O, but some resolved vertically and took moments about a different point. Most errors involved the use of incorrect distances.
Key points from the mark scheme and examiner's report
OA horizontal so the weight acts 3.6 m from O along OA
moments about O: 3.6W = 9λW, λ = 0.4
errors from wrong distances
June 2022 · AS Paper 2 (Further Mechanics 2) · Q1(a)5 marks
Mark scheme (whole question; this part is marked with the orange bar)
Examiner's comment
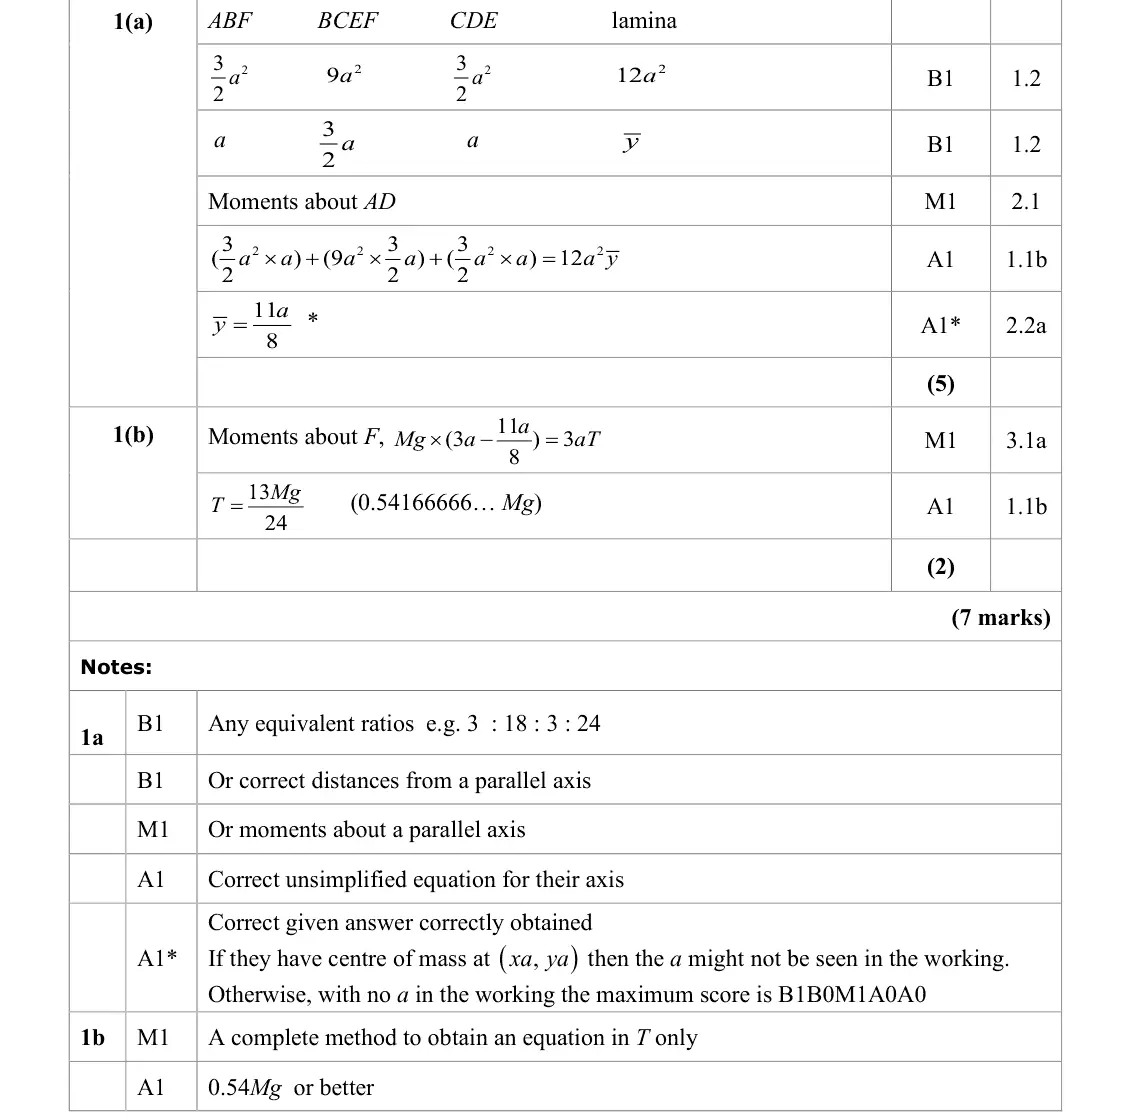
(a) Most candidates used the correct areas for a square and two triangles. They were asked to find the distance of the centre of mass from AD but many preferred to work from FE. Some made the required adjustment to obtain the given answer, but others just stopped. There were several arithmetic errors.
Key points from the mark scheme and examiner's report
split into two triangles and the square: areas 3a²/2, 9a², 3a²/2
moments about AD (many used FE and did not adjust) give 11a/8
June 2022 · AS Paper 2 (Further Mechanics 2) · Q1(b)2 marks
Mark scheme (whole question; this part is marked with the orange bar)
Examiner's comment
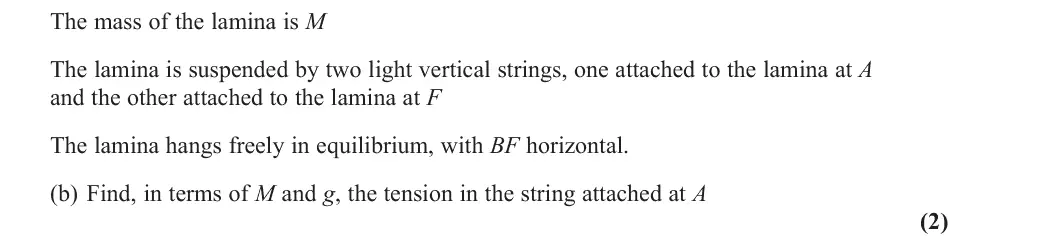
(b) Most candidates who attempted this part of the question understood that they needed to take moments about F. There were some fully correct solutions, but also several errors in the distances used, most notably using a in place of 3a.
Key points from the mark scheme and examiner's report
moments about F: Mg(3a − 11a/8) = 3aT so T = 13Mg/24 (0.54Mg)
common error a in place of 3a
June 2022 · AS Paper 2 (Further Mechanics 2) · Q2(a)5 marks
Mark scheme (whole question; this part is marked with the orange bar)
Examiner's comment
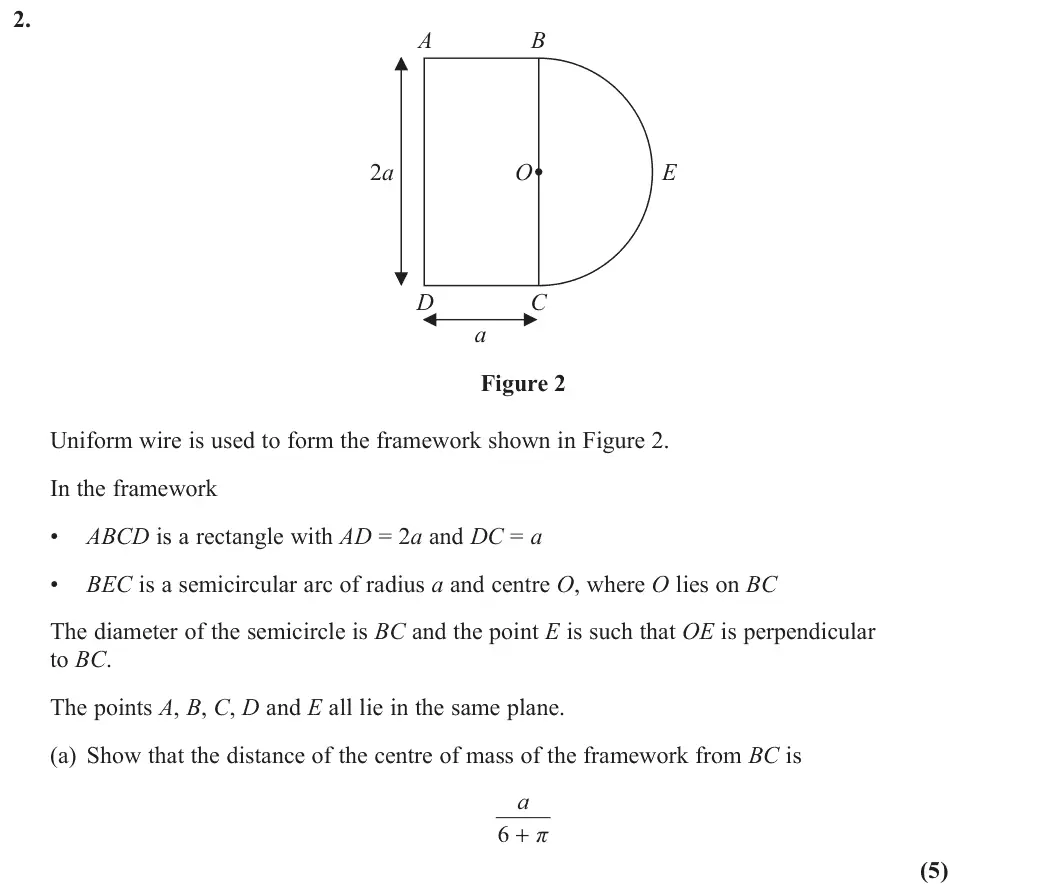
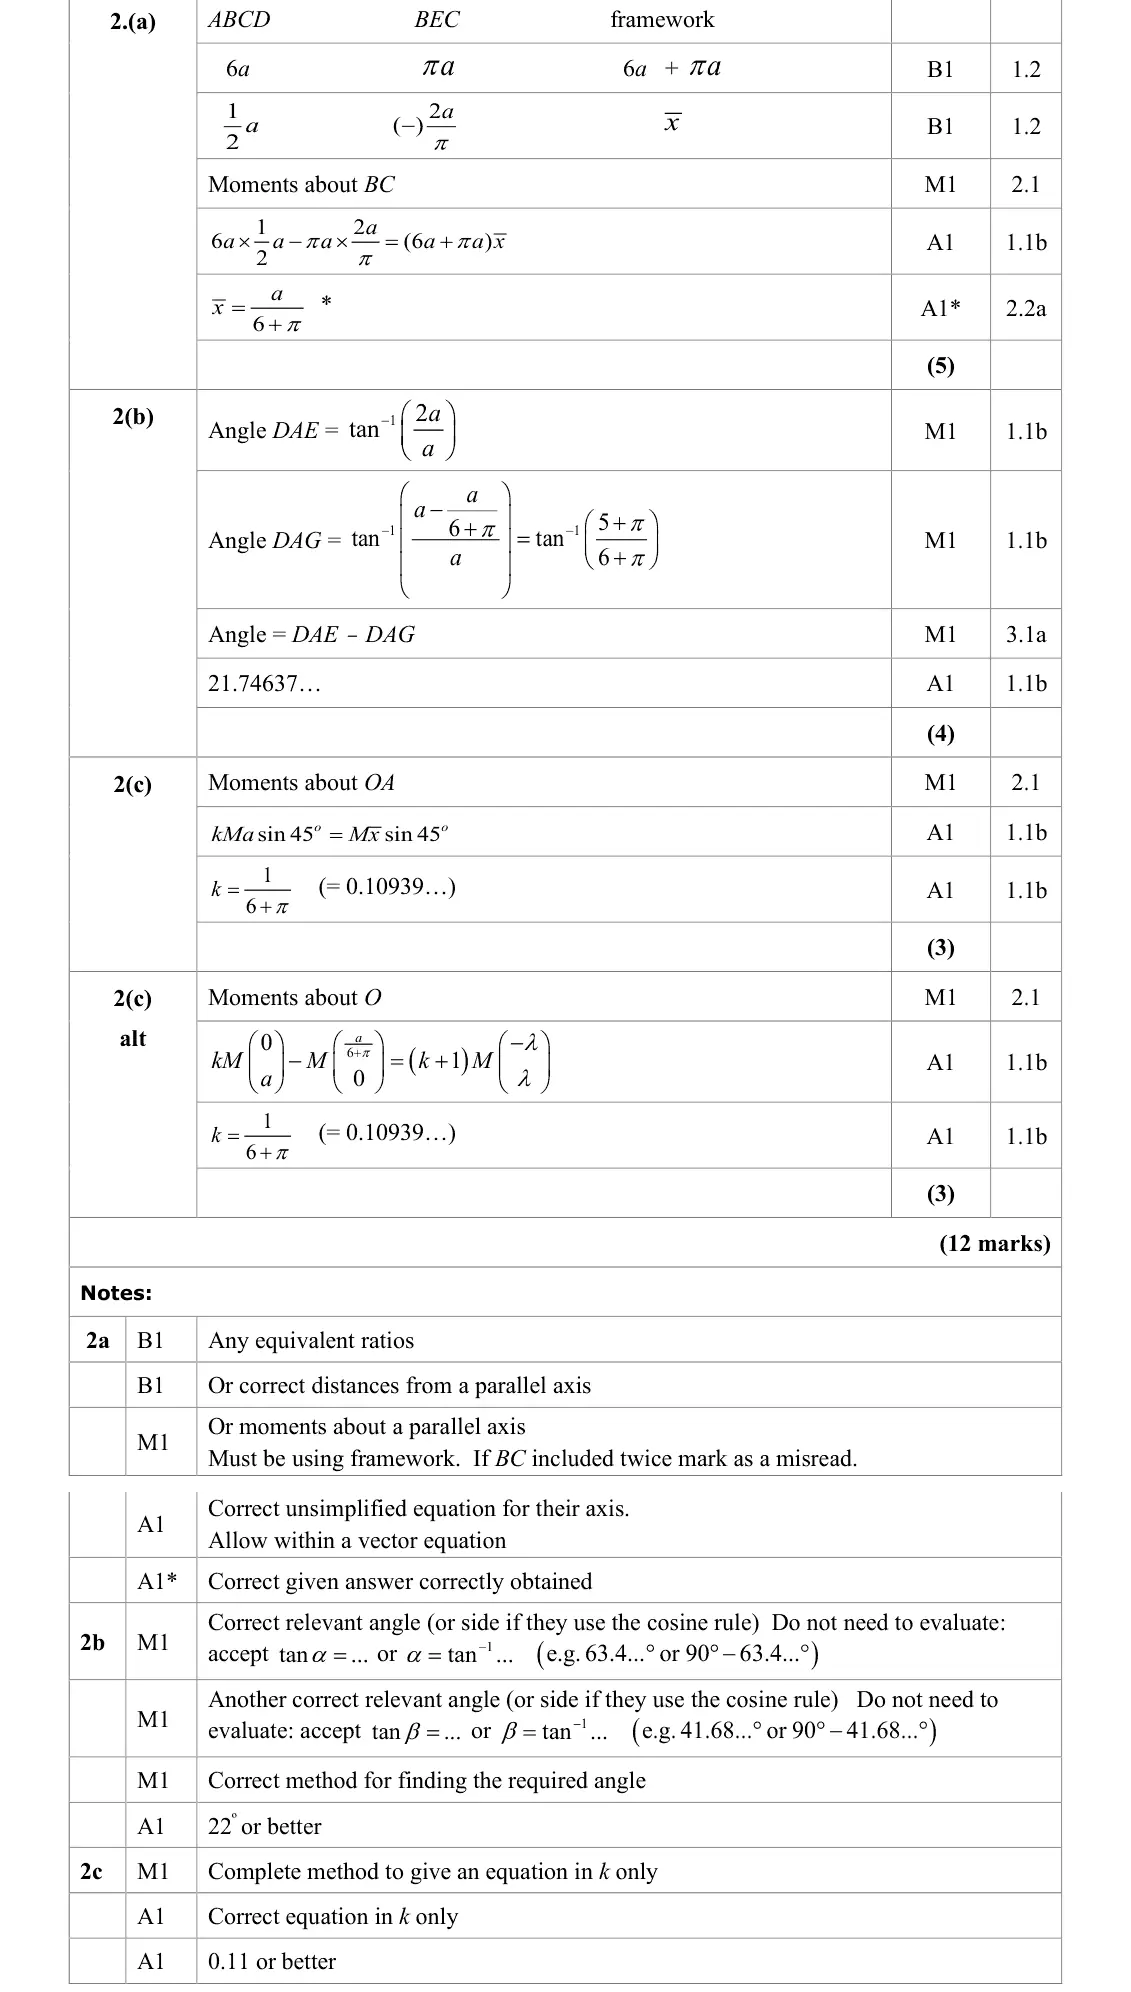
(a) The given answer should have given an indication to candidates if they had made a false start. This did not seem to be the case. The most common errors were: • Using areas in place of lengths of rods. • Including BC twice or not at all. • Using the formula for the centre of mass of a semi-circular lamina in place of the formula for a semi-circular arc. • Using an axis parallel to BC and not making the appropriate adjustment to find the distance asked for.
Key points from the mark scheme and examiner's report
a framework of rods: lengths 6a (rectangle) and πa (arc), not areas
arc centre of mass 2a/π from BC (not the semicircular lamina 4a/3π)
BC counted once
June 2022 · AS Paper 2 (Further Mechanics 2) · Q2(b)4 marks
Mark scheme (whole question; this part is marked with the orange bar)
Examiner's comment
(b) Very few correct solutions were seen. Candidates needed a clear diagram to identify the required angle and to be using the correct distances. Some candidates found one of the relevant angles but in the absence of a clear diagram did not realise that there were two angles to be found.
Key points from the mark scheme and examiner's report
a clear diagram is needed to see there are two angles
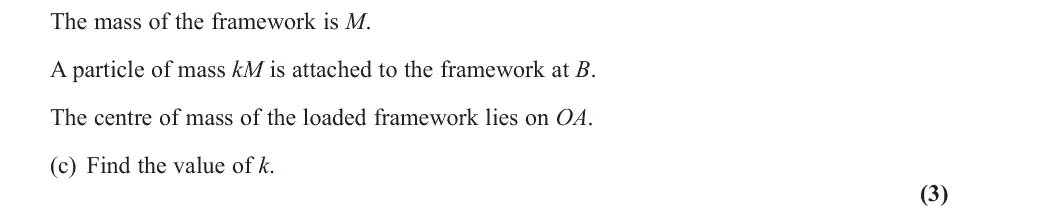
June 2022 · AS Paper 2 (Further Mechanics 2) · Q2(c)3 marks
Mark scheme (whole question; this part is marked with the orange bar)
Examiner's comment
(c) Very few candidates were able to offer a correct solution to this part of the problem. The most successful solutions used a moments equation with position vectors for the two components, as in the alternative method on the mark scheme.
Key points from the mark scheme and examiner's report
moments about OA (at 45°): kMa sin 45° = M x̄ sin 45° so k = 1/(6 + π) ≈ 0.109
position vectors about O were the most successful route
very few correct
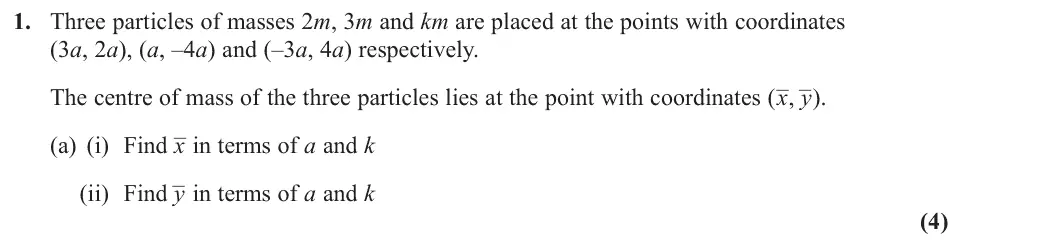
June 2022 · Paper 4C (Further Mechanics 2) · Q1(a)4 marks
Mark scheme (whole question; this part is marked with the orange bar)
Examiner's comment
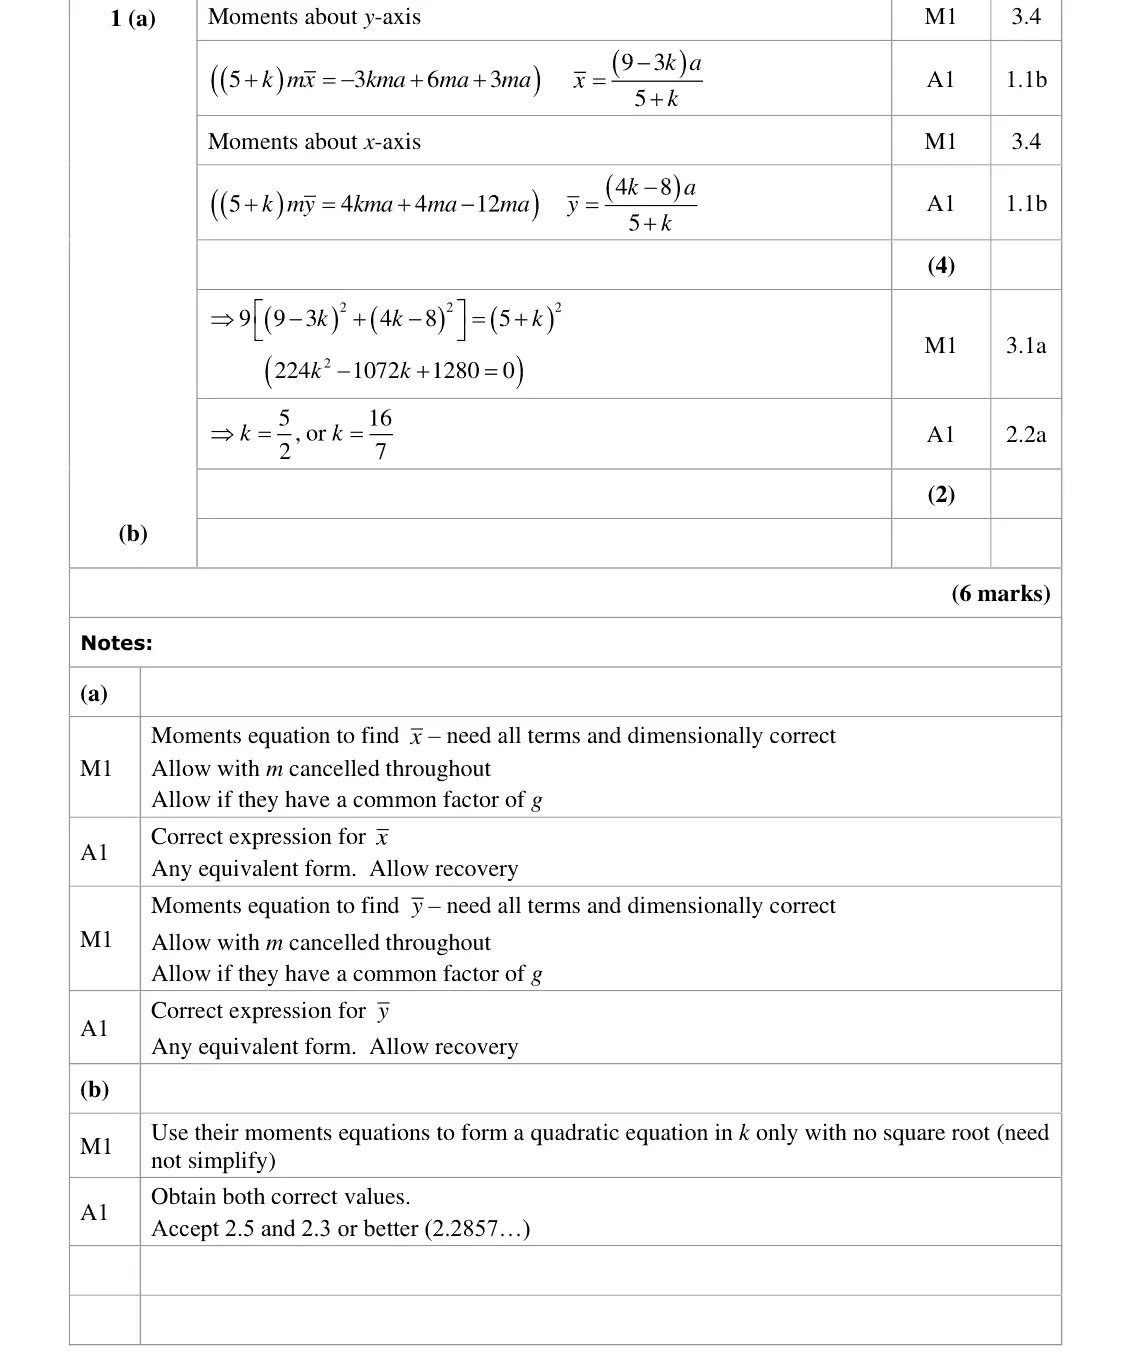
(a) This was a very accessible introduction to the paper, with the vast majority of students forming two correct moments equations and finding the correct distances. Many candidates worked with a vector equation. Common errors included inconsistent presence of “a” in equations and arithmetic errors.
Key points from the mark scheme and examiner's report
moments about each axis: x̄ = (9 − 3k)a/(5 + k), ȳ = (4k − 8)a/(5 + k)
keep a consistently in both equations
vector form also accepted
June 2022 · Paper 4C (Further Mechanics 2) · Q1(b)2 marks
Mark scheme (whole question; this part is marked with the orange bar)
Examiner's comment
(b) Nearly all candidates went on to use the given information about the distance to form and solve an equation in k. Again, some solutions were spoiled by processing errors.
Key points from the mark scheme and examiner's report
x̄² + ȳ² = a²/9 gives 224k² − 1072k + 1280 = 0
k = 5/2 or 16/7
processing slips common
June 2022 · Paper 4C (Further Mechanics 2) · Q3(a)4 marks
Mark scheme (whole question; this part is marked with the orange bar)
Examiner's comment
(a) The vast majority of candidates attempted to take moments about AC to find the position of the centre of mass of the framework. Many achieved a correct expression with only an occasional processing error. A significant minority of candidates scored no marks, either because they used lengths for masses (ignoring the fact that three of the rods were twice the mass per unit length of the others) or because they used mass per unit length (ignoring the lengths of the rods). A few did unnecessary work in finding the vertical position as well as the horizontal position for the centre of mass.
Key points from the mark scheme and examiner's report
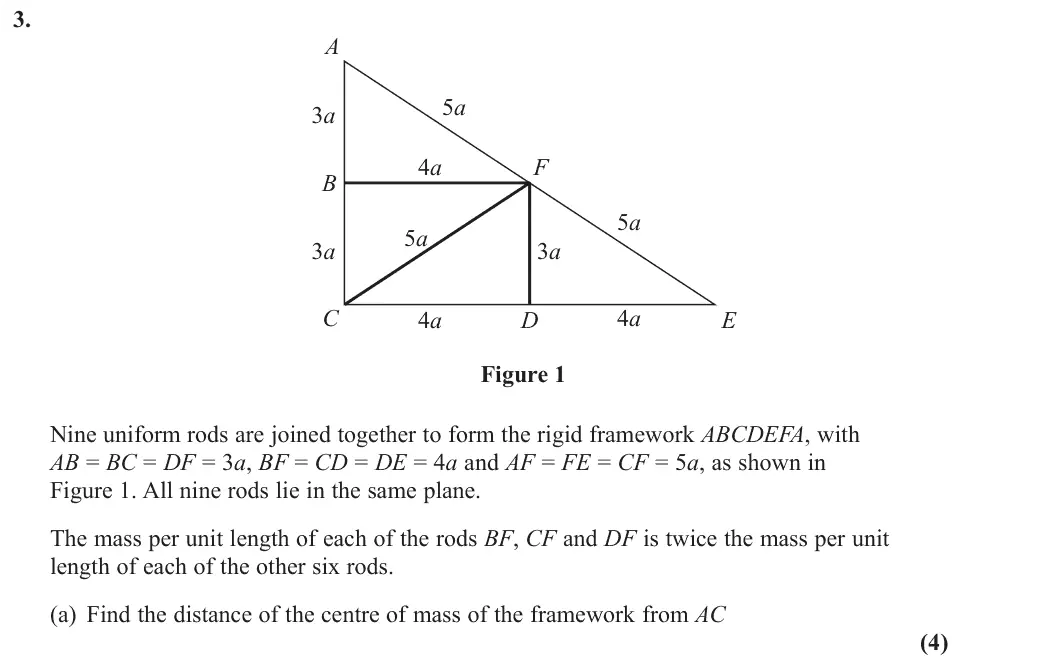
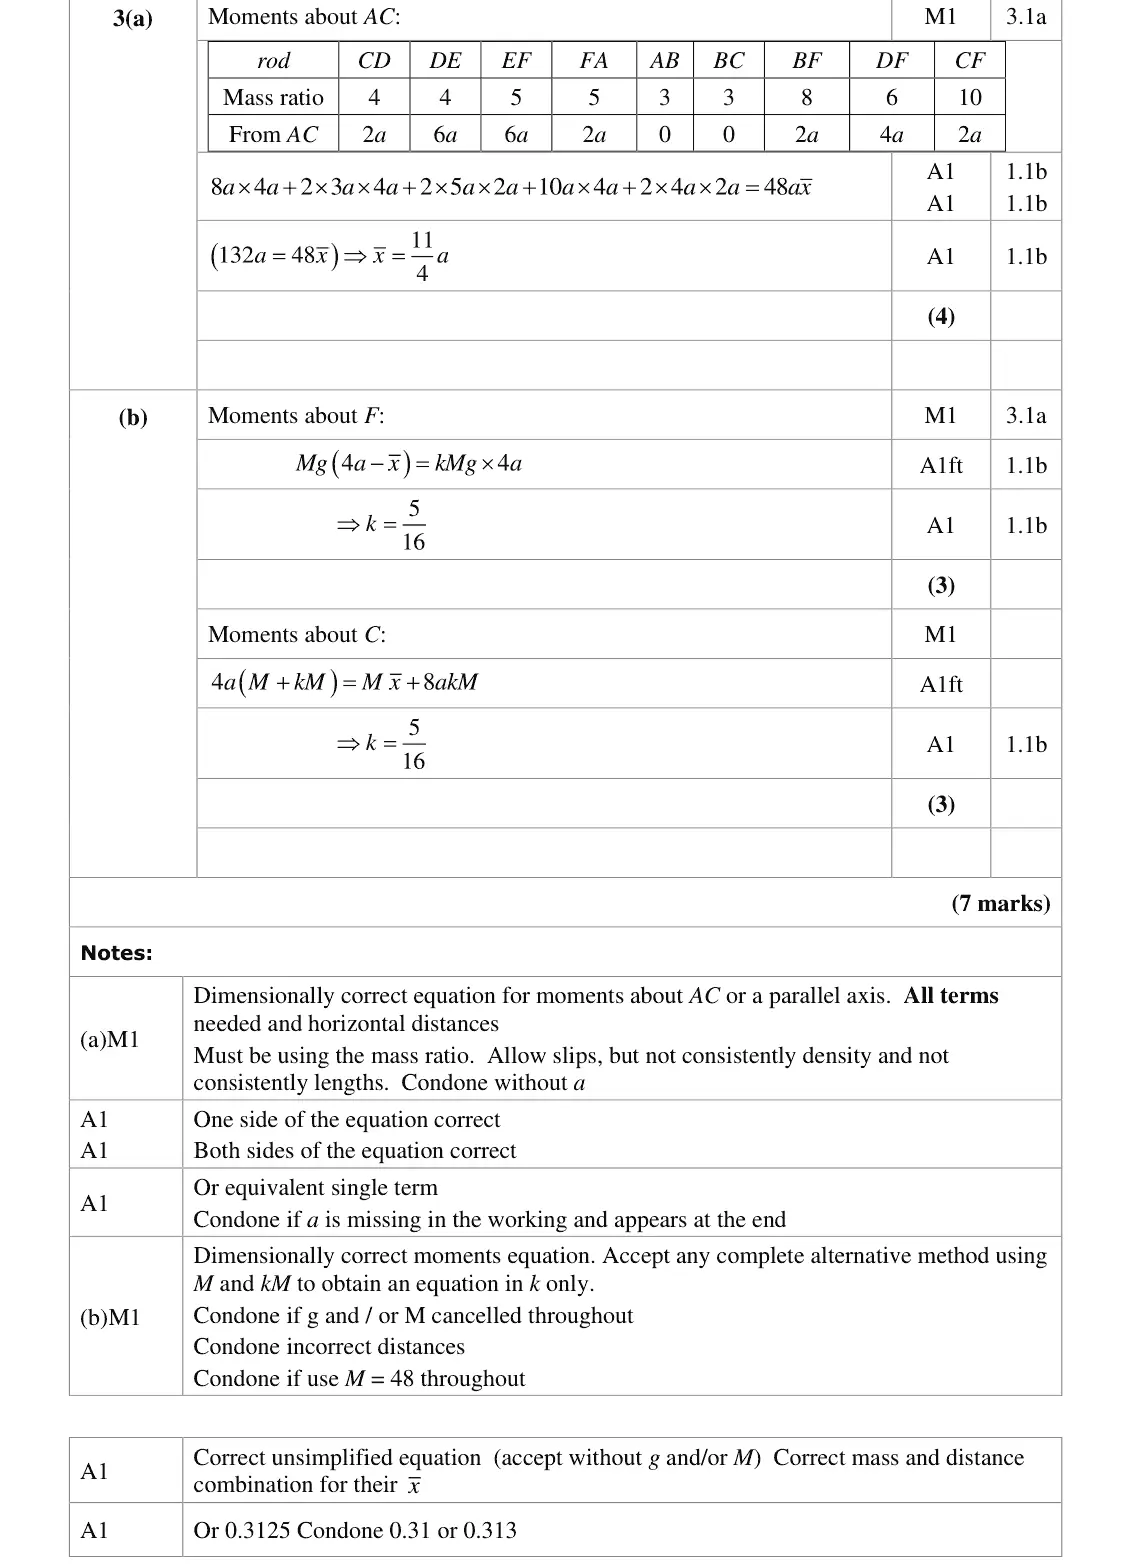
mass ratios use length × density: BF, CF, DF count double (total 48)
moments about AC give x̄ = 11a/4
common errors using only lengths or only density
June 2022 · Paper 4C (Further Mechanics 2) · Q3(b)3 marks
Mark scheme (whole question; this part is marked with the orange bar)
Examiner's comment
(b) Most candidates attempted a moments equation about F to find the value of the constant, k. Those who were carrying through an incorrect distance from (a) could achieve 2 of the available 3 marks. Some chose to take moments about C with nearly all realising that the centre of mass of the loaded framework had to lie on FD. There were occasional errors in distances or confusion with masses and lengths.
Key points from the mark scheme and examiner's report
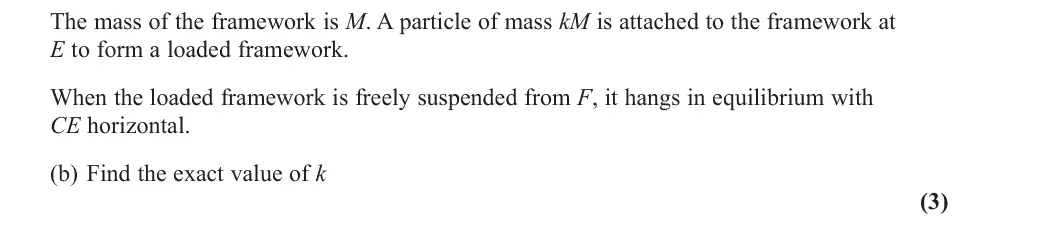
hanging from F with CE horizontal: centre of mass of loaded framework lies on FD (4a from AC)
M(4a − x̄) = kM(4a), k = 5/16
June 2022 · Paper 4C (Further Mechanics 2) · Q5(a)3 marks
Mark scheme (whole question; this part is marked with the orange bar)
Examiner's comment
(a) Most candidates used the formula for the centre of mass of a sector from the formula booklet successfully, but a few used an angle of pi 2 rather than pi 4 . Having found the distance OG, most then used trigonometry to find the distance from OC, whilst a smaller number used Pythagoras.
Key points from the mark scheme and examiner's report
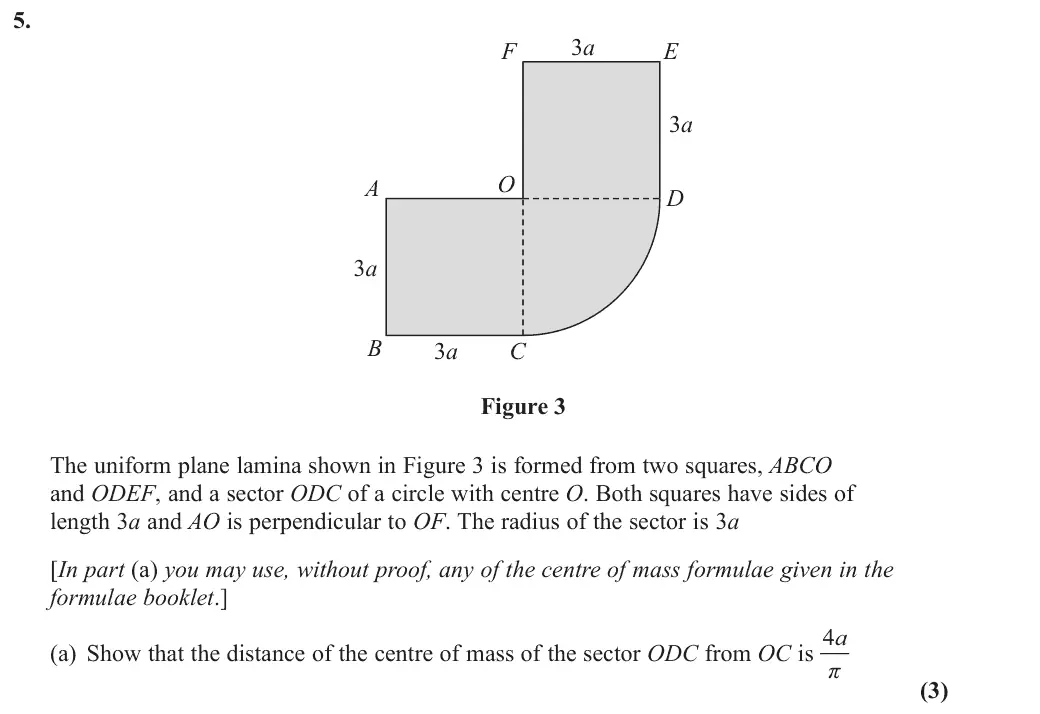
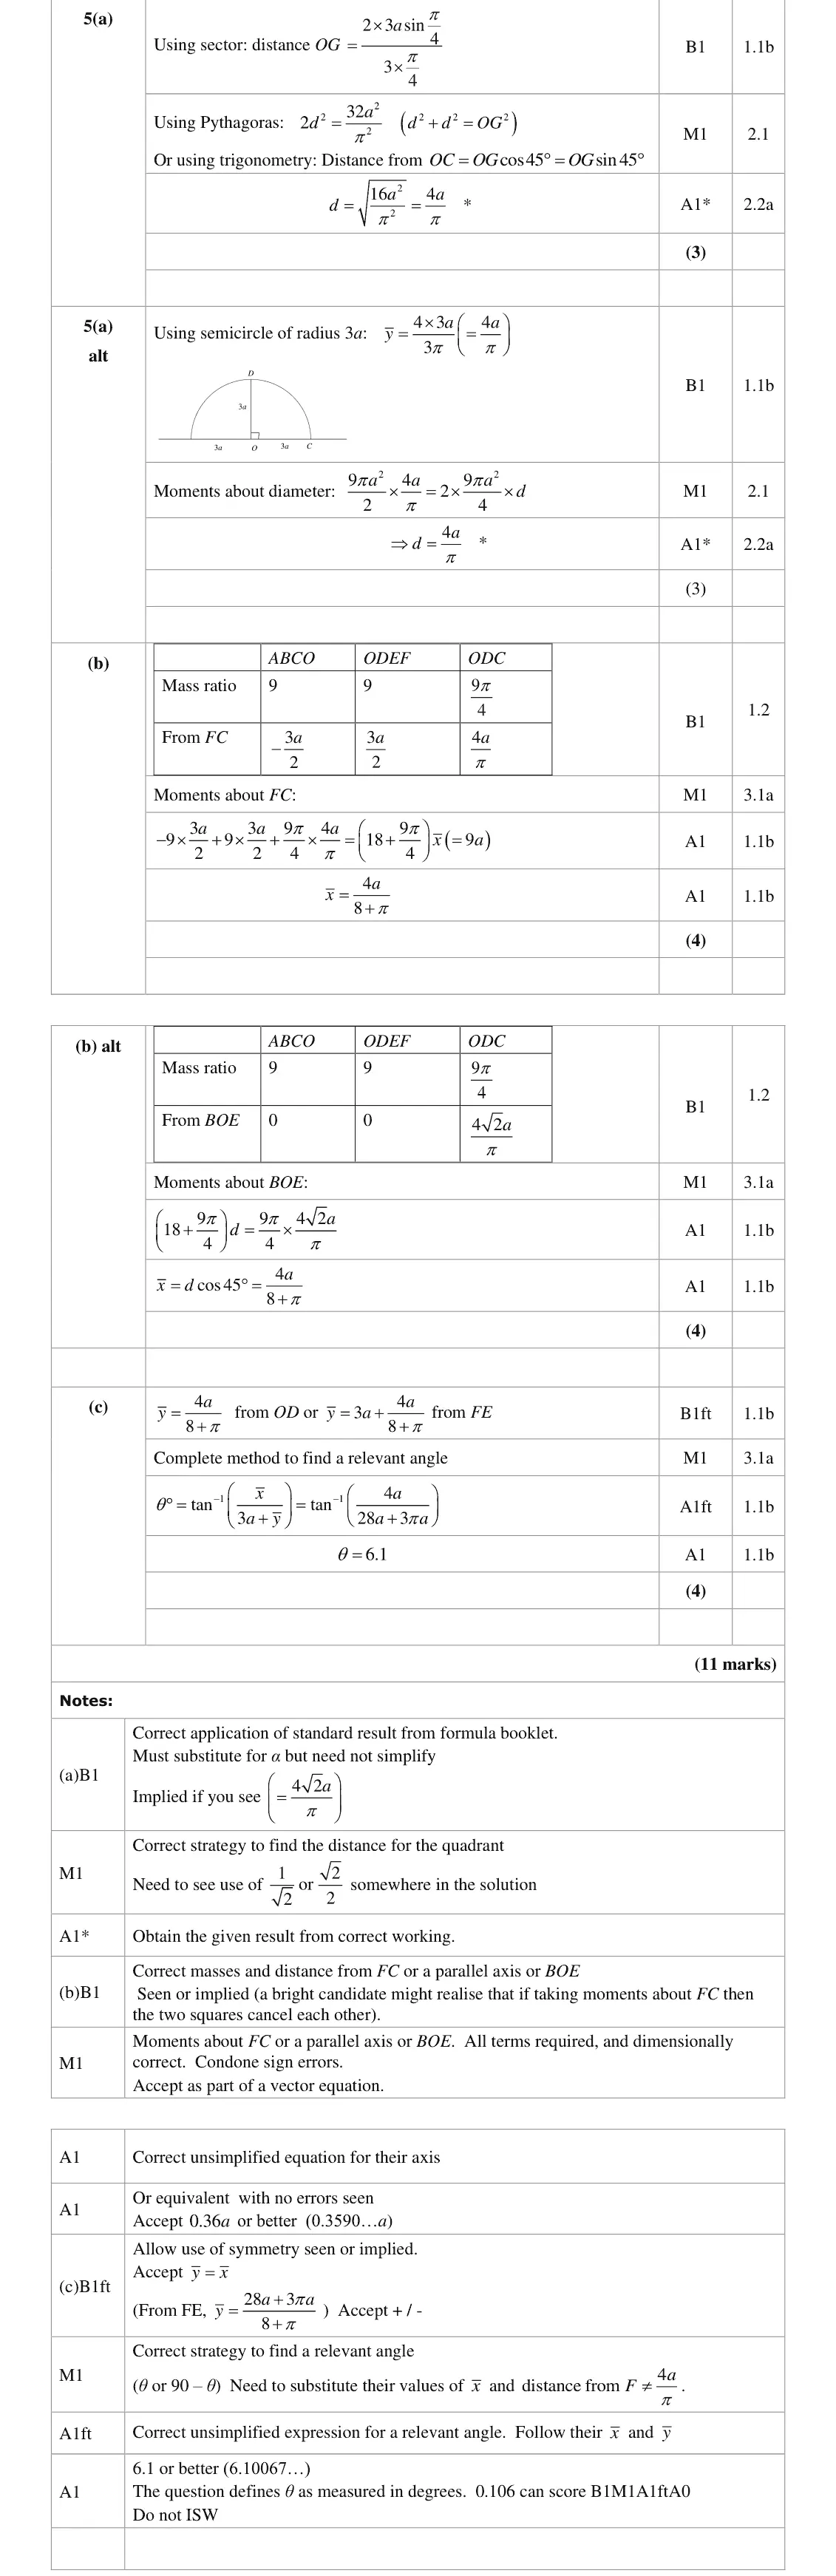
sector formula with half-angle π/4 (not π/2): OG = 4√2a/π, then OG cos 45° = 4a/π from OC
alternative uses a semicircle of radius 3a
June 2022 · Paper 4C (Further Mechanics 2) · Q5(b)4 marks
Mark scheme (whole question; this part is marked with the orange bar)
Examiner's comment
(b) Most candidates used moments about FC although quite a few preferred to work from AB. The most common errors were in simplifying the answer, and in finding the area of the sector.
Key points from the mark scheme and examiner's report
mass ratios 9, 9, 9π/4
moments about FC (the squares cancel): x̄ = 4a/(8 + π) ≈ 0.359a
errors in sector area and simplifying
June 2022 · Paper 4C (Further Mechanics 2) · Q5(c)4 marks
Mark scheme (whole question; this part is marked with the orange bar)
Examiner's comment
(c) Several candidates did not use the symmetry of the lamina and chose instead to set up a new moments equation to find the vertical position of the centre of mass. This in itself led to errors, and to an answer that often disagreed with the answer to (b). It was noted that candidates who drew a clear diagram were more likely to use the correct distances, to identify the required angle and to reach a correct conclusion.
Key points from the mark scheme and examiner's report
use symmetry ȳ = x̄ rather than a new moments equation
tan θ = x̄/(3a + ȳ) = 4/(28 + 3π)
θ = 6.1 (degrees)
draw a diagram to identify the angle
Nov 2021 · Paper 4C (Further Mechanics 2) · Q1(a)6 marks
Mark scheme (whole question; this part is marked with the orange bar)
Key points from the mark scheme and examiner's report
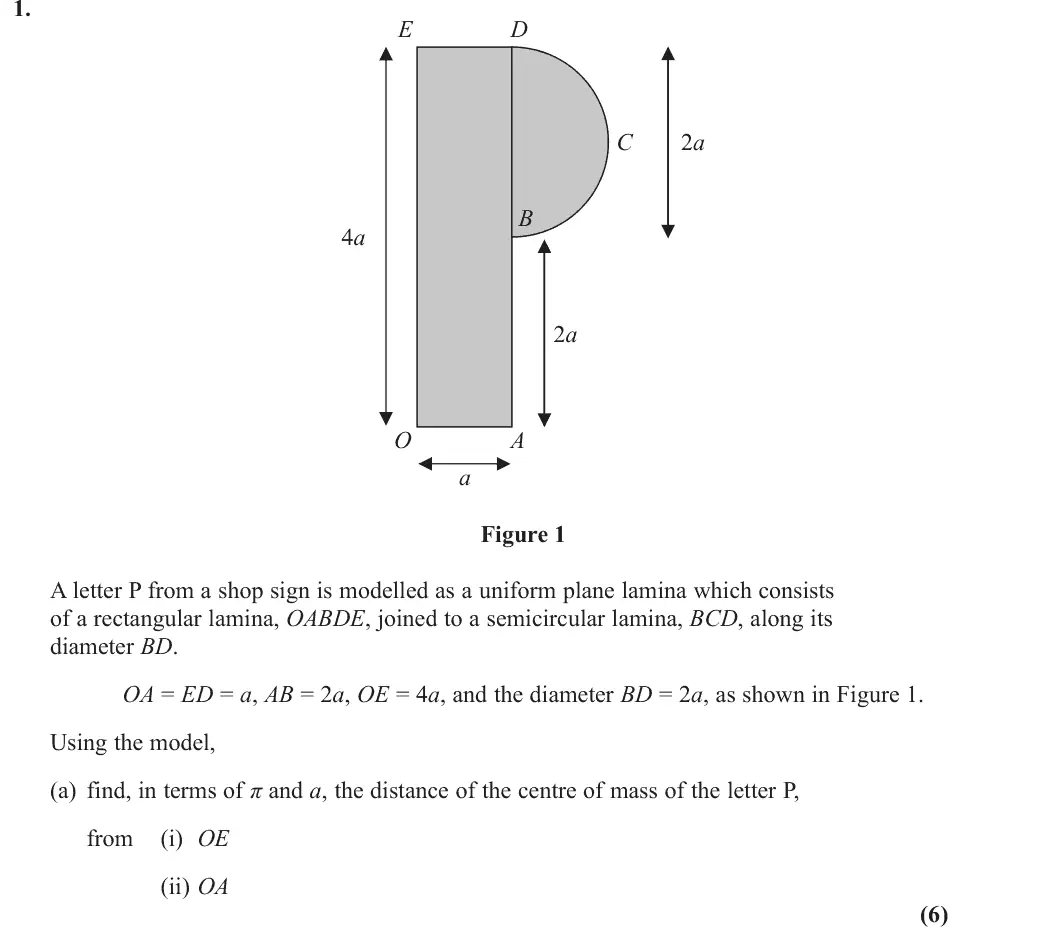
mass ratios 4a² : ½πa²
semicircle centre of mass 4a/(3π) beyond BD
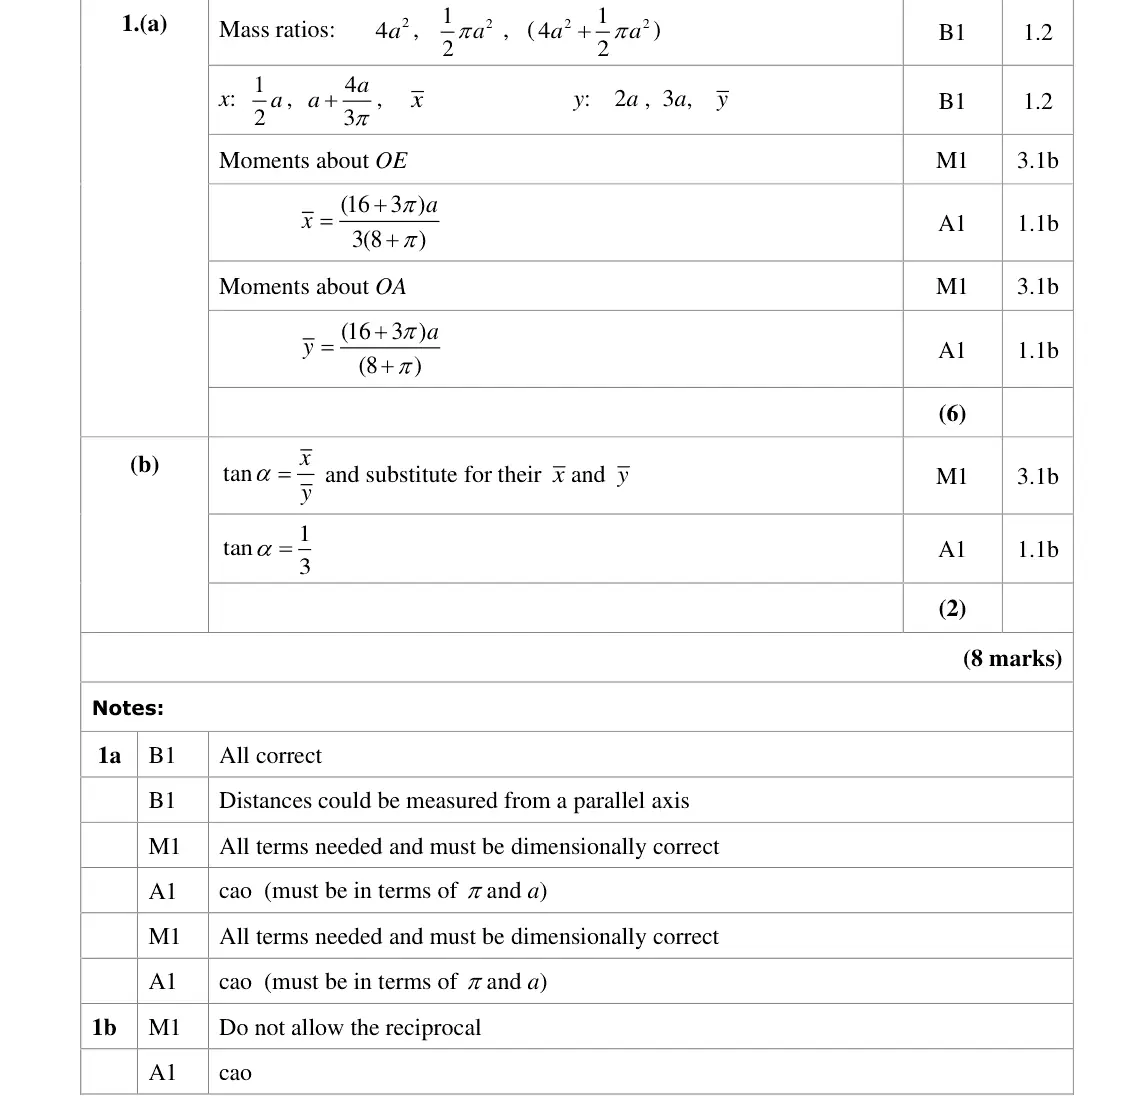
x̄ = (16 + 3π)a/(3(8 + π)) from OE, ȳ = (16 + 3π)a/(8 + π) from OA
answers must be exact in π and a
Nov 2021 · Paper 4C (Further Mechanics 2) · Q1(b)2 marks
Mark scheme (whole question; this part is marked with the orange bar)
Key points from the mark scheme and examiner's report
suspended from O: tan α = x̄/ȳ = 1/3
the reciprocal scores nothing
Oct 2020 · AS Paper 2 (Further Mechanics 2) · Q1(a)2 marks
Mark scheme (whole question; this part is marked with the orange bar)
Key points from the mark scheme and examiner's report
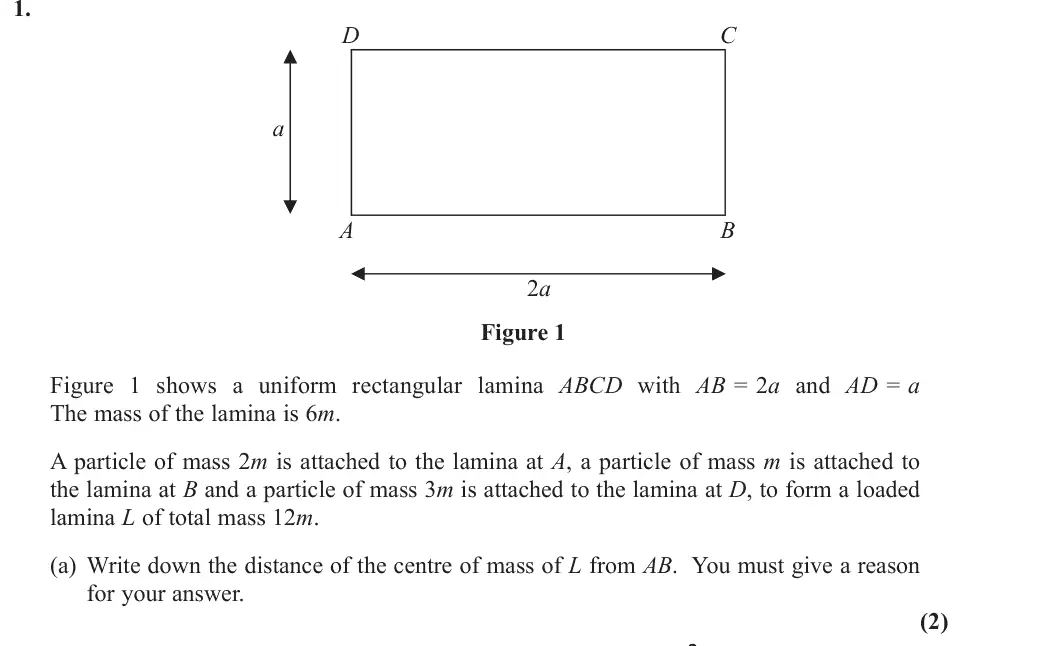
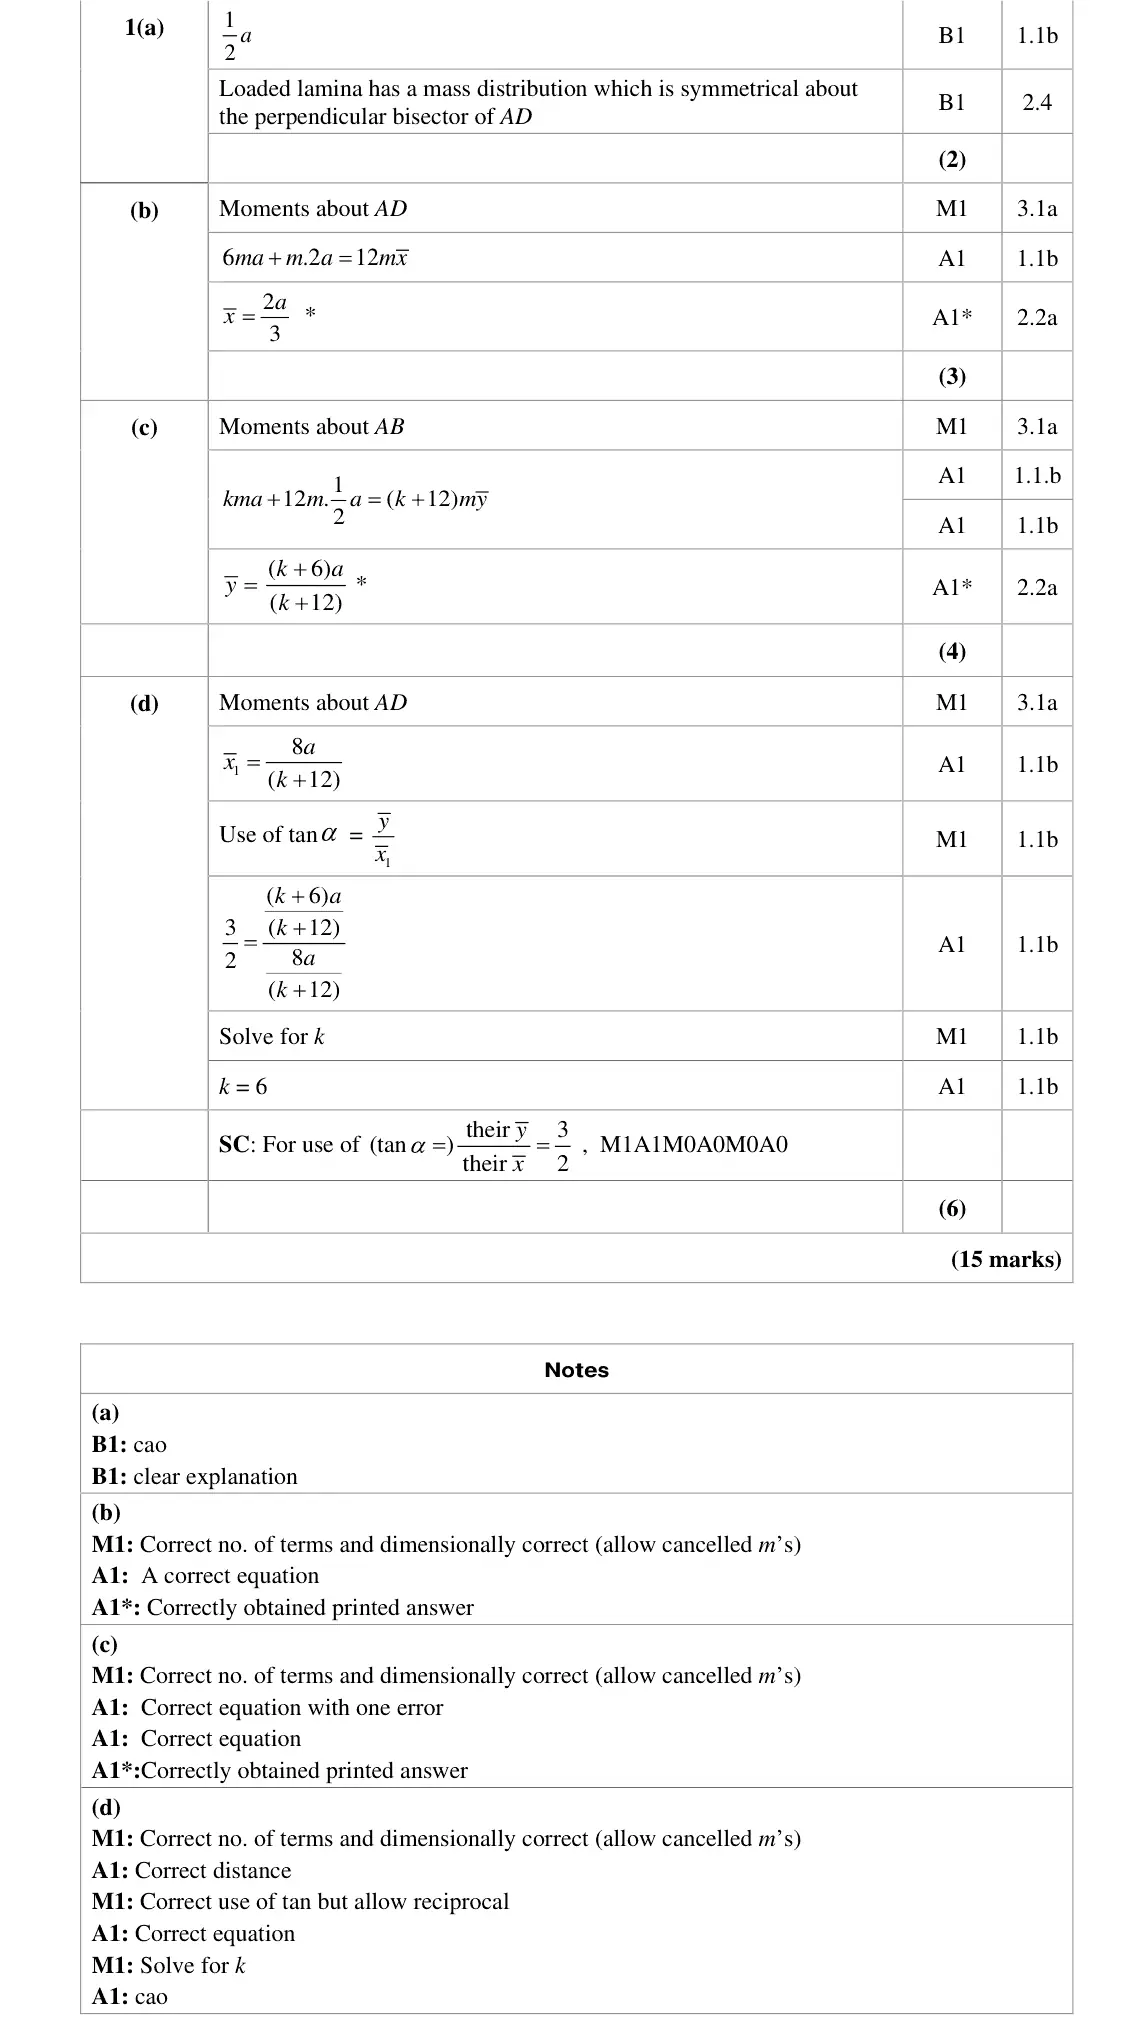
a/2
reason needed: the loaded lamina's mass distribution is symmetrical about the perpendicular bisector of AD (3m on each side)
Oct 2020 · AS Paper 2 (Further Mechanics 2) · Q1(b)3 marks
Mark scheme (whole question; this part is marked with the orange bar)
Key points from the mark scheme and examiner's report
Oct 2020 · AS Paper 2 (Further Mechanics 2) · Q1(d)6 marks
Mark scheme (whole question; this part is marked with the orange bar)
Key points from the mark scheme and examiner's report
new distance from AD is 8a/(k + 12) (the 2a/3 for L no longer applies)
tan α = ȳ/x̄ = 3/2 gives k = 6
using L's x̄ = 2a/3 earns only M1A1 (special case)
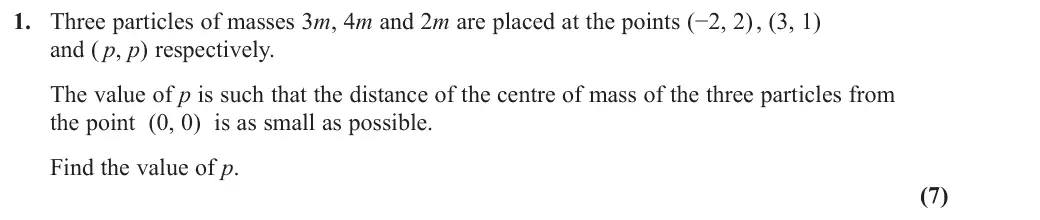
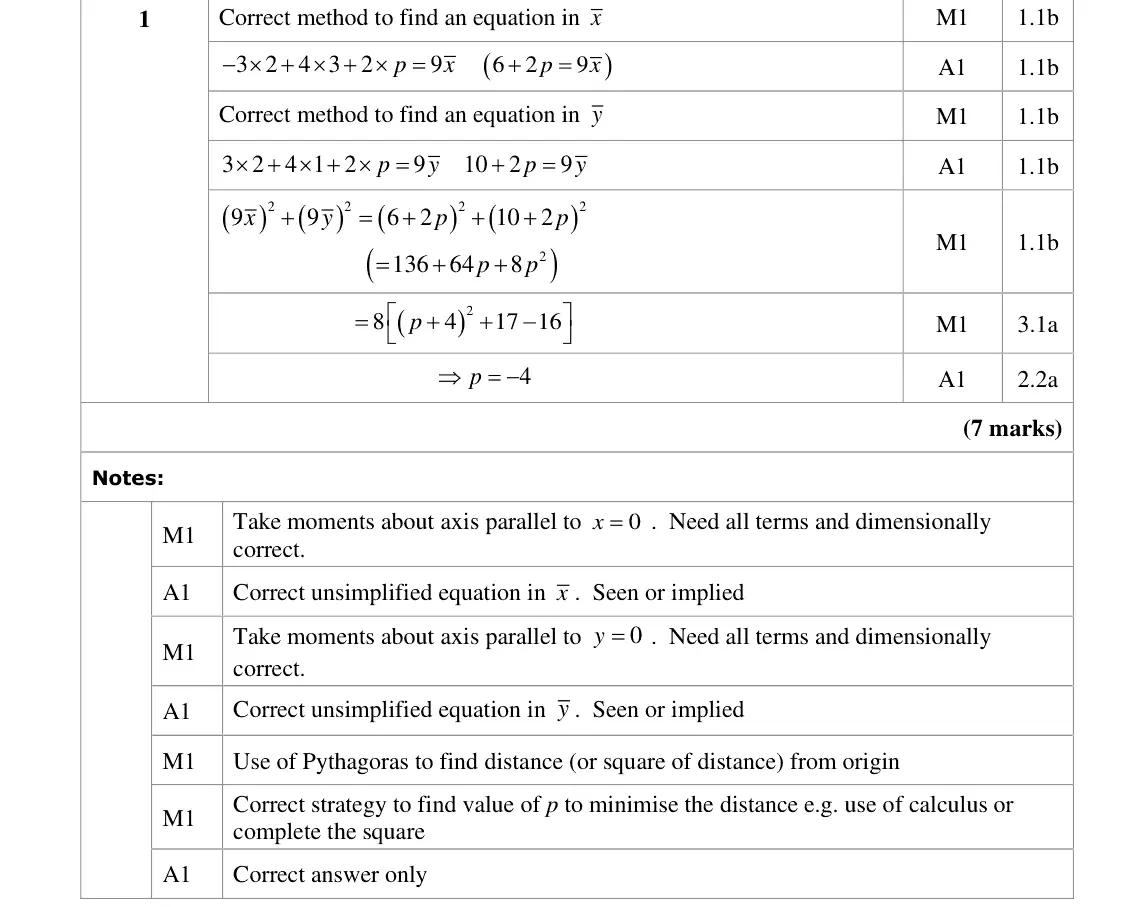
Oct 2020 · Paper 4C (Further Mechanics 2) · Q17 marks
Mark scheme (whole question; this part is marked with the orange bar)
Key points from the mark scheme and examiner's report
moments about both axes: 9x̄ = 6 + 2p, 9ȳ = 10 + 2p
minimise (6 + 2p)² + (10 + 2p)² = 8[(p + 4)² + 1] by completing the square or calculus
p = −4
June 2019 · AS Paper 2 (Further Mechanics 2) · Q1(a)1 mark
Mark scheme (whole question; this part is marked with the orange bar)
Examiner's comment
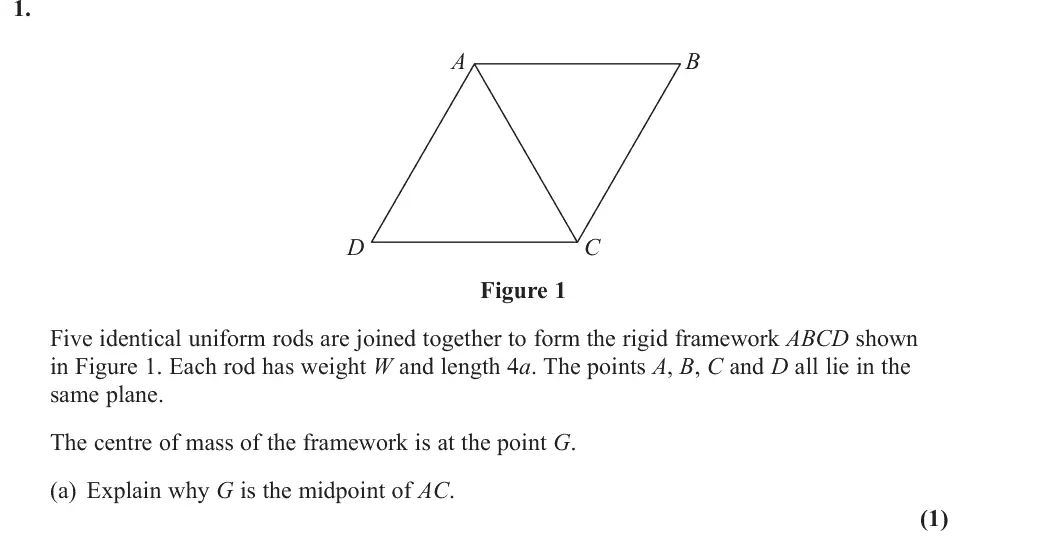
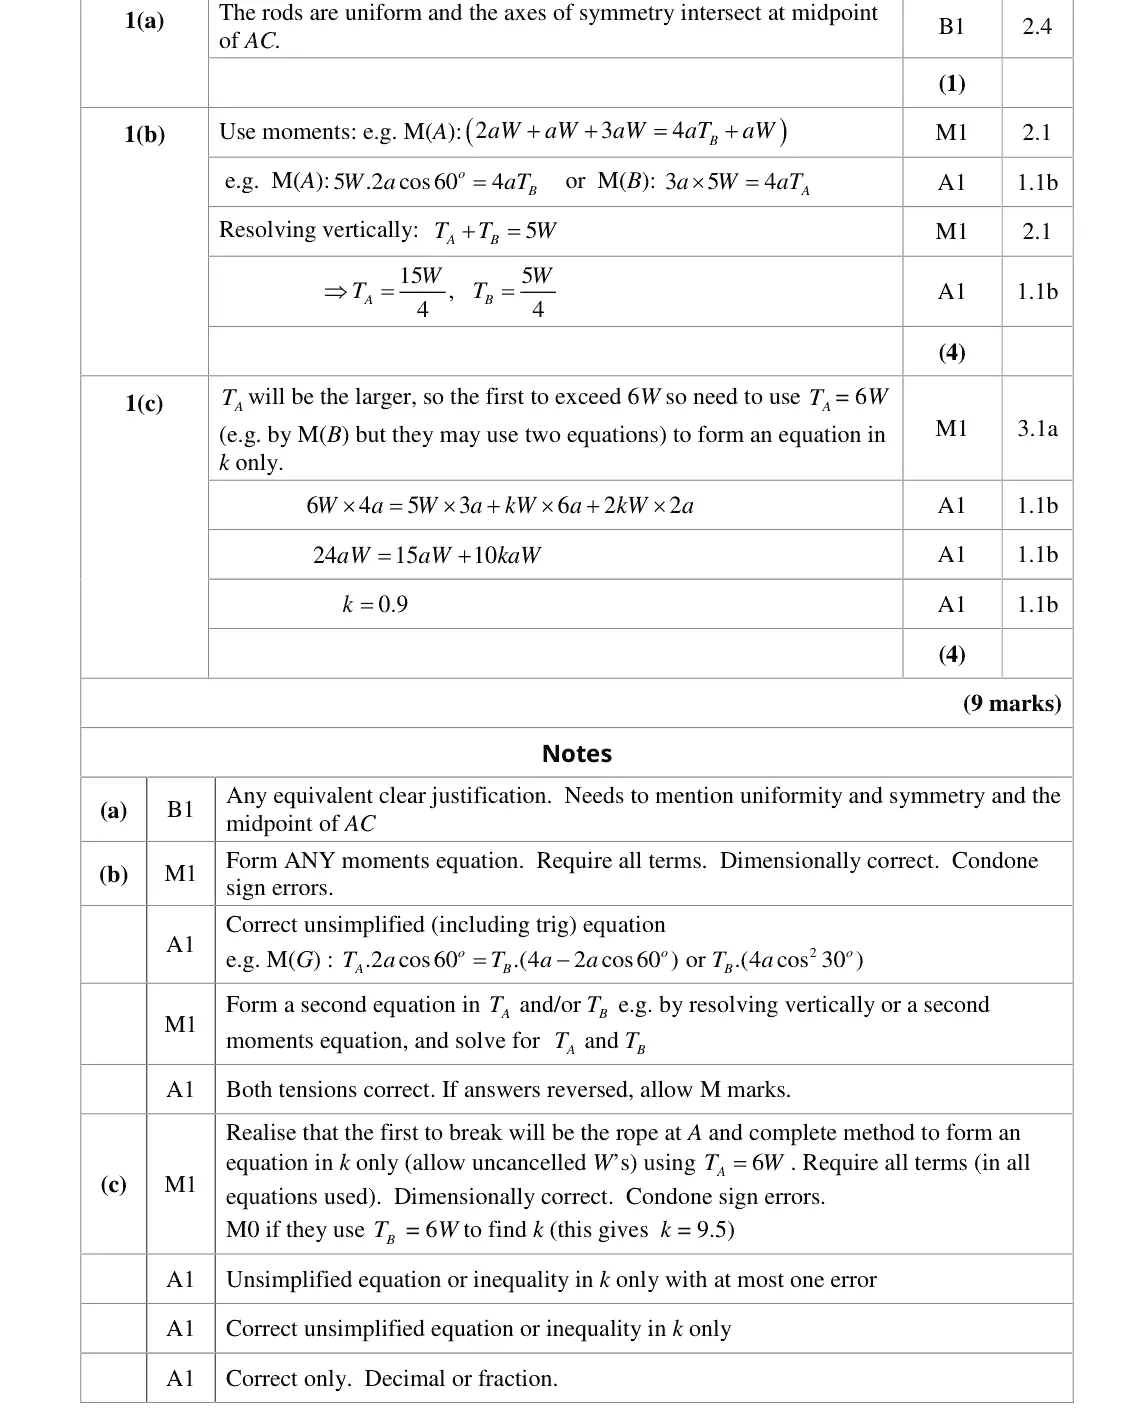
In Q01(a), very few scored the B1 mark. The uniformity of the rods was the criterion which
Key points from the mark scheme and examiner's report
must mention the rods are uniform and the symmetry (axes of symmetry meet at the midpoint of AC)
uniformity was most often missed
June 2019 · AS Paper 2 (Further Mechanics 2) · Q1(b)4 marks
Mark scheme (whole question; this part is marked with the orange bar)
Examiner's comment
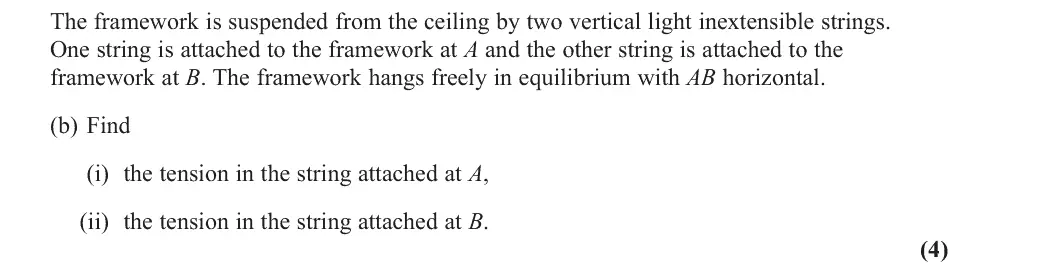
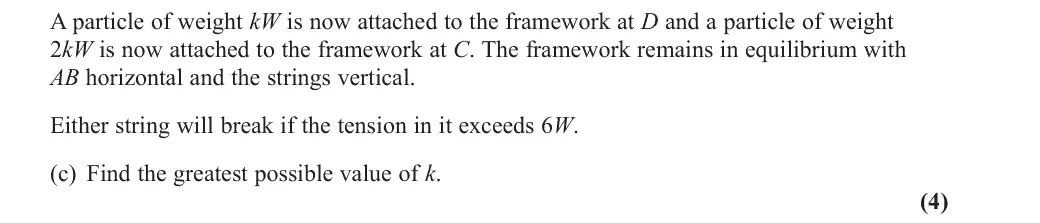
In Q01(a), very few scored the B1 mark. The uniformity of the rods was the criterion which was the most often missed. There were also several zero scores for the second part. Some took the weight of the entire lamina as W, some wrote down dimensionally incorrect equations and some displayed a general lack of understanding of moments, with candidates working out the distance from the point at which the weight acted to the point A or B rather than the perpendicular distance from the line of action. The majority of those who did manage to produce a correct answer used the tensions and 5W rather than considering every rod. In Q01(c), very few realised that TA was the larger tension. A number took moments about both A and B and then selected the correct k. Some chose the wrong one on the basis that 9.5 > 0.9 and they thought they were looking for the largest k overall. Some chose the right one but ended up with an inequality rather than the maximum value.
Key points from the mark scheme and examiner's report
moments about A or B plus resolving vertically: T_A = 15W/4, T_B = 5W/4
use the perpendicular distance from the line of action
total weight is 5W, not W
June 2019 · AS Paper 2 (Further Mechanics 2) · Q1(c)4 marks
Mark scheme (whole question; this part is marked with the orange bar)
Examiner's comment
In Q01(a), very few scored the B1 mark. The uniformity of the rods was the criterion which
Key points from the mark scheme and examiner's report
T_A is the larger tension so set T_A = 6W, moments about B: 24W = 15W + 10kW so k = 0.9
using T_B = 6W gives 9.5 (M0)
some left an inequality
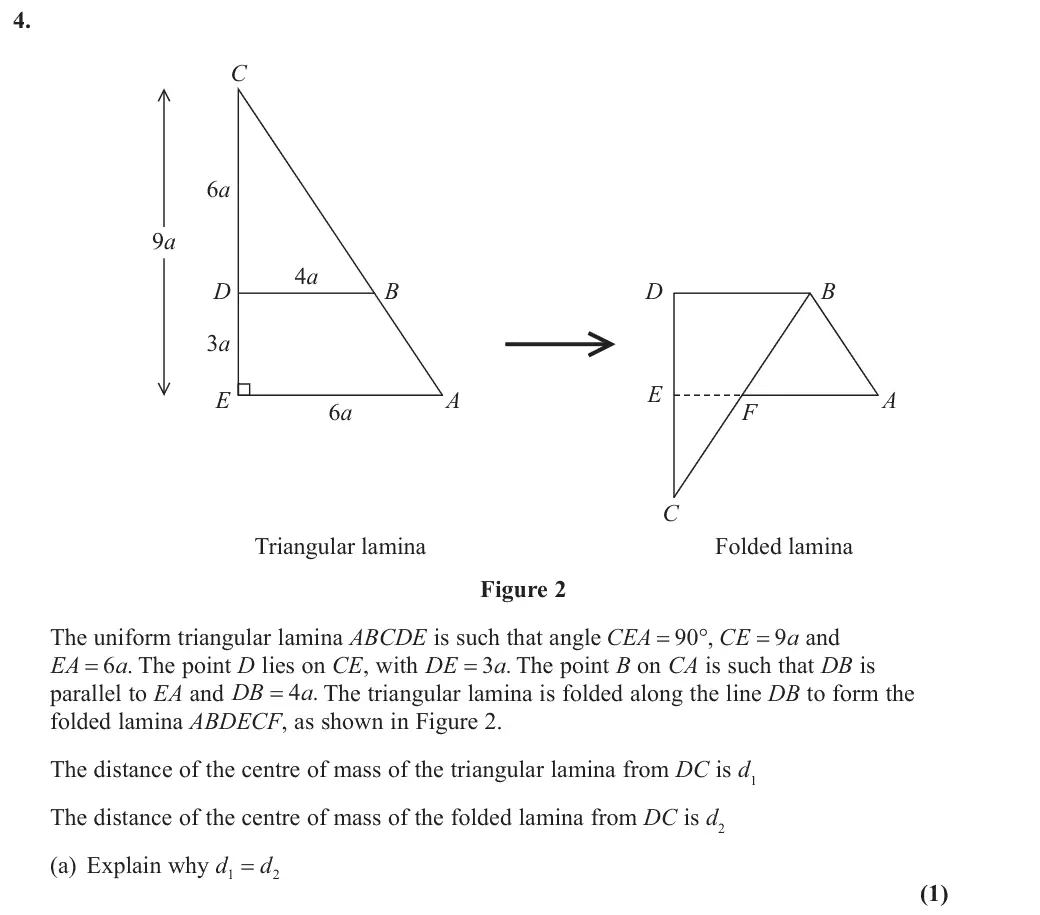
June 2019 · AS Paper 2 (Further Mechanics 2) · Q4(a)1 mark
Mark scheme (whole question; this part is marked with the orange bar)
Examiner's comment
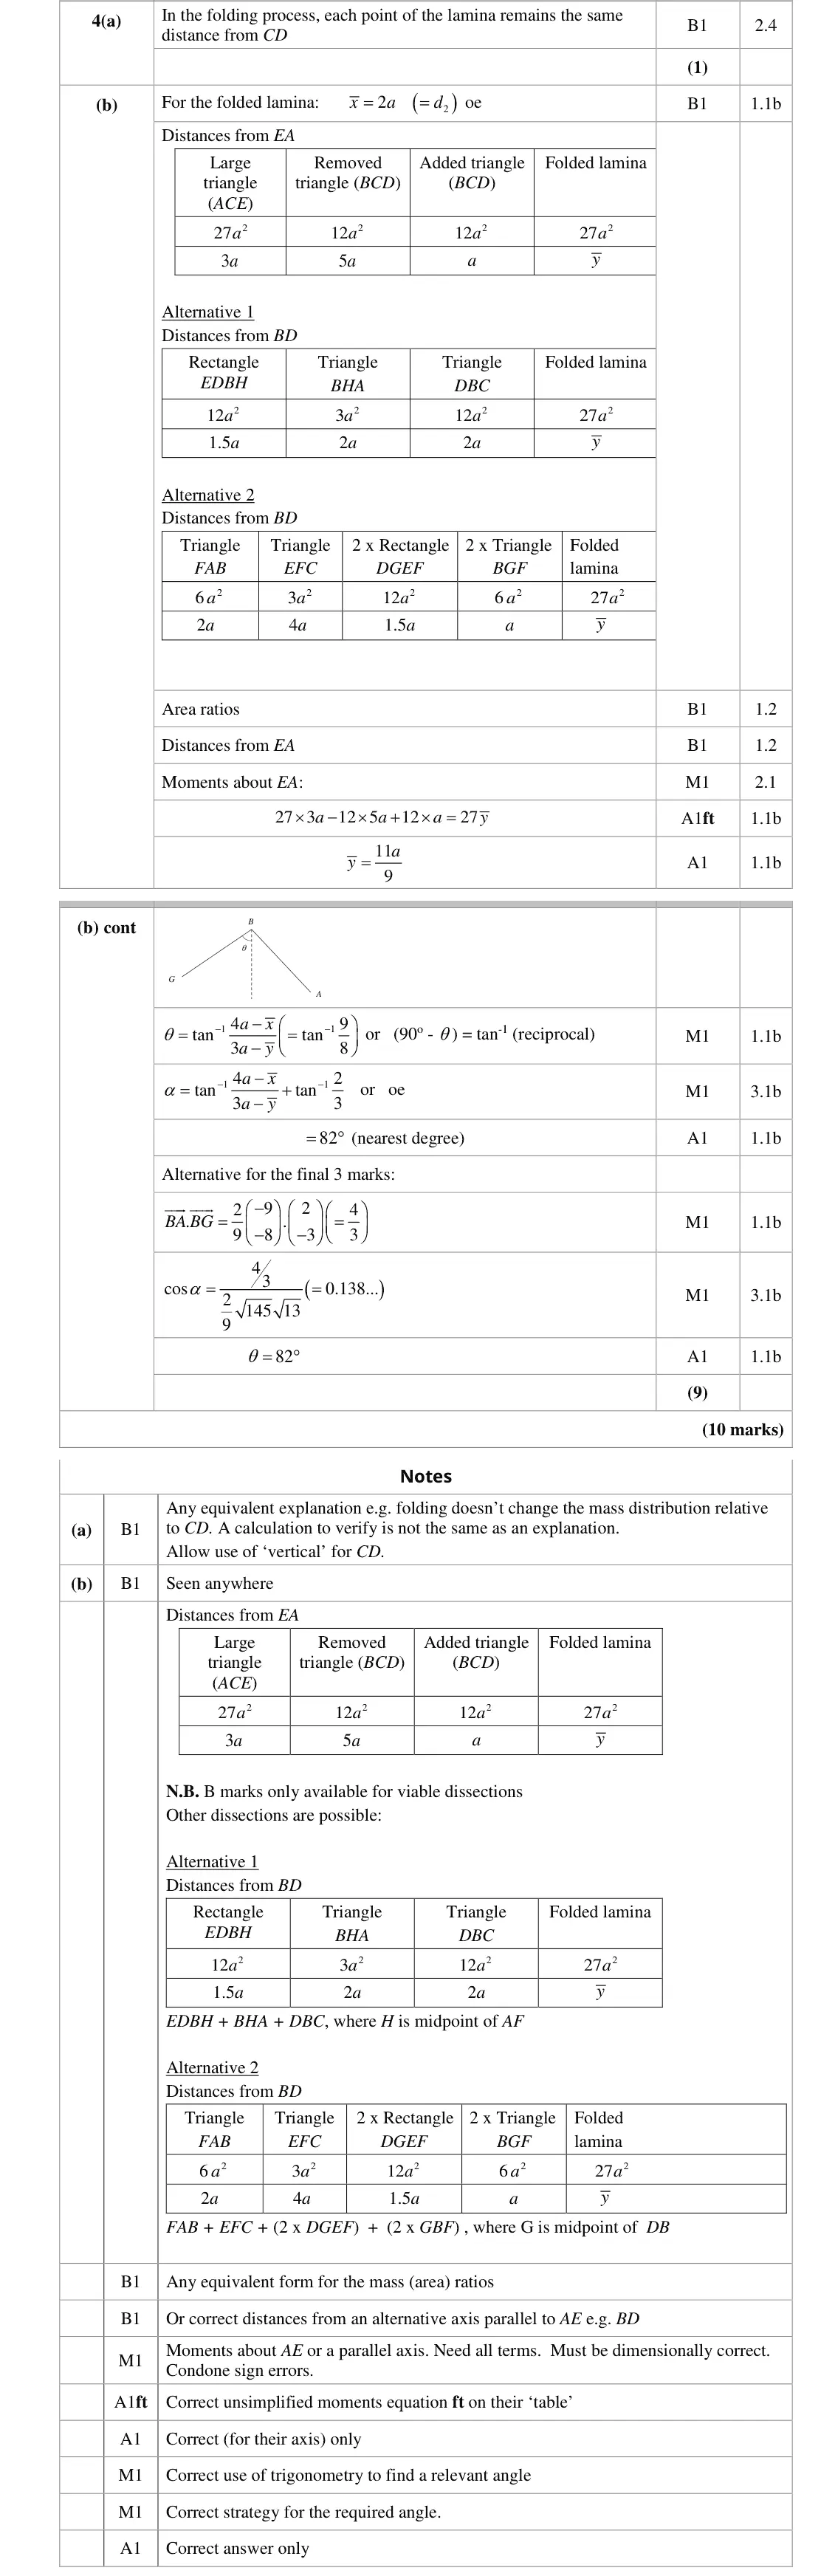
Very few scored the mark in Q04(a). The mass distribution was rarely referred to. Q04(b) proved to be very challenging, both for the candidates and for the examiners. The problem with this part of the question was that candidates were reluctant to say what they were doing. There were random areas and distances and they should have known from the original triangle that they were looking for a total mass proportional to 27. There was little thought as to which areas were doubled or overlapped. A small number worked out the centre of mass of the trapezium and used this and the large triangle which was a viable dissection. In order to succeed in this type of question, they should have a clear table specifying which part of the object they are considering and also specifying the axis from which they are measuring their distances. x = 2a was rarely seen despite many having said in Q04(a) that the horizontal distance of the centre of mass from DC would not change. Because the value of y was not a required answer, a distance from various axes was acceptable, with 11 a and 16 a being the most common. Some candidates lost 9 9 the a in their working and answers but this did not prevent them from finding the angle as 16 a was not a required answer. Correct answers for the angle were rarely seen and 9 some who did do the working correctly then forgot to round to the nearest degree and lost the final mark. A few just divided y by x , to try to produce the tan of an angle, presumably because they had done that before.
Key points from the mark scheme and examiner's report
folding along DB keeps every point the same distance from CD (mass distribution relative to CD unchanged)
a calculation is not an explanation
June 2019 · AS Paper 2 (Further Mechanics 2) · Q4(b)9 marks
Mark scheme (whole question; this part is marked with the orange bar)
Examiner's comment
Very few scored the mark in Q04(a). The mass distribution was rarely referred to. Q04(b) proved to be very challenging, both for the candidates and for the examiners. The problem with this part of the question was that candidates were reluctant to say what they were doing. There were random areas and distances and they should have known from the original triangle that they were looking for a total mass proportional to 27. There was little thought as to which areas were doubled or overlapped. A small number worked out the centre of mass of the trapezium and used this and the large triangle which was a viable dissection. In order to succeed in this type of question, they should have a clear table specifying which part of the object they are considering and also specifying the axis from which they are measuring their distances. x = 2a was rarely seen despite many having said in Q04(a) that the horizontal distance of the centre of mass from DC would not change. Because the value of y was not a required answer, a distance from various axes was acceptable, with 11 a and 16 a being the most common. Some candidates lost 9 9 the a in their working and answers but this did not prevent them from finding the angle as 16 a was not a required answer. Correct answers for the angle were rarely seen and 9 some who did do the working correctly then forgot to round to the nearest degree and lost the final mark. A few just divided y by x , to try to produce the tan of an angle, presumably because they had done that before.
Key points from the mark scheme and examiner's report
x̄ = 2a from (a)
a viable dissection with areas totalling 27a² (e.g. large triangle minus BCD plus folded BCD)
ȳ = 11a/9 from EA
angle α = tan⁻¹ ... = 82°
candidates rarely showed which areas they were using
June 2018 · AS Paper 2 (Further Mechanics 2) · Q1(a)4 marks
Mark scheme (whole question; this part is marked with the orange bar)
Examiner's comment
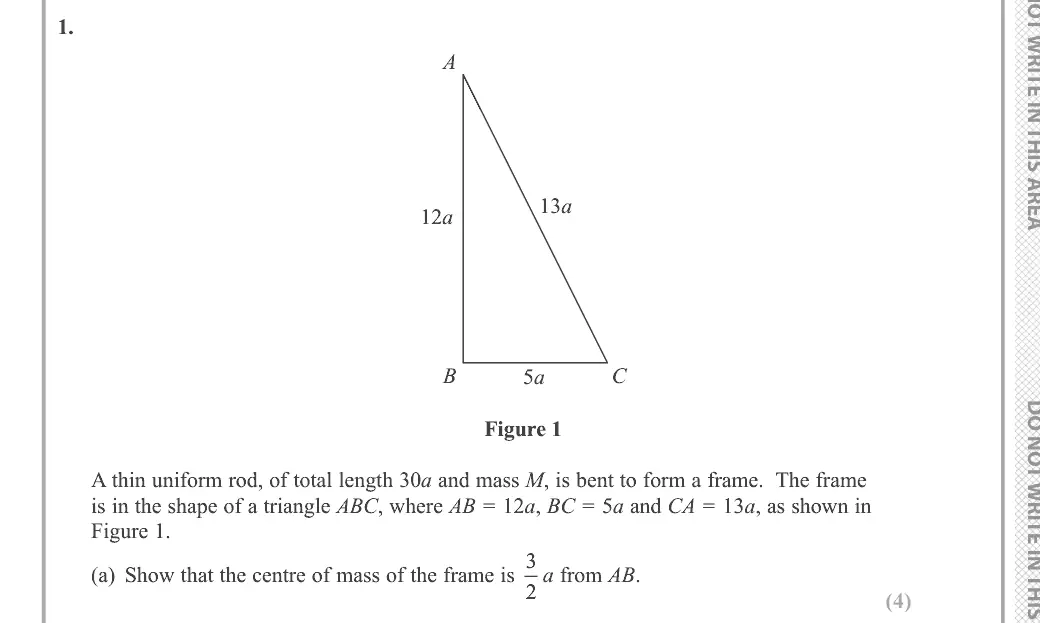
(a) By this stage in their mathematics, students should be aware of the need to read questions very carefully. This question talks about a rod being used to form a frame, but several students started by treating the frame as a triangular lamina. Rather than reconsider their strategy, some of these students then forced their working to produce the given answer.
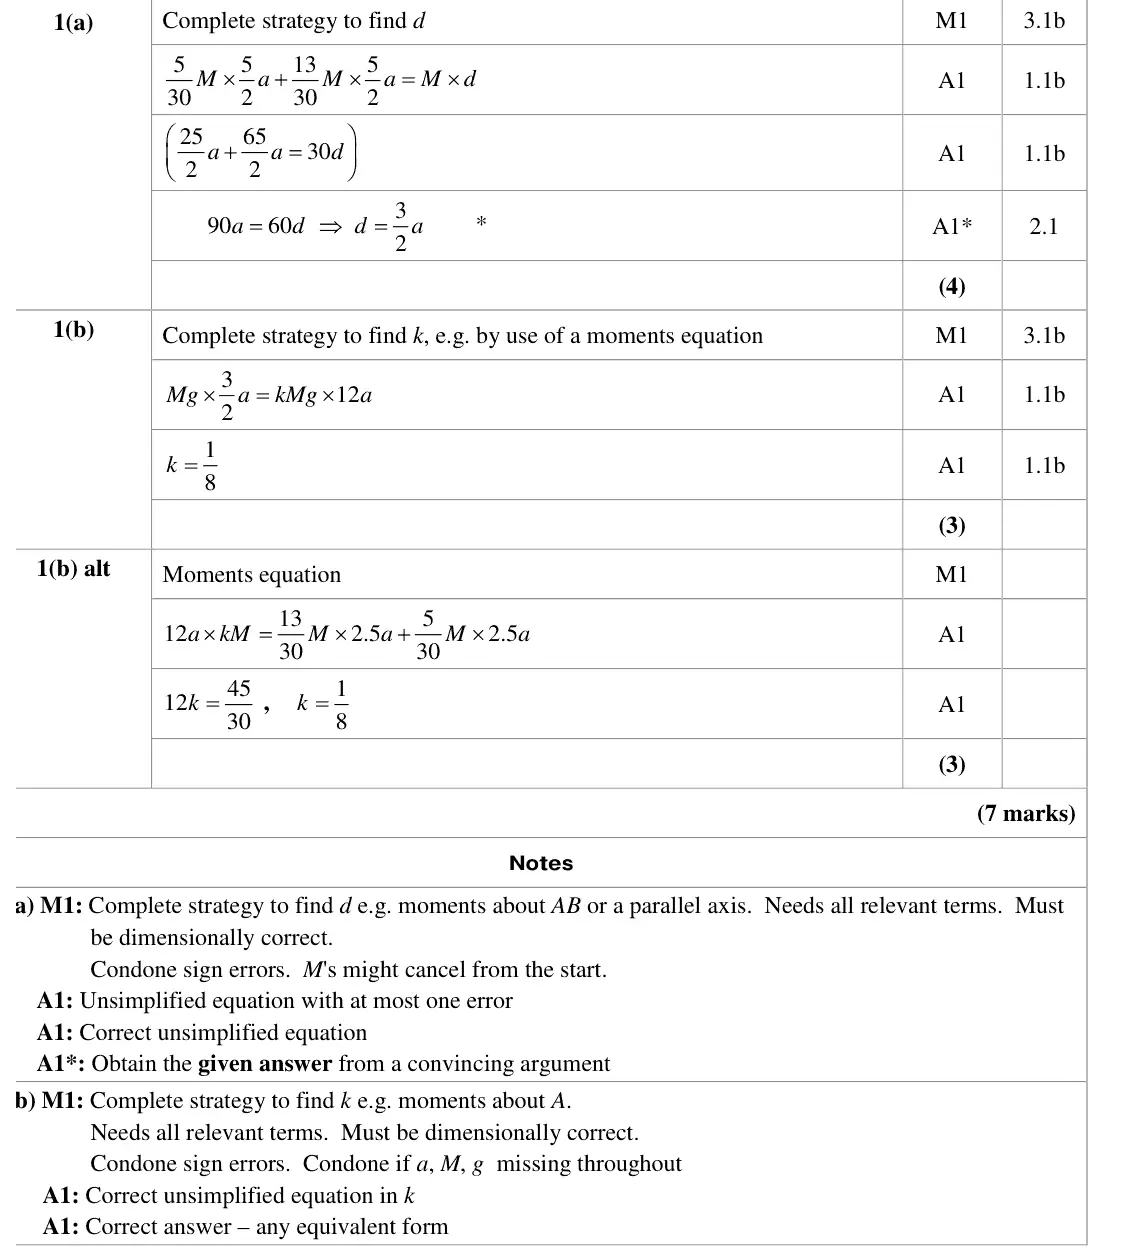
Key points from the mark scheme and examiner's report
it is a frame of three rods (masses 12M/30, 5M/30, 13M/30 at midpoints), not a triangular lamina
moments about AB: (5/30)M(5a/2) + (13/30)M(5a/2) = Md gives d = 3a/2
given answer, so no fudging
June 2018 · AS Paper 2 (Further Mechanics 2) · Q1(b)3 marks
Mark scheme (whole question; this part is marked with the orange bar)
Examiner's comment
(b) Fully correct solutions to this part of the question were unusual. The question talks about applying a horizontal force to maintain AB in a vertical position. Many students worked through their solution as if they were attaching a particle to the frame, with its weight acting vertically and AB horizontal. The distance that was actually needed was given in part (a), but the majority of students felt that they needed to know the vertical distance of the centre of mass of the frame from BC and to use that.
Key points from the mark scheme and examiner's report
moments about A with AB vertical: Mg × (3a/2) = kMg × 12a so k = 1/8
the distance needed is the one from (a)
many treated the force as a hanging particle or used the distance from BC
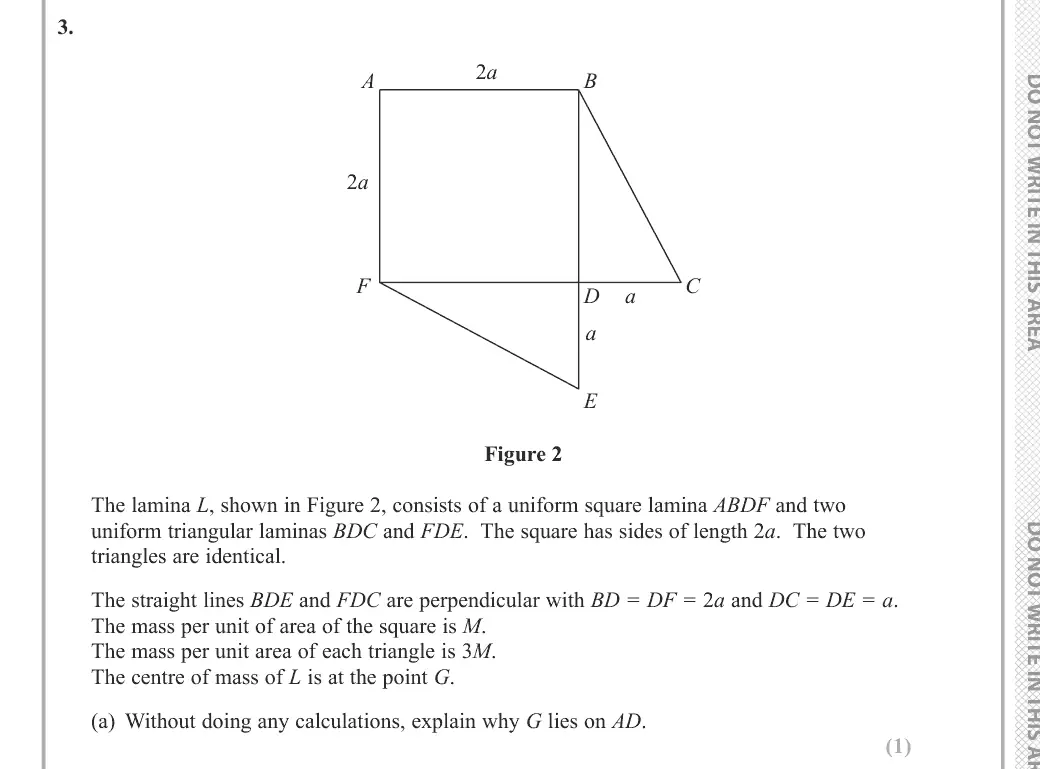
June 2018 · AS Paper 2 (Further Mechanics 2) · Q3(a)1 mark
Mark scheme (whole question; this part is marked with the orange bar)
Examiner's comment
(a) Virtually all the responses to this part of the question were correct, although some were quite long-winded given that there was only one mark available. It was sufficient to say that the figure was symmetrical about AD.
Key points from the mark scheme and examiner's report
L is symmetrical about AD
one short statement is enough
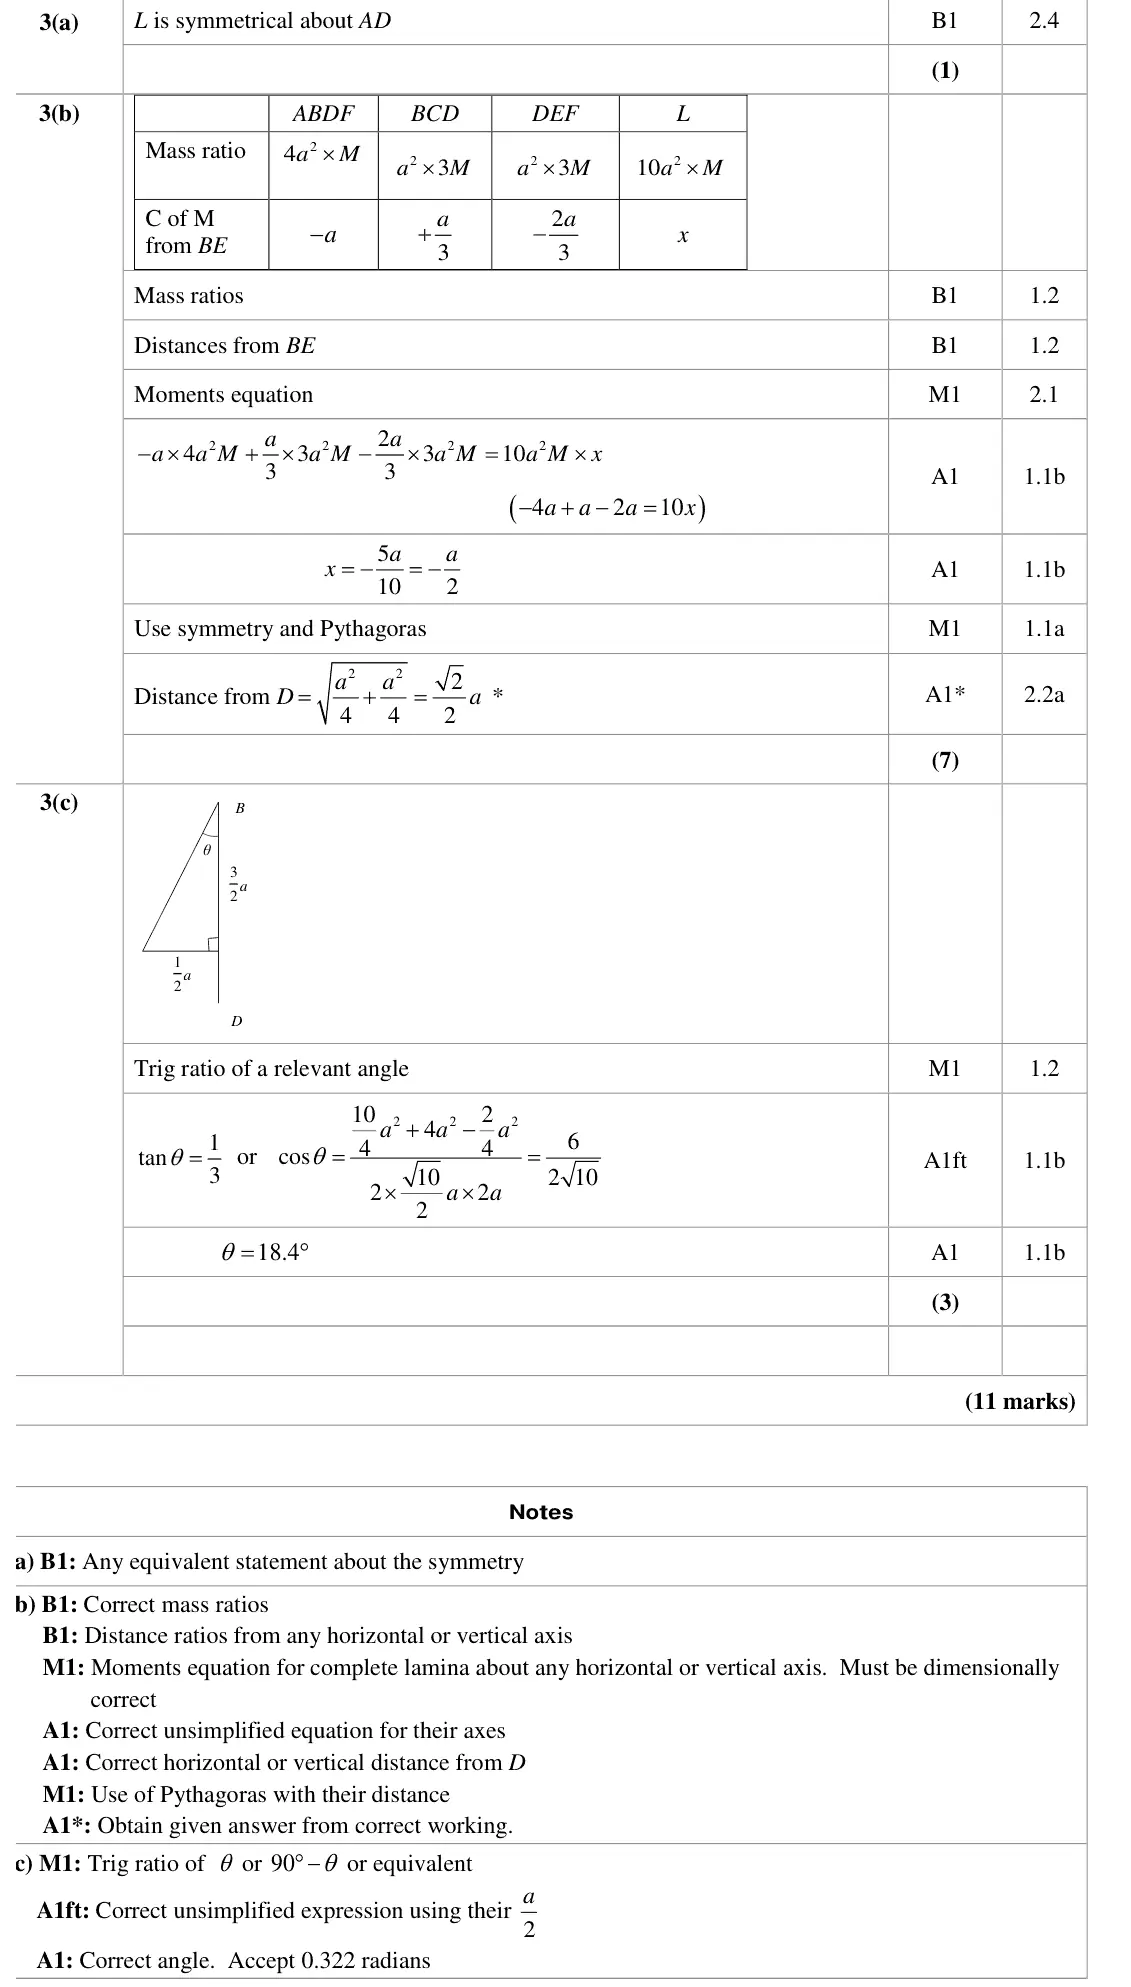
June 2018 · AS Paper 2 (Further Mechanics 2) · Q3(b)7 marks
Mark scheme (whole question; this part is marked with the orange bar)
Examiner's comment
(b) Most students located the centres of mass of the components of the lamina correctly. The mass ratios used were often incorrect, sometimes due to an error in calculating an area, but more often because the information about mass per unit area had been overlooked. The majority of students understood how to form the moments equation. Although the question talks about the distance from D, many students created extra work for themselves by working from AF or AB. The majority of students ignored the hint in part (a) and formed two separate equations for the horizontal and vertical distances, often getting two different values. Some students did obtain the given answer correctly, but there was a fair bit of fudging. Some students worked out from the given answer what their working should give as an answer, but they did not usually trace back their errors. The distances in the question are all given in terms of a, so this should have been present throughout the working - in some cases it only appeared at the end.
Key points from the mark scheme and examiner's report
mass ratios 4a²M : 3a²M : 3a²M (triangles have density 3M, often overlooked)
moments about BE give distance a/2, then symmetry and Pythagoras give √2a/2
use the symmetry from (a) rather than two separate equations
June 2018 · AS Paper 2 (Further Mechanics 2) · Q3(c)3 marks
Mark scheme (whole question; this part is marked with the orange bar)
Examiner's comment
(c) This was the sort of question the students were expecting. Several of them used the given answer to obtain the distances 1 2 a and 3 2 a and then found the required angle correctly.
Key points from the mark scheme and examiner's report
G lies 3a/2 below B along BE and a/2 from BE
tan θ = 1/3 gives 18.4°
Find an Edexcel Further Maths tutor
Stuck on this? Book a trial lesson with our Further Maths tutor.